Redshift Queries Iceberg Tables
Hands on guide setting up a transactional data lake with Iceberg and Querying it with Redshift
Published Feb 2, 2024
Why Iceberg
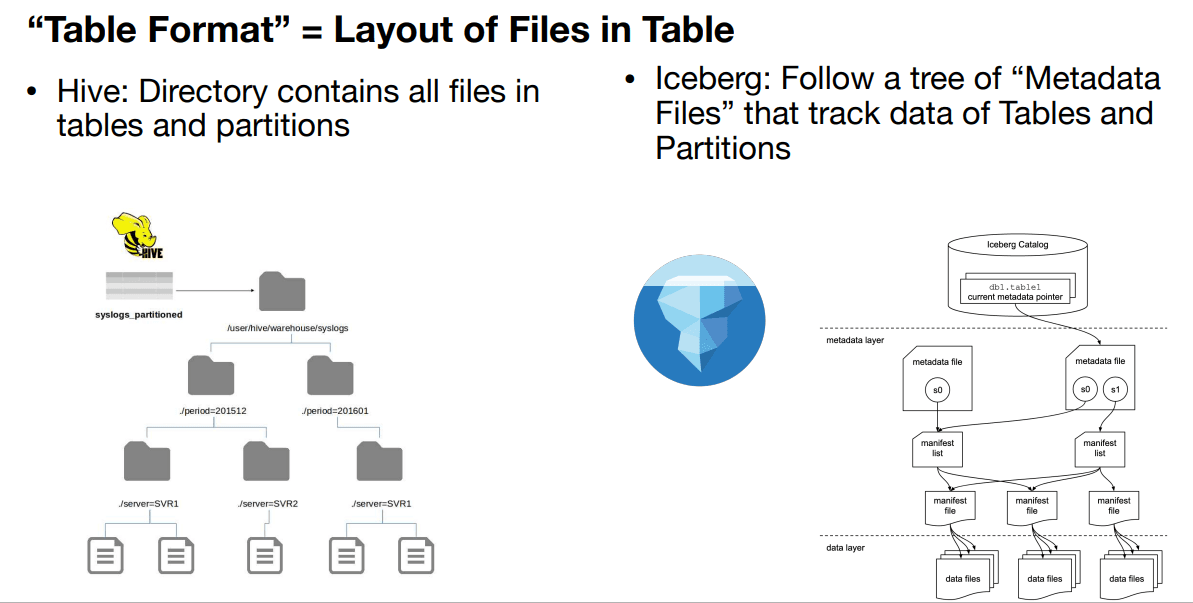
Iceberg is an open table format, Open tables are a way to give data lakes properties of relational databases. It aims to solve the problems with Hive table which is a directory based table format. Iceberg is a file based table format, storing it's data in metadata and manifest files

Iceberg improves data lakes compliance with ACID property. While maintaining the ability to use different compute engines like Spark, Flink on a single datastore.
Other Benefits of Iceberg
Hidden Partition - Iceberg partitions data and optimizes query without the user needing to specify how the data should be partitioned.
Time Travel - It enables rollback of data to a previous point in time. To learn more about problems solved by iceberg see this talk to learn about benefits of iceberg.
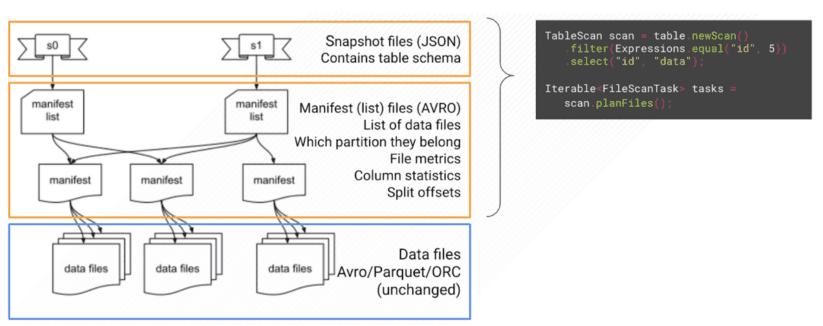
Iceberg store data in layers meta data layer and data layer
The iceberg metadata stores information about the data schema and the manifest files, which store information of the original data and it's partition. To learn more about iceberg metadata see this blog and talk.
Lets create an iceberg table and query it using Redshift.
- Create an S3 bucket give it any name, you can use this guide to create an s3 bucket, I named mine
redshift-iceberg-tutorial. - Navigate to the CloudShell, you can navigate to CloudShell console by typing CloudShell on the search bar in any service page and clicking Cloudshell. Paste the code snippet below into cloud shell CLI to Copy the data into the recently created bucket. Paste the code below in the CLI to explore list of files in the folder.
Paste the code below to copy green taxi files to your bucket. Replace
redshift-iceberg-tutorial with your bucket name.
To create an Athena workgroup
- Navigate to Athena service page and click workgroup on the left navigation pane. A workgroup in Athena is a resource for Athena to separate queries within the same account.
- Click create workgroup tab. Give your workgroup a name like
redshift-iceberg. Leave the remaining settings as default and clickcreate workgroup. - Click
Query Editorin the left navigation pane and select the newly created workgroup.

You can follow the steps below to create a new database or skip to use an existing or the default database
- Go the Glue console to create a table for our data. In the left navigation pane of the glue service page click databases to create a new database. Click
Add databasebutton to add a new database. Give the database a name and click theCreate databasebutton, I named mine icebergdb.

We would create and run a glue clue crawler using our database to populate our database with a table.
- Create a crawler to retrieve the schema of the data and create a table. Click on
crawlerfrom the left Navigation pane in Glue console. Clickcreate crawler - on the set crawler properties page give the crawler a name, leave the rest settings as default, and click the
Nextbutton. - On the
Chose data source and classifierspage clickBrowse S3buckets to search our newly created bucket or - Type the name of the bucket to search for the iceberg bucket, select it or any folder within it containing our data in my case the
Parquetfolder - Click choose to add to
Parquetfolder as an s3 data source for our crawler - Click
Create new IAMrole button. On the pop up icon give the role a name and or leave default name, click thecreatebutton leaving other settings as default. - On the set output and scheduling page select the glue database we created previously.
- Review your choices and click
create crawlerto create the crawler. - Click on the crawler page and then click
run crawler,to create a table for our glue database

Under Glue Databases select our previously created database and under tables select newly created table, Click
table data under view data to preview the table in Athena.
If you get an Error
Query results location not set click on settings tab in the query editor. Then click the Manage button and select an s3 location to store results of Athena query.In the Athena Service page. Click
Query Editor and open a new editor. In the editor paste the code below to create an iceberg tableTo load the data into iceberg table from our Glue table using this code. Paste into Query editor
we can preview our table to verify our insert operation worked.
Create Serverless workgroup, use an existing workgroup or cluster, you can setup a Redshift workgroup using this guide guide.
In the Serverless
Namespace configuration click the name and select Security and encryption tab under the Namespace configuration. Click the IAM role linked to the redshift cluster. In the IAM page select the
Add permissions button. Search for AmazonAthenaFullAccess on the next page, select it and click the Add permissions button to attach AmazonAthenaFullAccess Policy to default Redshift role. Follow this guide to learn more.
In Redshift console open the Query v2 Editor to query our iceberg table.
With the Editor create an External Schema to Query to the Iceberg table created previously with Athena.

Paste the code below into the query editor to create external schema. Specifying the name of your glue database, and region.
Now we can query our iceberg table using the external schema paste this code below into an editor in Query v2.

If you get an error similar to this confirm that you attached
AmazonAthenaFullAccess to your default IAM role.Access Denied Error RedshiftIamRoleSession is not authorized to perform: glue:GetTable on resource:We have successfully Queried an Iceberg table in our centralized data lake giving it properties of relational databases and maintained it's compute engine agnostic property using Athena and Redshift.
- Time travel
- Create and Alter commands currently not supported
- The table should be defined in a glue catalog

