logo
Menu
Automate the Account Factory for Terraform setup

Automate the Account Factory for Terraform setup

And understand the mechanics behind the scenes
Published Mar 27, 2024
Last Modified Apr 4, 2024

Introduction

In the dynamic landscape of Cloud Computing, organizations increasingly rely on Infrastructure as Code (IaC) solutions for efficient resource management and deployment. Among these solutions, Terraform has emerged as a robust tool for provisioning and managing infrastructure.
One of the significant challenges in AWS infrastructure management is the creation of multiple accounts, which traditionally involves a complex and time-consuming manual process, often creating dependencies on centralized or specialized infrastructure teams.
To address this challenge, the Account Factory for Terraform (AFT) is introduced. AFT offers an automated solution designed to simplify and expedite the creation of AWS accounts through Terraform definitions. This pragmatic approach accelerates account provisioning (also called "vending"), ensuring consistency, security, and compliance across the cloud environment.
While the product is relatively new, its documentation may be extensive, potentially posing difficulties in troubleshooting or validating setups. This article aims to consolidate key concepts into a single resource, providing a comprehensive understanding of AFT and guiding readers through the process of setting up their own AFT environment within their AWS organization.
Throughout this article, efforts will be made to automate tasks wherever possible, providing transparency into the underlying processes and facilitating troubleshooting. While many steps can be performed using the AWS Management Console, utilizing tools such as the AWS CLI or Terraform enhances learning and comprehension.

AFT Components

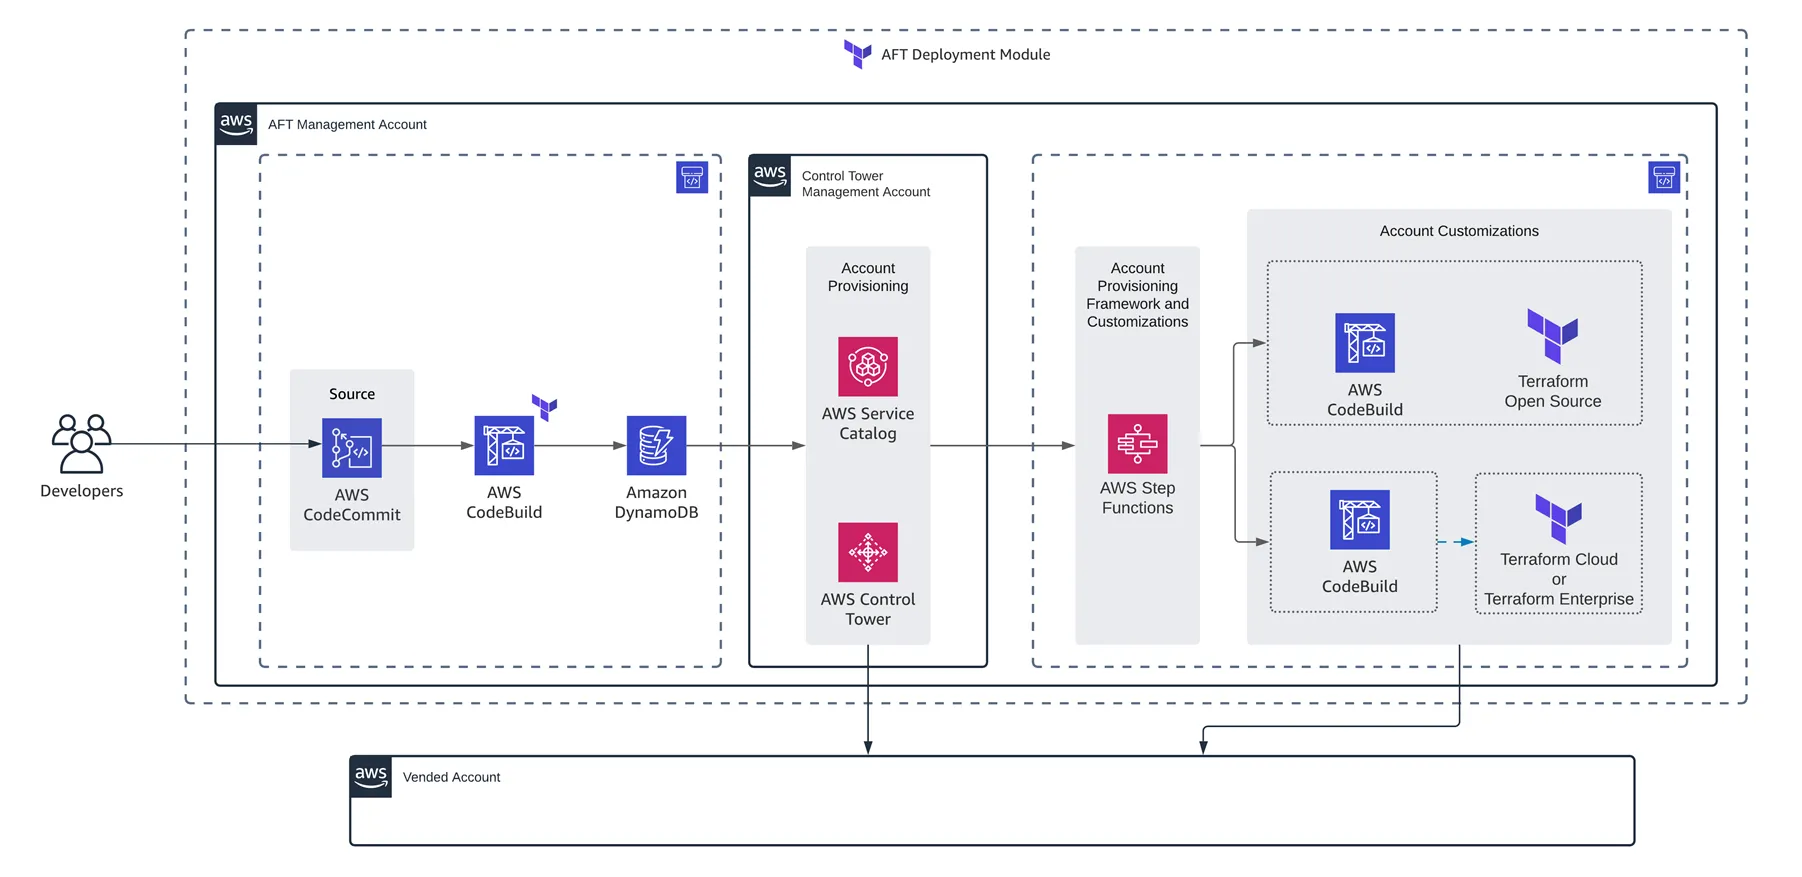
Let's cut to the chase! The diagram below is part of the announcement of AFT back on 2021 and shows the basic components involved on the Account Factory for Terraform:
aft-overview-diagram
AFT overview
Before digging into the parts involved in the AFT, let's have an understanding on the AWS components used in this module:
  • Control Tower: AFT uses Control Tower Landing Zones to vend new AWS Accounts. Actually, Control Tower introduces the term of Account Factory. We could imagine the AFT as a Terraform implementation of an Account Factory, but it could be others available.
  • Service Catalog: this service is used to prepare and deploy IaC templates in AWS, like for instance let Account Factories to create AWS accounts on-demand.
  • Source Repositories, CodeBuild and CodePipeline: as shown in the diagram above, the user (like a Developer, for instance) will push an IaC commit on a Git repository, that will trigger a CI/CD pipeline to vend and customize on-demand AWS accounts (known as vended accounts). We'll dig on that later.
On the other hand, Control Tower leverages the multi-account feature to separate features and ensure a least-privilege access model to vend new accounts based on an IaC git push. Let's explore the purpose of each AWS account type used in AFT:
  • (existing) 💰Control Tower Management Account: this is the root AWS account of our Organization (also known as the management account, paying account or billing account) and will be used to start configuring the module using a Landing Zone. Imagine this account as the seed (or origin) AWS account.
  • (new) 🐙 AFT Management Account: this will be an AWS account dedicated to host & orchestrate the vending and customization of new AWS accounts requested as code by IaC users (e.g. Developers). It will be created using Service Catalog from the Control Tower Management account.
  • (new) 🤖 Shared Accounts: the AFT makes use of an Audit account and a Log Archive account for centralized security, compliance and long-term storage of logs.
  • (new) 🚀 Vended Accounts: as the name says, these are the new AWS accounts created and customized by AFT, in a on-demand basis.
The AFT module strongly recommends using Organizational Units (OUs) to logically group the Shared Accounts, and the AFT Management Account with the Vended Accounts. We'll explore more on that later.
Emoji alert: from now on we will use the emojis listed above 💰🐙 🤖🚀 when referring to each AWS account type to give better understanding while reading. In my humble opinion all types sound pretty similar while reading this article or any other documentation related to AFT, so to avoid confusion we will put emojis before referring to each AWS account.

AFT Workflow

So, how does the AFT workflow operate when everything is up and running?:
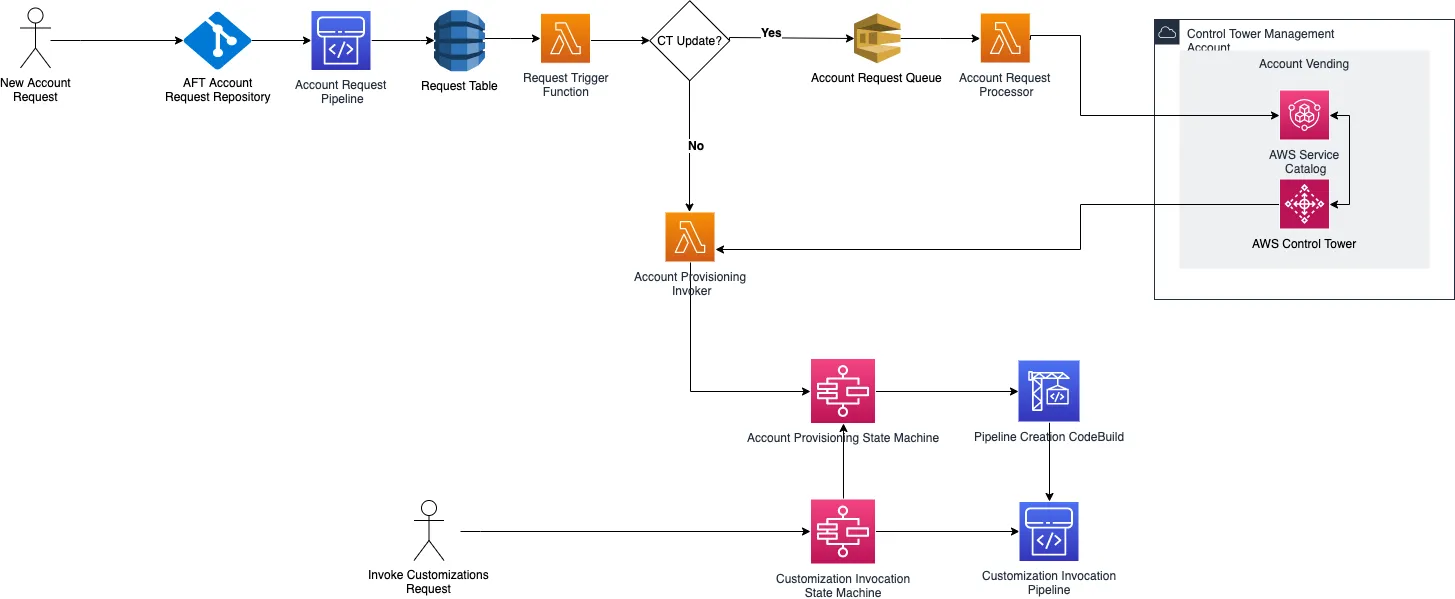
aft-workflow-diagram
AFT Workflow
As seen in the diagram above (taken from the official docs) there are 2 possible paths to be followed:
  • To vend new AWS accounts:
    1. A new AWS account request is received as a git push operation. As of today, the AFT supports several git repositories, like CodeCommit, Bitbucket, GitHub, GitHub Enterprise, GitLab and GitLab Self Managed.
    2. That git push triggers a new CodePipeline pipeline, that invokes lambda functions to use Control Tower and Service Catalog to vend a new AWS account. The orchestration of these functions and the pipelines is made by Step Functions.
    3. After the new AWS account is vended, two groups of customizations pipelines are invoked:
      • Global customizations: definitions to be applied across all vended AWS accounts, like base VPC configurations, IAM roles, S3 buckets, or anything needed to be deployed by default in all our accounts. These customizations will be defined by us in Terraform, and hosted in a git repository.
      • Account customizations: these definitions will apply to certain groups of vended AWS accounts, for example access restrictions for S3 in Production, NAT Gateways, EventBridge rules to monitor the Health of some resources, or any other specific needs for a subgroup of vended AWS accounts. These customizations work the same way as the Global customizations, which is by using Terraform modules (folders) in a separate git repository.
  • Update existing vended AWS account:
    1. After pushing the changes to the AWS account request git repo, the user has to invoke the customizations State Machine (using Step Functions) that will trigger both Global customizations and Account customizations pipelines. These pipelines will run the Terraform projects affected by the AWS account, to update their definitions.
As of the date of this document, there's no path to suspend/remove vended AWS accounts 😔 It would be great to have this in the near future, but for now we'll have to use other methods like the CLI, the Management Console or any other code-driven approaches to manually remove the AWS accounts out of the AFT.

Required Repositories for AFT

As you may seen from the previous sections, there are some required Git repositories to be prepared for our setup:
  • (required) Account Request repo: this repo will host all AWS vended accounts, and must be accesible by Users (e.g. Developers) to request new AWS accounts. Sample repo.
  • (required) Global Customizations repo: this repo will host all Global Customizations, as a Terraform module/folder. Sample repo.
  • (required) Account Customizations repo: this repo will host account or group-specific Account Customizations, as Terraform modules/folders. Sample repo.
  • (required) Account Provisioning Customizations repo: this repo will host all account or group-specific provisioning-time Account Customizations, as Terraform modules/folders. Sample repo.
  • (recommended) AFT setup repo: as mentioned in the title of this Article, we'll set up the AFT using a code-driven approach. It would be good to version these commands/definitions in a Git repo to not lose our commands.
By default, all these repositories could be blank. But, as long as we vend and customize AWS accounts we'll start populating these repositories using Terraform definitions.
If we're using CodeCommit, the first four repositories will be automatically created for us when deploying the base AFT module. If you're like the other 99% of the world, you'll need to create the repositories by yourself.

AFT setup Checklist

Ok, if you have reached this point you may feel a little overwhelmed 😬 At least this is how I felt the first, second and third time using the AFT. My first impression after reading about the AFT was the word simplicity... but after using it in a PoC and then in Dev & Prod environments that impression dramatically changed to "this is a monster". That's actually the reason why I'm writing this article, to try to expose my experience using the AFT and concentrate the information in a single place to start spinning your AFT environment.
Moving on, I guess the best first step to jump into a new AFT deployment is to create a checklist of components and activities to be done:
☑️ 1. Create IAM Roles required by Control Tower
☑️ 2. Create Log Archive AWS Account
☑️ 3. Create Audit AWS Account
☑️ 4. Enable Landing Zone in our AWS Region
☑️ 5. Create AFT Management Account
☑️ 6. Deploy AFT Module
☑️ 7. Post-deployment and Next Steps
Let's get started!

1. Create IAM Roles required by Control Tower

As seen before, the AFT uses Control Tower Landing Zones govern vended AWS accounts in a compliant AWS Organization. For that reason the deployment of our AFT module requires to have a Landing Zone enabled in one or more regions of our AWS Management Account.
To pursue that requirement, the first step is to let Control Tower to leverage some IAM Roles required to enable a Landing Zone later. The official documentation describes 4 new IAM Roles:
  • AWSControlTowerAdmin
  • AWSControlTowerStackSetRole
  • AWSControlTowerCloudTrailRole
  • AWSControlTowerConfigAggregatorRoleForOrganizations
Note: if we use the AWS Management Console to enable our Landing Zone, the IAM Roles displayed above will be created automatically for us, which means you could skip this step if you're using the UI. I prefer to run these steps manually for better understanding.
So, let's log into the CLI with root or AdminAccess in the 💰Control Tower Management Account to create each Role and their respective trust policy & permissions.

AWSControlTowerAdmin

AWSControlTowerStackSetRole

AWSControlTowerCloudTrailRole

AWSControlTowerConfigAggregatorRoleForOrganizations

2. Create Log Archive AWS Account

The next step with the requisites for enabling our Landing Zone is to create a new AWS Account for log archiving purposes in our AFT AWS accounts (part of our 🤖 shared accounts). You can name this account however you want to; I'll define it as aft-log-archive.
Let's run the create-account CLI command using the 💰Control Tower Management Account with AdminAccess:
As you may see above, we're using a + sign when setting up the email of our new AWS account. That trick helps us to have multiple email addresses signed in AWS, but all of them will arrive to the same email inbox without the plus sign suffix, which in this case would be your-email@domain.com.
The create-account command from above will display a new account creation Id:
That could be used a few minutes later to get the account Id of our new Log Archive AWS account:
Let's save this AWS account number 111111111111 for the next steps.

3. Create Audit AWS Account

We will follow the same previous procedure to create the Audit AWS account required by the AFT (part of our 🤖 shared accounts) with the create-account CLI command in the 💰Control Tower Management Account with AdminAccess:
This account will concentrate all Audit requirements for our AFT AWS accounts, like CloudTrail logs. We will run then the list-create-account-status command to get the AWS account status:
And save the AWS account number 222222222222 as soon as it gets successfully created.

4. Enable Landing Zone in our AWS Region

Now that we have our required AWS accounts and IAM Roles, we're finally ready to enable our Landing Zone using the create-landing-zone CLI command.
That command uses a manifest JSON file to define all the options to be set up in our Landing Zone, so let's create a new file called landing-zone.json:
Unfortunately, as of the date of this document there is no good documentation about the fields available for these manifest files 😞 The best option available is this example found in the AWS docs. The good news is that the fields found on this example are very self-explanatory:
  • governedRegions field defines on which region(s) our Landing Zone will be deployed.
  • organizationStructure.security and organizationStructure.sandbox are new Organizational Units (OUs) to be created automatically by the create-landing-zone command in our root AWS account:
    • The Security OU will be named aft-shared in this example, and will host both Audit and Log Archive AWS accounts (both 🤖 shared accounts). Both accounts will be moved automatically by the create-landing-zone command after creating this new OU.
    • The Sandbox OU will be named aft-accounts in this example, and will host all 🚀 vended AWS accounts and also the 🐙 AFT Management AWS account.
  • centralizedLogging.accountId will include the AWS account Id of our new 🤖 Log Archive account, which in this example is 111111111111.
  • centralizedLogging.configurations will define the retention period of the Log S3 buckets.
  • securityRoles.accountId will include the AWS account Id of our new 🤖 Audit account, which in this example is 222222222222.
So, with no further introduction, let's enable our new Landing Zone using the create-landing-zone command using the 💰Control Tower Management Account with AdminAccess:
This command will take between 25-60 minutes to complete, and will run several configurations like creating the OUs, moving the 🤖 shared AWS accounts, create security & audit S3 buckets and enable CloudTrail logs.
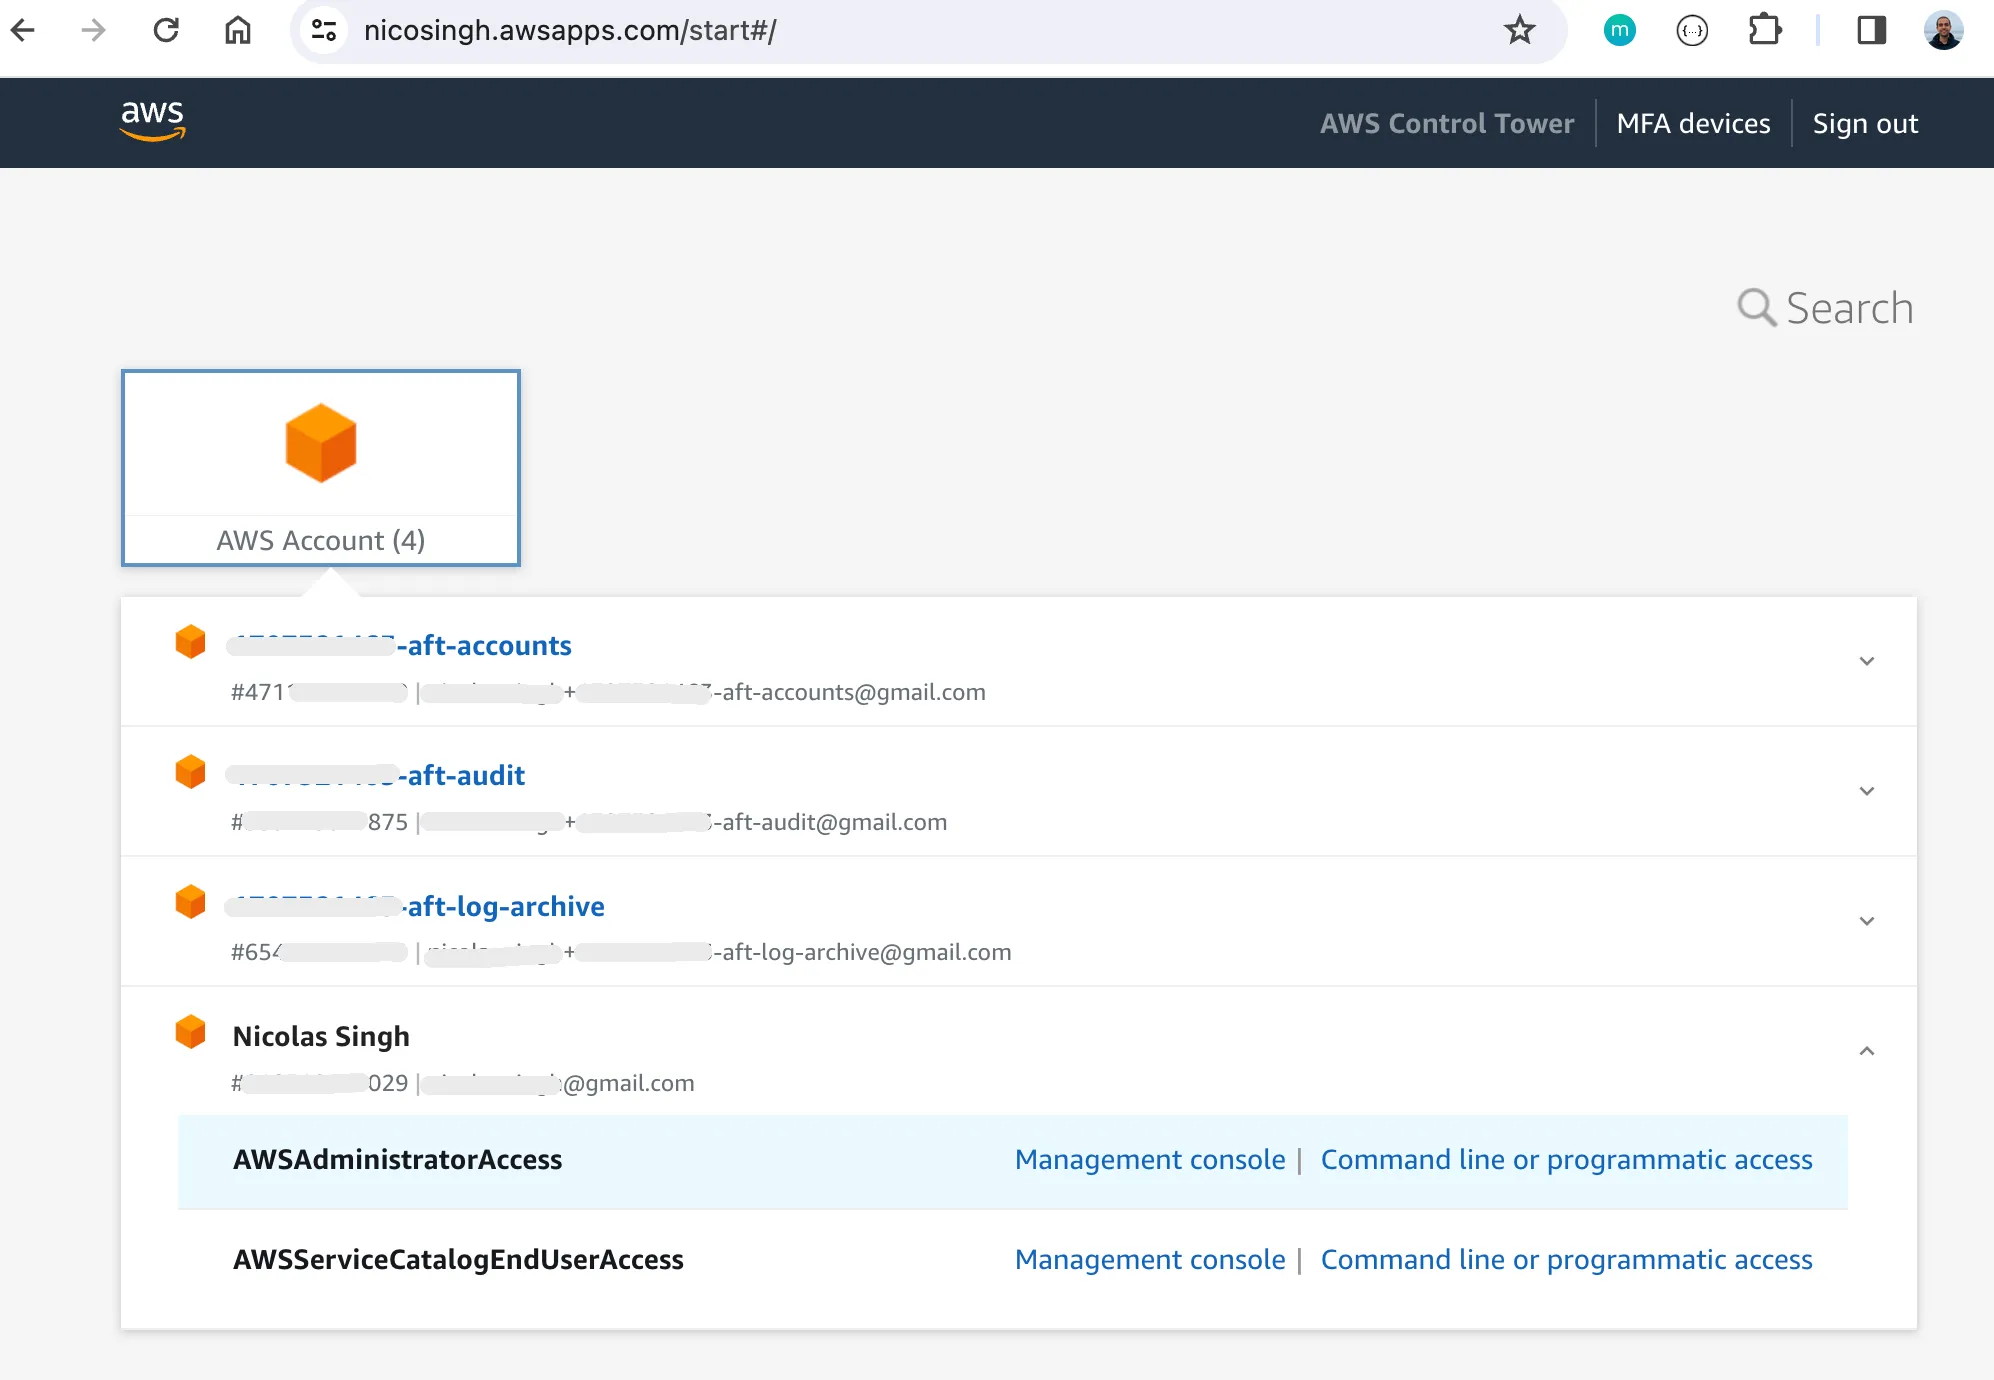
The Landing Zone will also configure IAM Identity Center (former AWS Single Sign-On) for us, to enable used-based login to jump among all available AWS accounts using both the Management Console or programatic access:
iam identity center from your Landing Zone
IAM Identity Center
After having a coffee, we can check the status of our Landing Zone using the Management Console or using the get-landing-zone-operation command. In my experience, it's much easier to see the UI to explore if any problems are found during the process.
🧘 Be patient, because there are a ton ways this thing could fail, like not having the right permissions to run the create-landing-zone command, using the wrong account to do so, reaching AWS account creation limits, fix incorrect IAM Roles, ... In all of these cases we have to find the cause of the issue (sometimes looking at the CloudFormation logs) and re-run the create-landing-zone command over and over again.
If you're in luck, though, and the Landing Zone is successfully configured... congratulations! We are half way on the AFT setup 🎉 So, let's move on into the next step.

5. Create AFT Management Account

So, to wrap up so far... we have an activated Landing Zone with the appropriate 🤖 shared AWS accounts, OUs and some guardrails for these resources. The next step is to enable the 🐙 AFT management AWS account, which in this case will be handled by a new Service Catalog product created by our Landing Zone.
This Service Catalog product is called AWS Control Tower Account Factory and can be found in the Management Console or using the servicecatalog search-products command of the AWS CLI.
To find the Service Catalog product Id we need to be logged into the 💰Control Tower Management Account with AdminAccess, to run the search-products command:
Given the JSON above, we need to write the ProductViewSummaries[0].ProductId field to identify the AWS Control Tower Account Factory product. Actually, we can modify the previous command to get the Id only:
Next, we need to get the current version of this Service Catalog product. We will use the list-provisioning-artifacts command for this:
Note: in case these two commands return no results, check if your Landing Zone is fully configured and also if you're logged in your CLI with AWSAdministratorAccess role. You can use the IAM Identity Center to get temporary programmatic credentials for this role in the 💰Control Tower Management Account.
After getting these two Ids, it's time to create the 🐙 AFT Management AWS account via Service Catalog. For this we need to change our CLI credentials to the AWSServiceCatalogEndUserAccess role in our 💰Control Tower Management Account, to run this command:
As you may see, this command uses an input file called aft-accounts.json. That file includes some parameters to be given to our new Service Catalog product, which are related to the E-mail & OU of that new AWS account to be created:
After a few minutes, we can go back to the AWSAdministratorAccess role in the 💰Control Tower Management Account to get new AWS account Id:
In this example, the 🐙 AFT Management Account Id is 333333333333.
We're now ready on enabling our Account Factory, which leaves us to the next step which is to deploy the Account Factory for Terraform (AFT) module.

6. Deploy AFT Module

As mentioned before, at this step we're done with enabling our Landing Zone with an Account Factory. Let's imagine this concept as a generic Account Factory, which means that the next step is to configure the Terraform implementation of that Account Factory, that turns out to be the Account Factory for Terraform (AFT).
To do that we are going to use Terraform (of course) to consume the official AWS module for this purpose. As shown in the examples directory, we will create the following Terraform definition to deploy the AFT:
To apply this definition, we need to log in our AWS CLI using the AWSAdministratorAccess role in the 💰Control Tower Management Account:
Fingers crossed, after a few minutes the AFT resources will be created across all AWS Accounts. If anything doesn't work, go to the affected resource on the AWS Accounts and run terraform apply again after fixing the issue.
7. Post-deployment and Next Steps

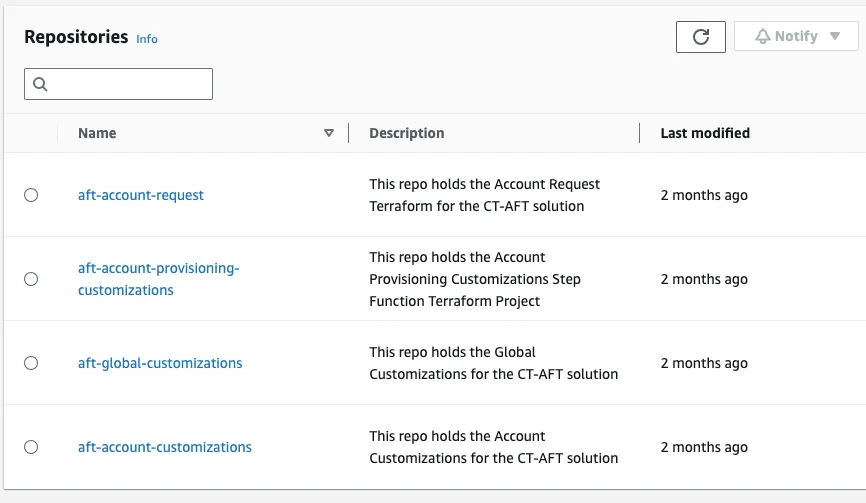
After enabling the AFT in our environment, the next step will be to populate the created repositories in the 🐙 AFT Management Account, and start vending & customizing accounts:
default-aft-git-repositories-codecommit
AFT Git Repositories, hosted in CodeCommit by default
The official documentation is a great starting point to understand the purpose of each repository, how to version the required components on each one of them, and vend & customize new AWS Accounts using these repositories and the AFT.
That's it on the instructions of the AFT set up! Please be aware that's only the beginning of your journey using the AFT 😀 I strongly recommend you to follow the guides and sample repositories shown in the link from above, to understand how to vend new accounts and customize multiple account at once using global & account customizations.
I would really appreciate any kind of feedback, questions or suggestions. Feel free to ping me in here, or post any comments in this post.
 

Comments