We use essential cookies and similar tools that are necessary to provide our site and services. We use performance cookies to collect anonymous statistics, so we can understand how customers use our site and make improvements. Essential cookies cannot be deactivated, but you can choose “Customize” or “Decline” to decline performance cookies.
If you agree, AWS and approved third parties will also use cookies to provide useful site features, remember your preferences, and display relevant content, including relevant advertising. To accept or decline all non-essential cookies, choose “Accept” or “Decline.” To make more detailed choices, choose “Customize.”
Customize cookie preferences
We use cookies and similar tools (collectively, "cookies") for the following purposes.
Essential
Essential cookies are necessary to provide our site and services and cannot be deactivated. They are usually set in response to your actions on the site, such as setting your privacy preferences, signing in, or filling in forms.
Performance
Performance cookies provide anonymous statistics about how customers navigate our site so we can improve site experience and performance. Approved third parties may perform analytics on our behalf, but they cannot use the data for their own purposes.
Allowed
Functional
Functional cookies help us provide useful site features, remember your preferences, and display relevant content. Approved third parties may set these cookies to provide certain site features. If you do not allow these cookies, then some or all of these services may not function properly.
Allowed
Advertising
Advertising cookies may be set through our site by us or our advertising partners and help us deliver relevant marketing content. If you do not allow these cookies, you will experience less relevant advertising.
Allowed
Blocking some types of cookies may impact your experience of our sites. You may review and change your choices at any time by selecting Cookie preferences in the footer of this site. We and selected third-parties use cookies or similar technologies as specified in the AWS Cookie Notice.
Your privacy choices
We display ads relevant to your interests on AWS sites and on other properties, including cross-context behavioral advertising. Cross-context behavioral advertising uses data from one site or app to advertise to you on a different company’s site or app.
To not allow AWS cross-context behavioral advertising based on cookies or similar technologies, select “Don't allow” and “Save privacy choices” below, or visit an AWS site with a legally-recognized decline signal enabled, such as the Global Privacy Control. If you delete your cookies or visit this site from a different browser or device, you will need to make your selection again. For more information about cookies and how we use them, please read our AWS Cookie Notice.
By Glendon Thaiw, AWS Startup Solutions Architect, Singapore
Background and Context
AWS Organizations is an account management service that lets you consolidate multiple AWS accounts into an organization that you create and centrally manage. With Organizations, you can create member accounts and invite existing accounts to join your organization. You can organize those accounts into groups and attach policy-based controls.
AWS IAM Identity Center (Successor to AWS Single Sign-On) helps you securely create or connect your workforce identities and manage their access centrally across AWS accounts and applications. With IAM Identity Center, you can leverage a centralized identity provider including Microsoft Active Directory, Okta, Ping Identity, JumpCloud, Google Workspace, and Azure Active Directory (Azure AD), as the access management mechanism across multiple AWS accounts within an AWS Organization.
Problem Statement
When AWS Organizations is used to centrally manage a fleet of AWS accounts, the consolidated billing feature helps you consolidate billing and payment for all AWS accounts in the Organization, helping you streamline cost management and combine usage across all accounts to share volume pricing discounts, Reserved Instance discounts and Savings Plans. This is particularly helpful for large Enterprises with large-scale workloads across multiple applications and account boundaries.
When an external AWS account is added to an existing Organization managed with IAM Identity Center, you can leverage the existing authentication mechanism to centrally manage that external AWS account and have its billing consolidated into the Organization.
However, there are times where you would like the central access management that comes with the merge, but have a business requirement to separate the billing of the external AWS account from that of the Organization. This cannot be implemented by adding the external AWS account into an existing Organization, as consolidated billing within an Organization, when enabled, applies to all member accounts of that Organization.
This requirement is common during corporate Mergers & Acquisitions (M&A) scenarios, where the technology stack of 2 previously-separate entities are to be merged for central infrastructure management, but billing is to remain separate for commercial purposes of cost visibility or existing business constraints (E.g. Enterprise Discount Programs). This use-case is also often prevalent in companies with international operating entities, where billing reports for different regions or entitles are to be separated for tax and / or corporate auditing reasons.
Solution Overview
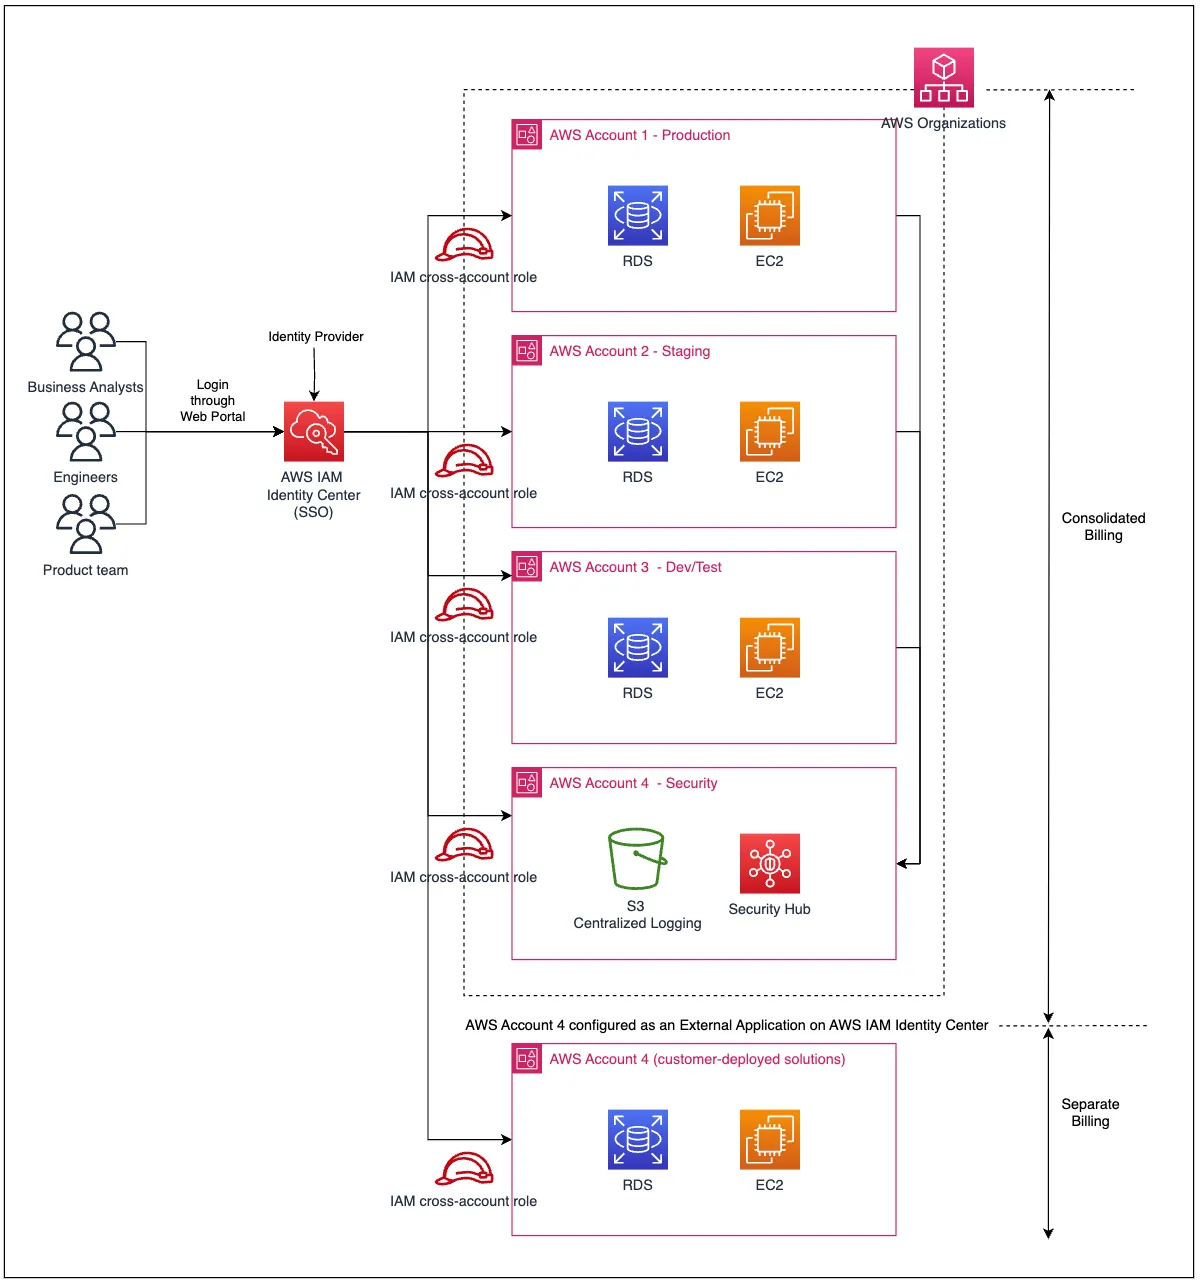
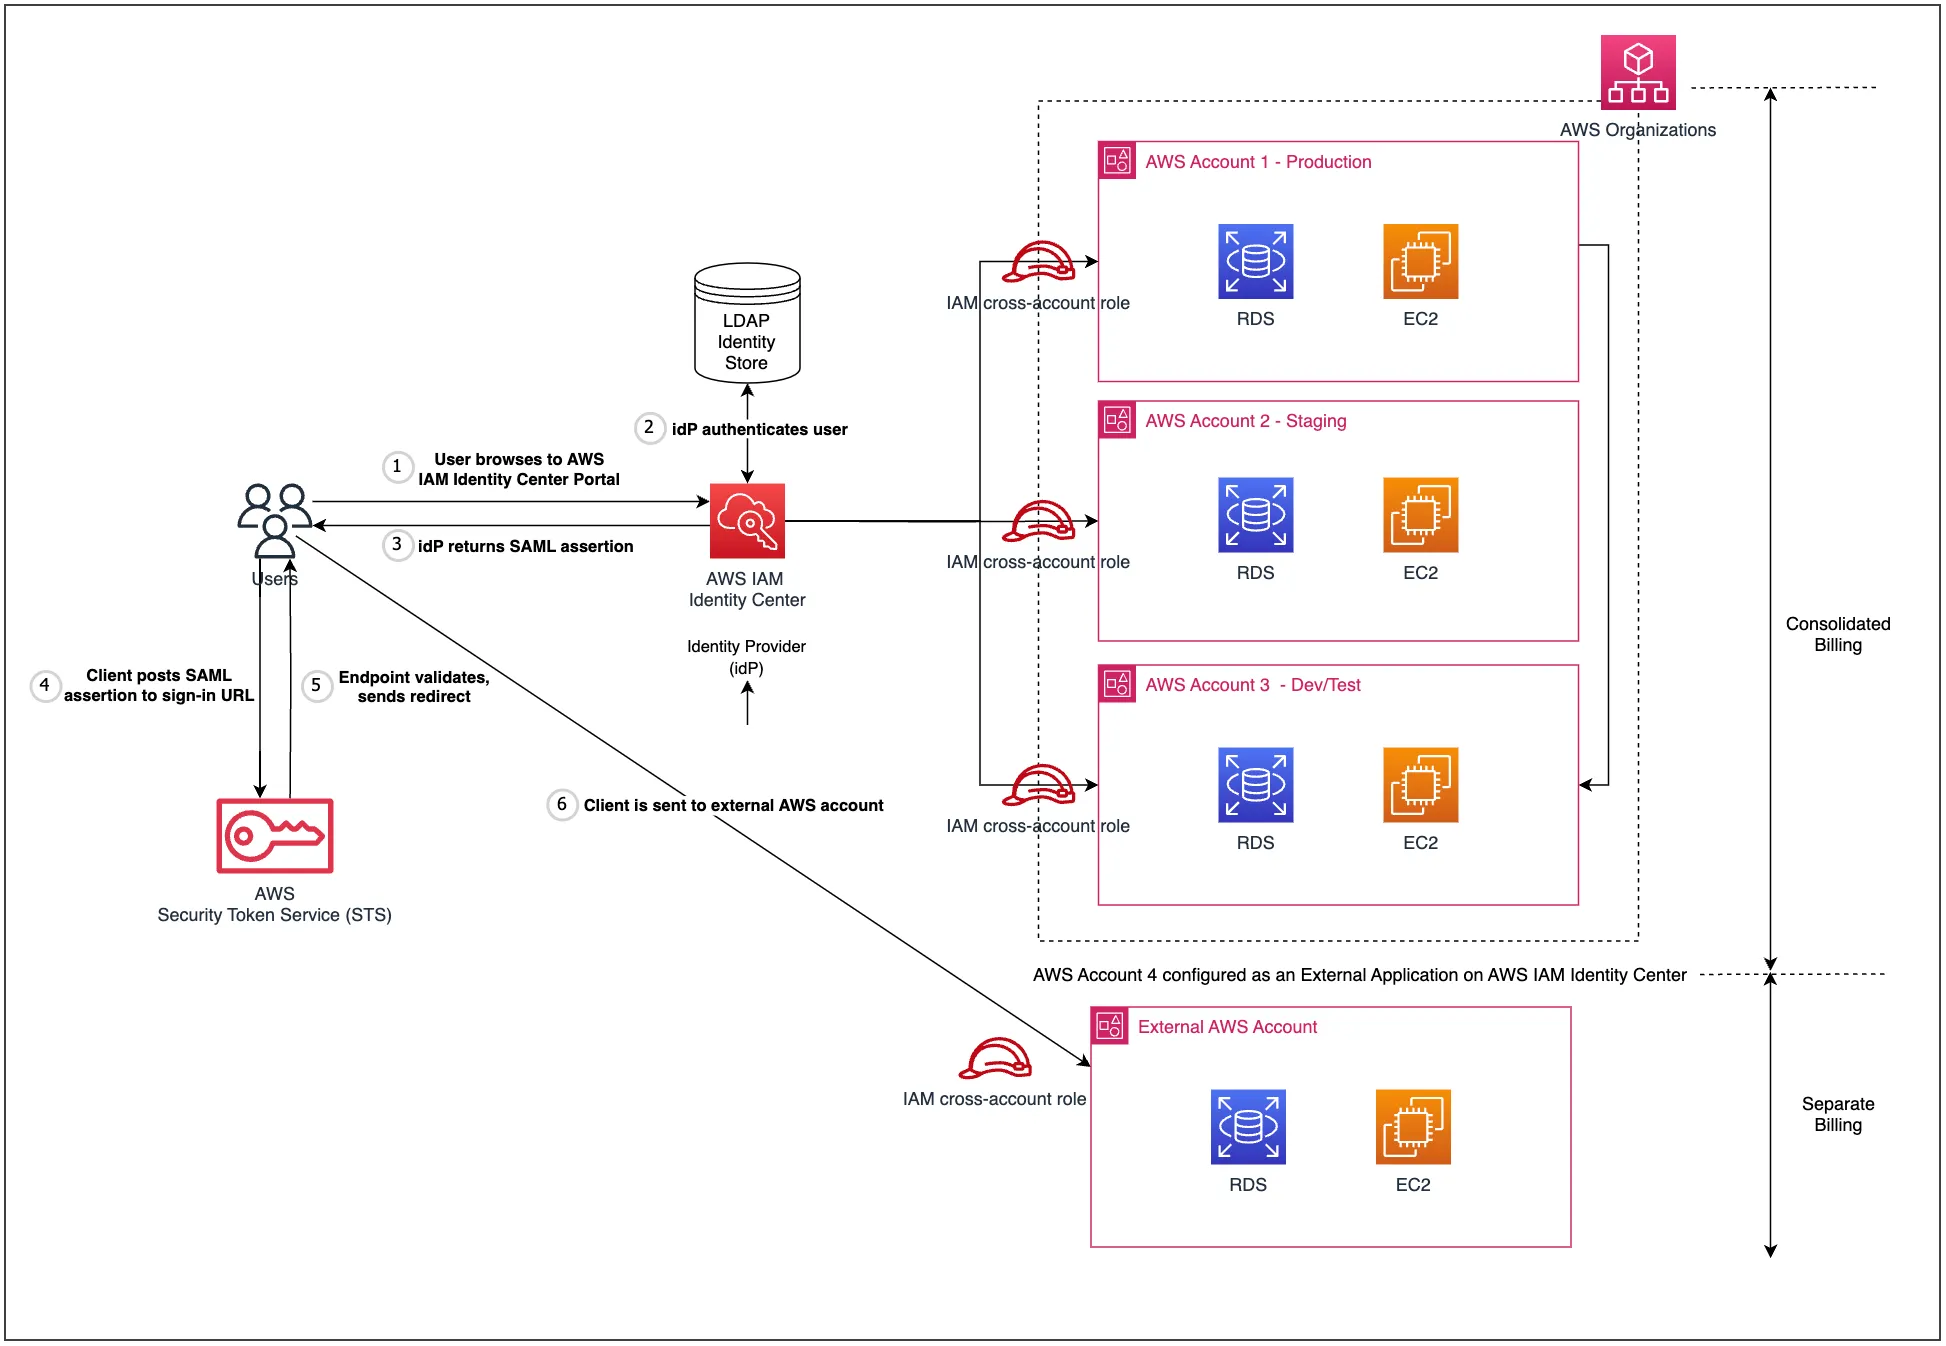
In this blog post, we will show how you can implement a solution by leveraging a particular feature in AWS IAM Identity Center - the ability to configure IAM Identity Center to facilitate single sign-on (SSO) for external AWS accounts (accounts outside your AWS Organization) using Security Assertion Markup Language or SAML.
The architecture diagram in Figure 1 showcases the solution set-up of the integration. By configuring IAM identity center to integrate an external AWS account using SAML, you can manage sign-in security for the external account using the same Identity Provider and SSO mechanism implemented for the AWS organization. This allows multiple separate AWS entities (multiple AWS external accounts can be integrated in the same way) to enjoy central access management with a single identity mechanism.
At the same time, as the external AWS account does not belong to the same AWS Organization, this set up will produce independent AWS billing - one consolidated bill for the Organization and individual bills for each external AWS account - allowing us to meet our aforementioned requirements.
How can we set this up? Read on!
Implement the solution
This section describes the steps needed to set up the solution integration.
In this post, you’ll perform the following tasks:
Step 1: Add the external AWS account as an application to AWS Identity Center in primary account
Step 2: Create a SAML Identity Provider in external AWS account
Step 3: Create an IAM Policy in external AWS account
Step 4: Create an IAM role for SAML Federation in external AWS account
Step 5: Configure access details of created IAM role in the IAM Identity Center of primary account
Step 6: Verify the SSO integration
Note: the term “Primary AWS account” is used to indicate the AWS account with IAM Identity Center set-up and “External AWS account” is used to indicate the AWS account to be integrated.
Prerequisites
Ensure you have the following prerequisites needed for the set-up:
Access to the primary AWS account’s IAM Identity Center console with permissions to manage applications.
An external AWS Account outside your Organization with admin permissions for AWS IAM.
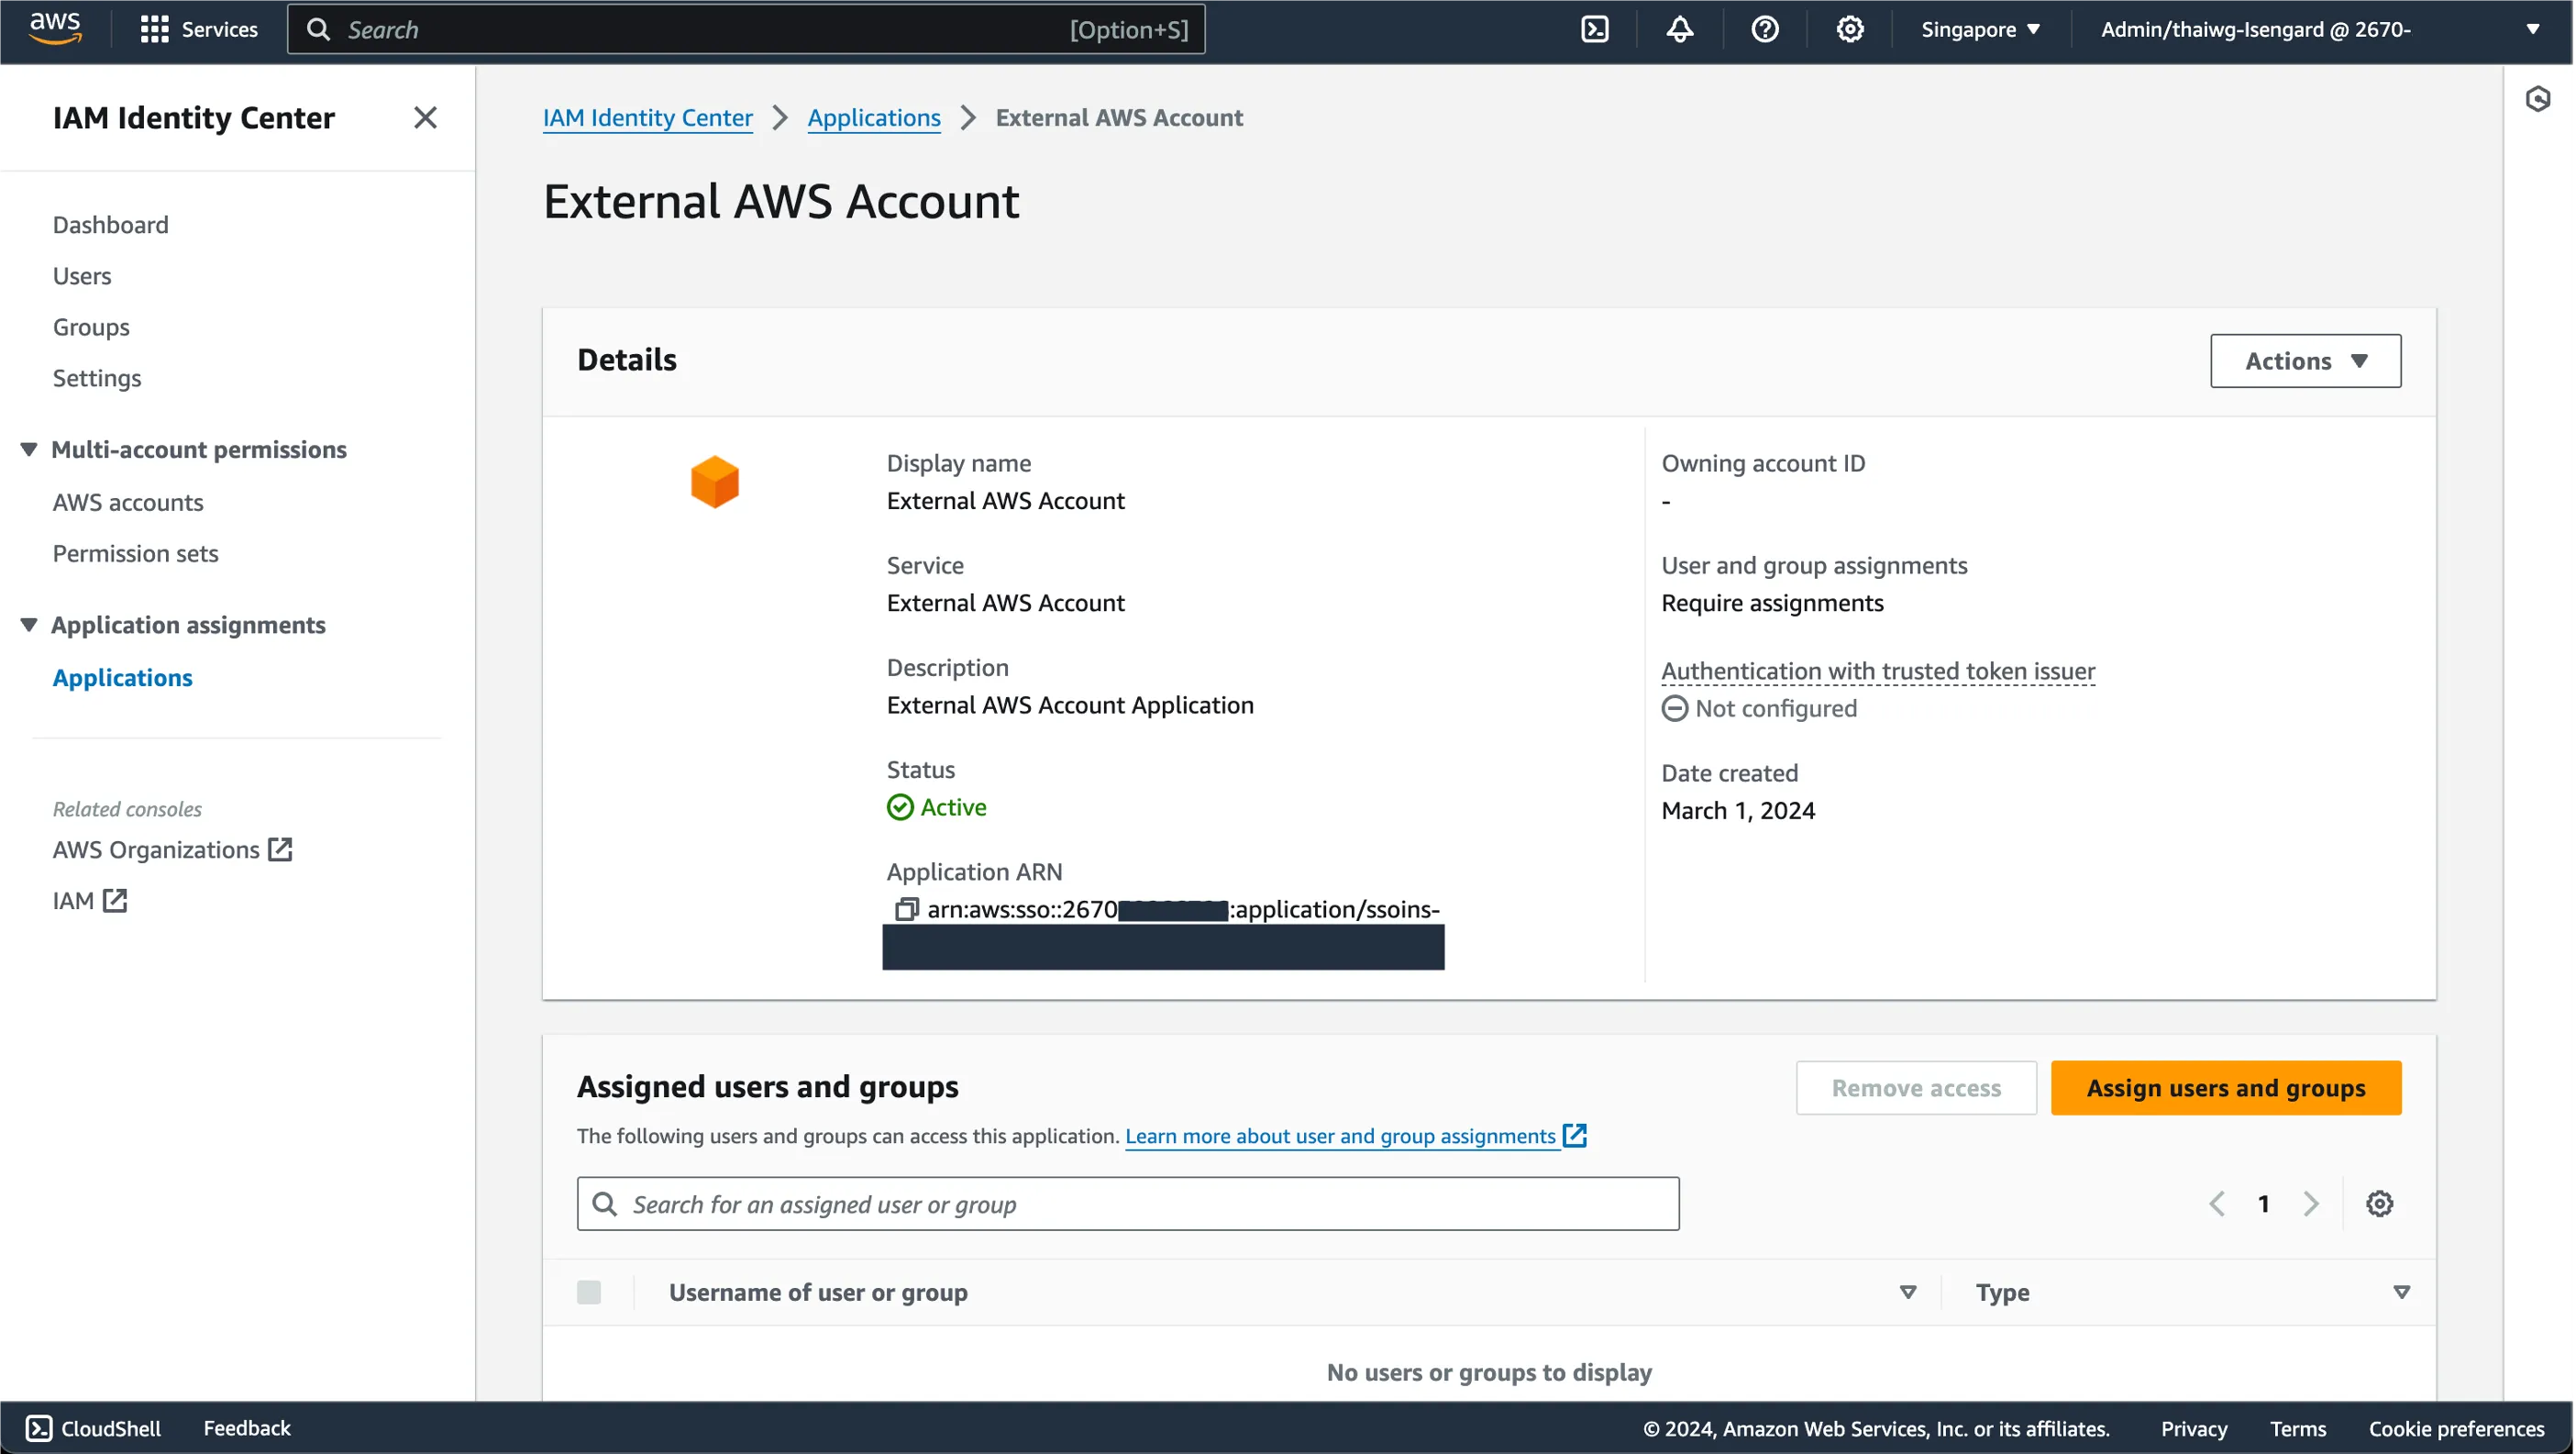
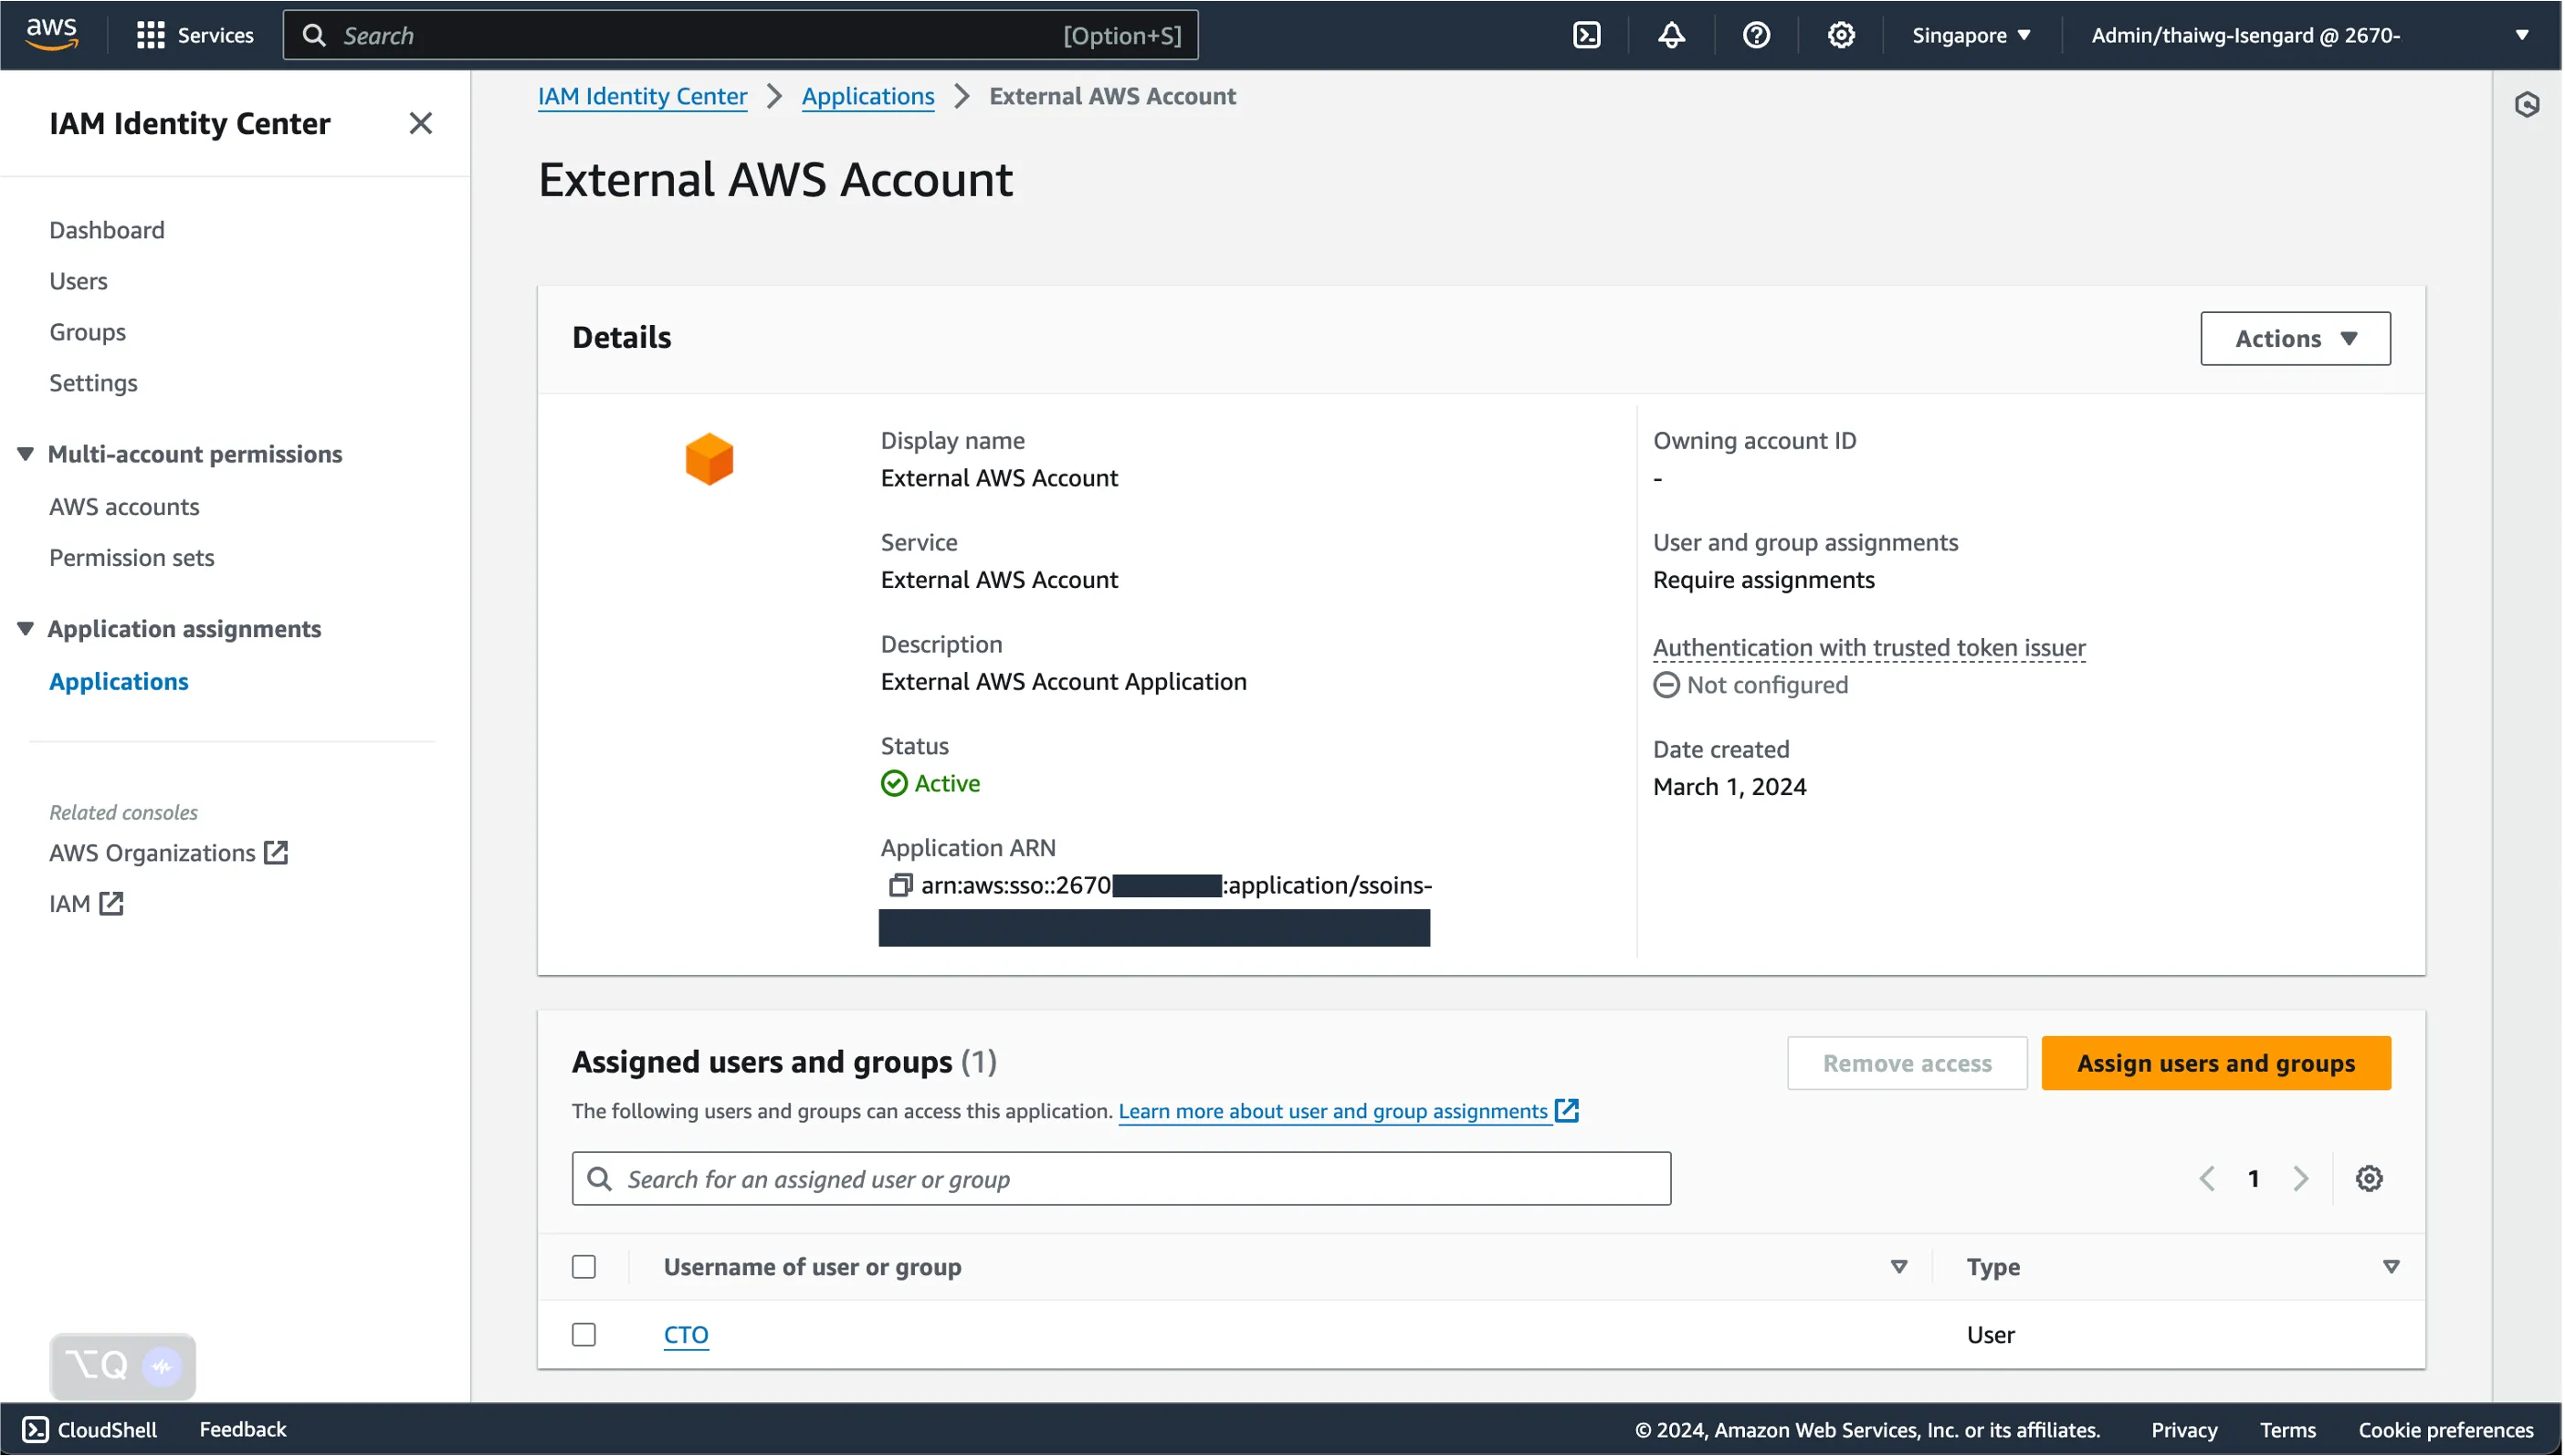
Step 1: Add the external AWS account as an application to AWS Identity Center in primary account
We will start by adding the external AWS account as an application to AWS Identity Center in the primary AWS account.
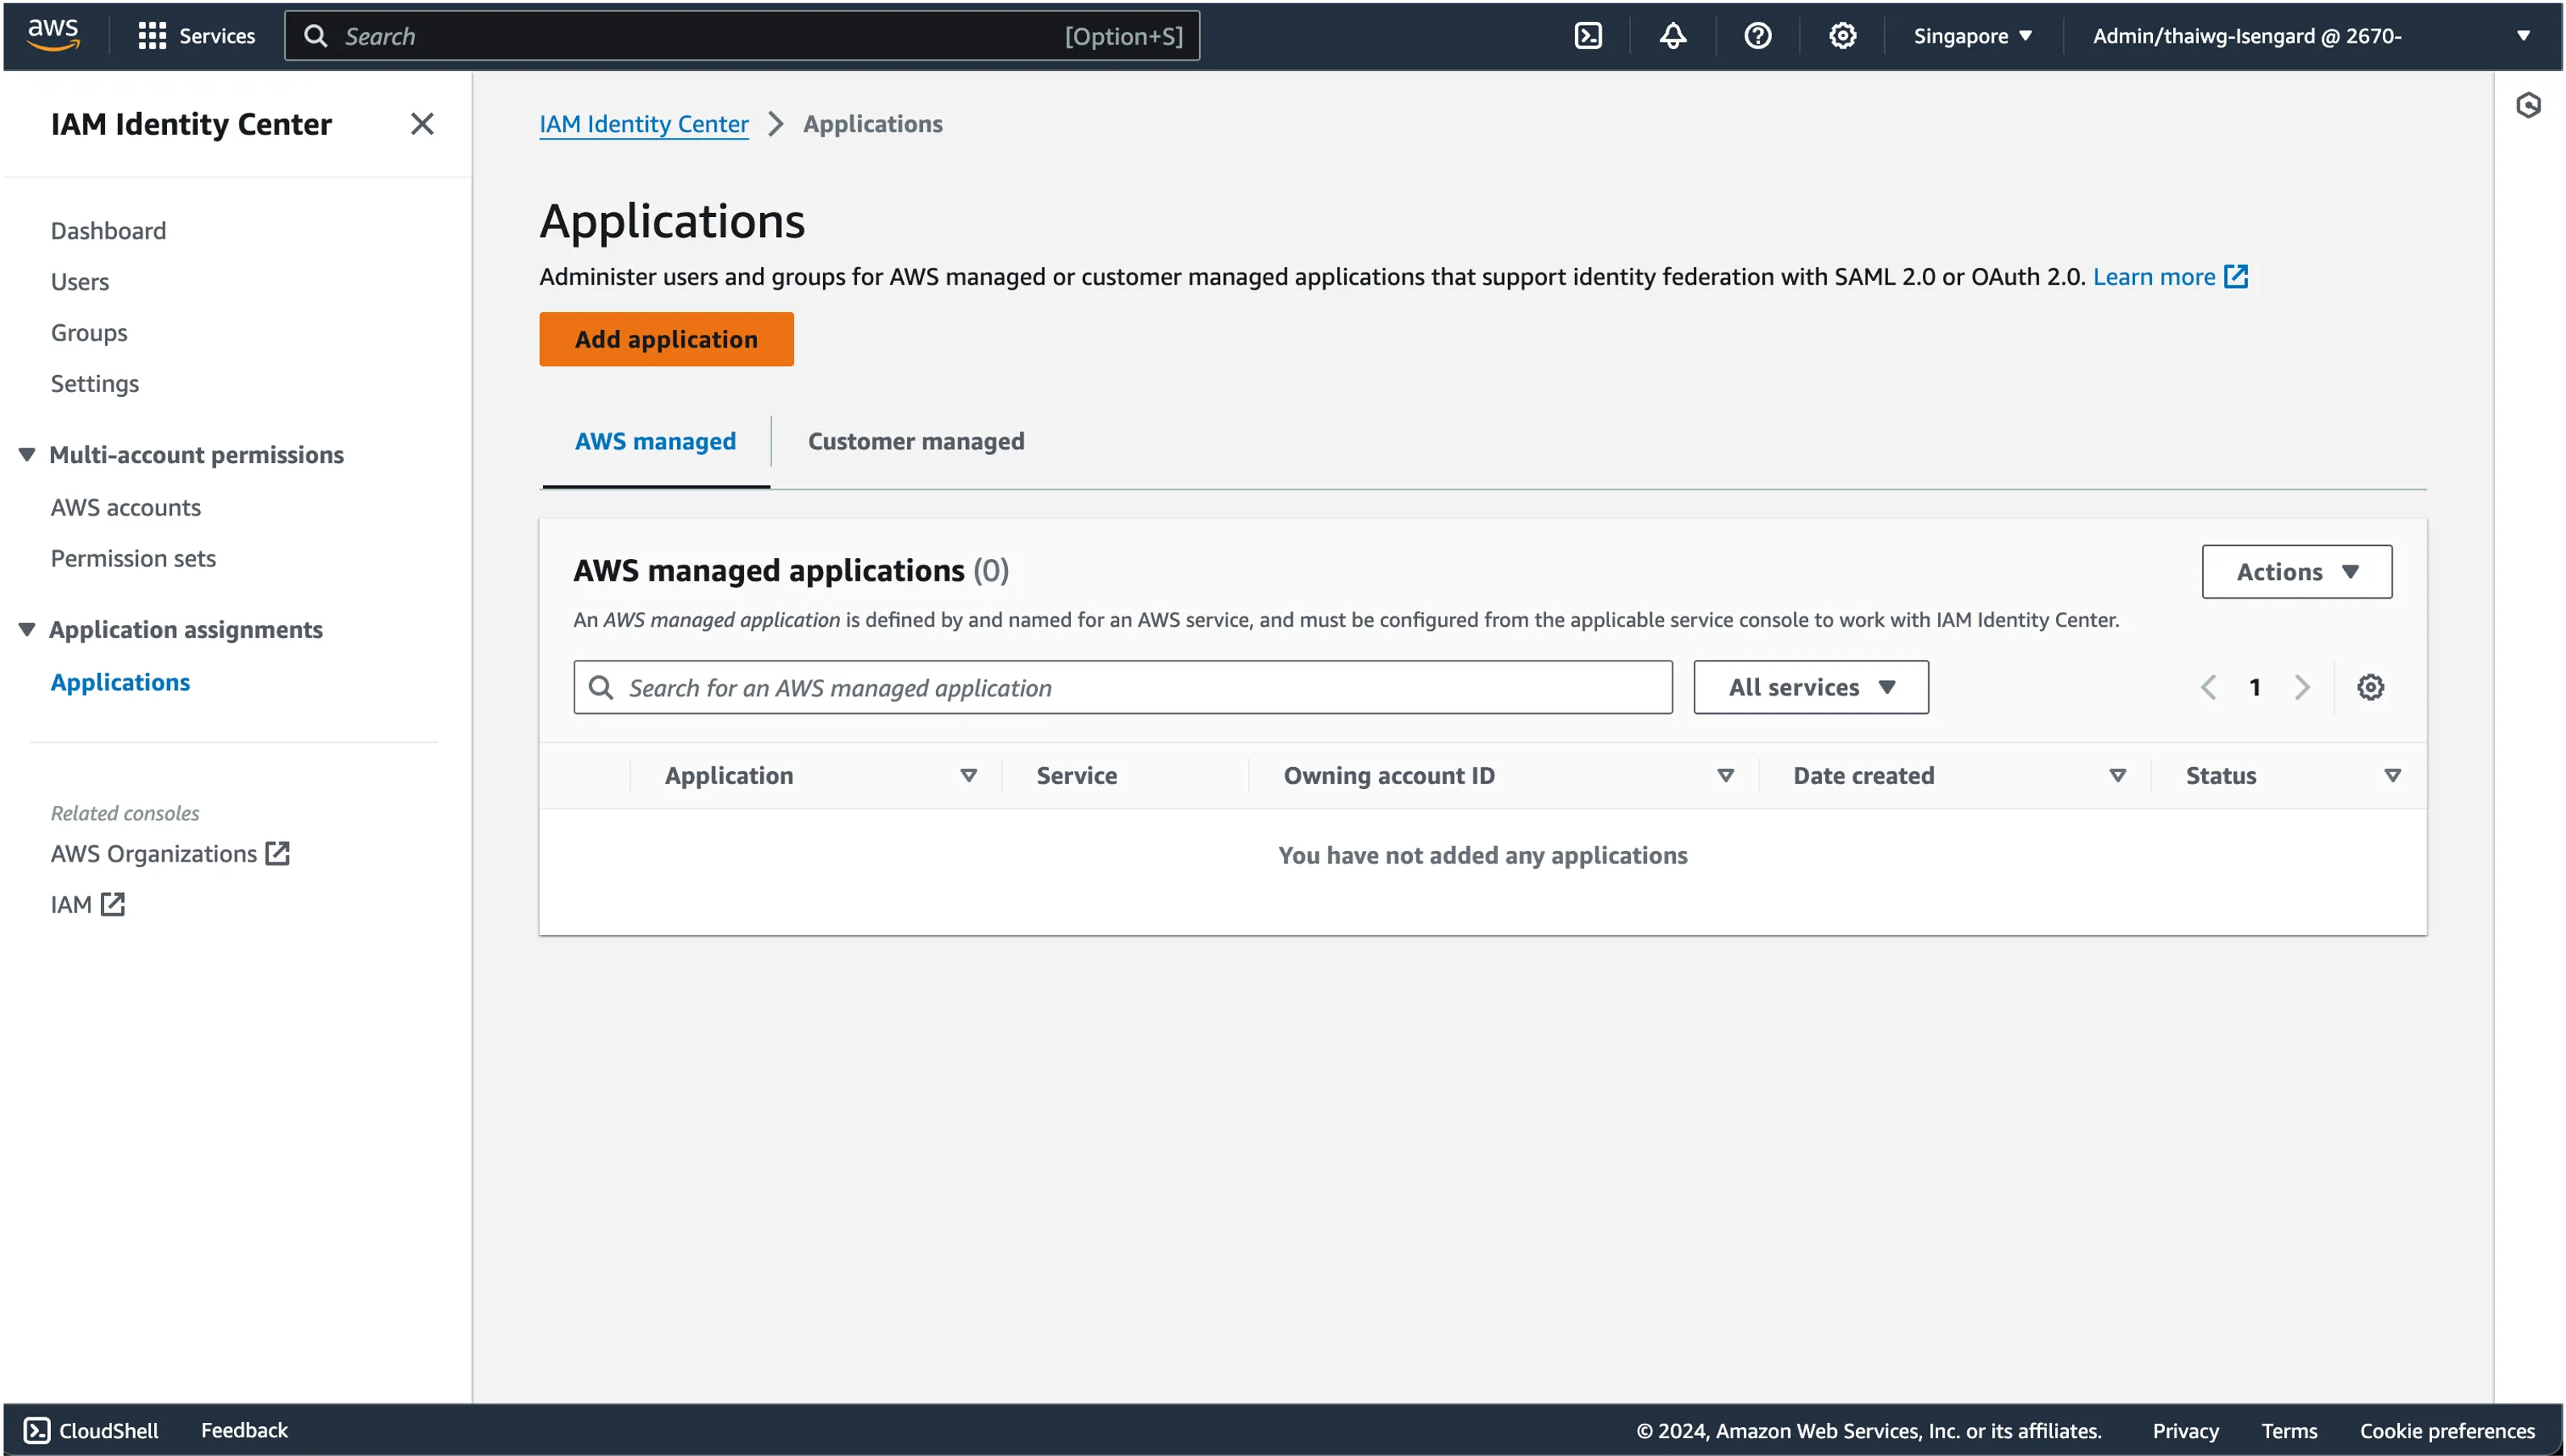
To do so, first head to AWS IAM Identity Center on your primary AWS account.
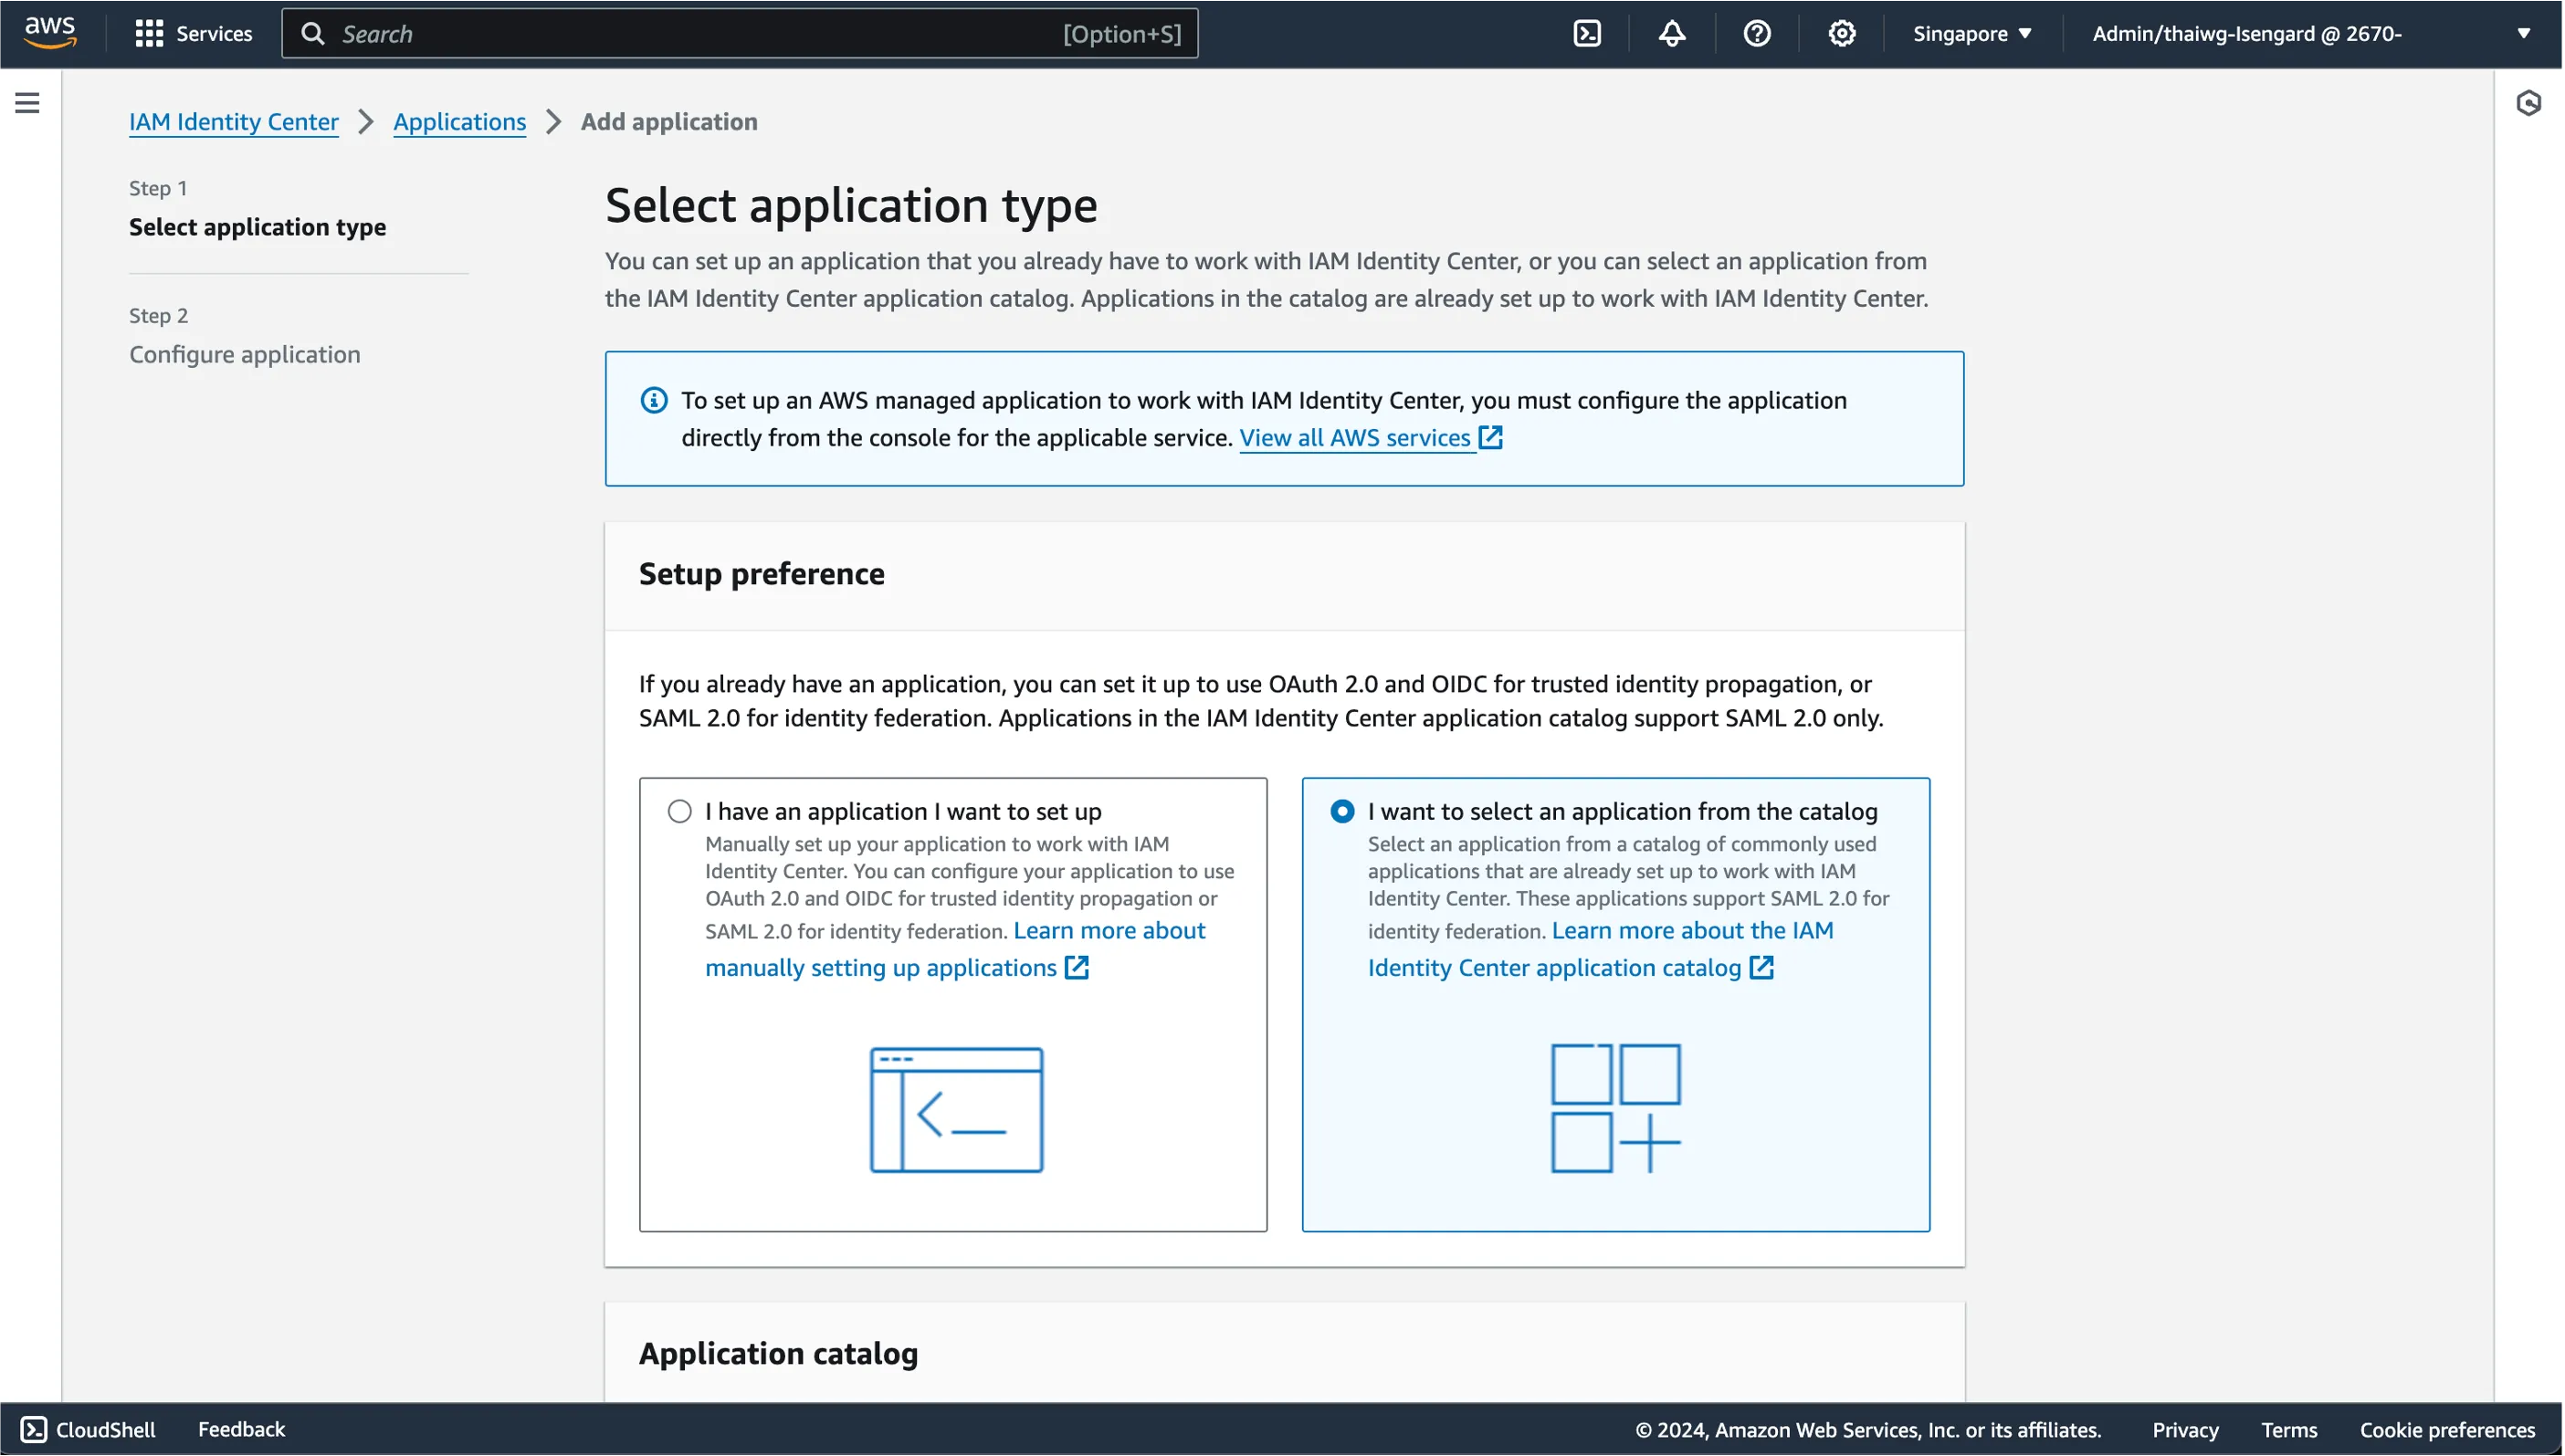
On the navigation pane, click on Applications, then click Add application.
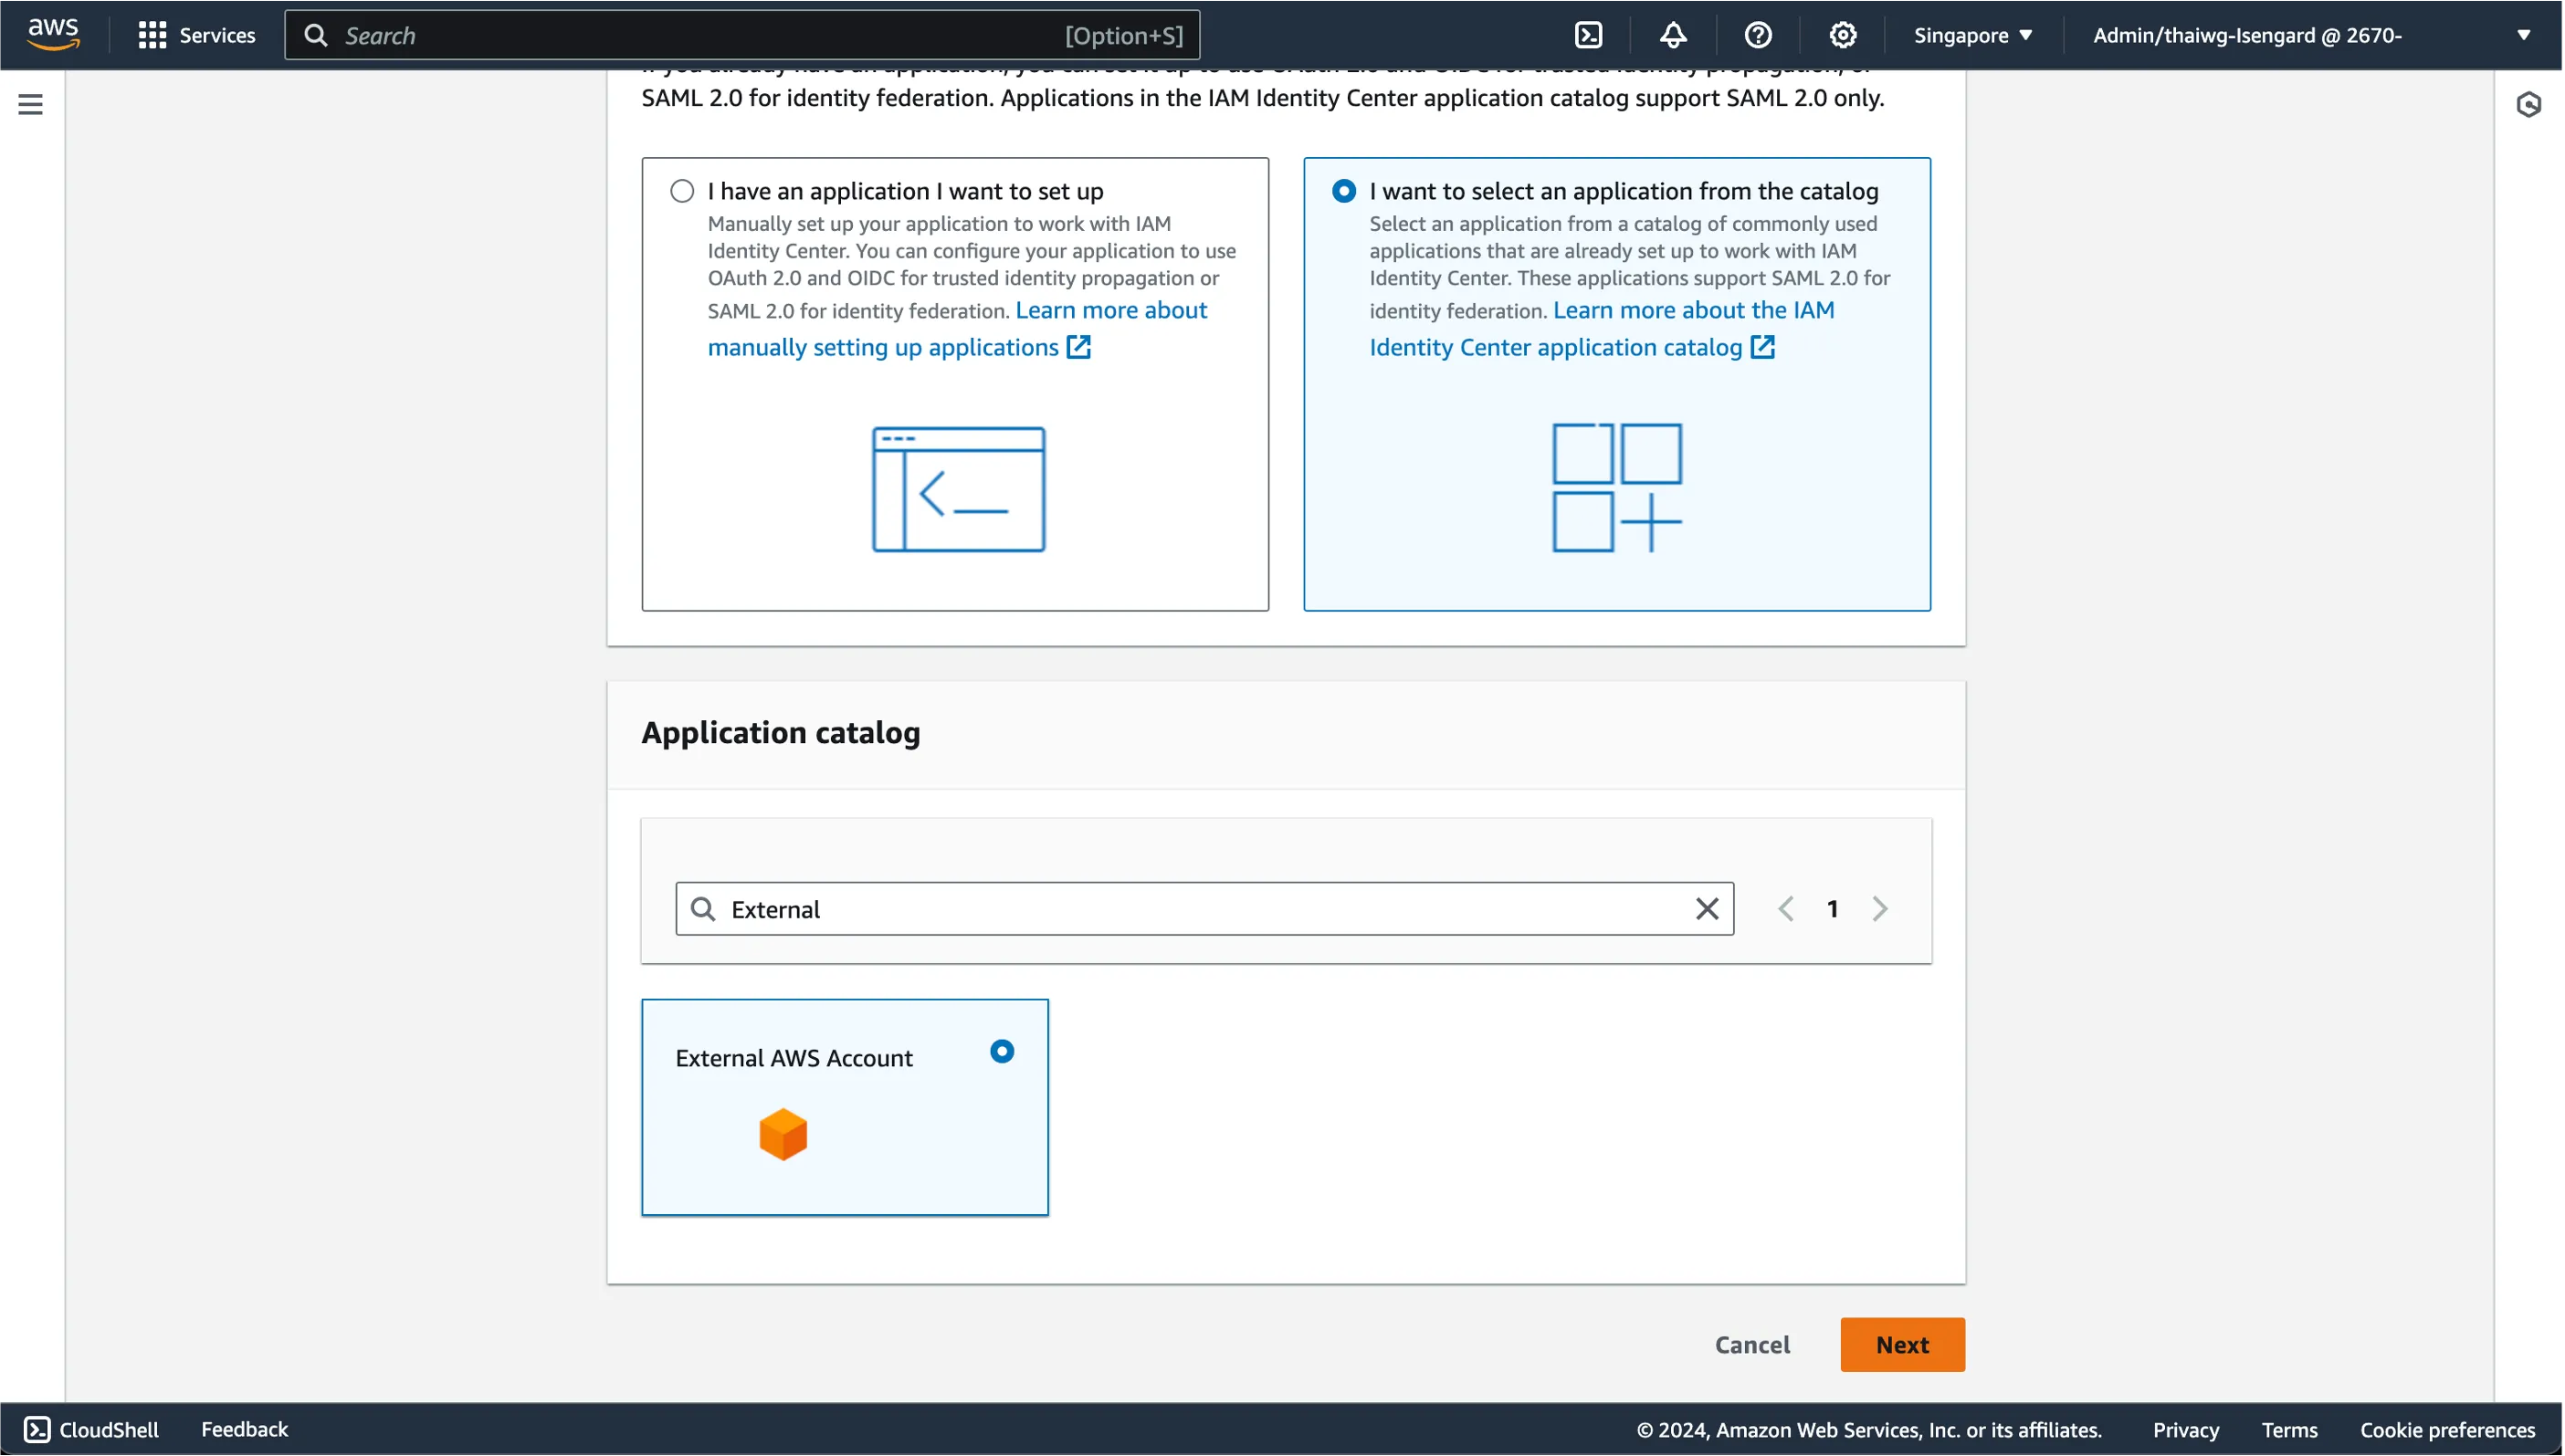
Select “I want to select an application from the catalog”.
In the search bar, type "External AWS Account". Select it and click Next.
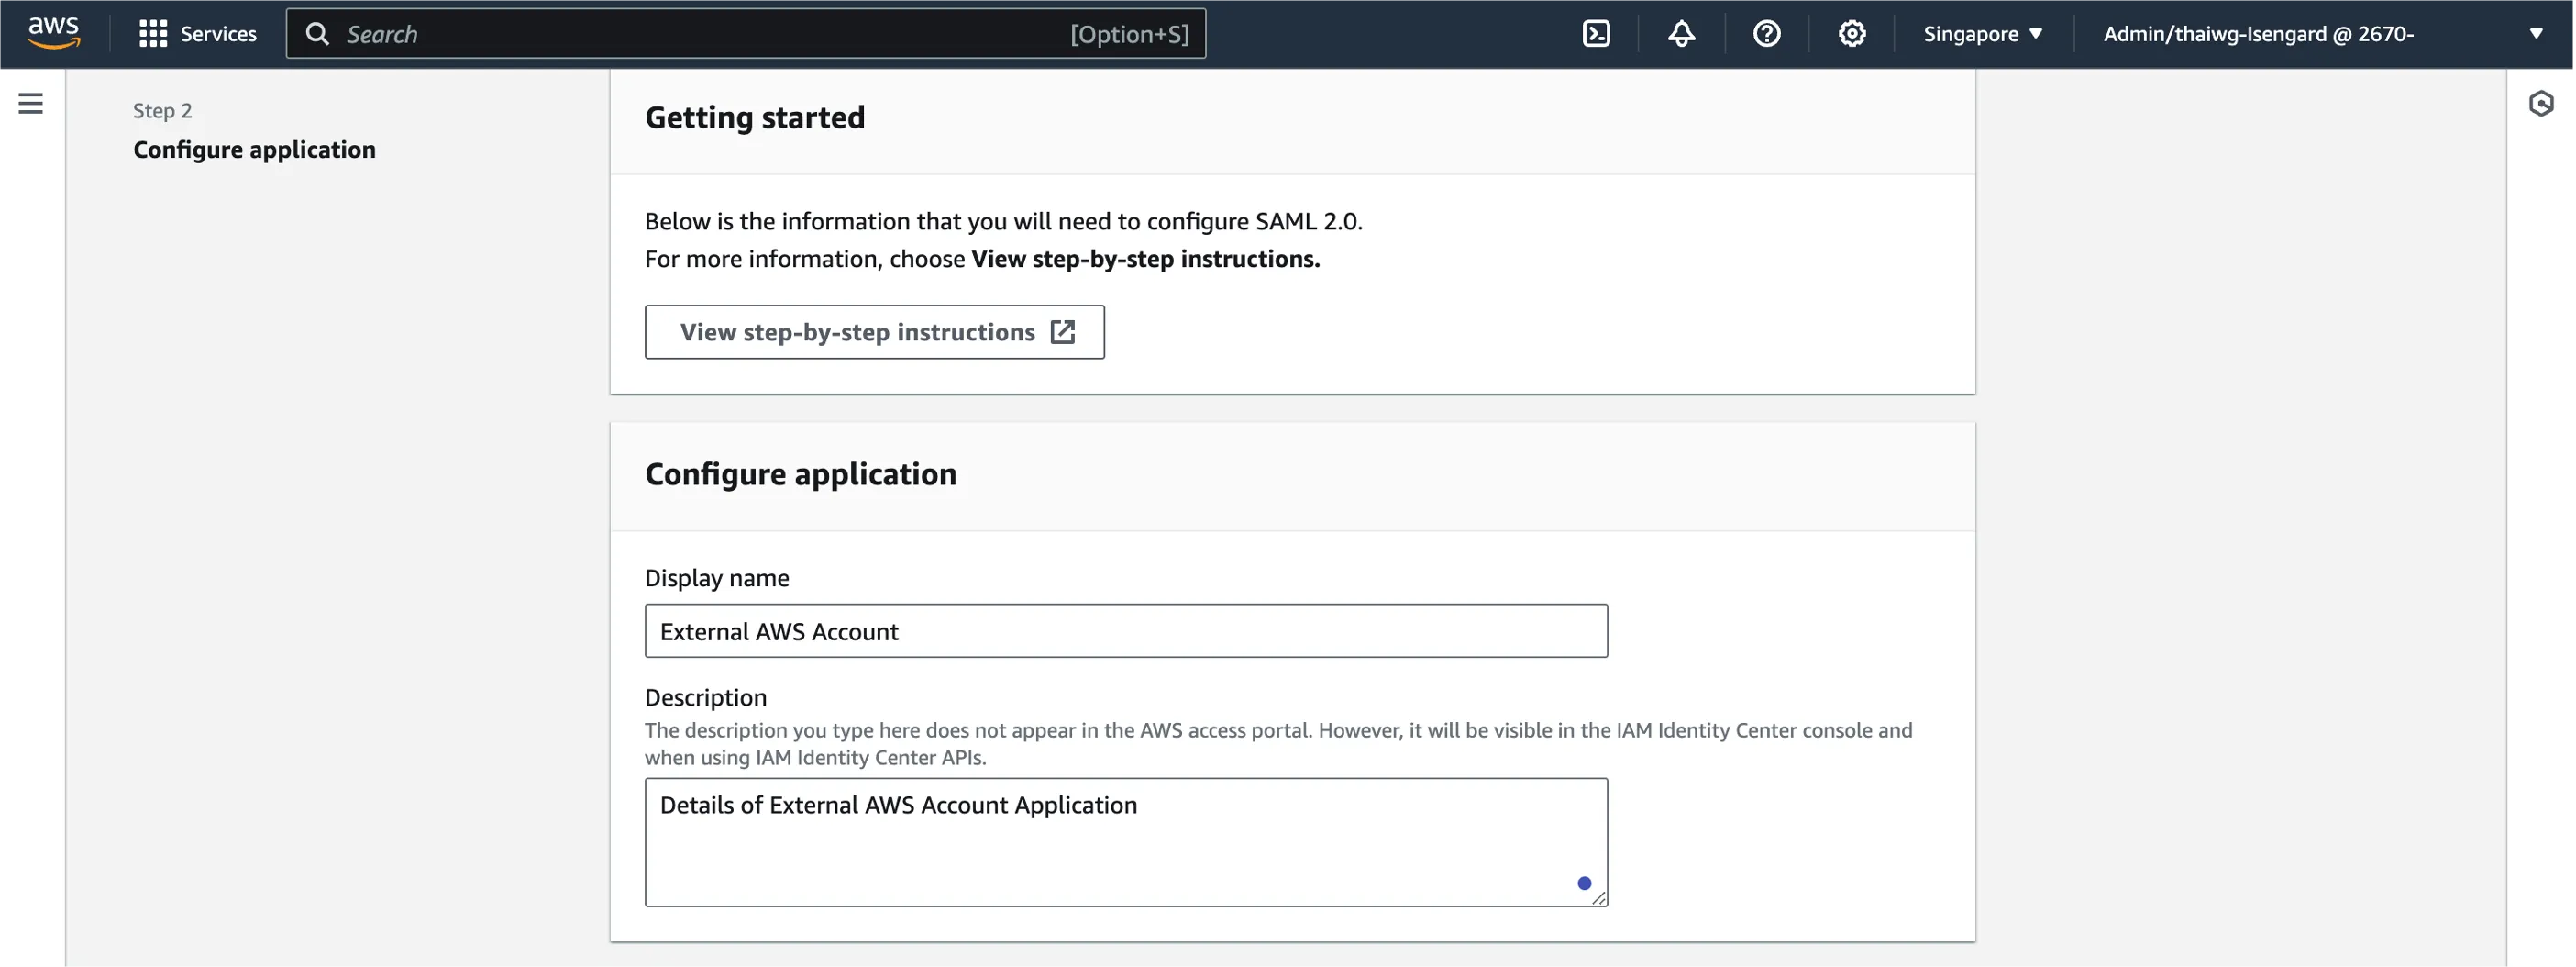
In the next page, Provide a Display name to identify the external AWS account and a proper description associated with it.
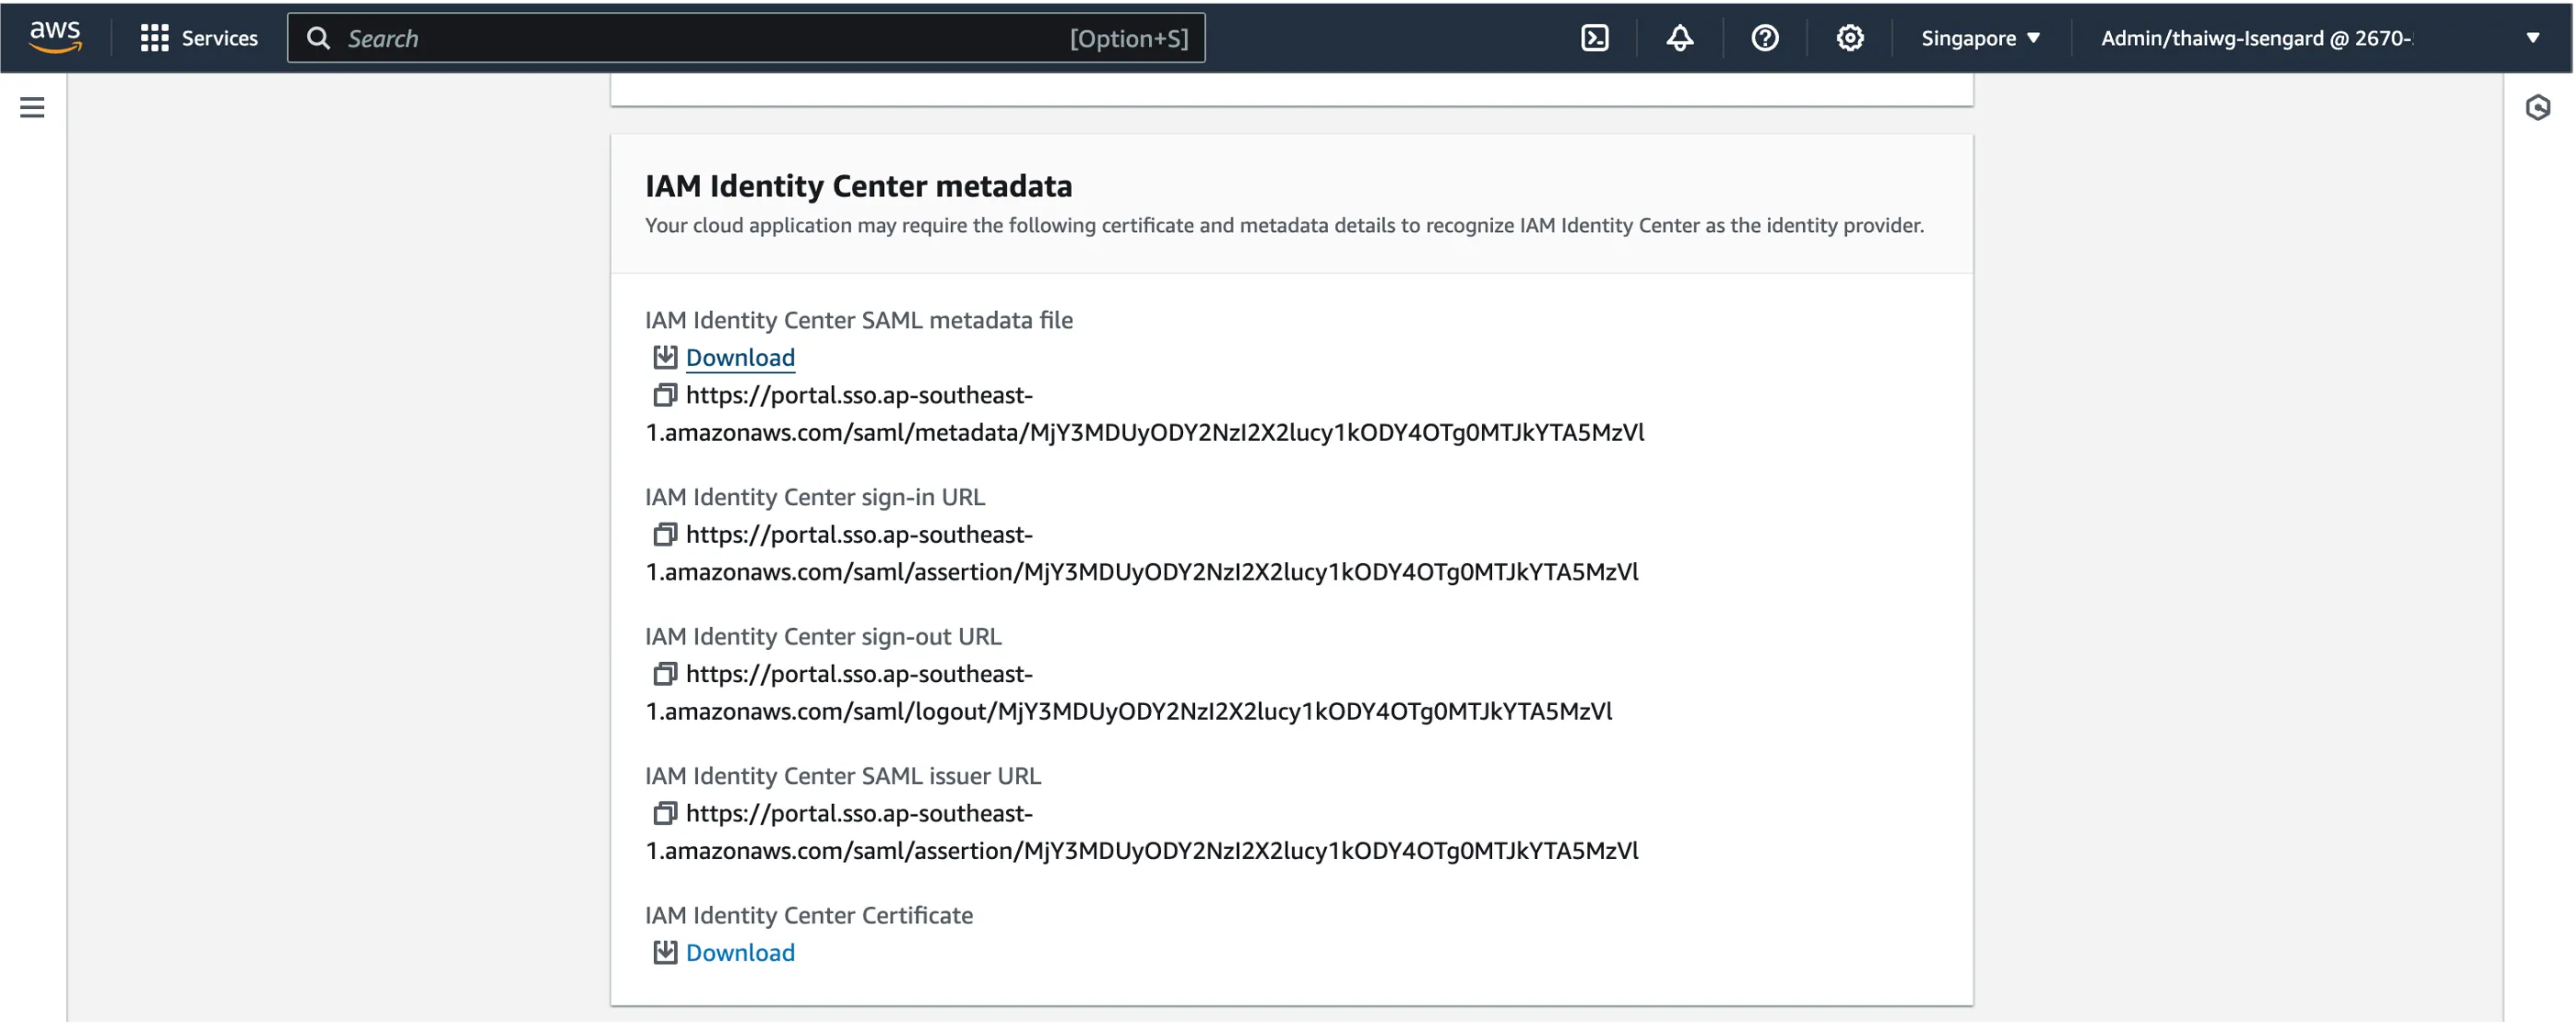
Scroll down to IAM Identity Center meta data and download the IAM Identity Center SAML metadata.
Leave the remaining parameters default and click Submit.
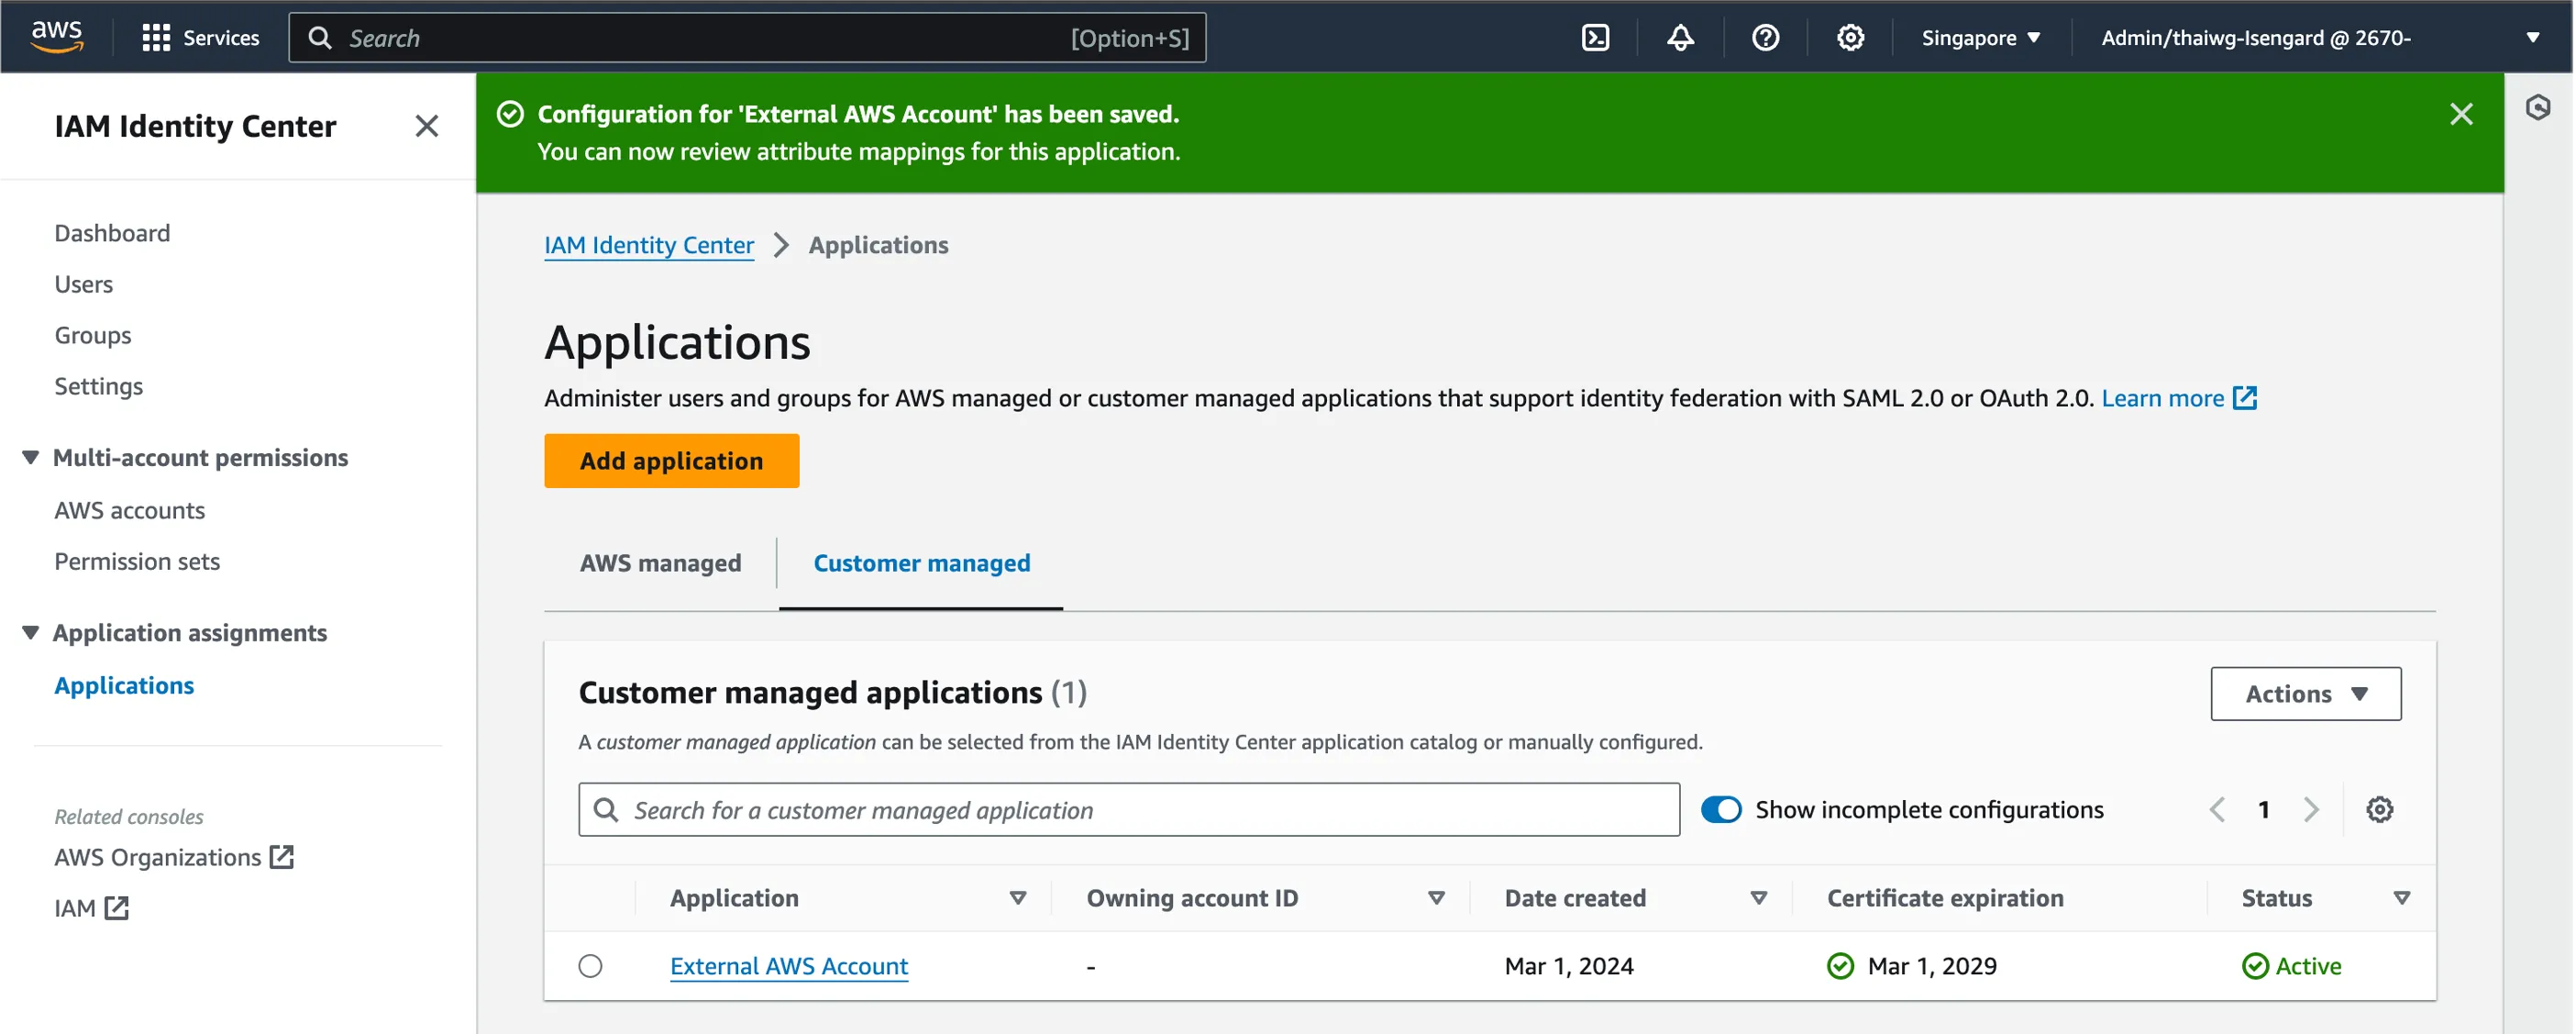
You should see your newly created application show up under the Customer managed tab in your IAM Identity Center console page.
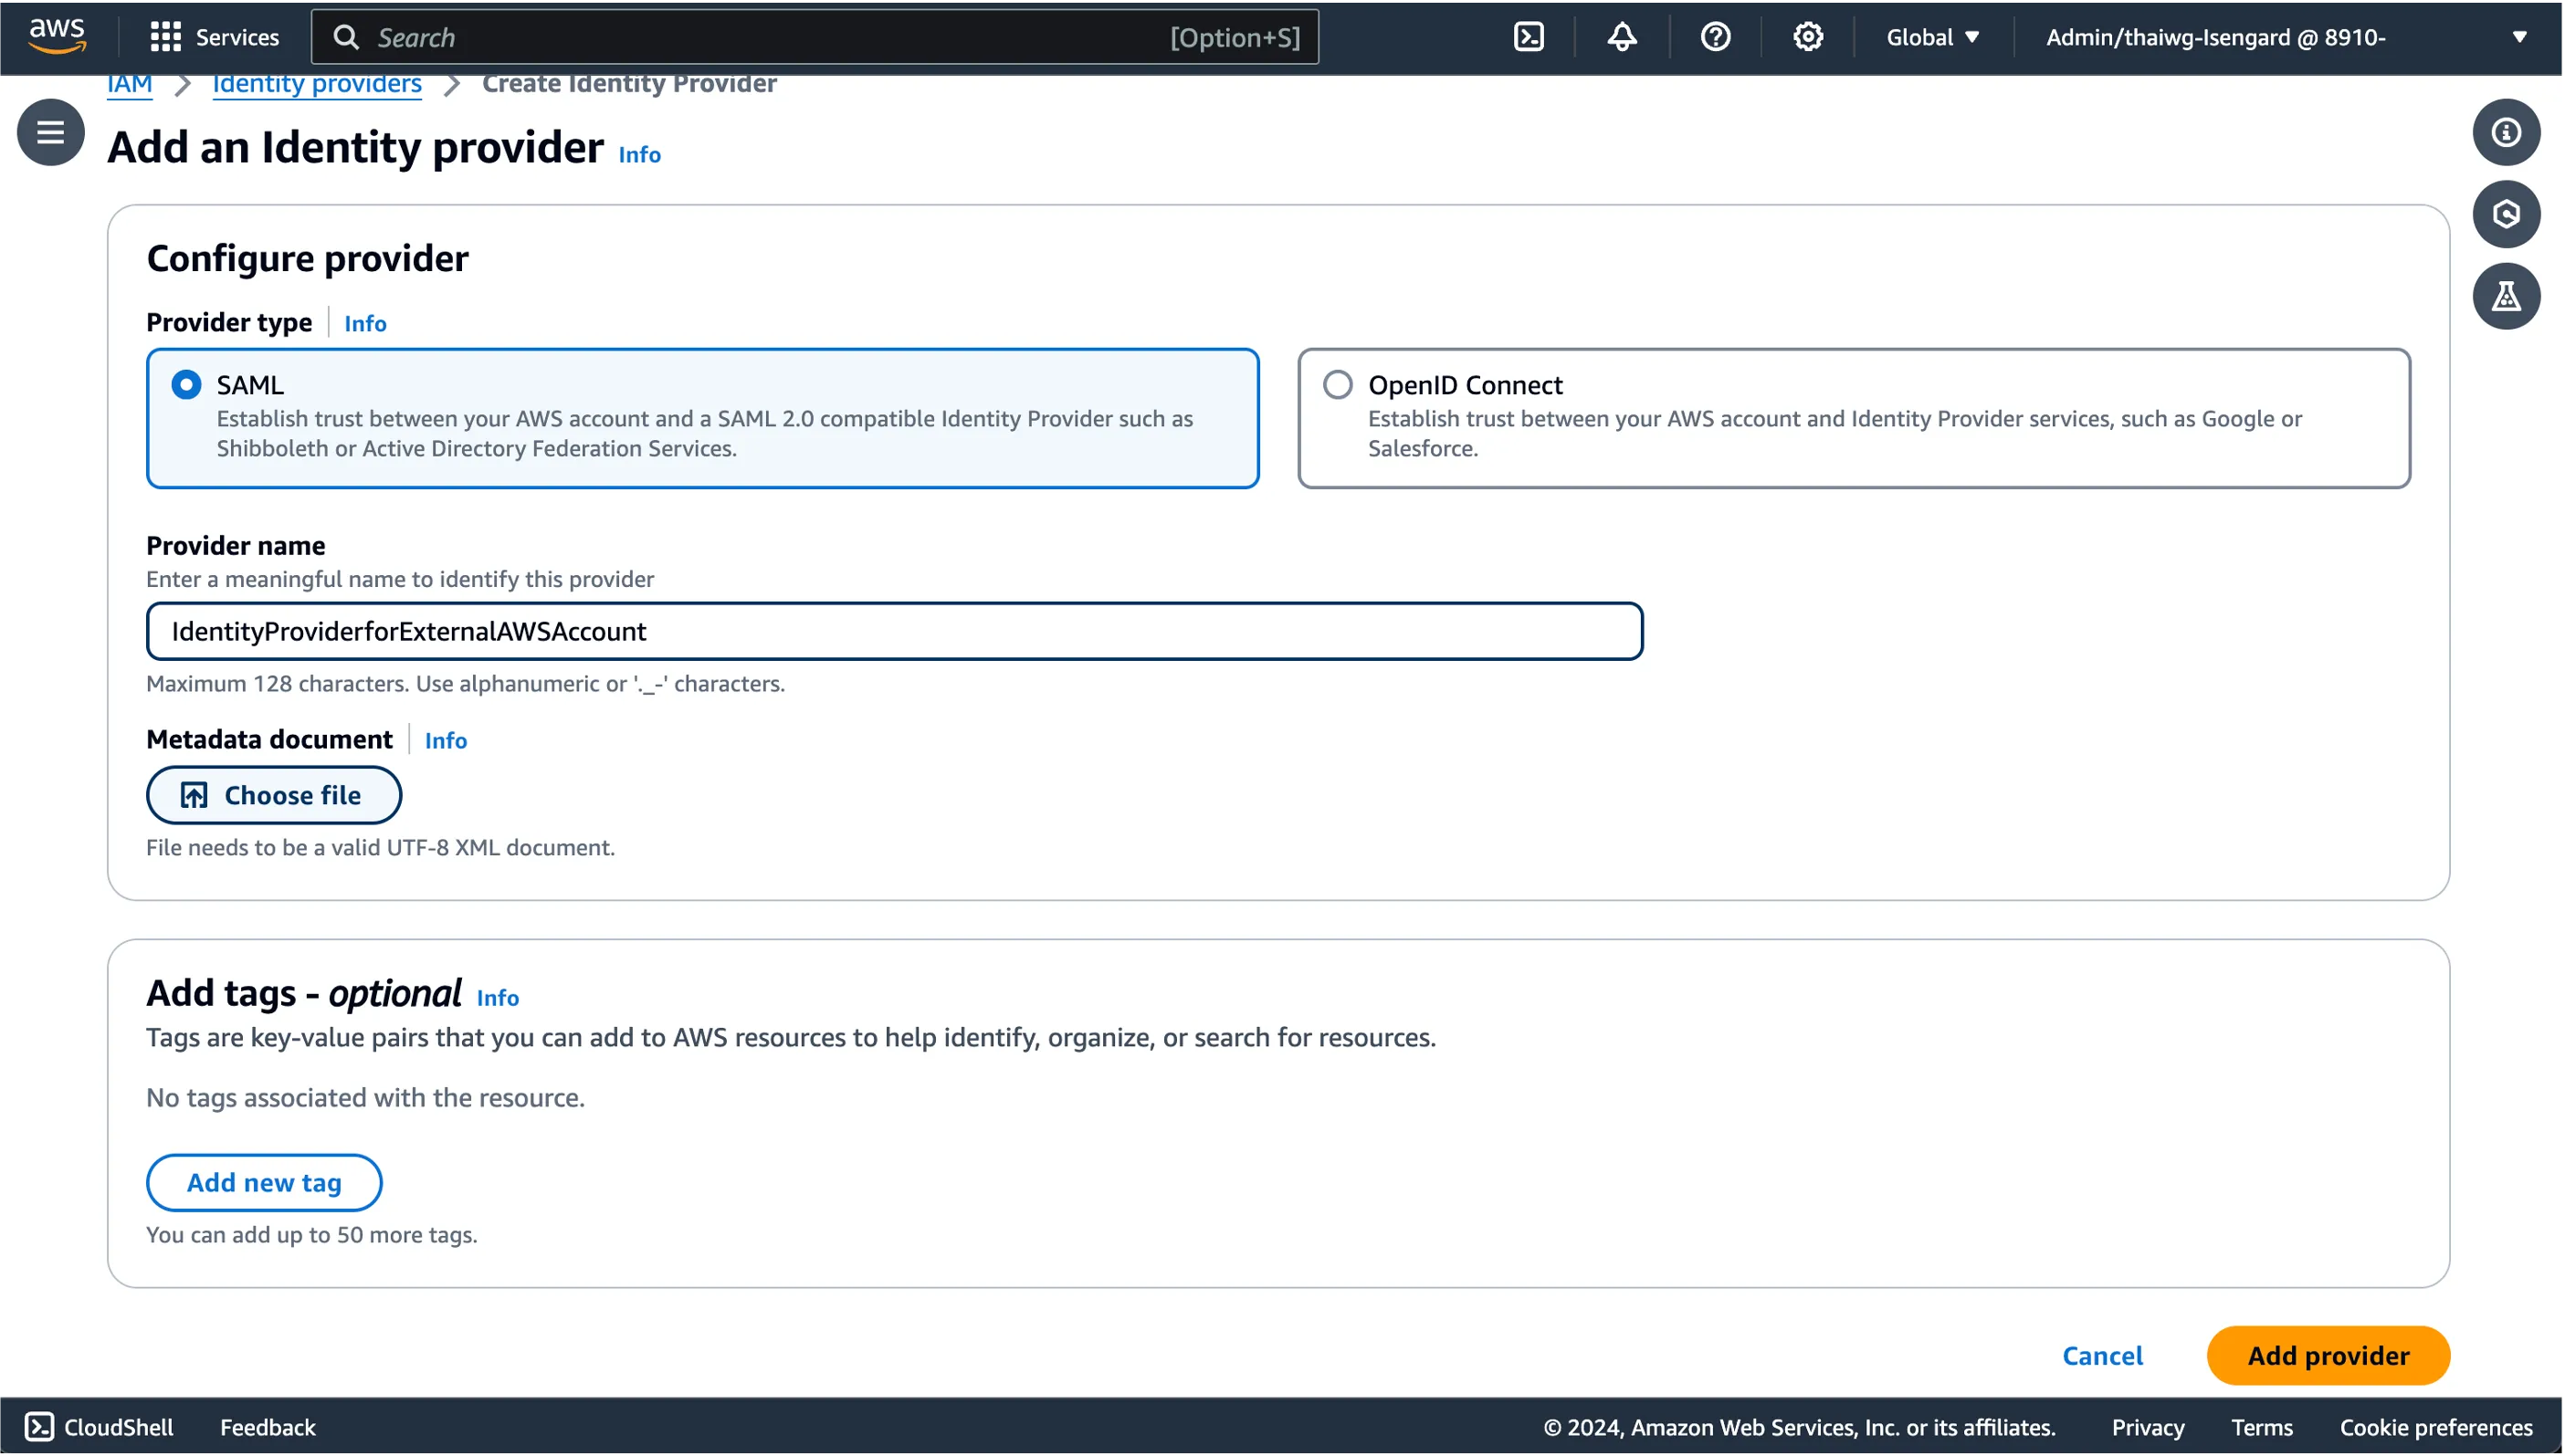
Step 2: Create a SAML Identity Provider in external AWS account
Now, we are going to set up a SAML Identity Provider in the external AWS account to be integrated.
Start by logging into the external AWS account, and head over to AWS IAM.
On the navigation pane, click Identity Provider, and select Add Provider.
Select SAML as the Provider type, and provide a Provider name. Take note of this name as we would need it later.
Upload the IAM Identity Center SAML metadata you downloaded from before by clicking Choose file.
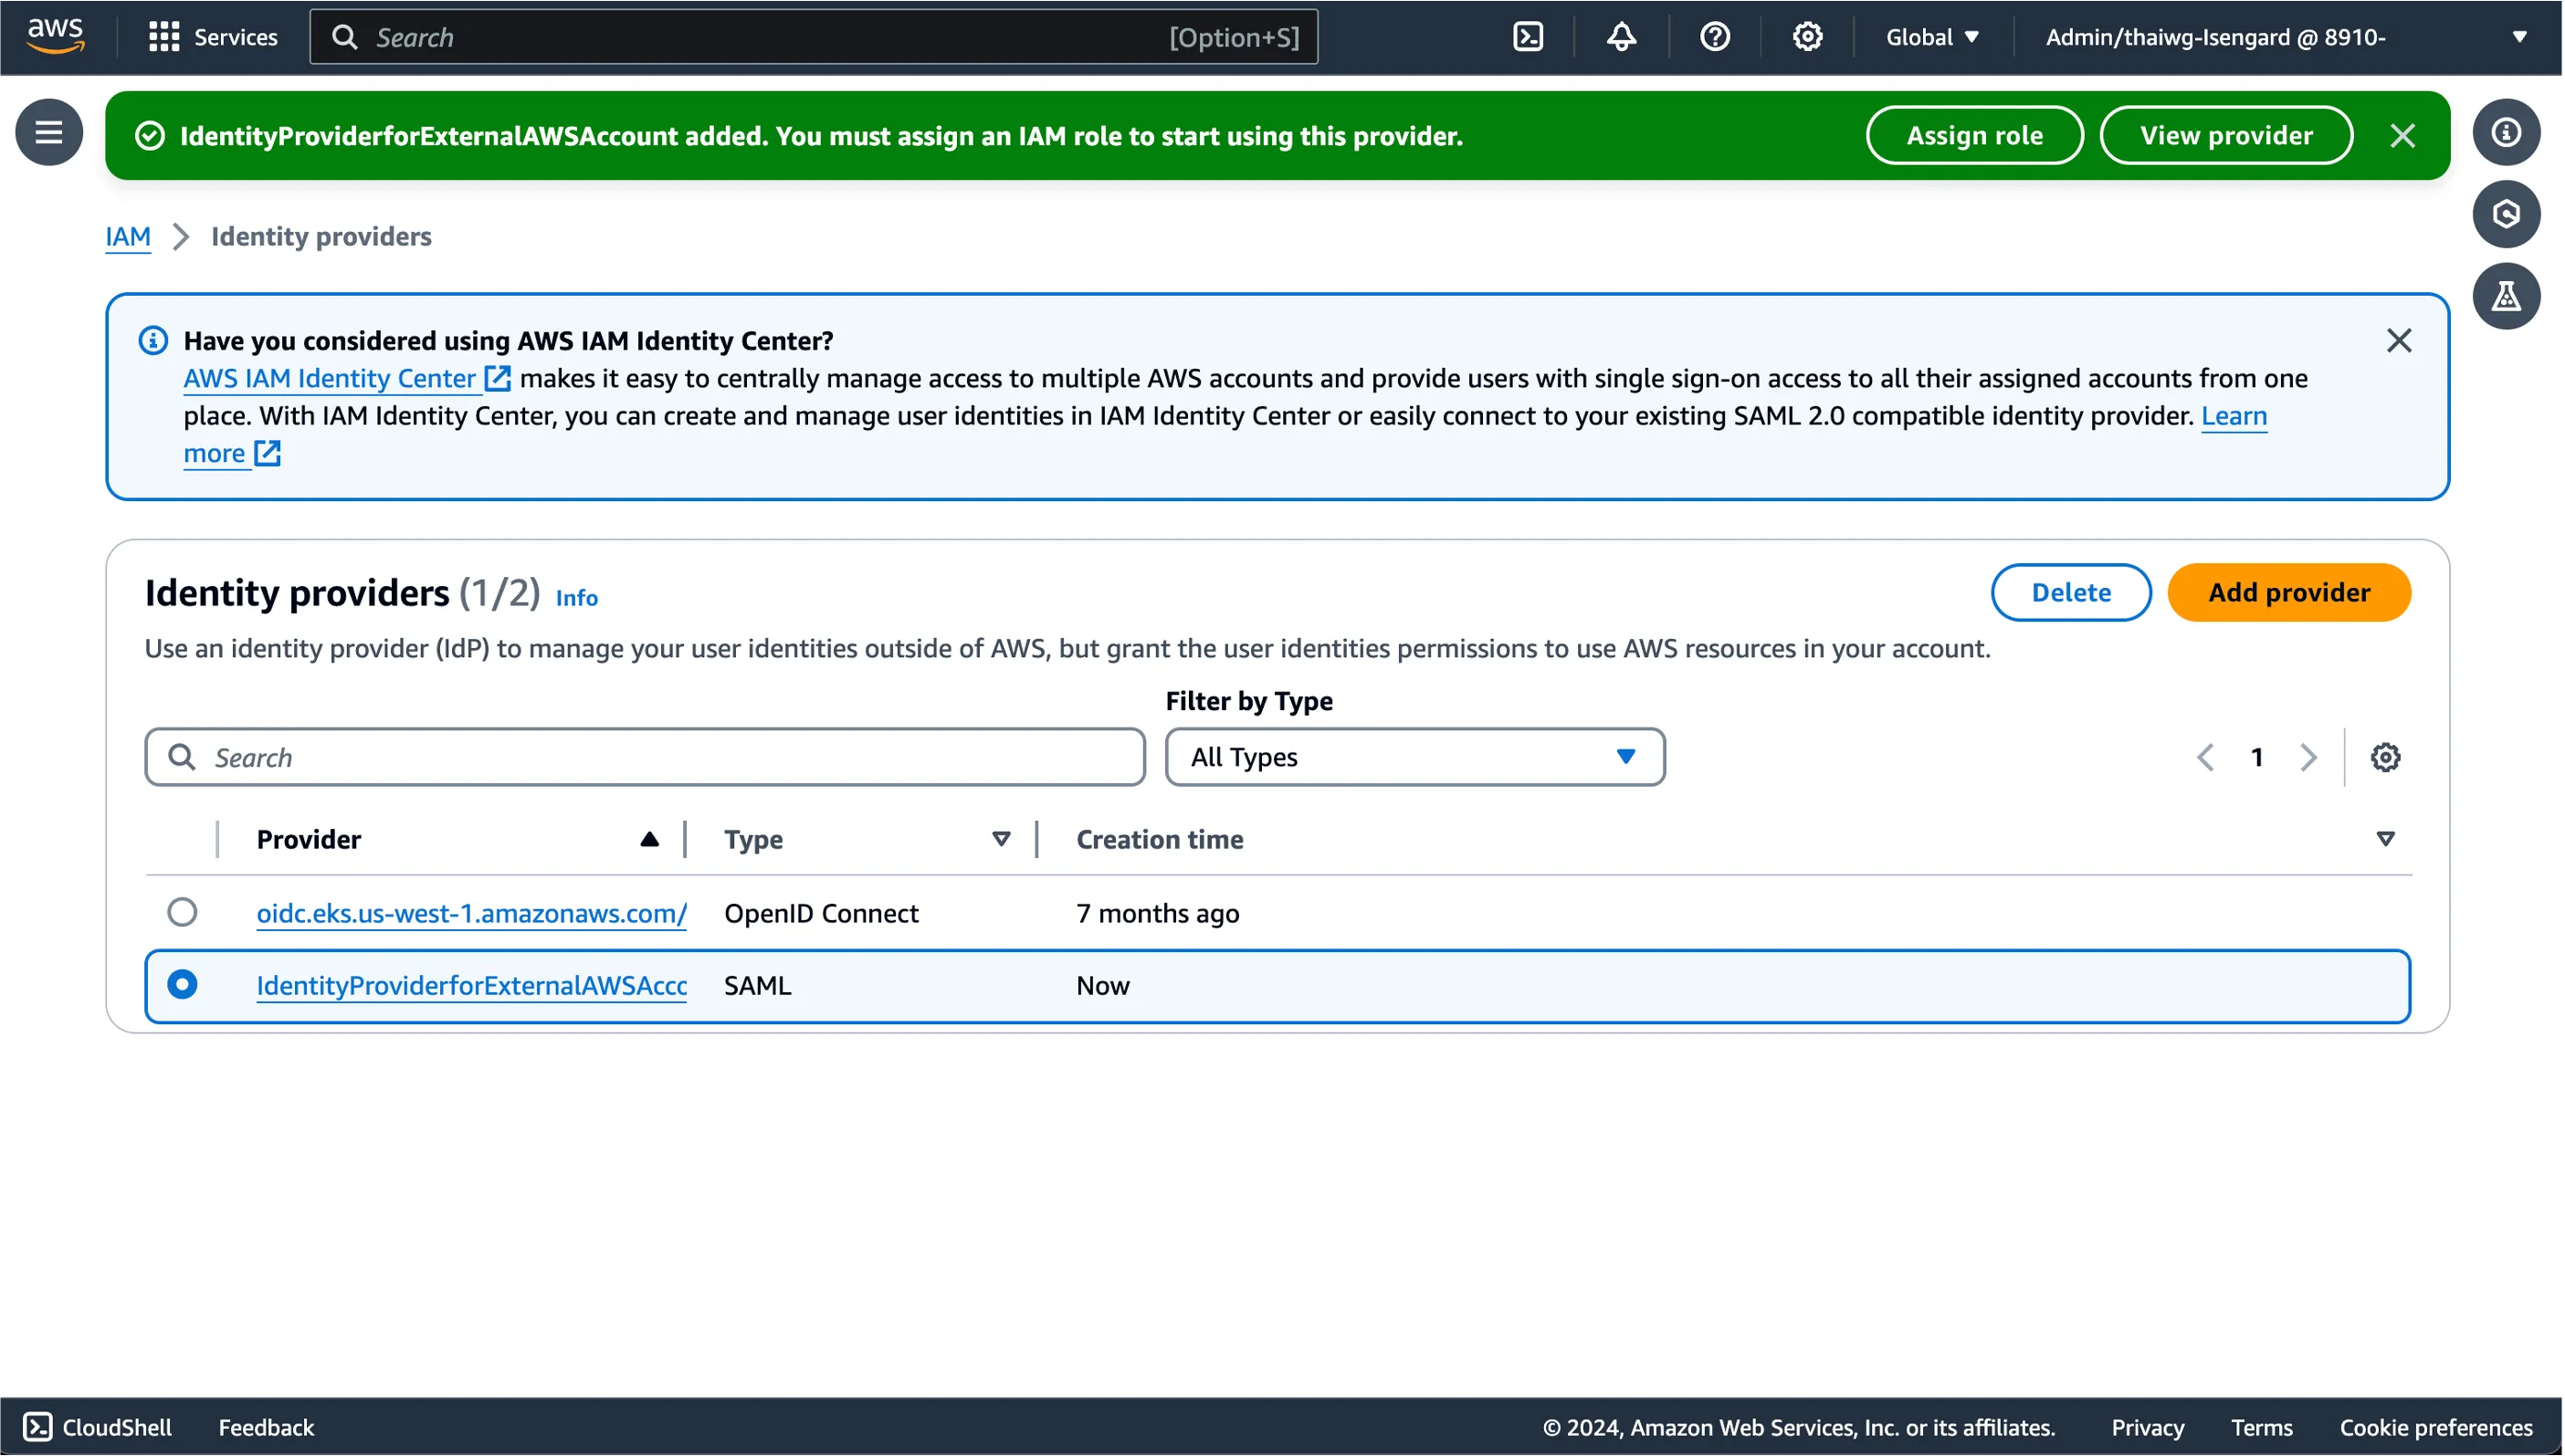
Once done, select Add provider.
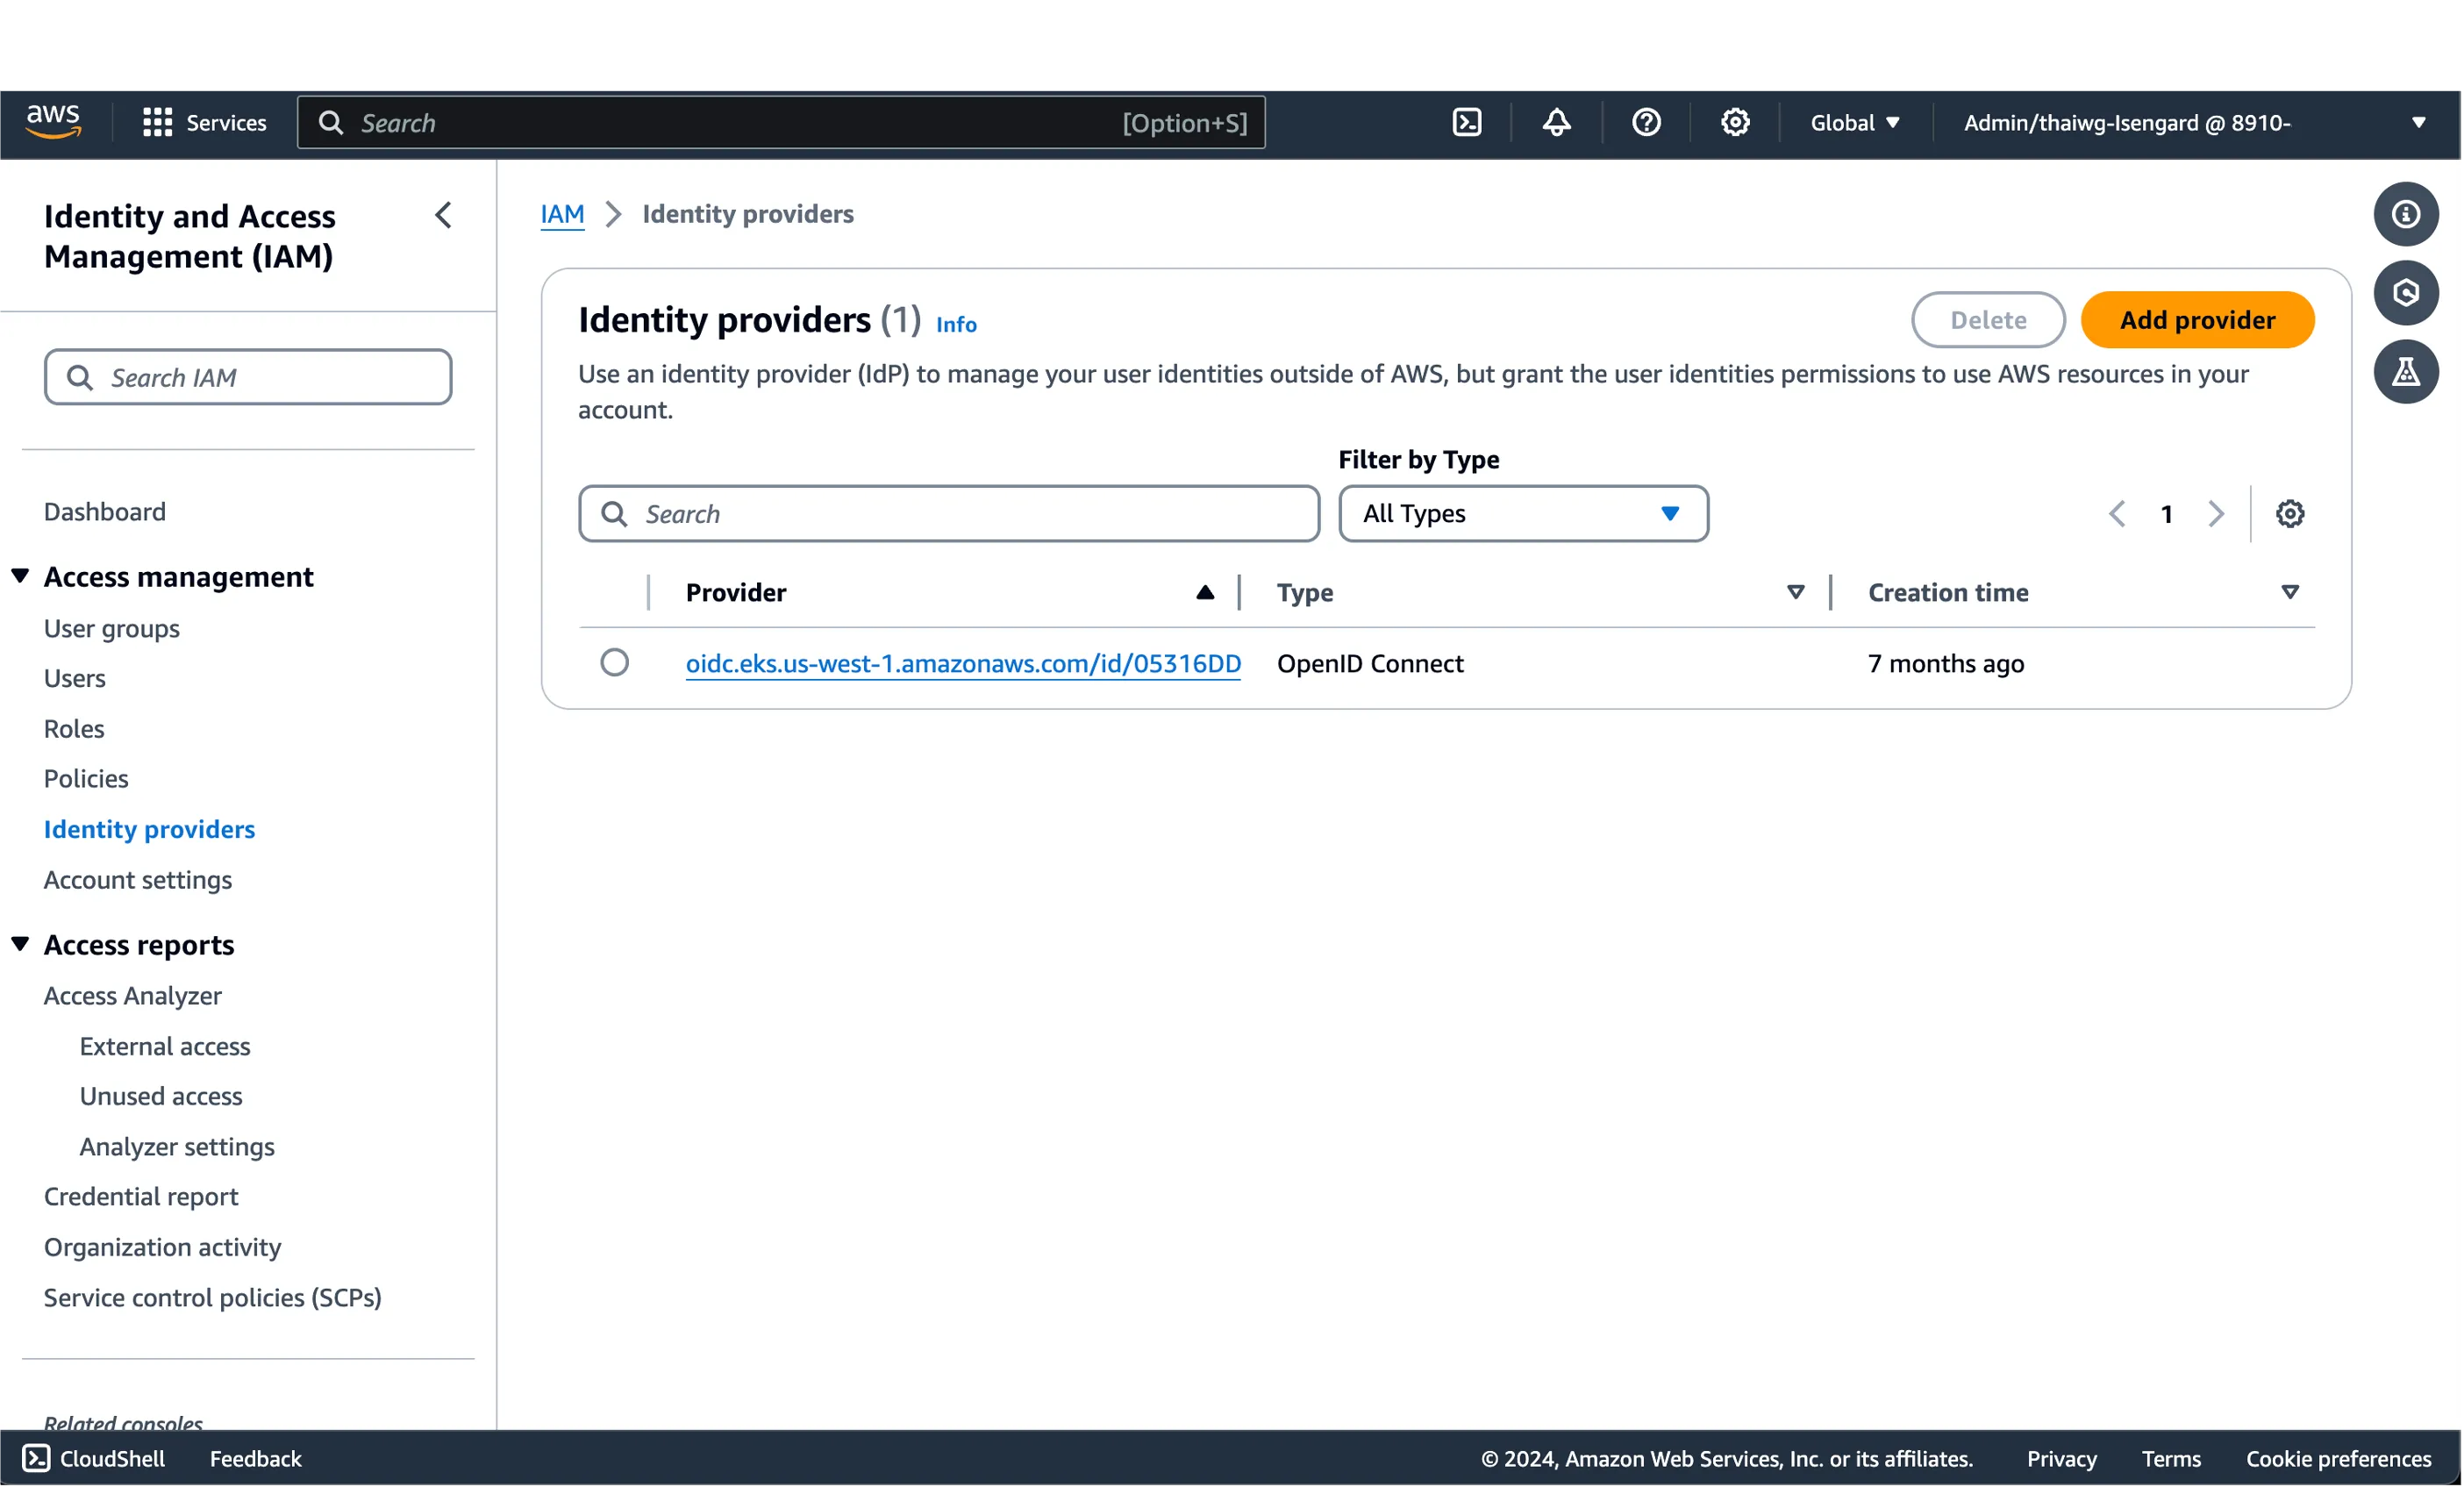
You should see your newly created SAML Identity Provider show up on your IAM dashboard.
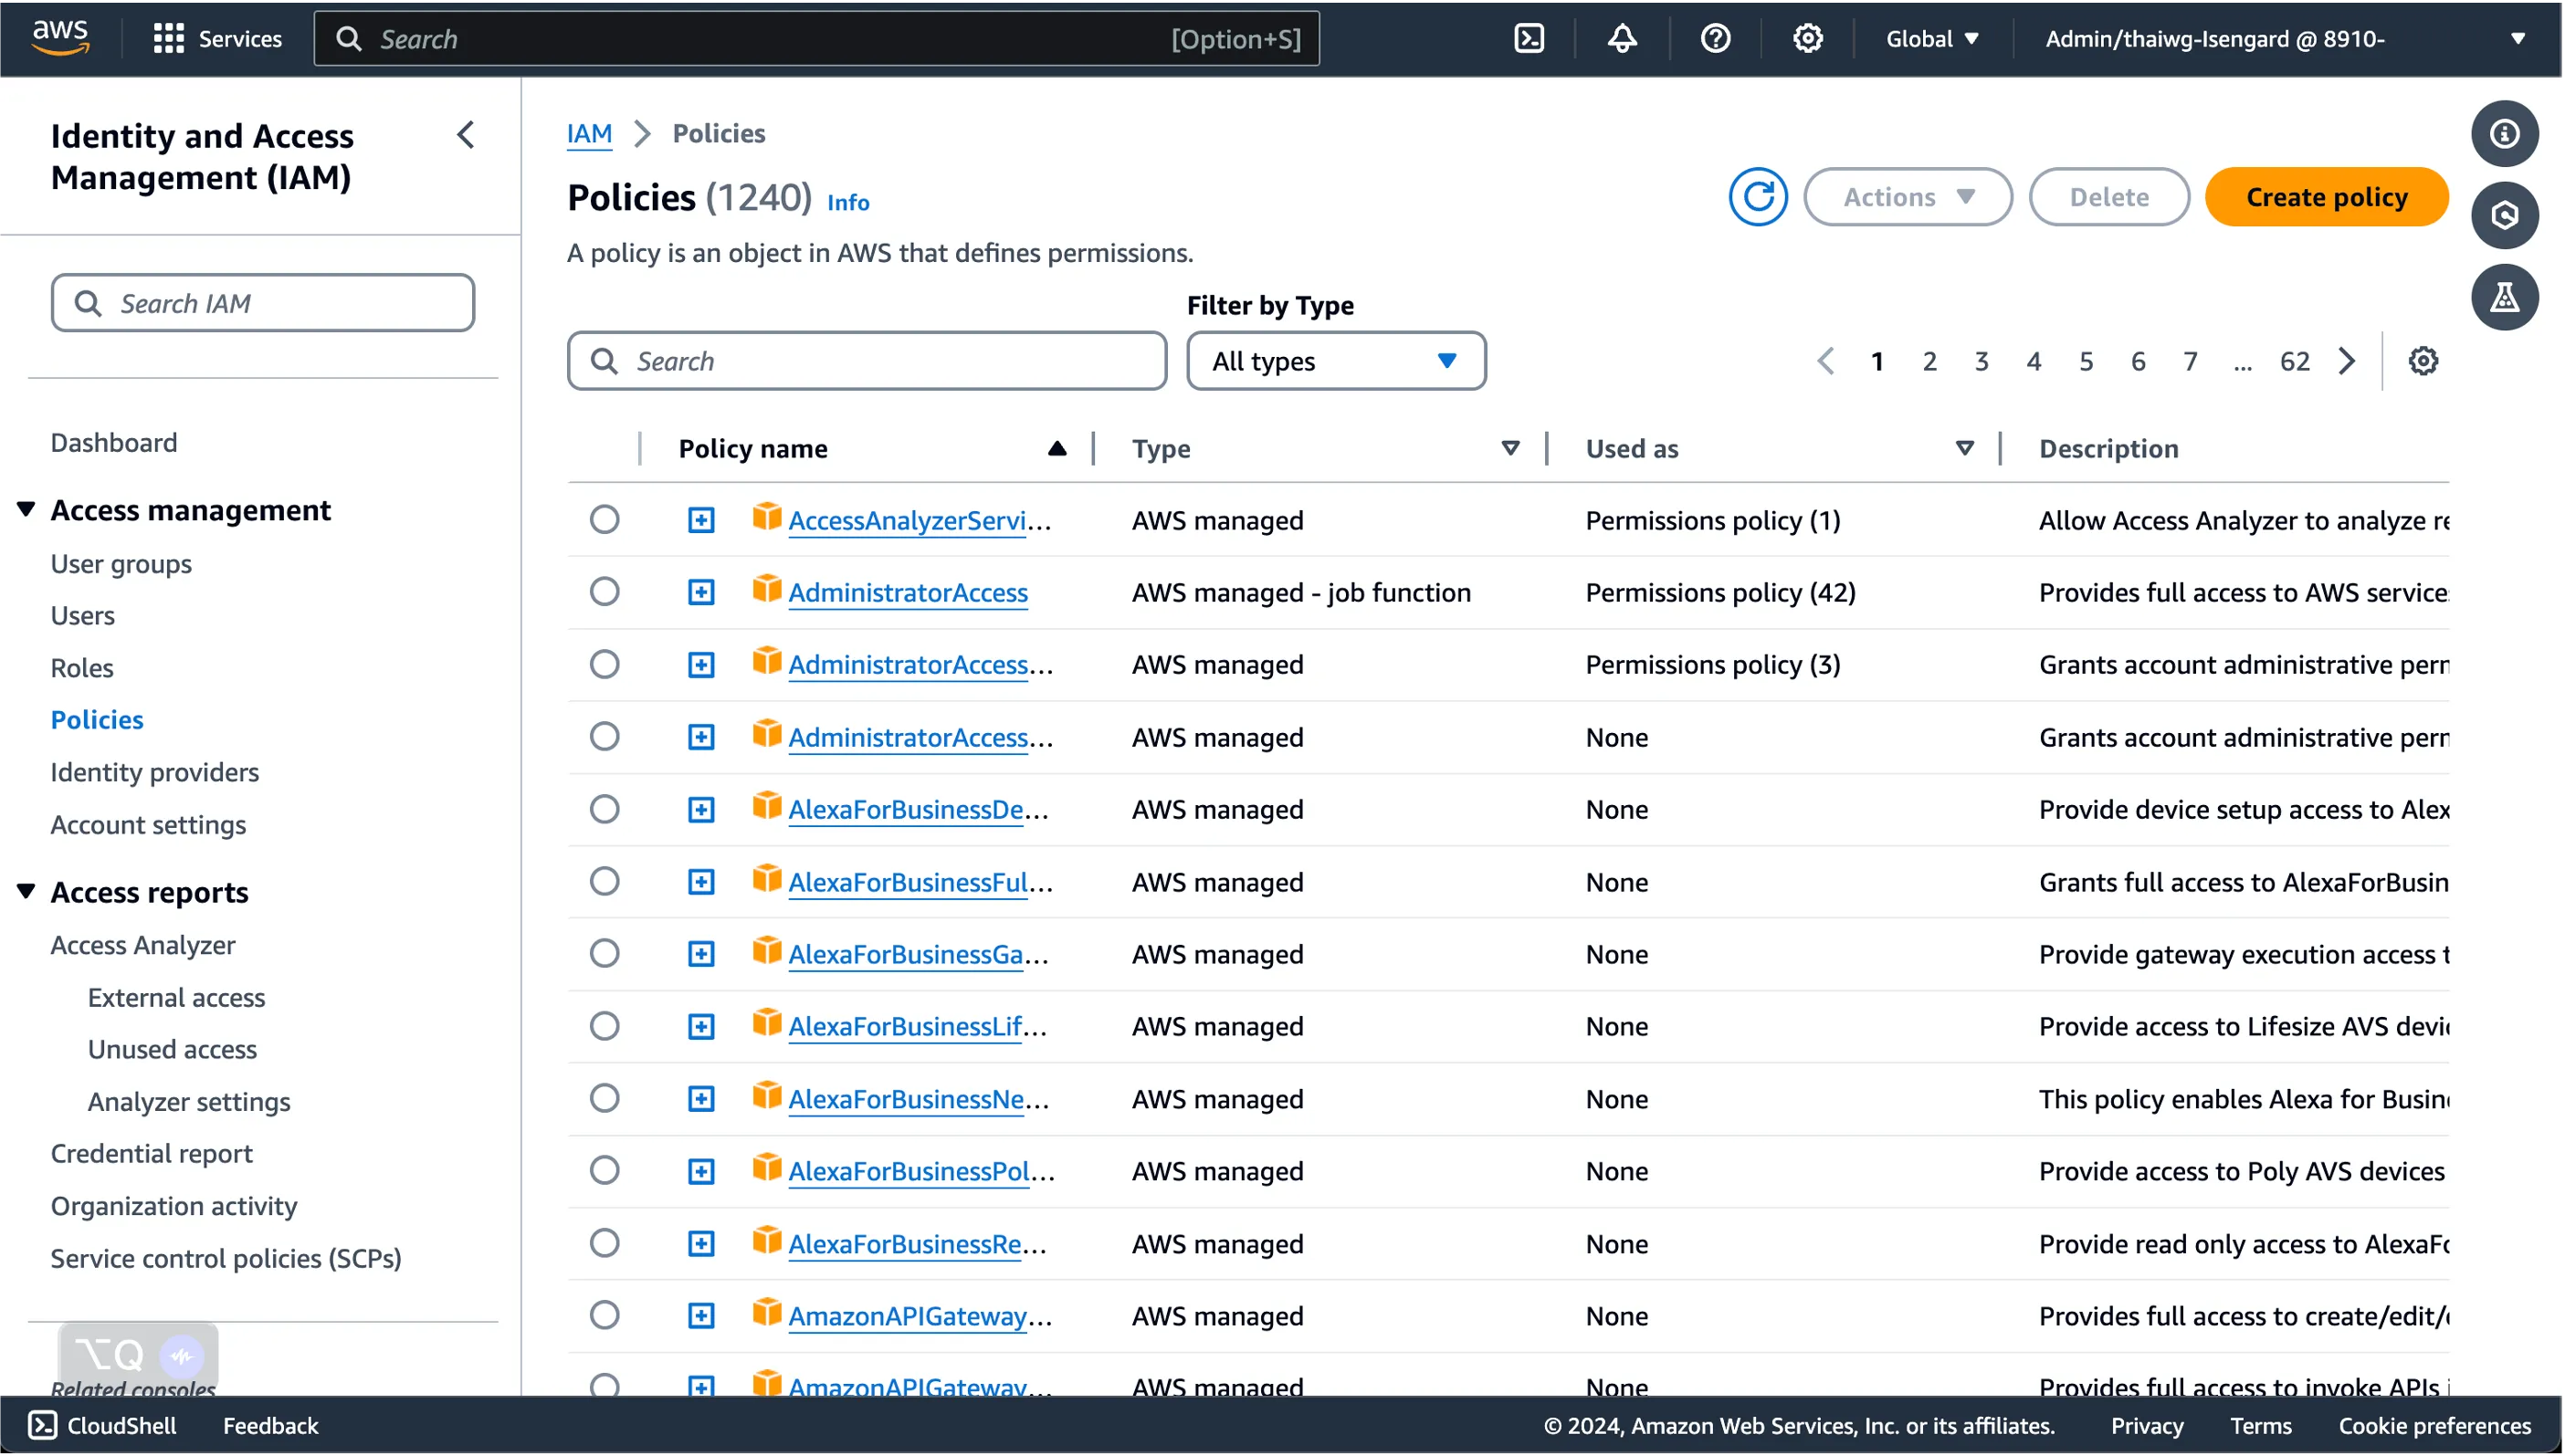
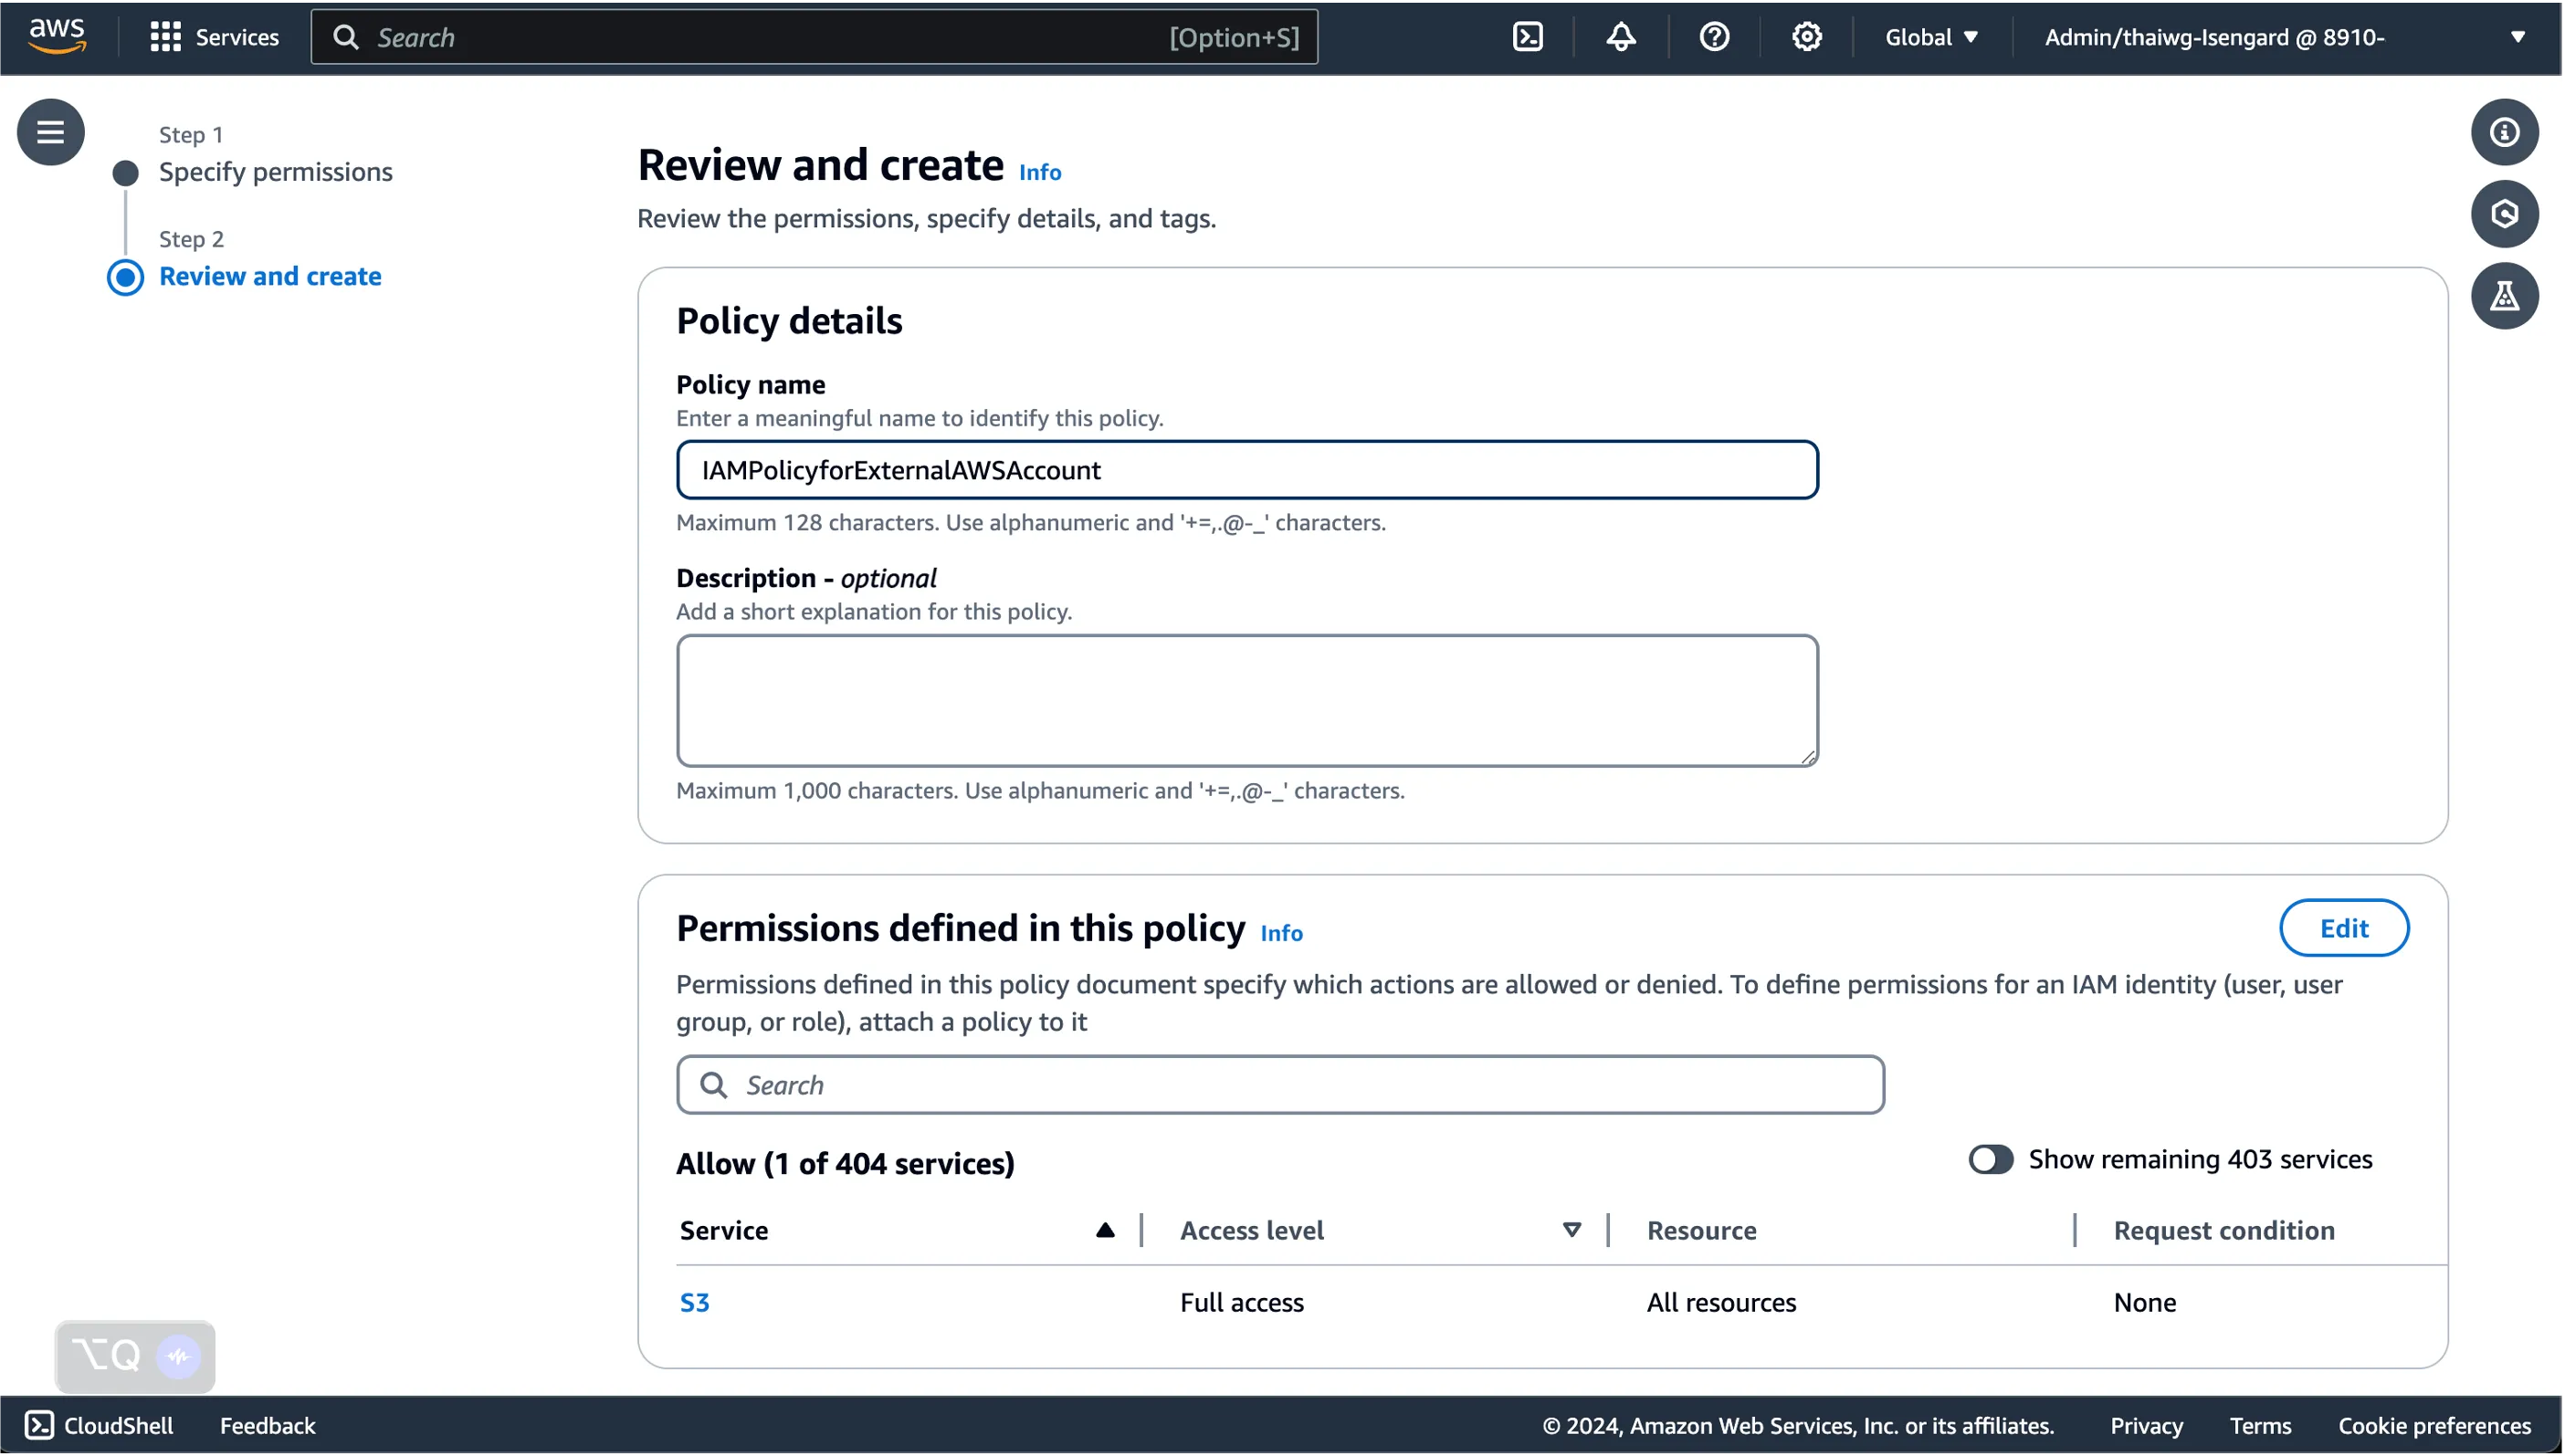
Step 3: Create an IAM Policy in external AWS account
Now that we have our SAML Identity Provider created, we will define permissions to resources in the external AWS account by creating an IAM Policy.
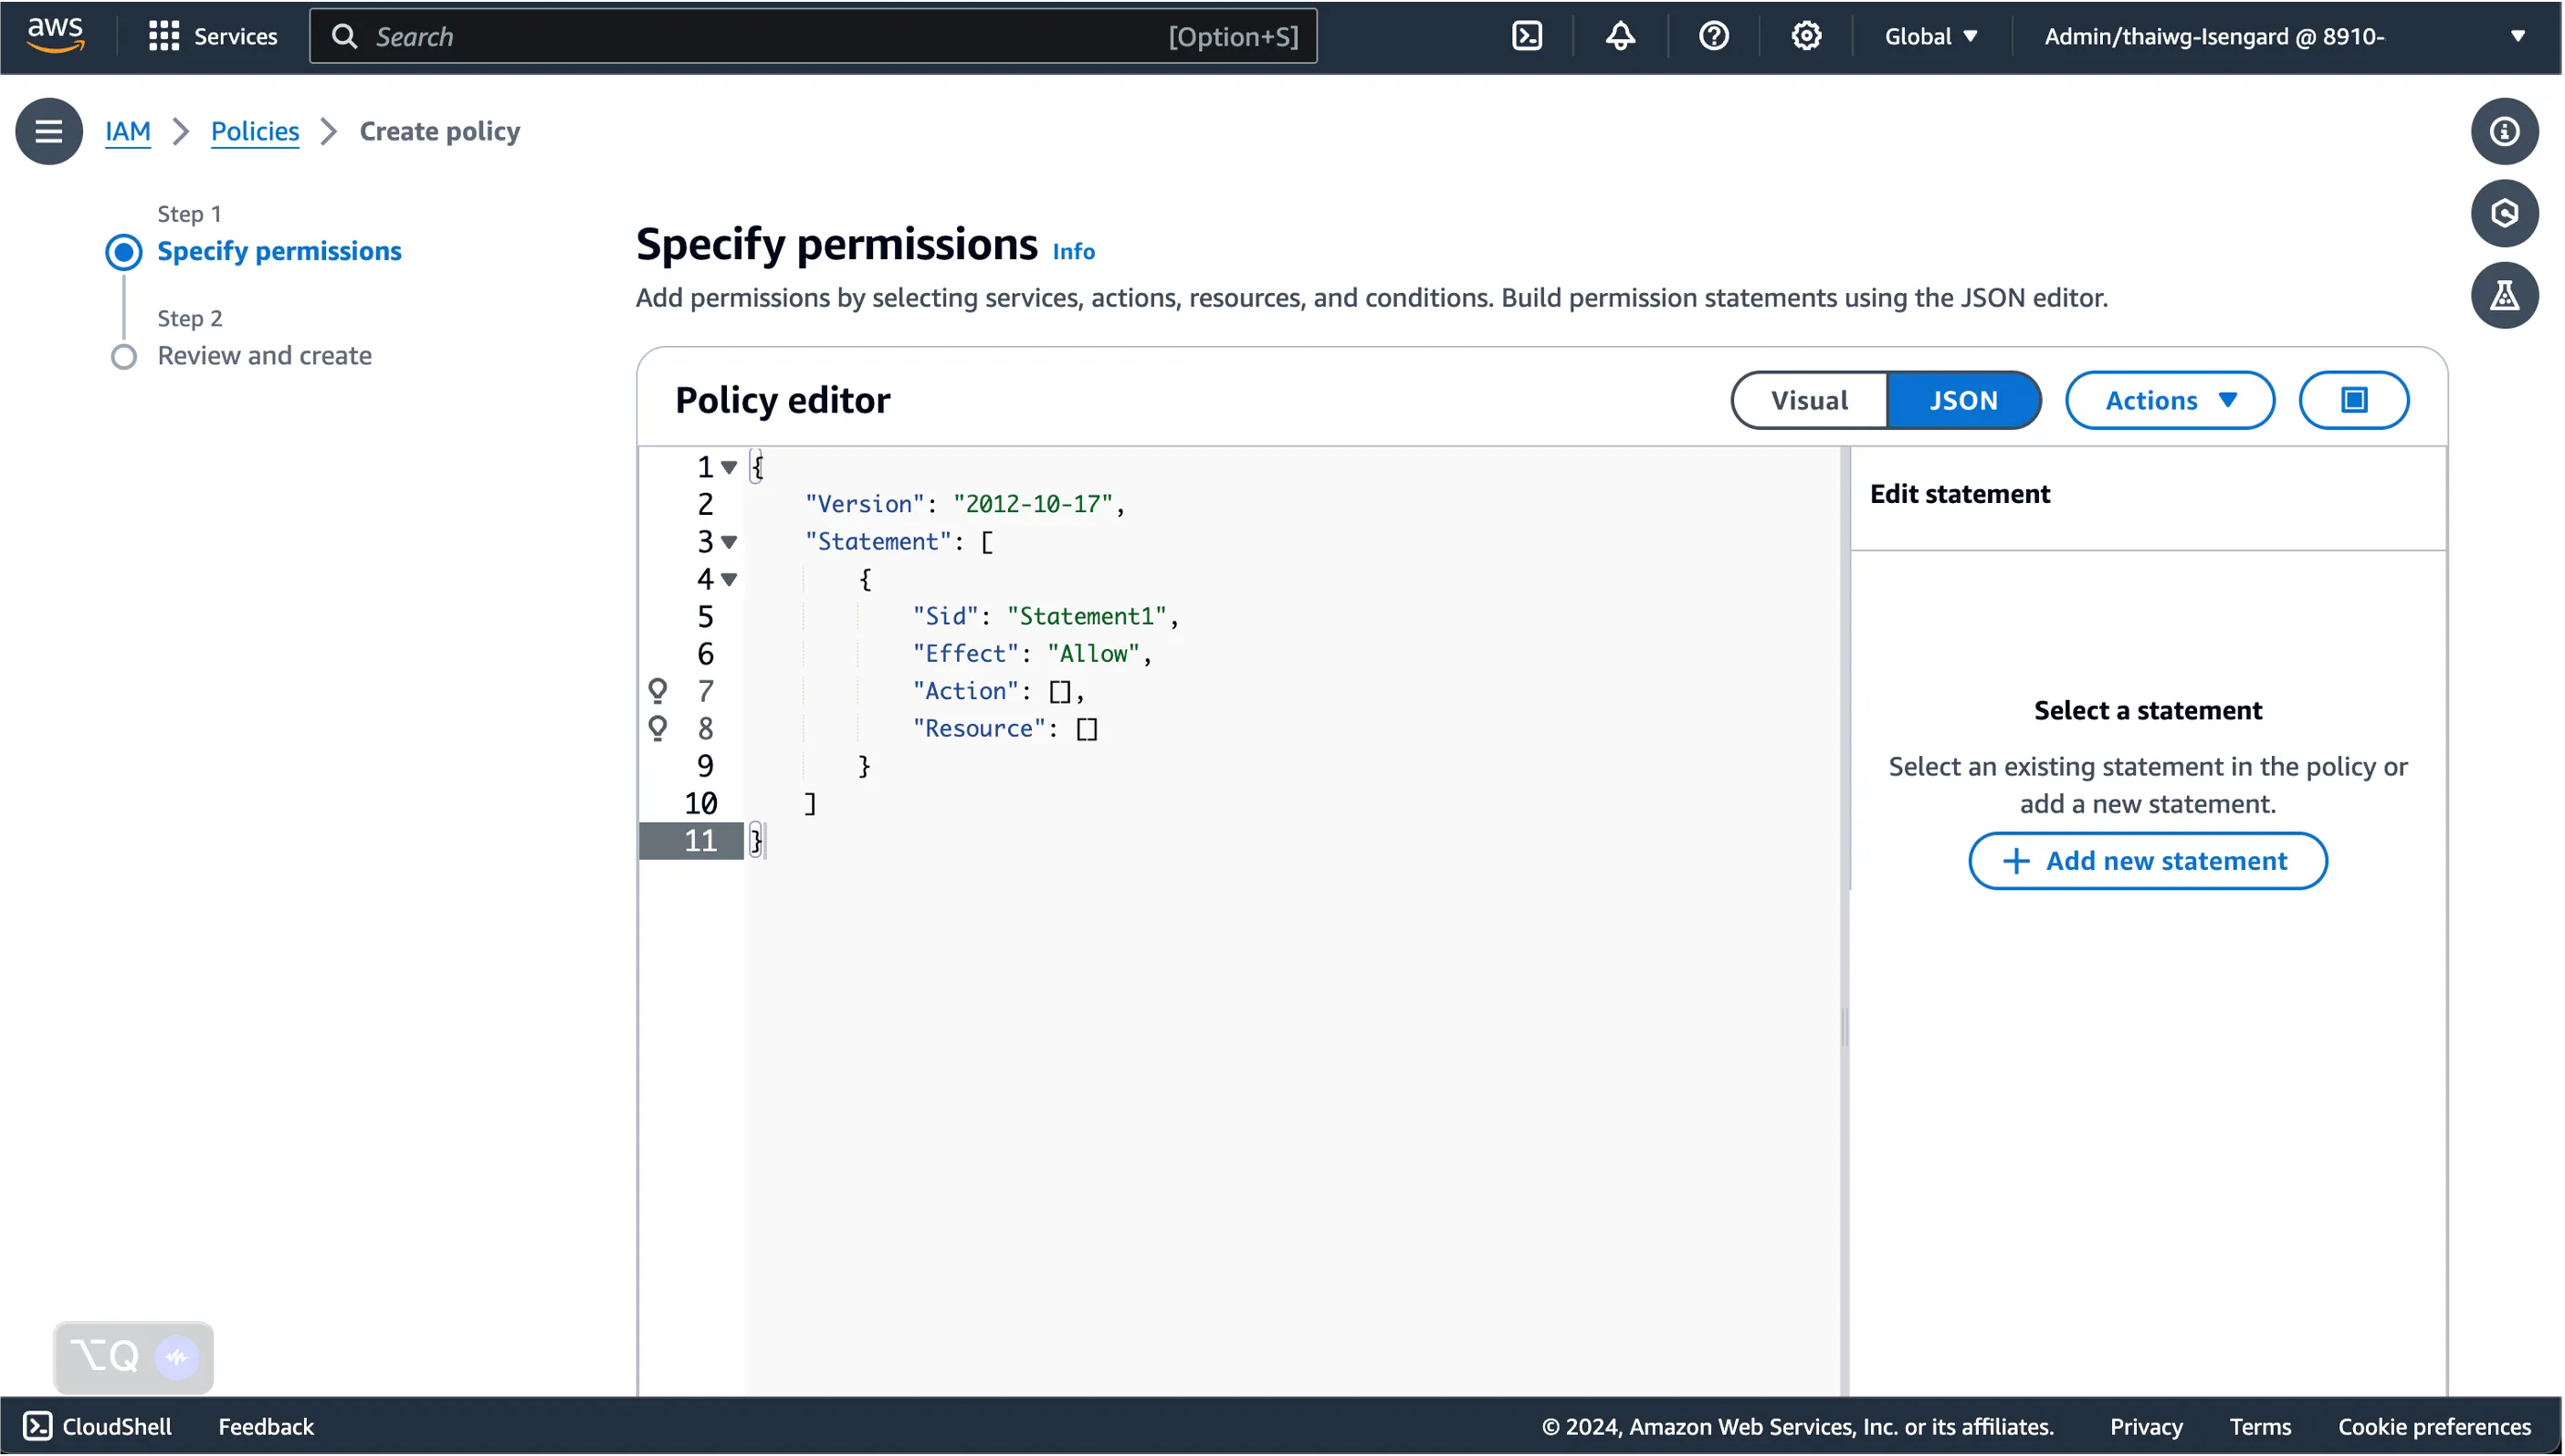
On the external AWS account, go to IAM, click on Policies on the navigation panel and click Create policy.
Here, we can start defining fine-grained permissions to resources we want to grant to users accessing this external AWS account from our primary AWS account.
Adhering to the principle of least privilege, we should only provide permissions to the smallest set of actions necessary to fulfill a specific task. Therefore, think deeply about which actions should be granted to which resources by defining a proper IAM policy.
Once done, click Next, and provide a name for the policy so we can identify it later.
Select Create policy.
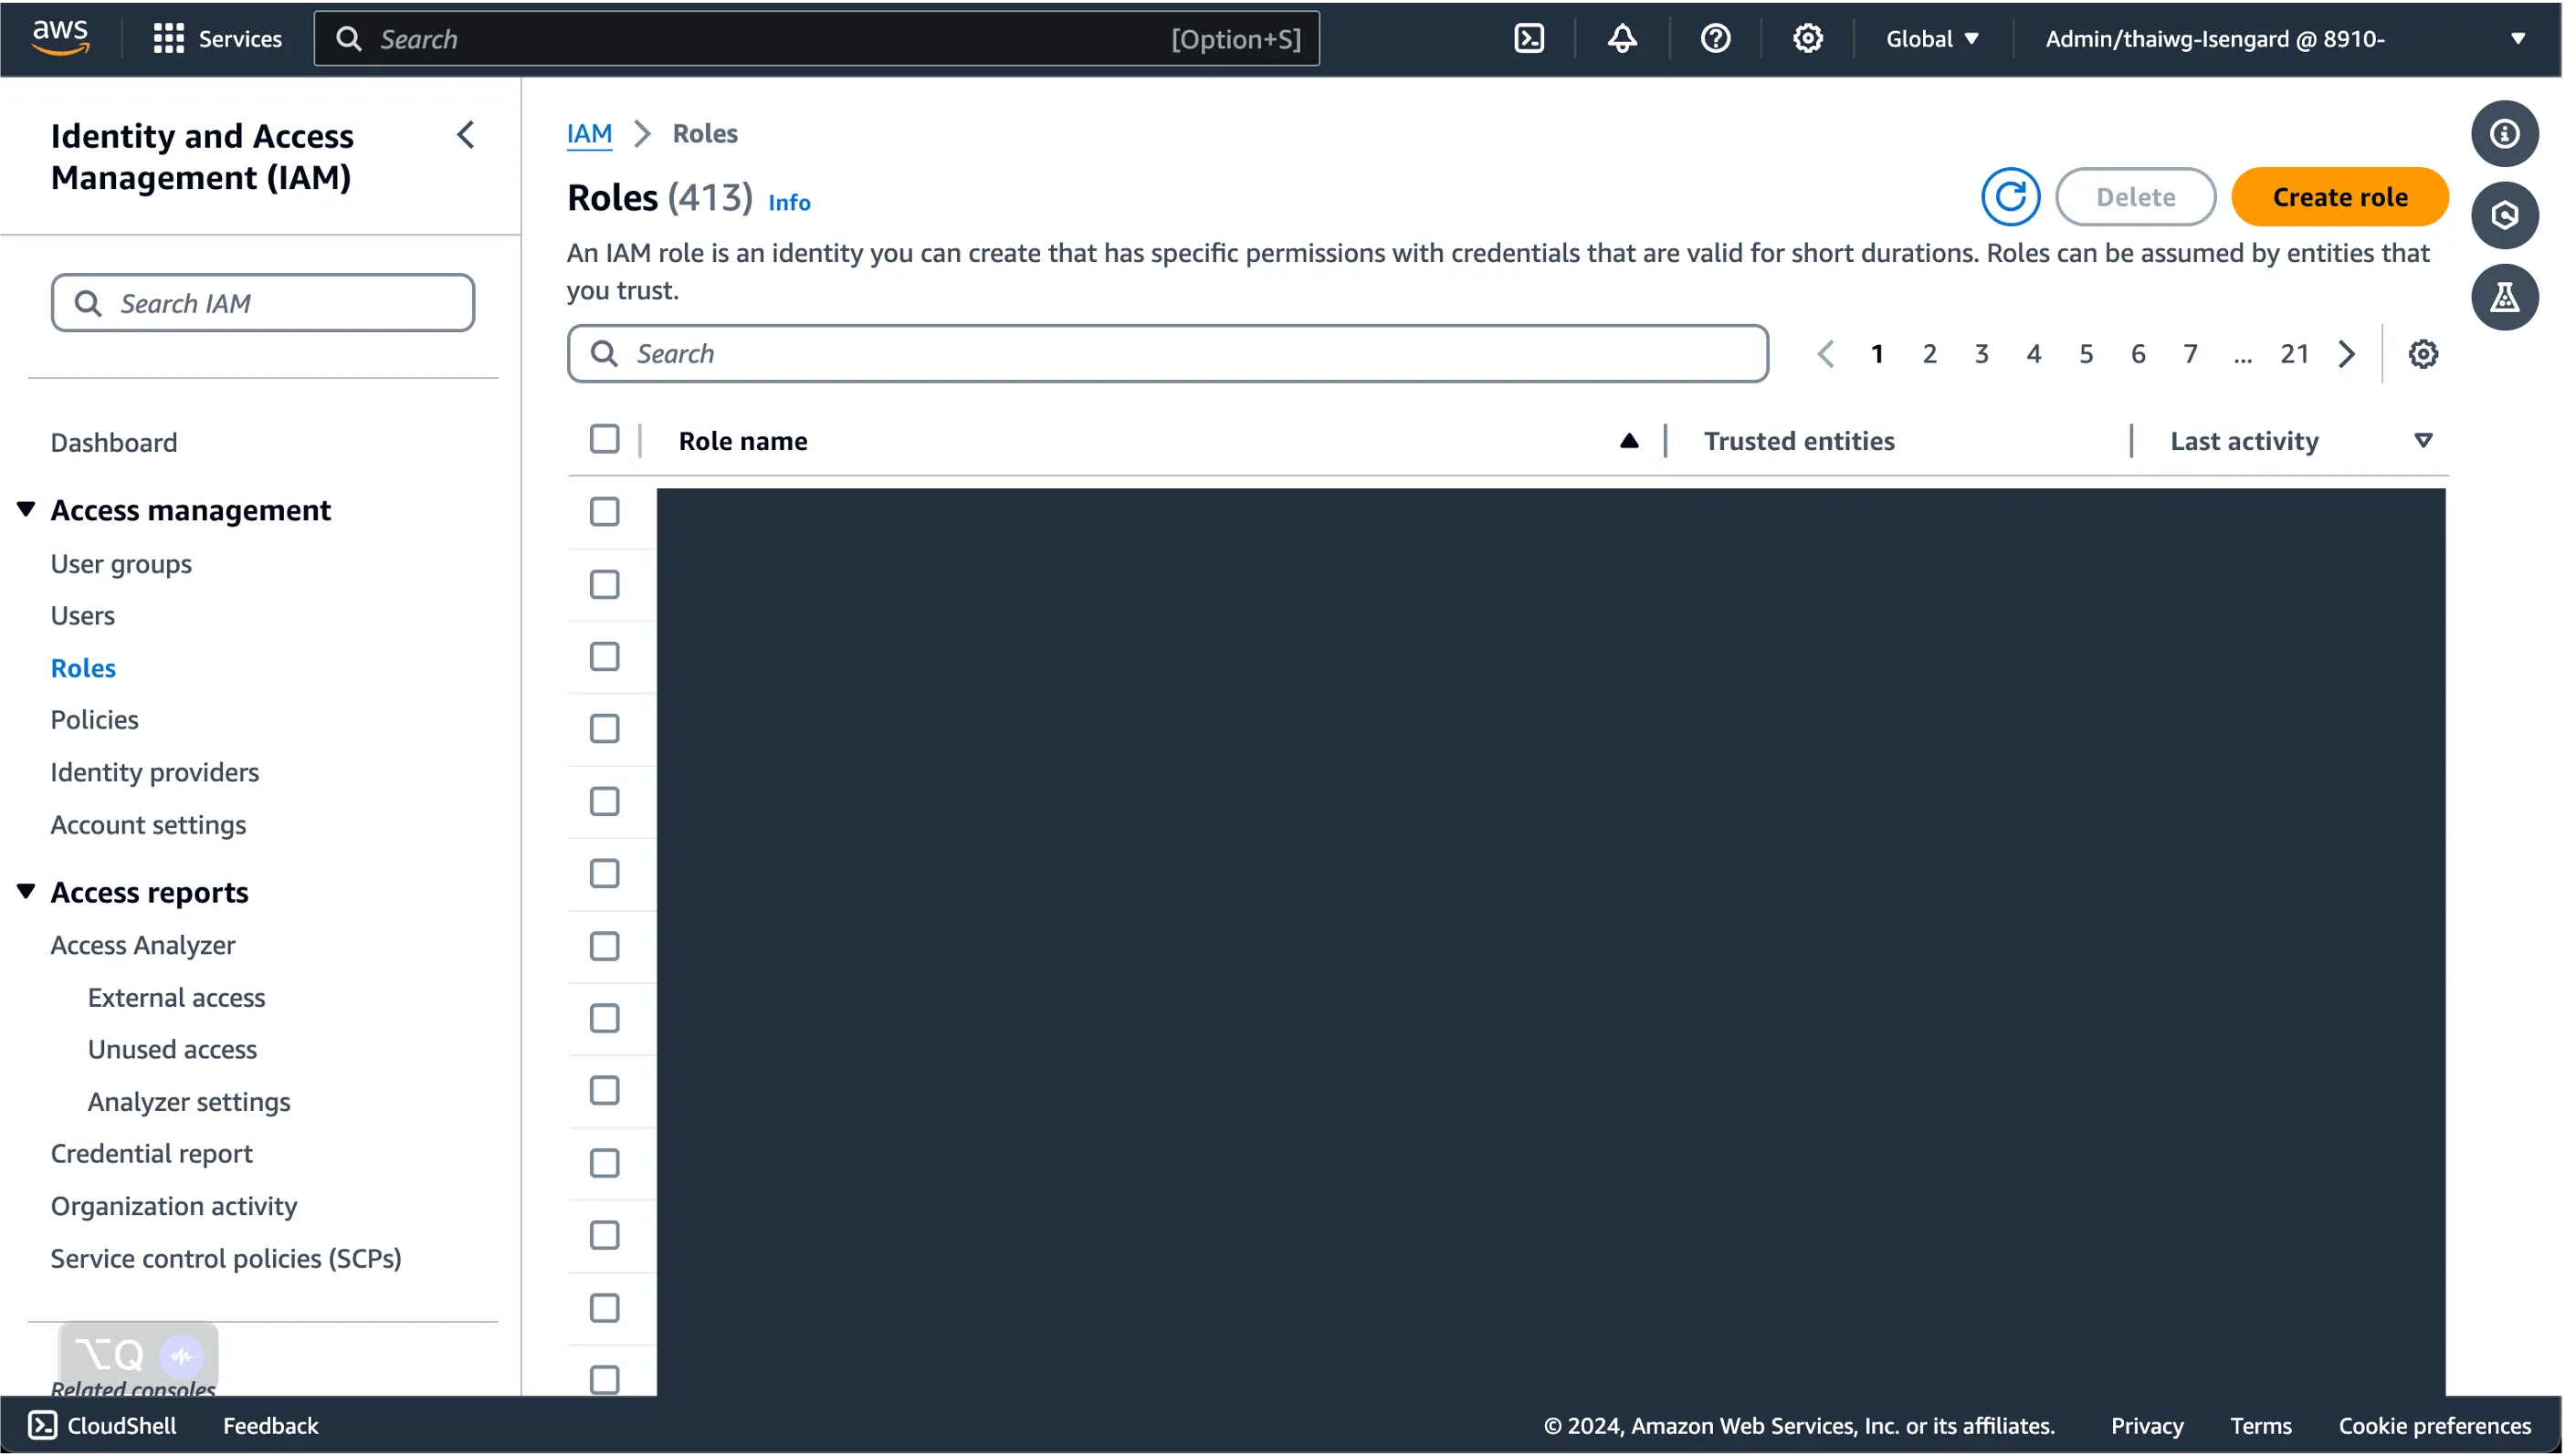
Step 4: Create an IAM role for SAML Federation in external AWS account
Finally, let’s create an IAM role for the SAML federation. This IAM role will be assumed during the cross-account access through IAM Identity Center after the integration is established.
On the same external AWS account, go to IAM, click on Roles on the navigation panel and click Create role.
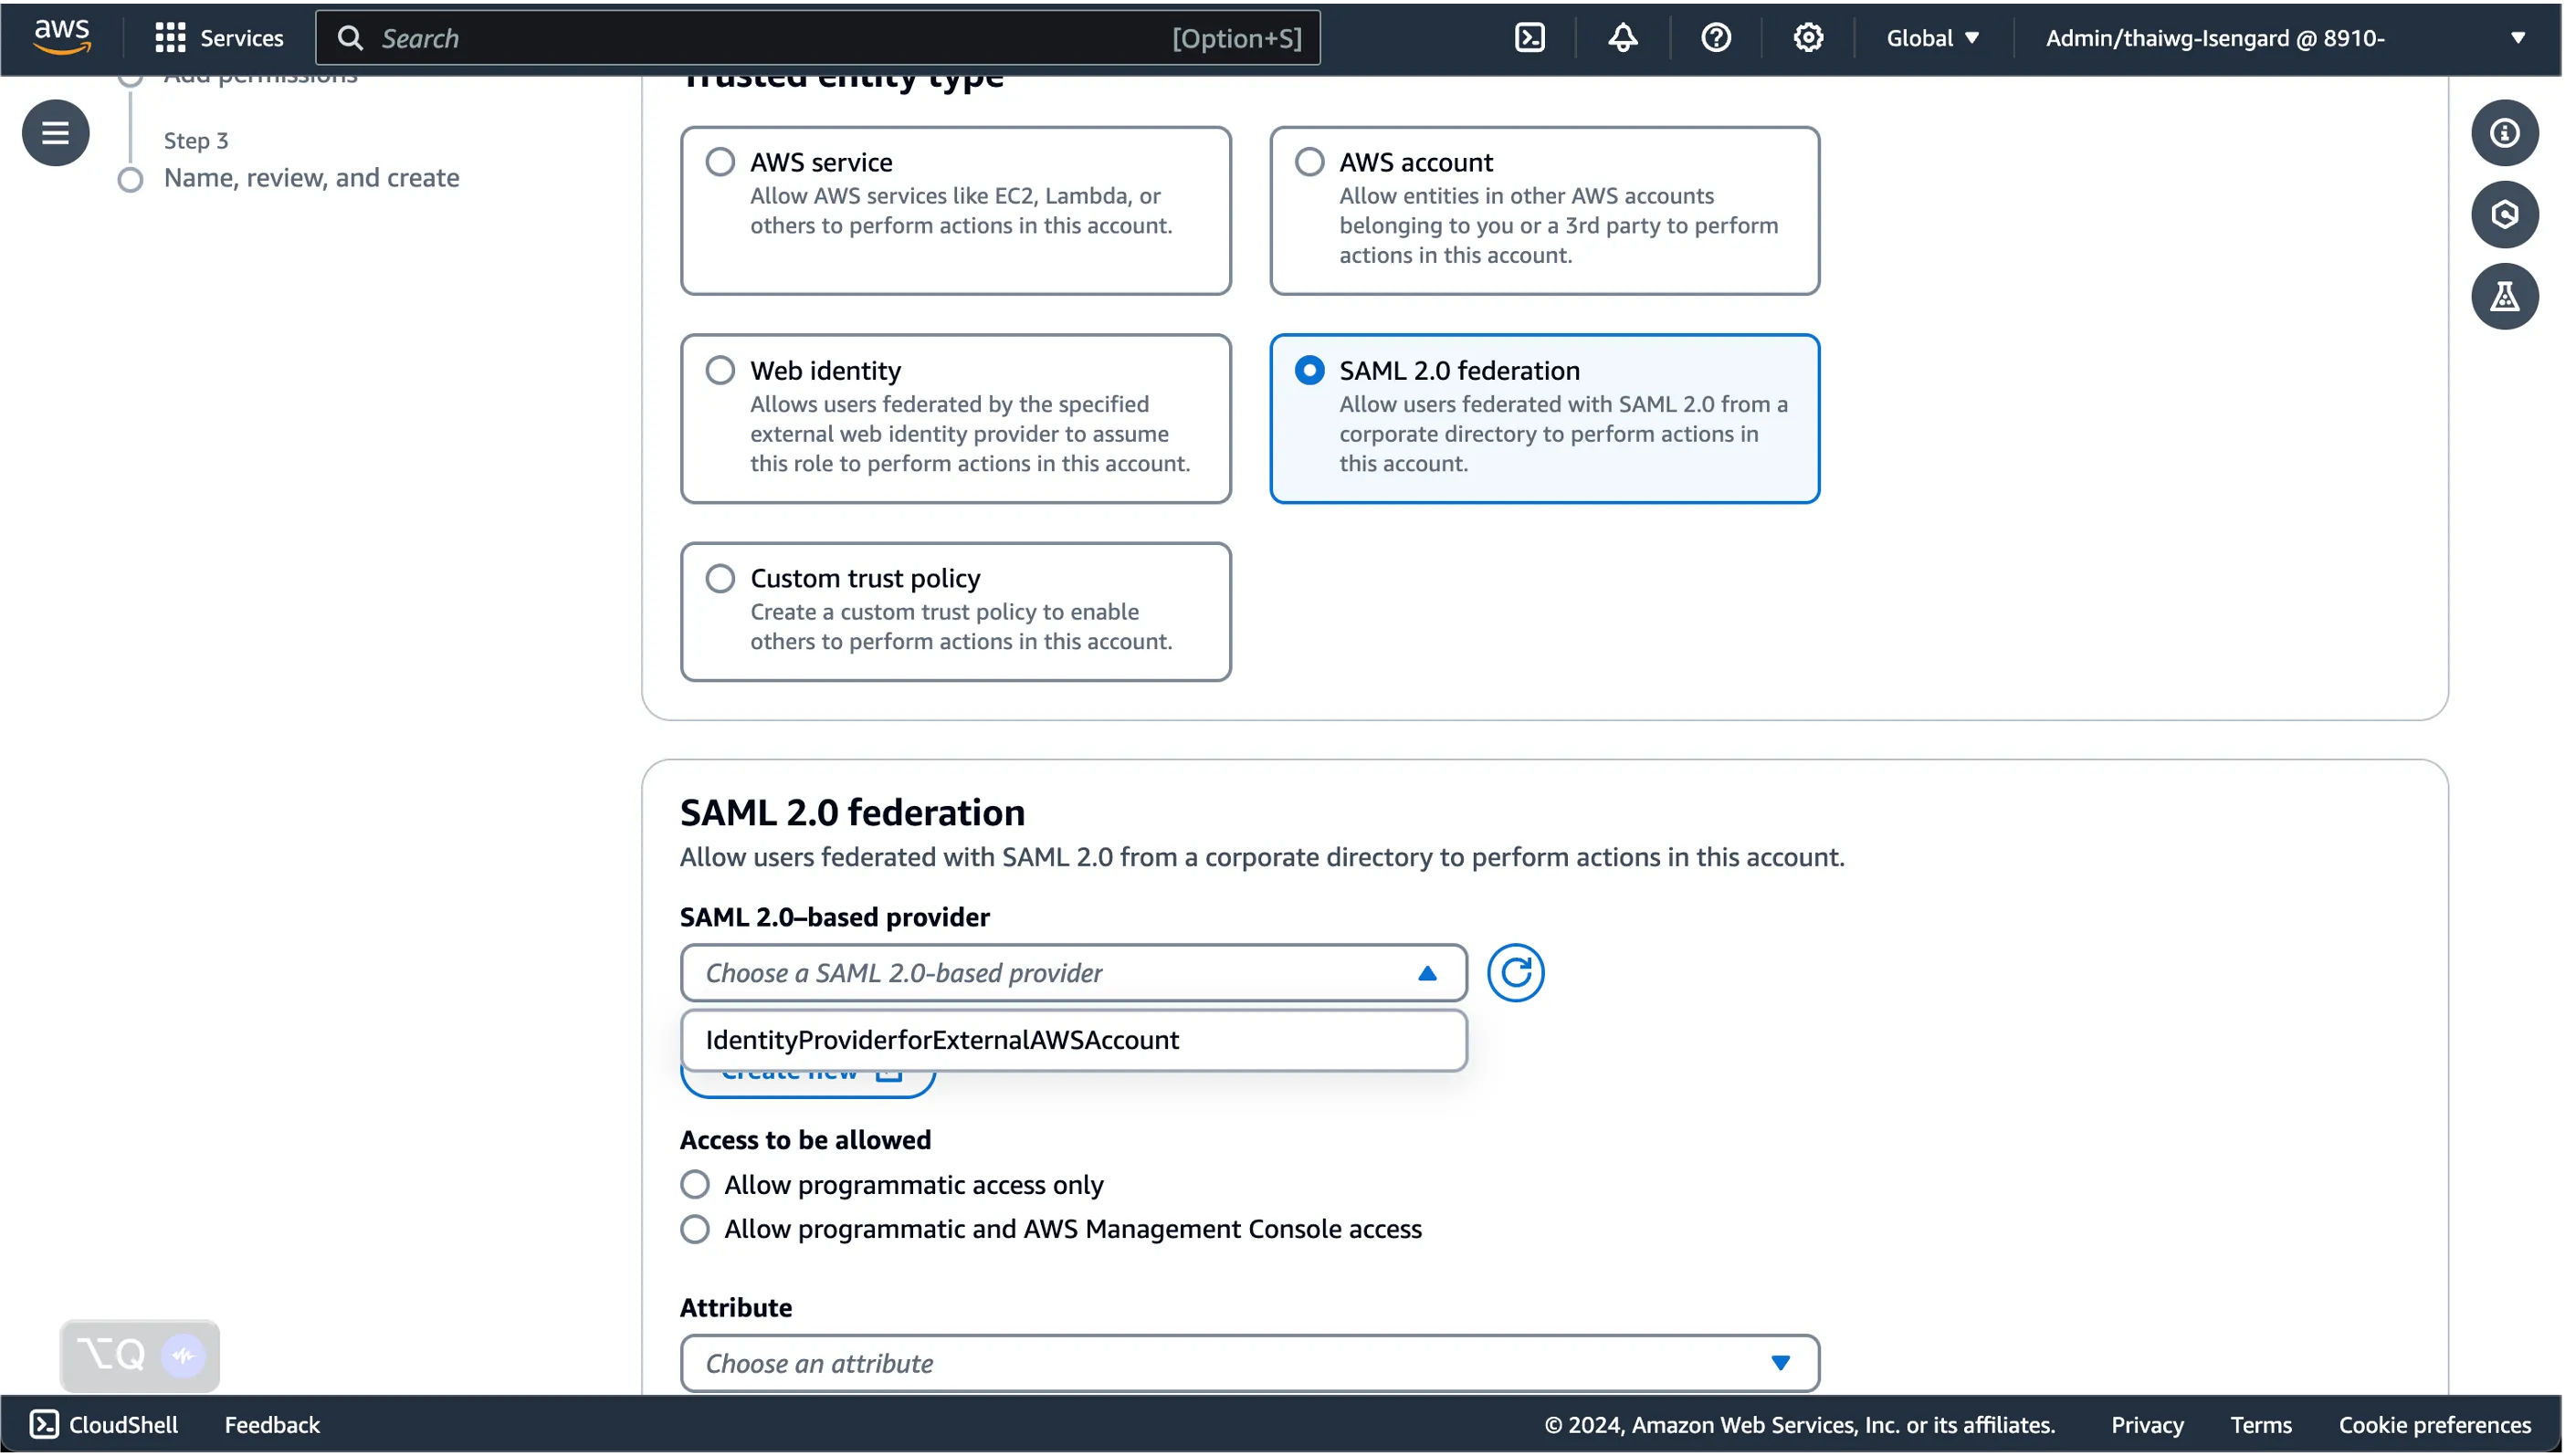
Here, select SAML 2.0 federation as the Trusted entity type, and choose the SAML Identity Provider we created from the step before.
You should see it as an available SAML 2.0-based provider by clicking on the drop-down toggle.
Following which, determine whether you would like to provide access to the AWS Management Console through this role, or only programmatic access by selecting the associated option.
Once done, click Next.
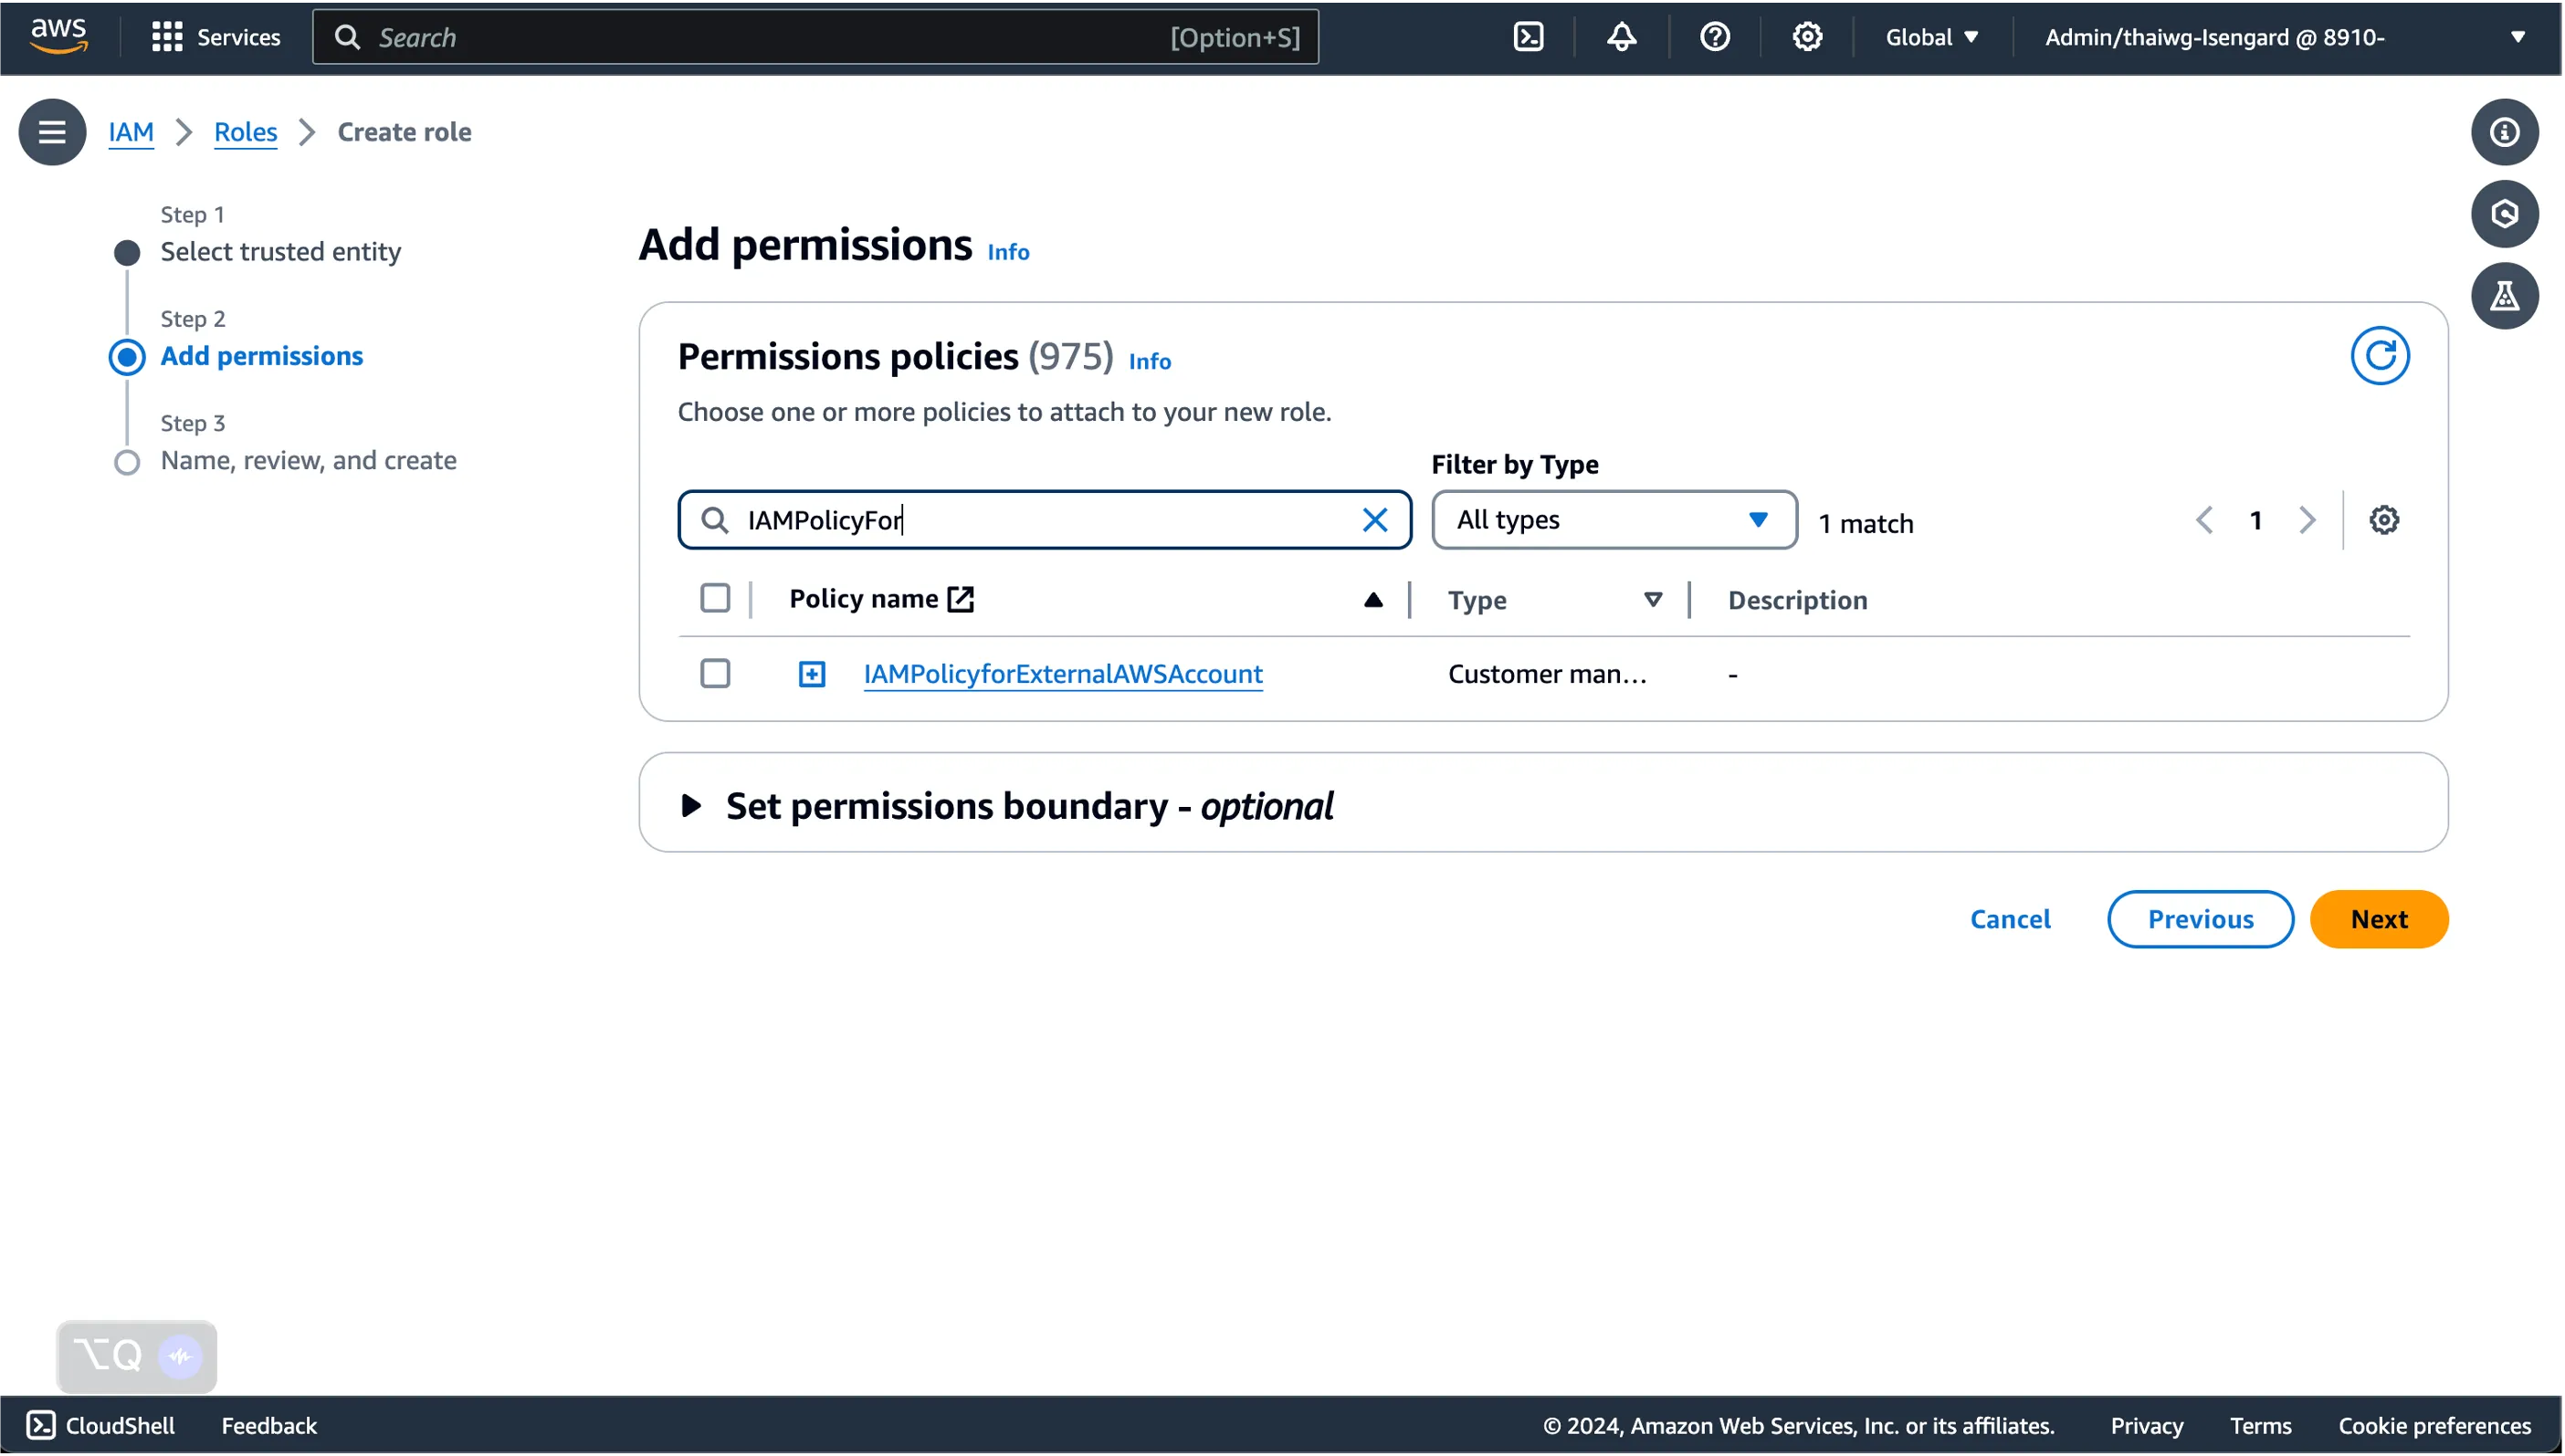
Now, select the IAM Policy we previously created by searching for it in the search bar. Click Next.
Finally, provide the IAM role with an appropriate name for us to identify it later.
Once done, create the role by selecting Create role.
Step 5: Configure access details of created IAM role in the IAM
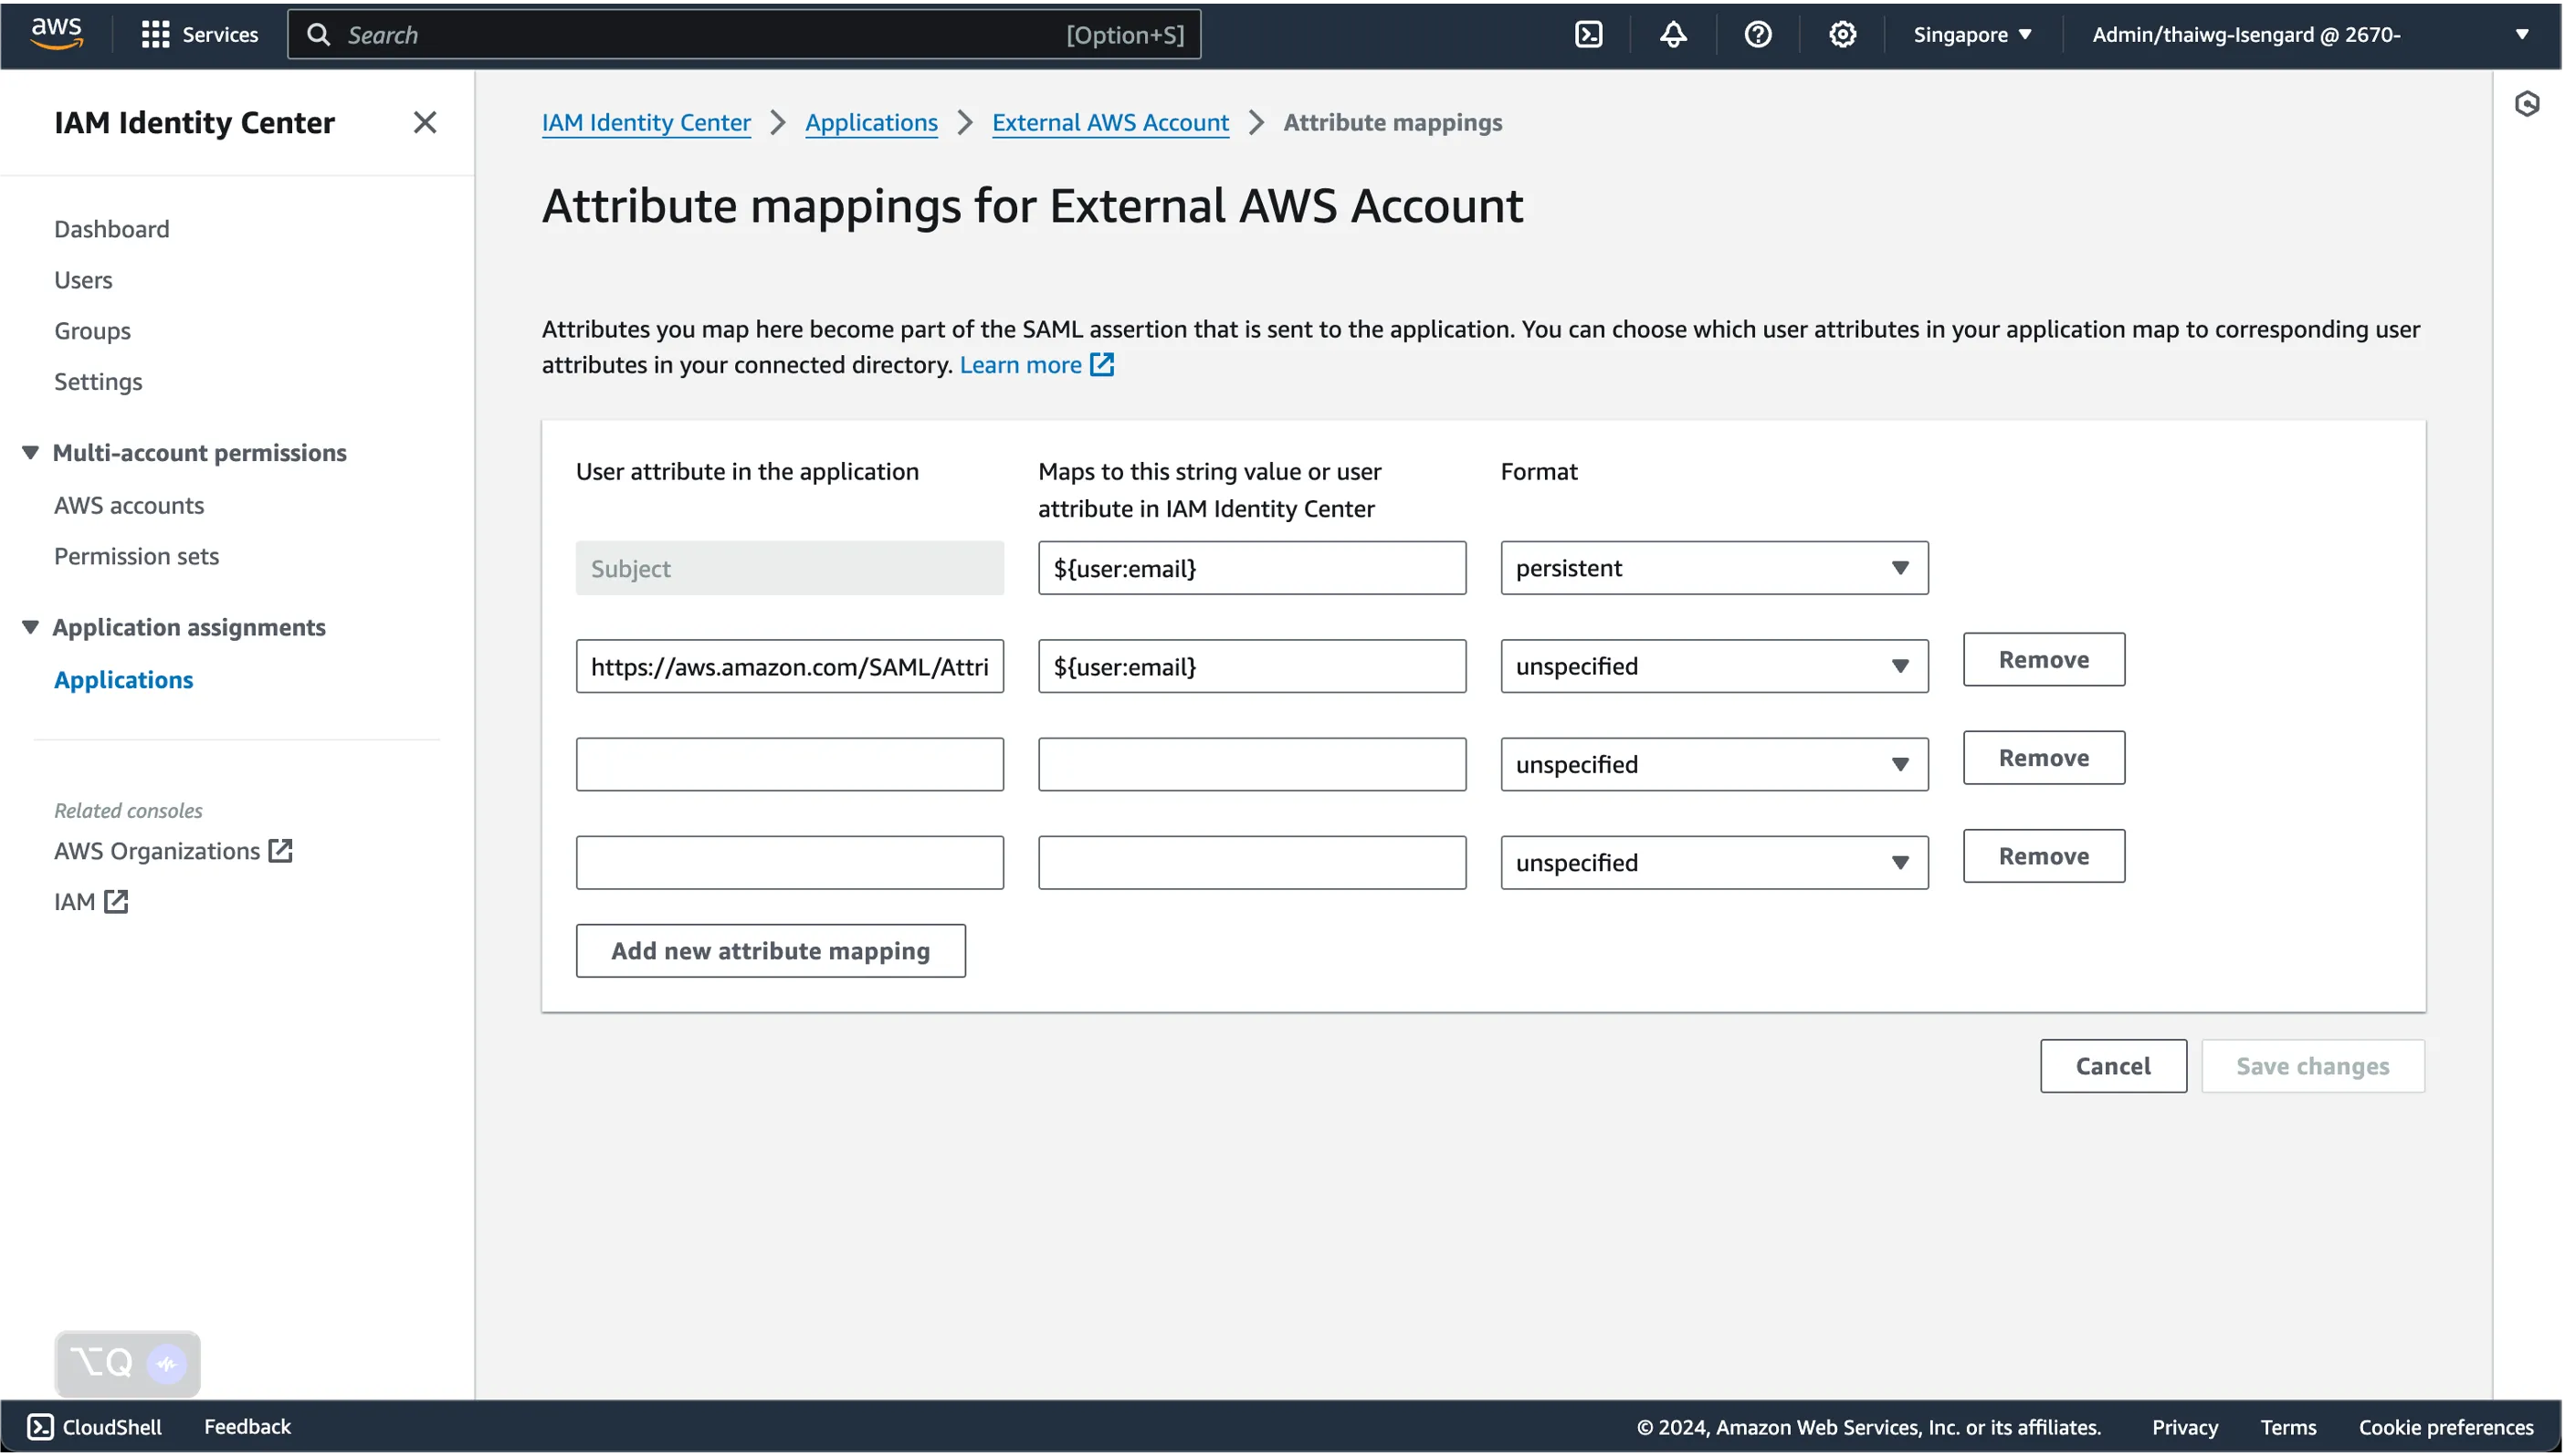
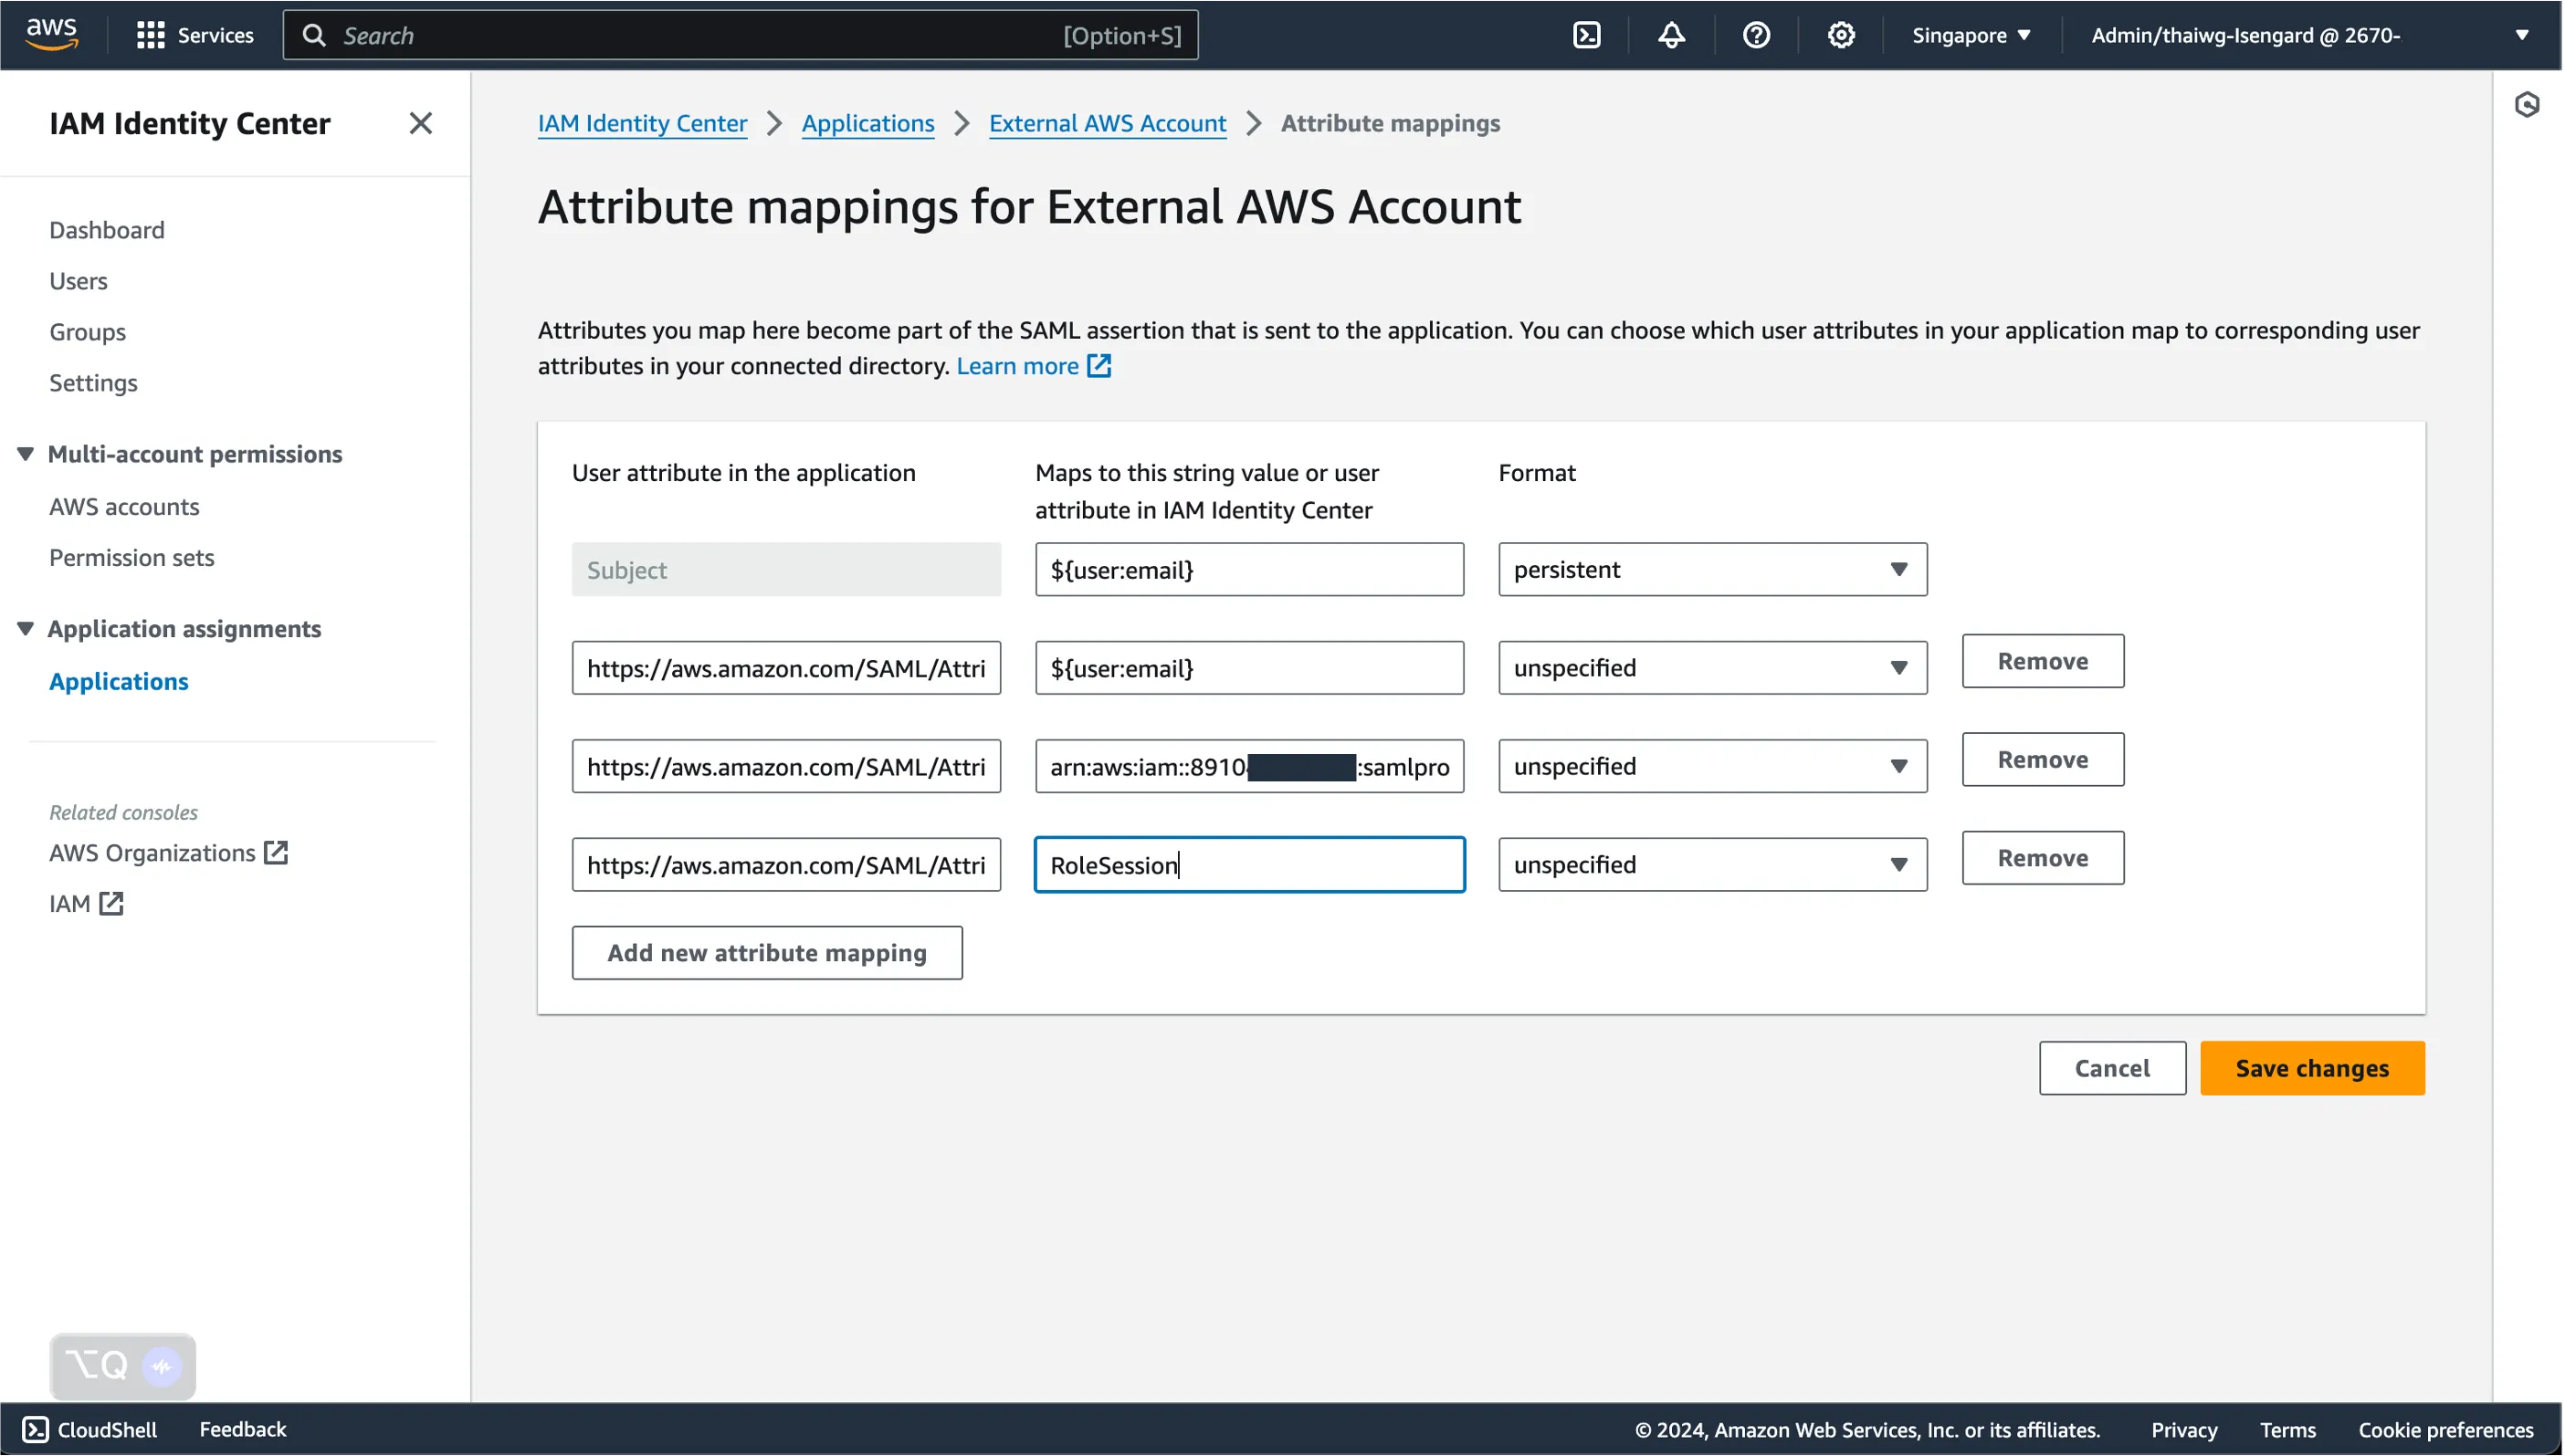
Now that we have the right resources created on the external AWS account, it’s time to head back to the IAM Identity Center console page in the primary AWS account to complete the integration.
On the AWS Identity Center console, go back to the external application we created in Step 1.
Select the external application, click on Actions, and select Edit attribute mappings.
Here is where we will provide details of our SAML Identity Provider and IAM Role of our external AWS account to allow the SAML Federation to work.
Create 2 additional attribute mappings by clicking Add new attribute mapping twice.
Fill in the 2 new attribute mappings with the following details - replace the values of the following parameters:
ACCOUNTID is the AWS Account ID of the external AWS account
SAMLPROVIDERNAME is the name of the SAML Identity Provider created in the external AWS account
ROLENAME is the name of the IAM Role created in the external AWS account
<ROLE_SESSION_NAME> must match [a-zA-Z_0-9+=,.@-]{2,64}
unspecified
Take your time when replacing the values of the parameters, as we need this to be accurate for the integration to work.
Once done, click Save changes.
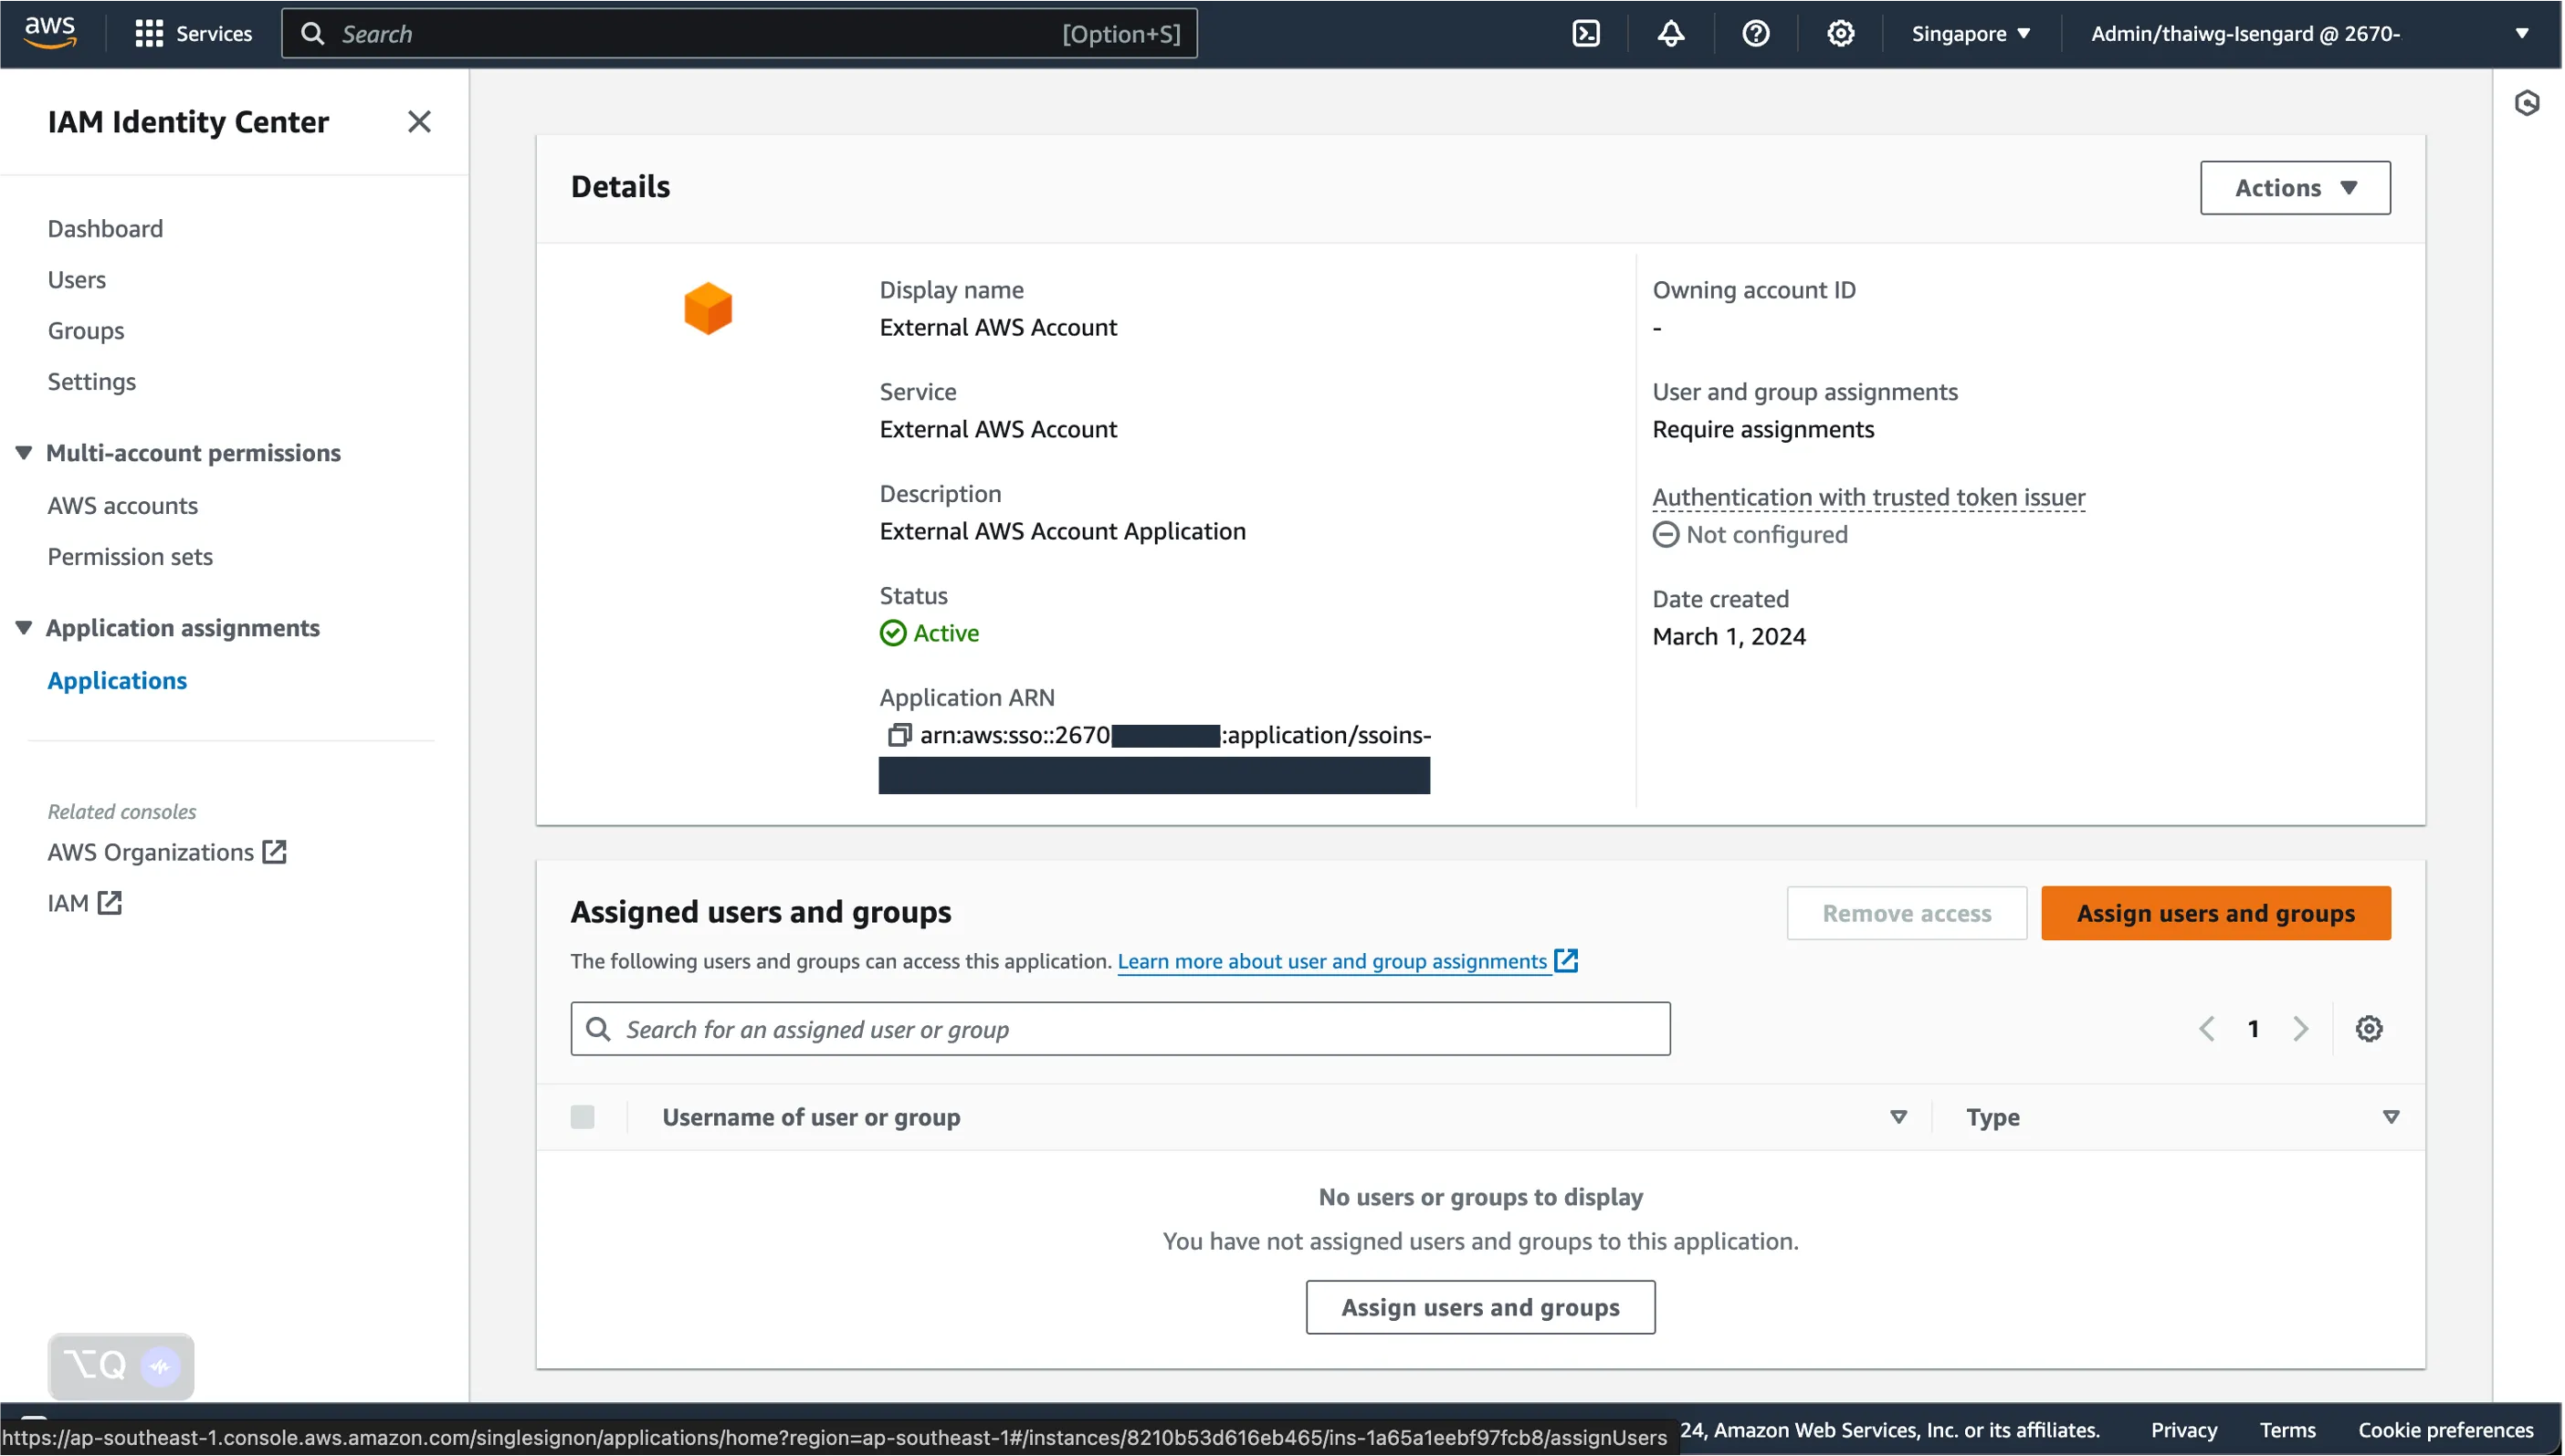
Now that we have the integration configured, we will assign this access to specific users or groups in our IAM Identity Center.
Select Assign users and groups.
Depending on your set-up and use-case, assign individual users and / or groups you want to allow access to this External AWS account.
Once done, you should see your assigned users and groups under the Assigned users and groups section.
And... we’re done!
Step 6: Verify the SSO integration
Let us verify that the integration has been configured properly.
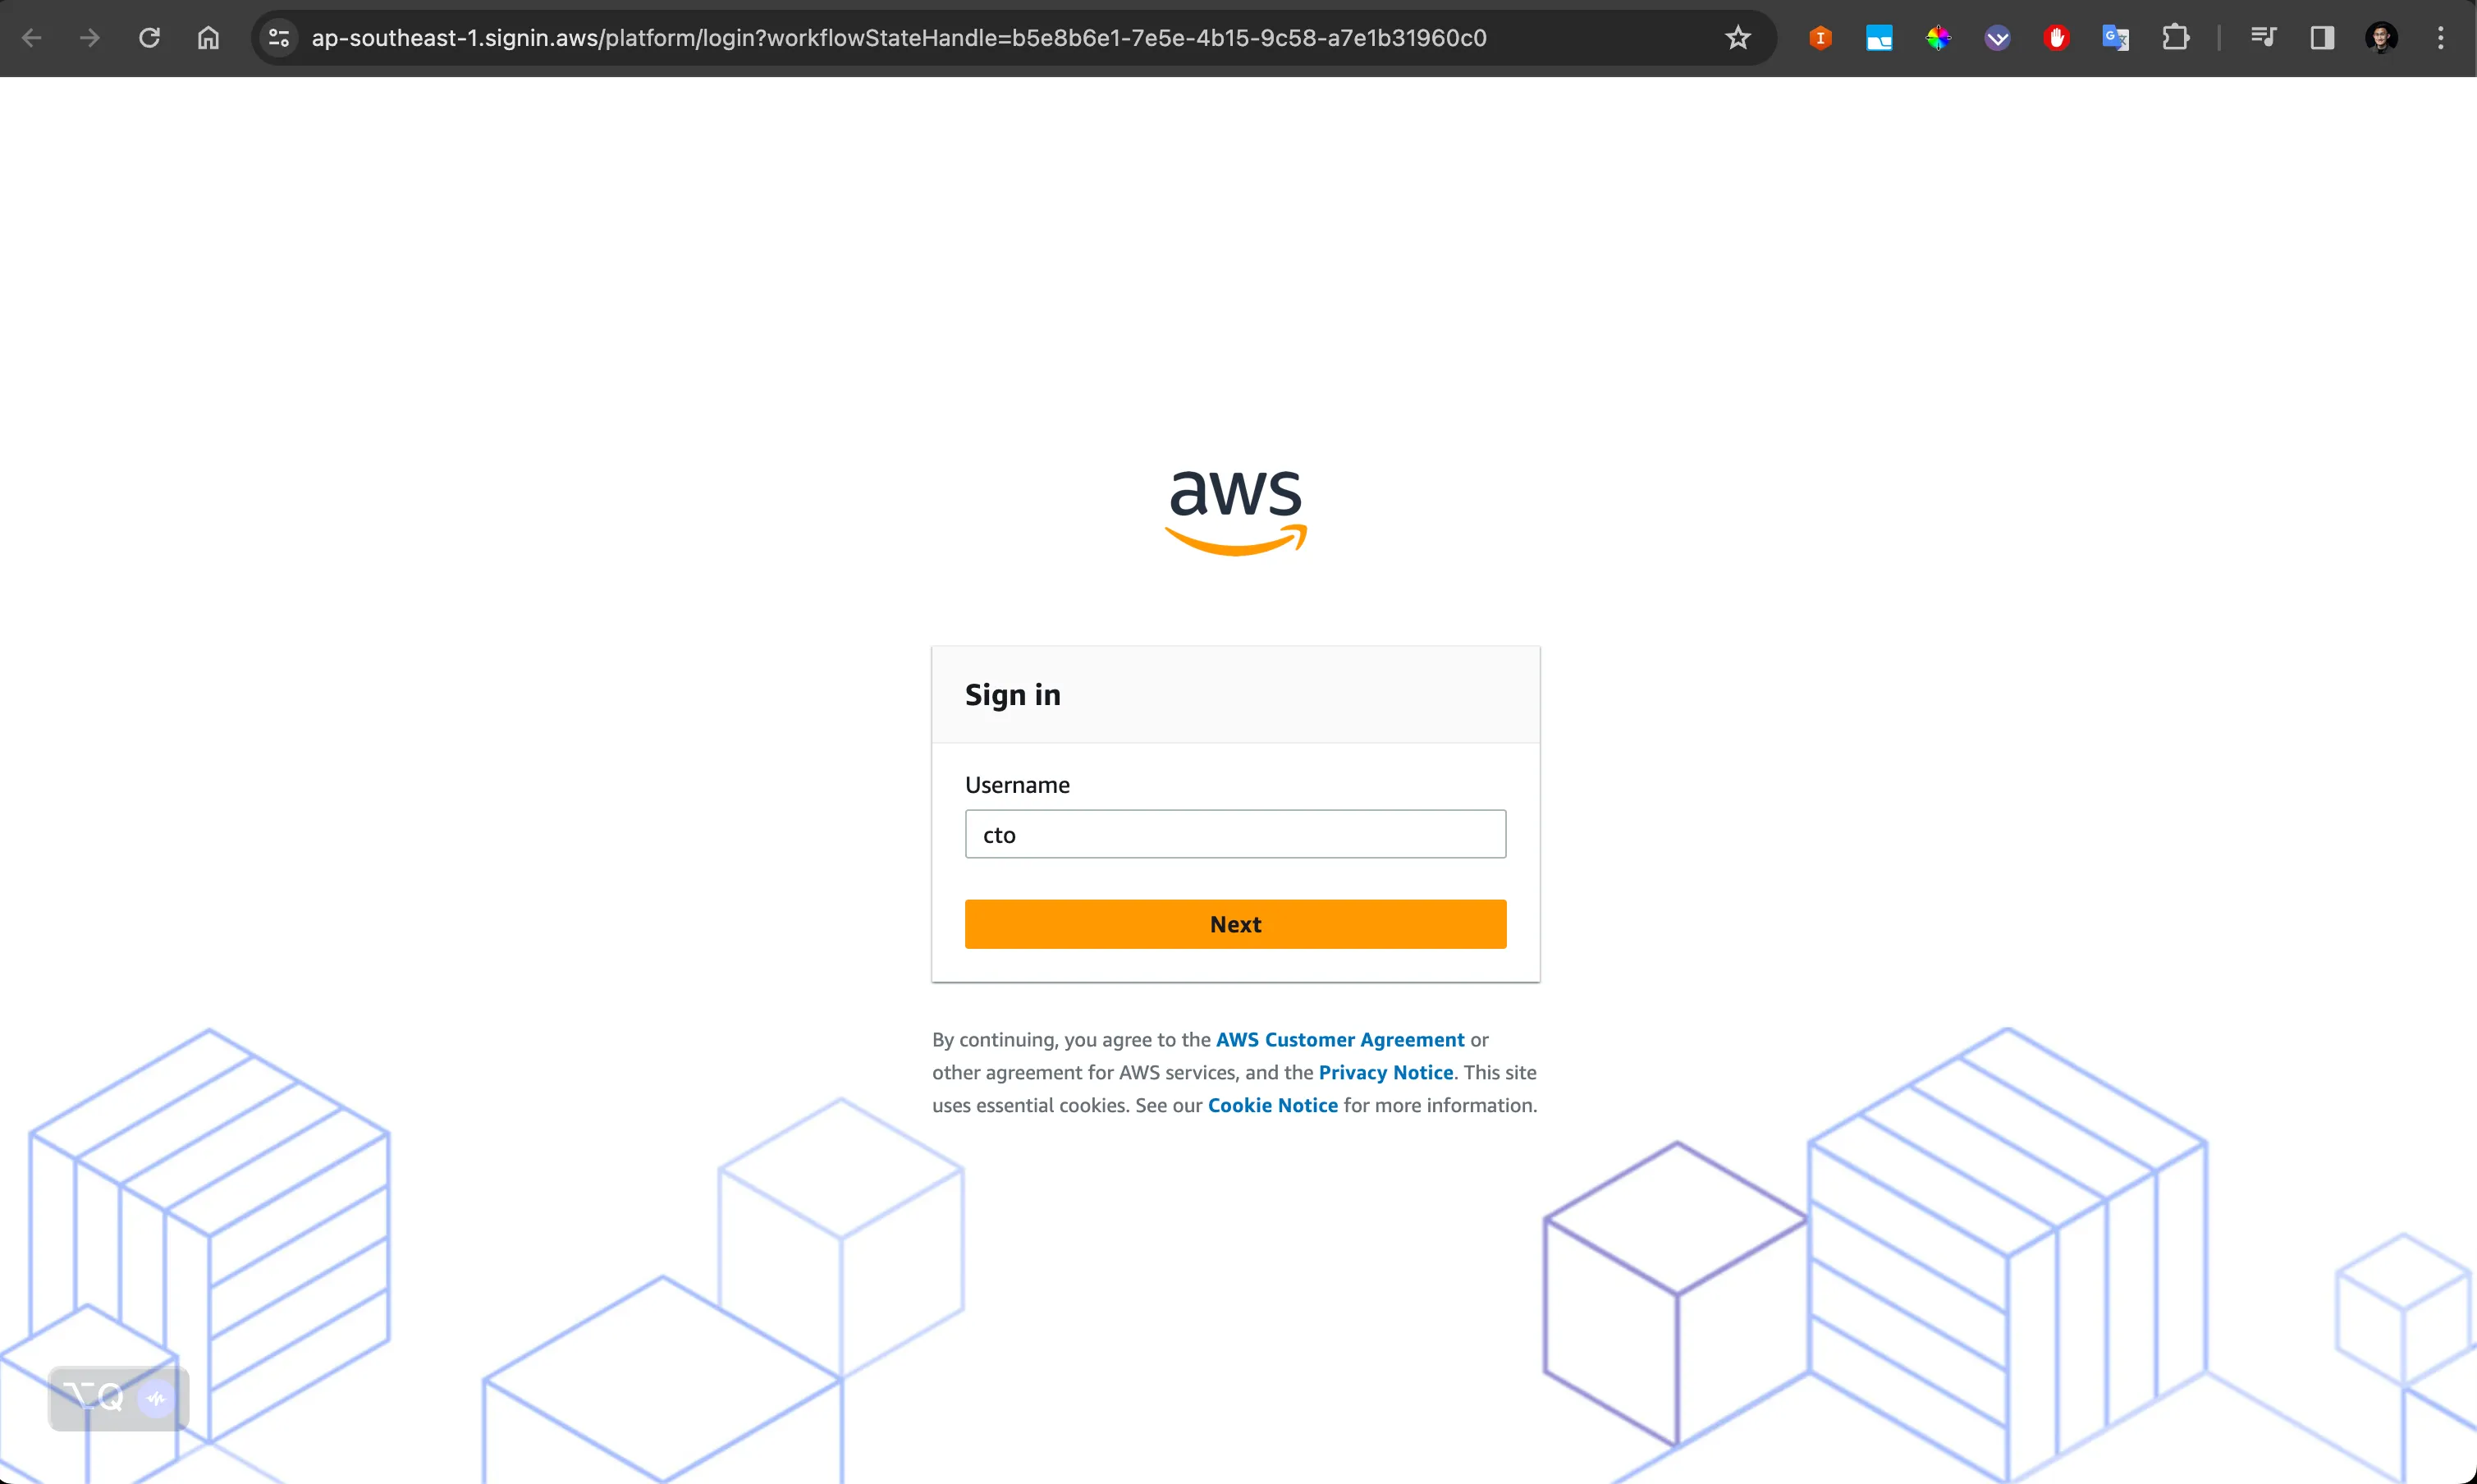
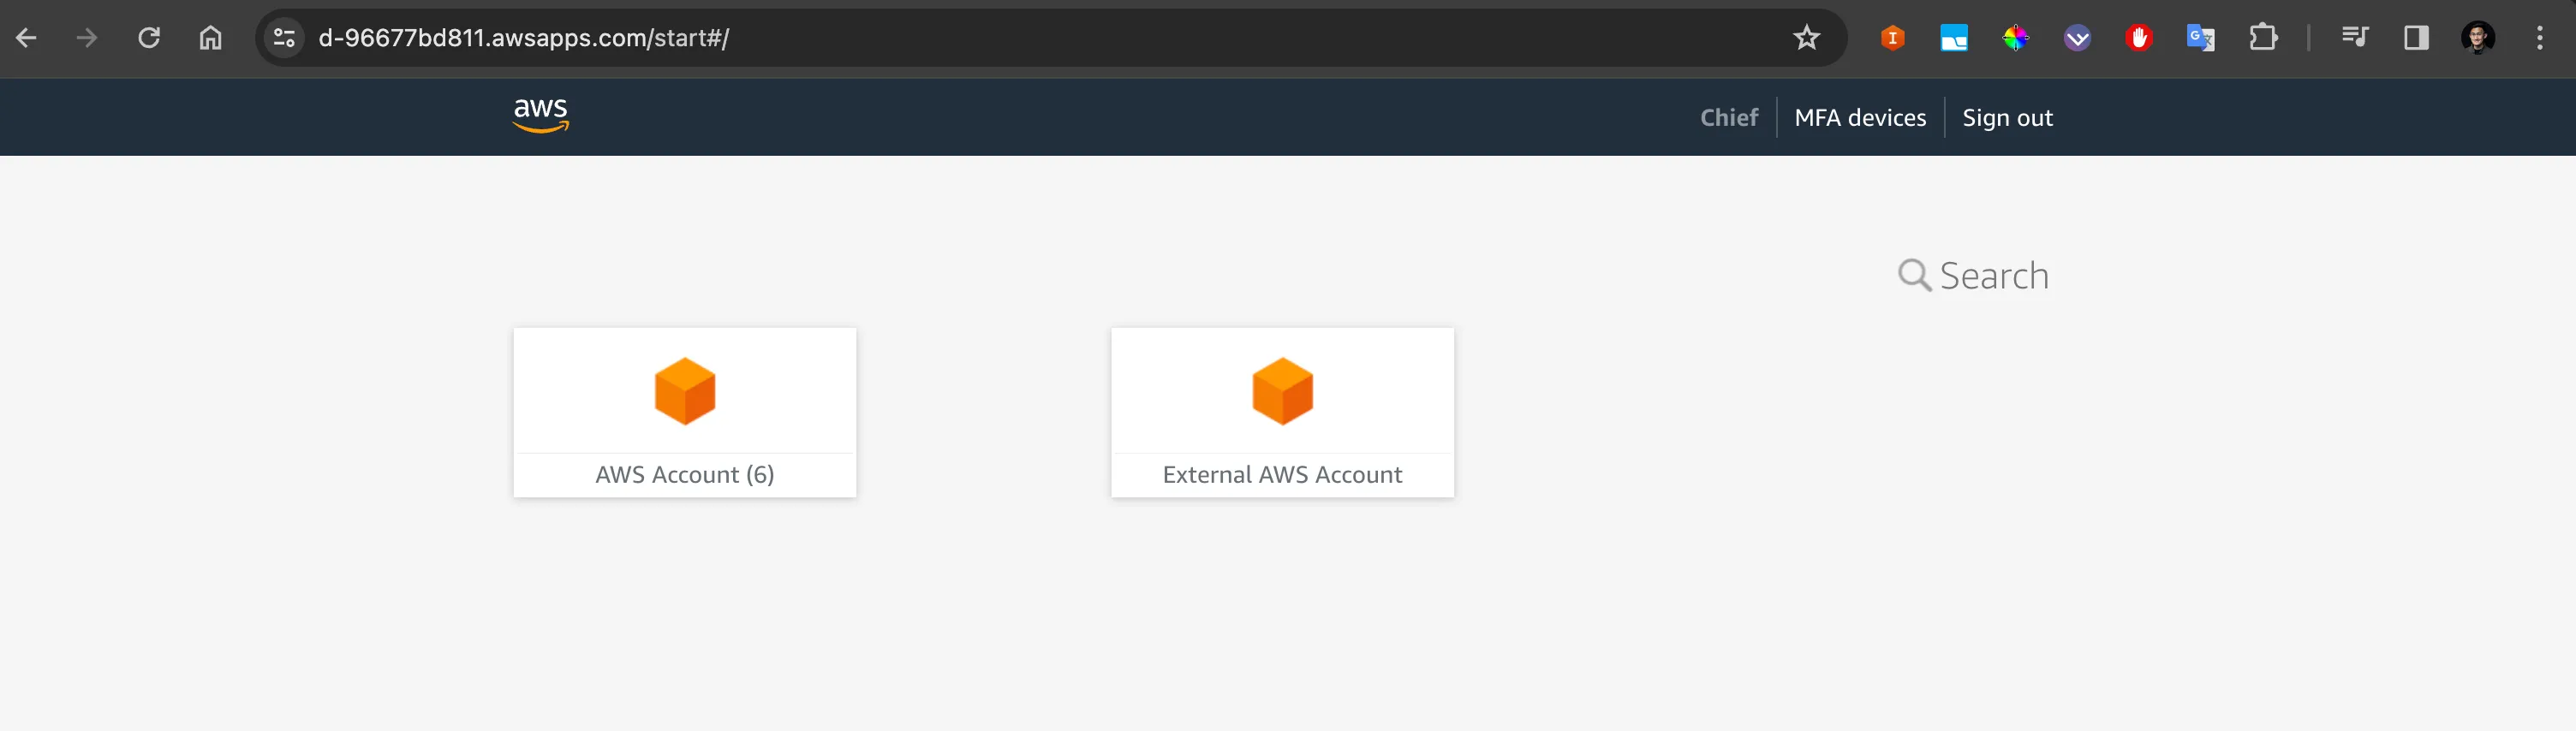
On the primary AWS account, go to the AWS access portal URL through the IAM Identity Center console page.
Here, login to the AWS access portal using an IAM Identity Center user you have given access to the external AWS account.
You should be able to see the name of the external AWS account show up as a separate application on your access portal.
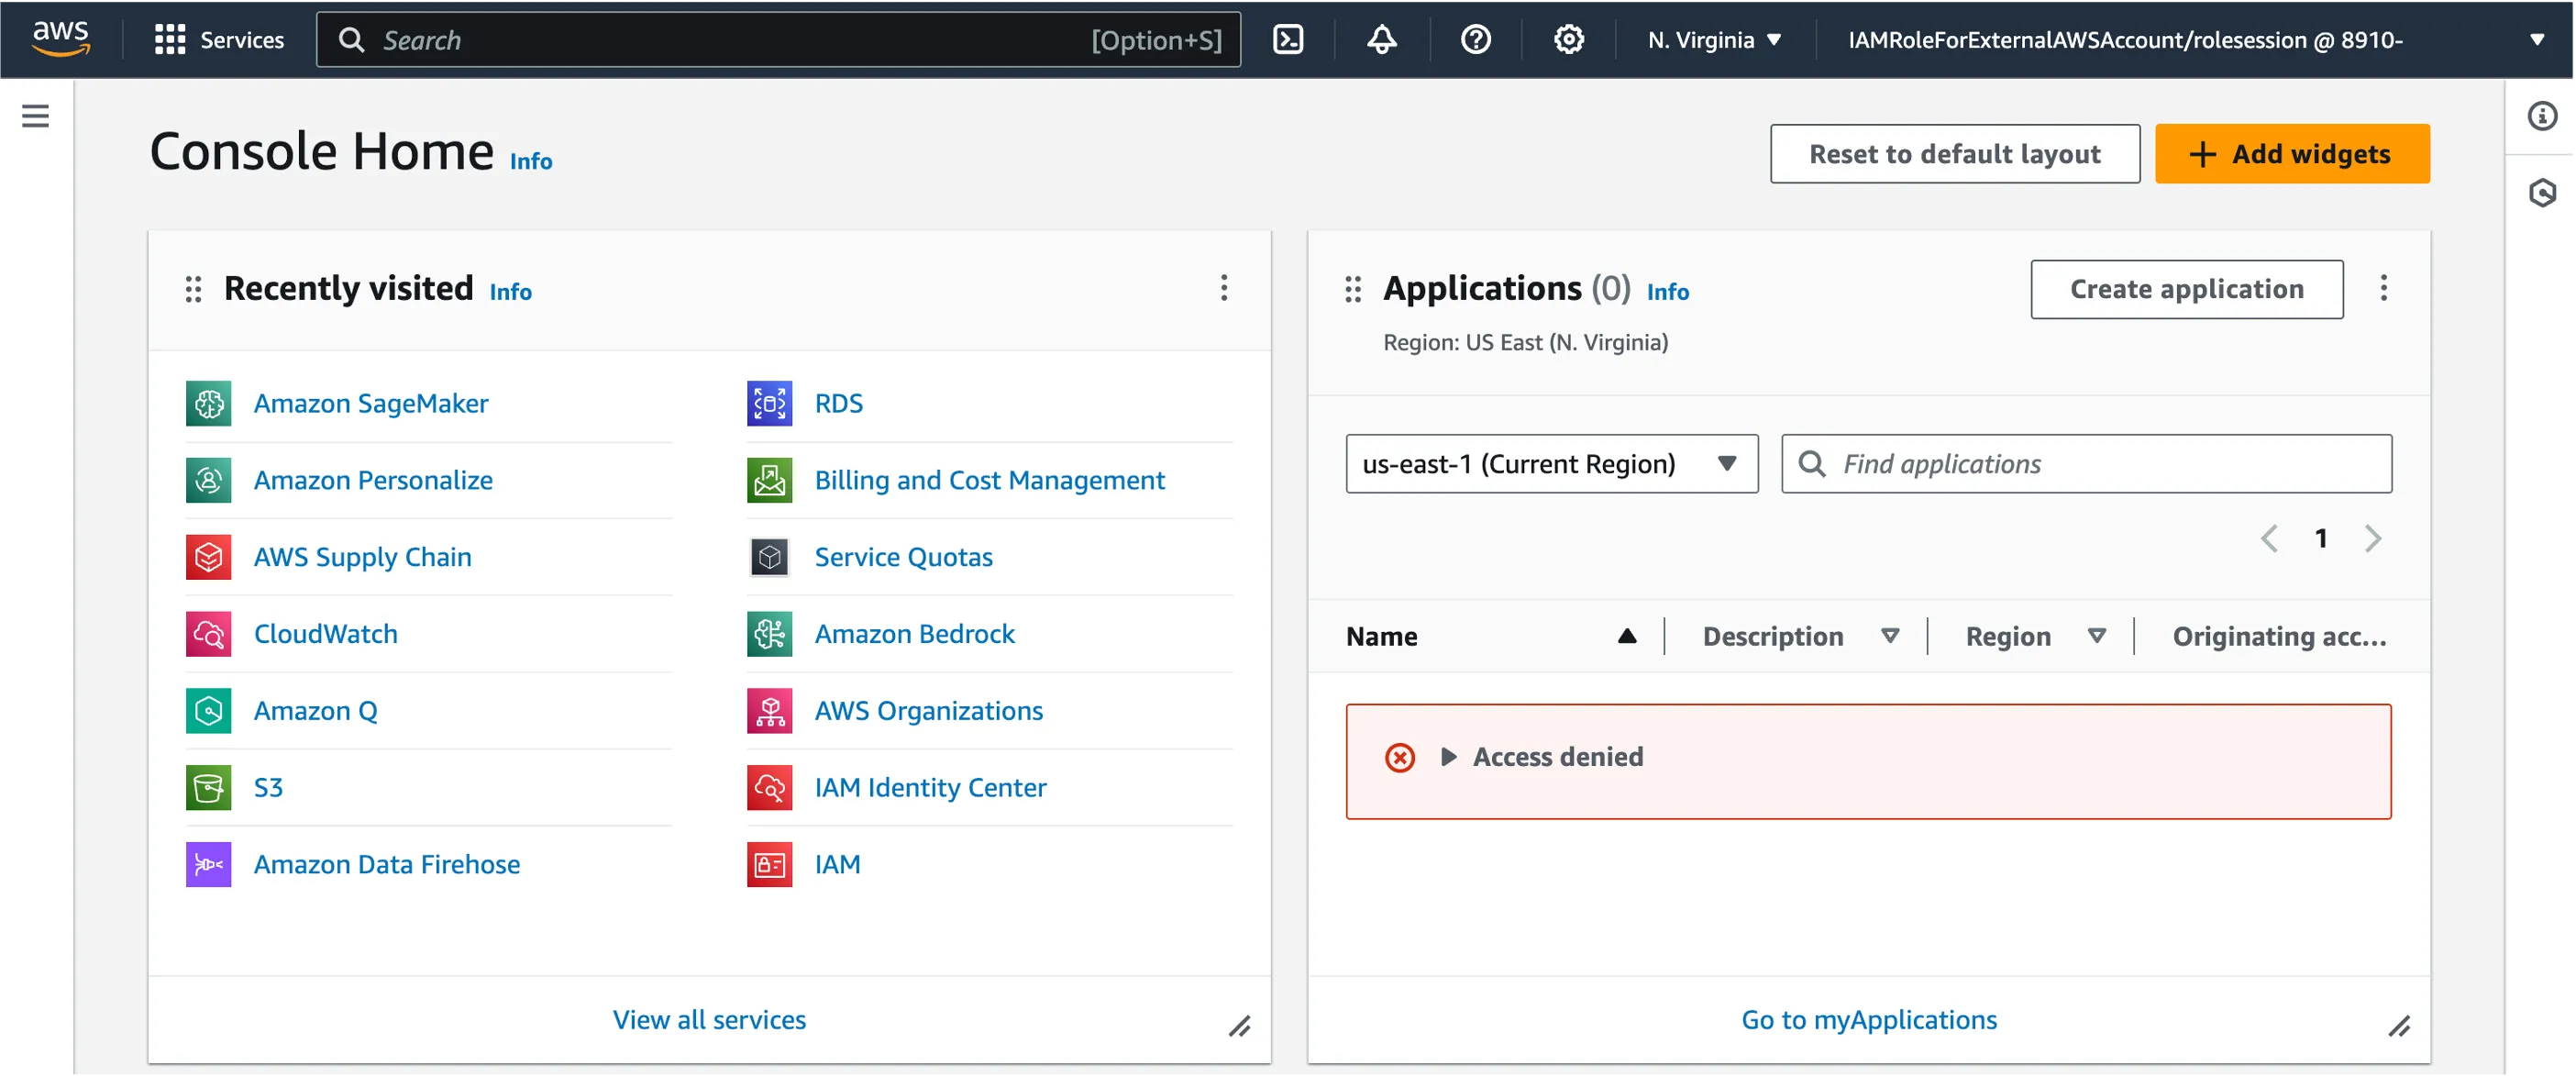
Click on it, and you will now be directed to the External AWS account.
Take note that you are now accessing the external AWS account with permissions attached to the IAM Role created in Step 4. You can verify this by looking at the role name at the top right hand side of your navigation bar.
And...there we have it!
How does this work?
The integration of external AWS accounts to an existing IAM Identity Center set-up is established using a technique called SAML Assertion. Let’s take a deeper look into it!
Security Assertion Markup Language (SAML) standard & SAML Assertion SAML, which stands for Security Assertion Markup Language, is a standardized protocol used for exchanging authentication and authorization data between identity providers (IdPs) and service providers (SPs). Essentially, it's a set of rules and formats that allow different systems to communicate securely about who you are and what you're allowed to do.
It enables the Single Sign-On (SSO) mechanism behind AWS IAM Identity Center, which helps enhance user experience and security by allowing users to access multiple services using a single login. SAML ensures data integrity and authenticity, facilities identity federation and promotes interoperability across different systems through digitally signed assertions - or what we call SAML assertions.
A SAML assertion, at its core, is simply a digitally signed XML document that contains statements about a user's authentication, attributes, and authorization decisions. You can think of SAML assertions as being like an identification card: a short, standardized way to show who someone is and what they can do.
Let’s see how this works in our solution set-up above.
SAML Assertions in AWS Identity Center integration with external AWS Accounts When integrating an external AWS account into an existing IAM Identity setup, SAML assertions hands over crucial authentication and authorization data between IdPs and SPs.
First, the external AWS account acts as the service provider (SP), while the existing AWS IAM Identity Center set-up serves as the identity provider (IdP).
Here's how it works:
User Authentication: When a user attempts to access the external AWS account or its resources, they are redirected to the primary AWS account’s IAM system for authentication. This authentication mechanism is carried out using the same IdP configured within the primary AWS account’s IAM Identity Center set-up.
Generation of SAML Assertion: Upon successful authentication, the IAM system generates a SAML assertion (remember - a digitally signed XML document) containing information about the user's identity and permissions.
Transmission to external AWS account: This SAML assertion is then securely transmitted to the external AWS account environment, where the AWS Security Token Service (STS) validates the assertion's authenticity and extracts the user's identity and attributes.
Authorization: Based on the information in the SAML assertion, AWS determines the user's access rights and permissions within the external AWS account.
Access Granted: If everything checks out, the user is granted access to the requested AWS resources, with their permissions managed according to the IAM policies configured for the external account. This is the same process when a user assumes an IAM role to access resources within a single AWS account.
As you can see - SAML assertions help us perform this automated yet secure transmission of user identity and permissions between the primary AWS account’s IdP and the external AWS account, helping us extend the authentication mechanism of AWS Identity Center to external AWS accounts with the same security and compliance posture.
Conclusion
In this post, we showed how you can consolidate the access management of multiple AWS accounts using a single authentication mechanism, yet maintain independent billing constructs of these external AWS accounts from your existing AWS Organizations, using AWS IAM Identity Center integration with external AWS accounts.
We described how you can set this up, and discussed how this integration works in the backend by diving deeper into the wonders of SAML assertions, and its ability to streamline identity federation and interoperability across different systems and account boundaries.
GT
Any opinions in this post are those of the individual author and may not reflect the opinions of AWS.