Creating an EKS Cluster: Version 1.25 from Scratch.
Create an Amazon EKS cluster 1.25 version from scratch. When your cluster is ready, you can configure your favorite Kubernetes tools.
- Open IAM Dashboard
- **** Create a user. username : ashish
- Attach AdministratorAccess policy.
- Create access and secret key.
- Open a EC2 Dashboard.
- Launch instance
- Name and Tags : MyTest
- Application and OS Image ( AMI ) : Amazon Linux 2023 AMI
- Instance Type: t2.micro
- Keypair : ashish.pem
- Network Settings : VPC, subnet
- Security Group : 22 - SSH (inbound)
- Storage : Min 8 GiB , GP3
- Click Launch instance
1
ssh -i "sunday.pem" ec2-user@ec2-18-206-121-98.compute-1.amazonaws.com1
2
3
4
5
[root@ip-172-31-88-31 ~]# aws configure
AWS Access Key ID ]: ****************4E4R
AWS Secret Access Key]: [****************HRJx]:
Default region name]: [Region Name]:
Default output format]: [None]:
- Download and extract the latest release
- Move the extracted binary to /usr/local/bin
- Test that your eksclt installation was successful.
1
2
3
4
5
6
7
8
9
10
11
12
# for ARM systems, set ARCH to: `arm64`, `armv6` or `armv7`
ARCH=amd64
PLATFORM=$(uname -s)_$ARCH

curl -sLO "https://github.com/eksctl-io/eksctl/releases/latest/download/eksctl_$PLATFORM.tar.gz"

# (Optional) Verify checksum
curl -sL "https://github.com/eksctl-io/eksctl/releases/latest/download/eksctl_checksums.txt" | grep $PLATFORM | sha256sum --check

tar -xzf eksctl_$PLATFORM.tar.gz -C /tmp && rm eksctl_$PLATFORM.tar.gz

sudo mv /tmp/eksctl /usr/local/bin- Download kubectl version
- Grant execution permissions to kubectl executable
- Move kubectl onto /usr/local/bin
- Test that your kubectl installation was successful
1
2
3
4
wget https://amazon-eks.s3.us-west-2.amazonaws.com/1.16.8/2020-04-16/bin/linux/amd64/kubectl
chmod +x ./kubectl
mkdir -p $HOME/bin && cp ./kubectl $HOME/bin/kubectl && export PATH=$PATH:$HOME/bin
kubectl version --short --client1
eksctl create cluster --name ashish --version 1.25 --region us-east-1 --nodegroup-name ashish-workers --node-type t3.medium --nodes 2 --nodes-min 1 --nodes-max 3 --managed- eksctl create cluster : Creating a cluster eksctl
- --name ashish :**** Name of Cluster
- --version 1.25 : EKS cluster version
- --region us-east-1 : AWS Region Name
- --nodegroup-name ashish-workers : Autoscaling Group Name
- --node-type t3.medium : instance type
- --nodes 2 : Desire Node capacity is 2.
- --nodes-min 1 : Minimum Node capacity is 1.
- --nodes-max 4 --managed : Maximum capacity is 4.
1
2
3
4
5
6
7
8
9
10
11
12
13
14
15
16
17
18
19
20
21
22
23
24
25
26
27
28
29
30
31
32
33
34
35
36
37
38
39
40
41
[root@ip-172-31-88-31 ~]# eksctl create cluster --name ashish --version 1.25 --region us-east-1 --nodegroup-name ashish-workers --node-type t3.medium --nodes 2 --nodes-min 1 --nodes-max 3 --managed
2024-03-30 03:10:16 [ℹ]  eksctl version 0.175.0
2024-03-30 03:10:16 [ℹ]  using region us-east-1
2024-03-30 03:10:16 [ℹ]  skipping us-east-1e from selection because it doesn't support the following instance type(s): t3.medium
2024-03-30 03:10:16 [ℹ]  setting availability zones to [us-east-1f us-east-1d]
2024-03-30 03:10:16 [ℹ]  subnets for us-east-1f - public:192.168.0.0/19 private:192.168.64.0/19
2024-03-30 03:10:16 [ℹ]  subnets for us-east-1d - public:192.168.32.0/19 private:192.168.96.0/19
2024-03-30 03:10:16 [ℹ]  nodegroup "ashish-workers" will use "" [AmazonLinux2/1.25]
2024-03-30 03:10:16 [ℹ]  using Kubernetes version 1.25
2024-03-30 03:10:16 [ℹ]  creating EKS cluster "ashish" in "us-east-1" region with managed nodes
2024-03-30 03:10:16 [ℹ]  will create 2 separate CloudFormation stacks for cluster itself and the initial managed nodegroup
2024-03-30 03:10:16 [ℹ]  if you encounter any issues, check CloudFormation console or try 'eksctl utils describe-stacks --region=us-east-1 --cluster=ashish'
2024-03-30 03:10:16 [ℹ]  Kubernetes API endpoint access will use default of {publicAccess=true, privateAccess=false} for cluster "ashish" in "us-east-1"
2024-03-30 03:10:16 [ℹ]  CloudWatch logging will not be enabled for cluster "ashish" in "us-east-1"
2024-03-30 03:10:16 [ℹ]  you can enable it with 'eksctl utils update-cluster-logging --enable-types={SPECIFY-YOUR-LOG-TYPES-HERE (e.g. all)} --region=us-east-1 --cluster=ashish'
2024-03-30 03:10:16 [ℹ]
2 sequential tasks: { create cluster control plane "ashish",
    2 sequential sub-tasks: {
        wait for control plane to become ready,
        create managed nodegroup "ashish-workers",
    }
}
2024-03-30 03:10:16 [ℹ]  building cluster stack "eksctl-ashish-cluster"
2024-03-30 03:10:16 [ℹ]  deploying stack "eksctl-ashish-cluster"
2024-03-30 03:10:46 [ℹ]  waiting for CloudFormation stack "eksctl-ashish-cluster"
2024-03-30 03:11:16 [ℹ]  waiting for CloudFormation stack "eksctl-ashish-cluster"
2024-03-30 03:12:16 [ℹ]  waiting for CloudFormation stack "eksctl-ashish-cluster"
2024-03-30 03:25:31 [ℹ]  waiting for CloudFormation stack "eksctl-ashish-nodegroup-ashish-workers"
2024-03-30 03:25:31 [ℹ]  waiting for the control plane to become ready
2024-03-30 03:25:31 [✔]  saved kubeconfig as "/root/.kube/config"
2024-03-30 03:25:31 [ℹ]  no tasks
2024-03-30 03:25:31 [✔]  all EKS cluster resources for "ashish" have been created
2024-03-30 03:25:32 [ℹ]  nodegroup "ashish-workers" has 2 node(s)
2024-03-30 03:25:32 [ℹ]  node "ip-192-168-2-24.ec2.internal" is ready
2024-03-30 03:25:32 [ℹ]  node "ip-192-168-47-180.ec2.internal" is ready
2024-03-30 03:25:32 [ℹ]  waiting for at least 1 node(s) to become ready in "ashish-workers"
2024-03-30 03:25:32 [ℹ]  nodegroup "ashish-workers" has 2 node(s)
2024-03-30 03:25:32 [ℹ]  node "ip-192-168-2-24.ec2.internal" is ready
2024-03-30 03:25:32 [ℹ]  node "ip-192-168-47-180.ec2.internal" is ready
2024-03-30 03:25:32 [ℹ]  kubectl command should work with "/root/.kube/config", try 'kubectl get nodes'
2024-03-30 03:25:32 [✔]  EKS cluster "ashish" in "us-east-1" region is ready
- AWS CLI
- Check how many pods are running
1
2
3
4
5
6
7
8
[root@ip-172-31-88-31 ~]# kubectl get po -A
NAMESPACE     NAME                       READY   STATUS    RESTARTS   AGE
kube-system   aws-node-8qc9n             2/2     Running   0          7m38s
kube-system   aws-node-f7rkv             2/2     Running   0          7m34s
kube-system   coredns-5b676c58cf-67rnt   1/1     Running   0          13m
kube-system   coredns-5b676c58cf-sr5l5   1/1     Running   0          13m
kube-system   kube-proxy-mbnwt           1/1     Running   0          7m34s
kube-system   kube-proxy-rb7vn           1/1     Running   0          7m38s
- AWS Console
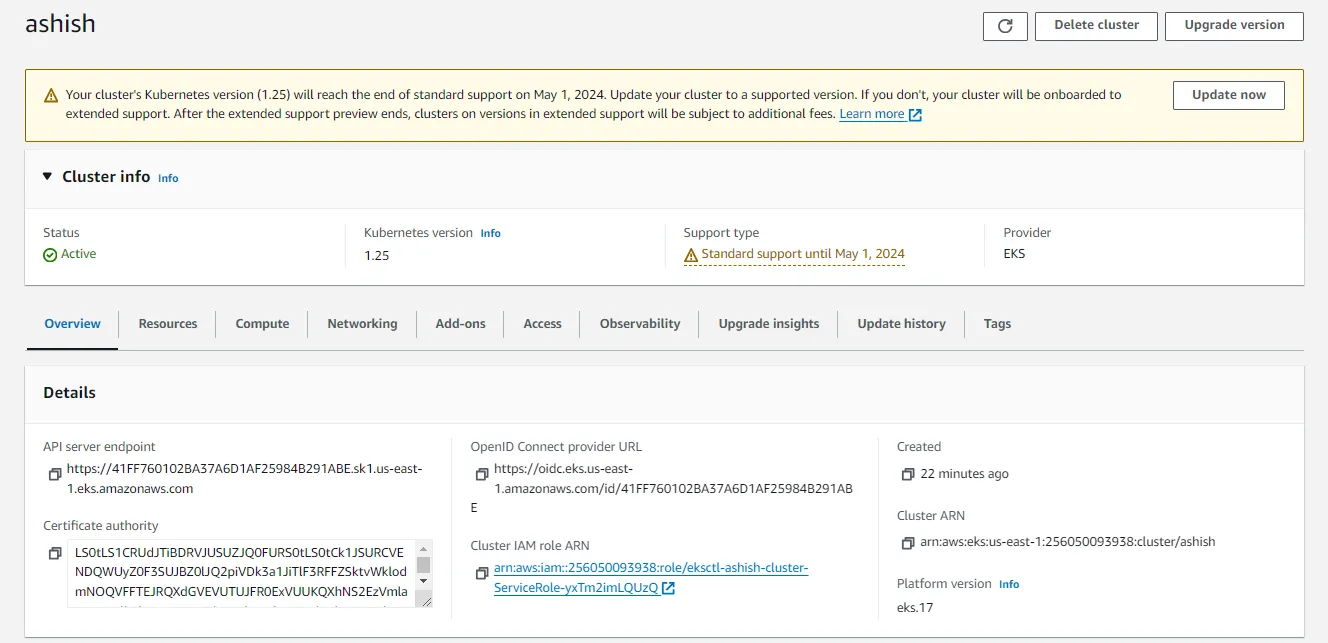
- Verify EKS Cluster and version.


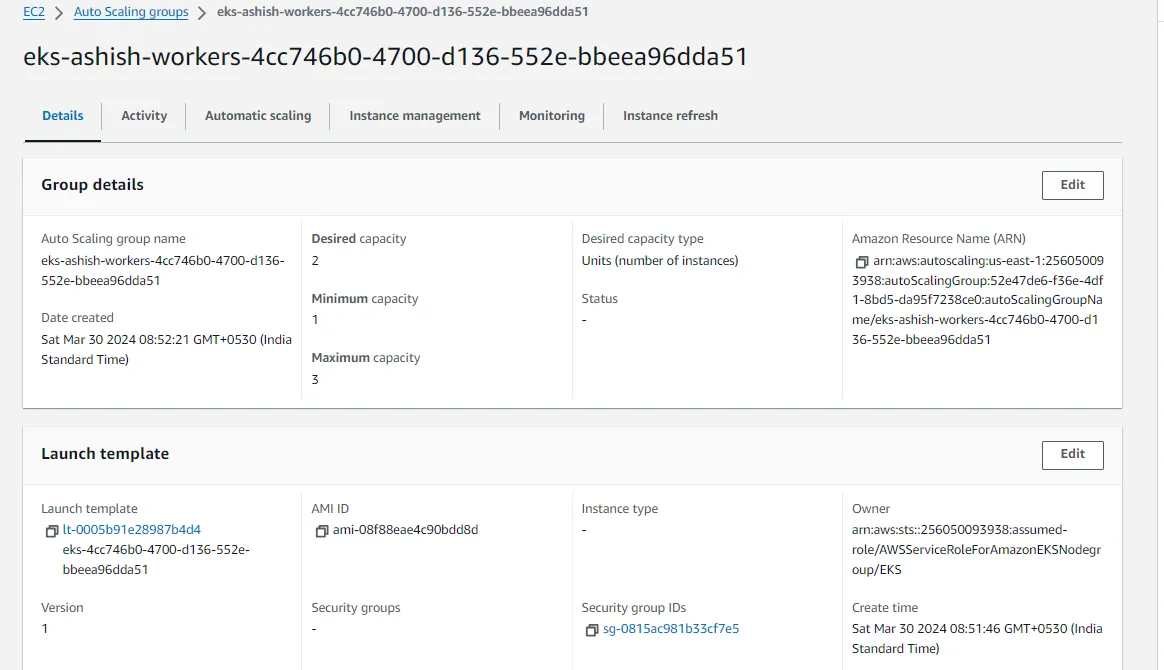
- Verify ASG Group

1
[root@ip-172-31-88-31 ~]# eksctl delete cluster --name ashish
