Managing multiple AWS accounts with AWS Organisations
Using AWS organisations to create multiple accounts for dev and prod workloads
Published Jan 7, 2025
AWS Organizations is an account management service that enables you to consolidate multiple AWS accounts into an organization that you create and centrally manage. AWS Organizations includes account management and consolidated billing capabilities that enable you to better meet the budgetary, security, and compliance needs of your business. As an administrator of an organization, you can create accounts in your organization and invite existing accounts to join the organization.
The management account is the account that you use to create the organization. Sign in to the AWS Organizations console. You must sign in as an IAM user, assume an IAM role, or sign in as the root user (not recommended) in the organization’s management account. By default, the organization is created with all features enabled. However, you can choose either of the following steps:If you accidentally choose the wrong option, you can immediately go to the Settings page, and then choose Delete organization and start over.
To create an organization with all features enabled, on the introduction page, choose Create an organization. The organization is created and the AWS accounts page appears. The only account present is your management account, and it's currently stored in the root organizational unit (OU). AWS Organizations should automatically send a verification email to the address that is associated with your management account.
From the organization's management account, you can do the following:
- Create accounts in the organization
- Invite other existing accounts to the organization
- Remove accounts from the organization
- Designate delegated administrator accounts
- Manage invitations
- Apply policies to entities (roots, OUs, or accounts) within the organization
- Enable integration with supported AWS services to provide service functionality across all of the accounts in the organization.
The management account has the responsibilities of a payer account and is responsible for paying all charges that are accrued by the member accounts.
To create a new account, select Create an AWS account as in the screenshot below, from the AWS accounts page under Add an AWS Account. We will create an account named Production first.
If you you use gmail, there is a neat trick which allows you to use the same email address and not have to create a new one for every account you create. If you add “+” followed by any numbers/letters to the end of your Gmail handle, Gmail recognises it as belonging to your email address but it looks like a unique email address to the site for which you are registering an account.
So for example if your address is awsguru@gmail.com, you can use following patterns like awsguru+1@gmail.com , awsguru+2@gmail.com, awsguru+dev@gmail.com, awsguru+prod@gmail.com etc when registering for a new account. Any email verifications or other notifications associated with the account, will still arrive in the in the inbox of your original email awsguru@gmail.com.
A default role OrganizationAccountAccessRole is created to give the management account access to the new member account. Accept the other default options and create the account. You should see it added to the list in the AWSAccounts page. Now repeat the same steps to create a Development account
Image not found

When you sign in to your organization's management account, you can create an OU in your organization's root. OUs can be nested up to five levels deep.
You can move accounts in your organization from the root to an OU, from one OU to another, or back to the root from an OU. Placing an account inside an OU makes it subject to any policies that are attached to the parent OU and any OUs in the parent chain up to the root. If an account isn't in an OU, it's subject to only the policies that are attached directly to the root and any policies that are attached directly to the account. To move accounts, complete the following steps.
To create an OU, complete the following steps.
A container for accounts within a root. An OU also can contain other OUs, enabling you to create a hierarchy that resembles an upside-down tree, with a root at the top and branches of OUs that reach down, ending in accounts that are the leaves of the tree. When you attach a policy to one of the nodes in the hierarchy, it flows down and affects all the branches (OUs) and leaves (accounts) beneath it. An OU can have exactly one parent, and currently each account can be a member of exactly one OU.
- Select the Root OU and in the on the Actions menu, under Organizational Unit, choose Create new
- In the Create organizational unit dialog box, enter the name of the OU that you want to create.
Image not found
When you create a member account in your organization, AWS Organizations also automatically adds a managed policy with the
OrganizationAccountAccessRole role to the member account.By default this enables users and roles in the management account to exercise full administrative control over the member account. This can be restricted using service control policies (described in the latter section). We can use a feature called switch in the AWS Management Console, to gain federated user access to the member account. In the IAM console, choose your user name on the navigation bar in the upper right. Choose Switch Role and type the following in the Switch Role page:
- Account ID: <account-id of production account>
- IAM role name:
OrganizationAccountAccessRole - Display Name: Prod
- Display color: Green (or choose whatever color you like)
Image not found
Repeat the same with the Dev account:
- Account ID: <account-id of development account>
- IAM role name:
OrganizationAccountAccessRole - Display Name: Dev
- Display color: Yellow (or another color different to the Prod Role)
You will be switched into the development account as in the screenshot below.
Image not found
From here we can switch back to the management account (by clicking the Switch back option) or directly into the other member account by clicking the role colored display name in the role history.
it is important to not that the original IAM user credentials which were used to login to the management account, will always be used to authorize the switch. In the example above, we first created a Prod Role and switched to Production, IAM uses original user credentials to determine whether you are allowed to assume Prod Role. We can then switch to Dev Role (development account), while using the Prod Role (in production account) and the original user credentials will still be used for authorisation and not the credentials for Prod Role.
Service control policies (SCPs) are a type of organization policy that you can use to manage permissions in your organization. SCPs offer central control over the maximum available permissions for the IAM users and IAM roles in your organization. SCPs help you to ensure your accounts stay within your organization’s access control guidelines.
An SCP defines a permission guardrail, or sets limits, on the actions that the IAM users and IAM roles in your organization can perform. SCPs do not grant permissions to the IAM users and IAM roles in your organization. To do this you will need to use identity based or resource based policies in the account. The effective permissions are the intersection of the SCP, identity and resource based policies.
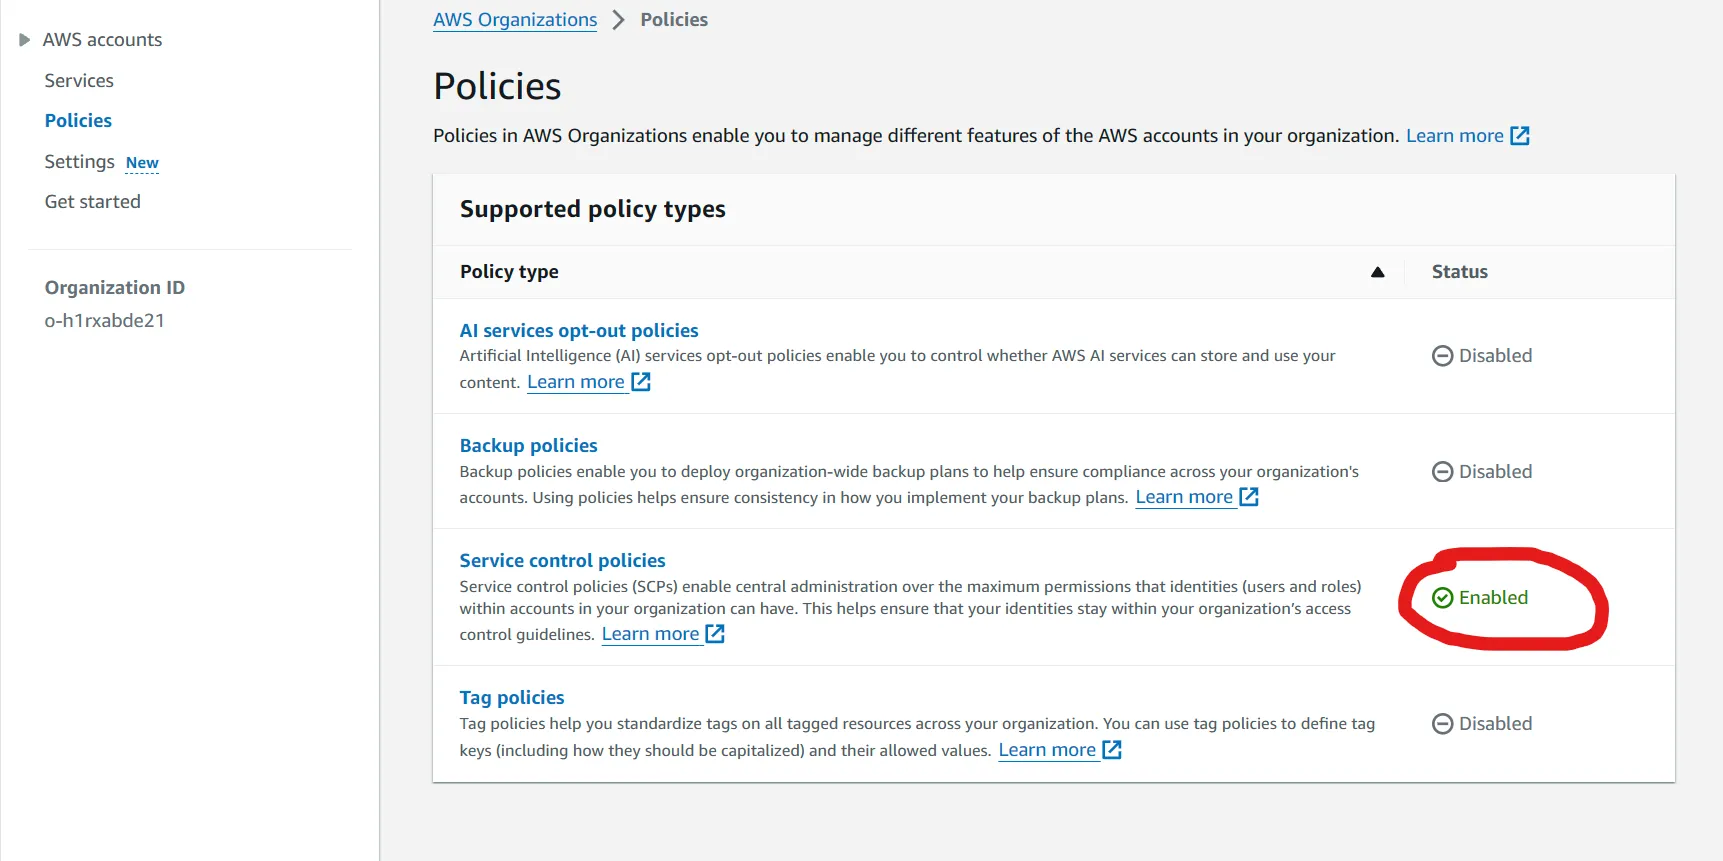
Before you can attach SCP to a root or to any OU within a root, you must enable the policy type for the organization. Policy types aren't enabled by default. To do this, navigate to policies page and under the supported policy types, enable the service control policy. It should show as enabled as in the screenshot below.
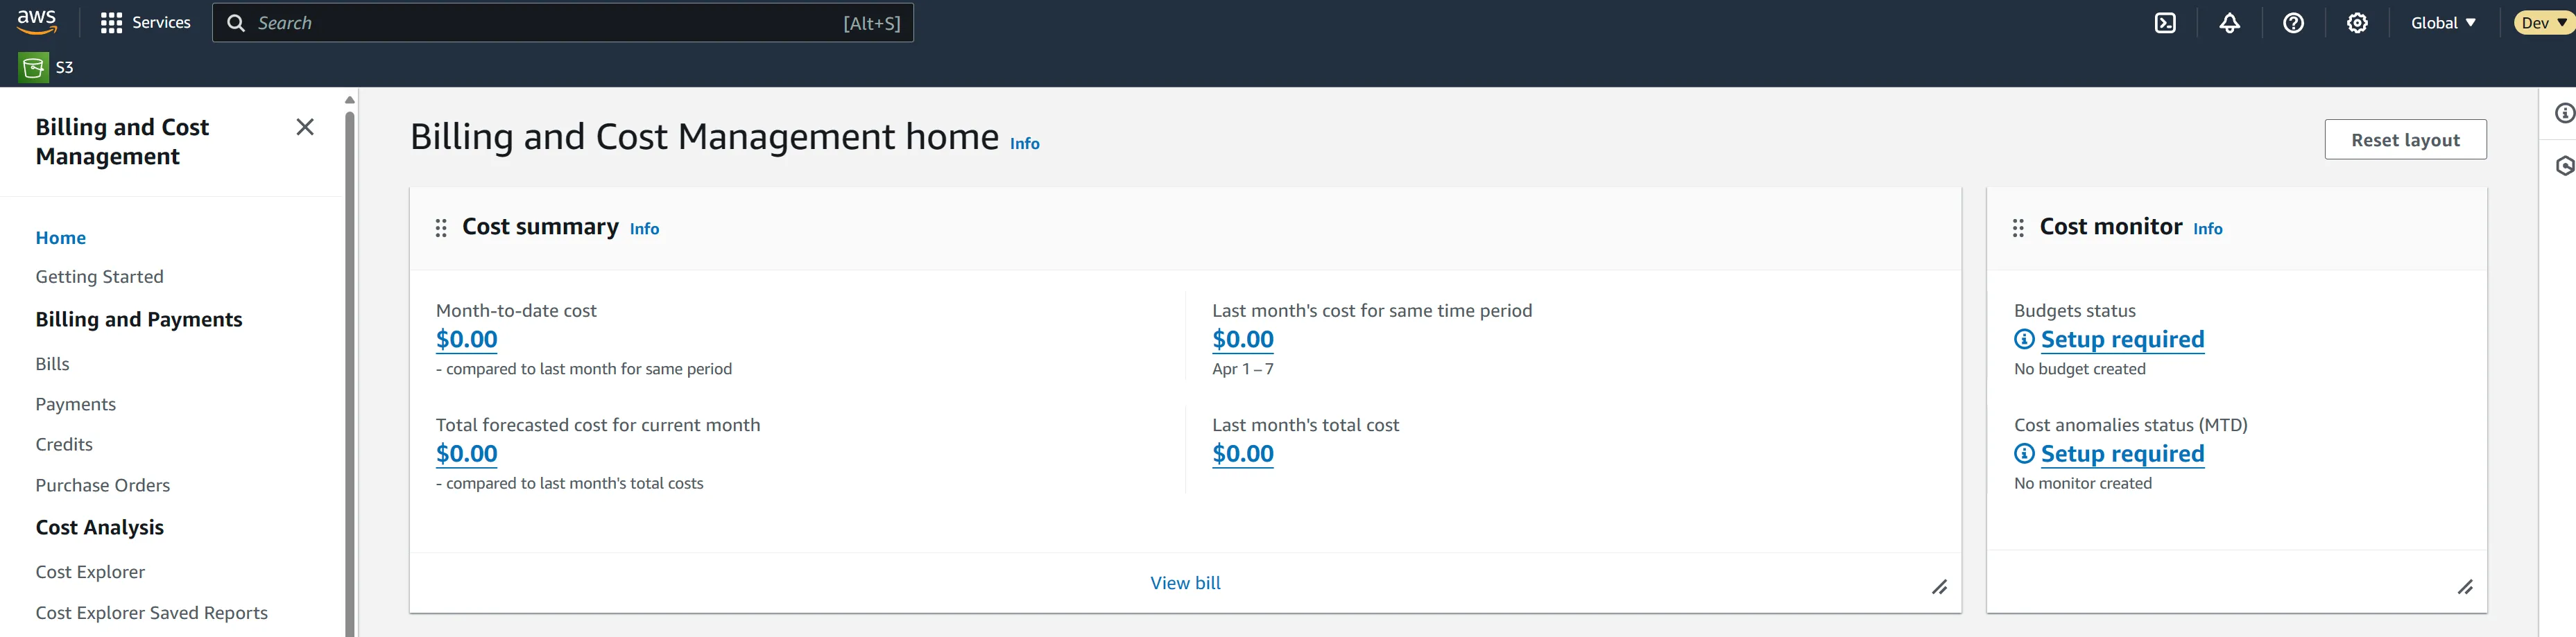
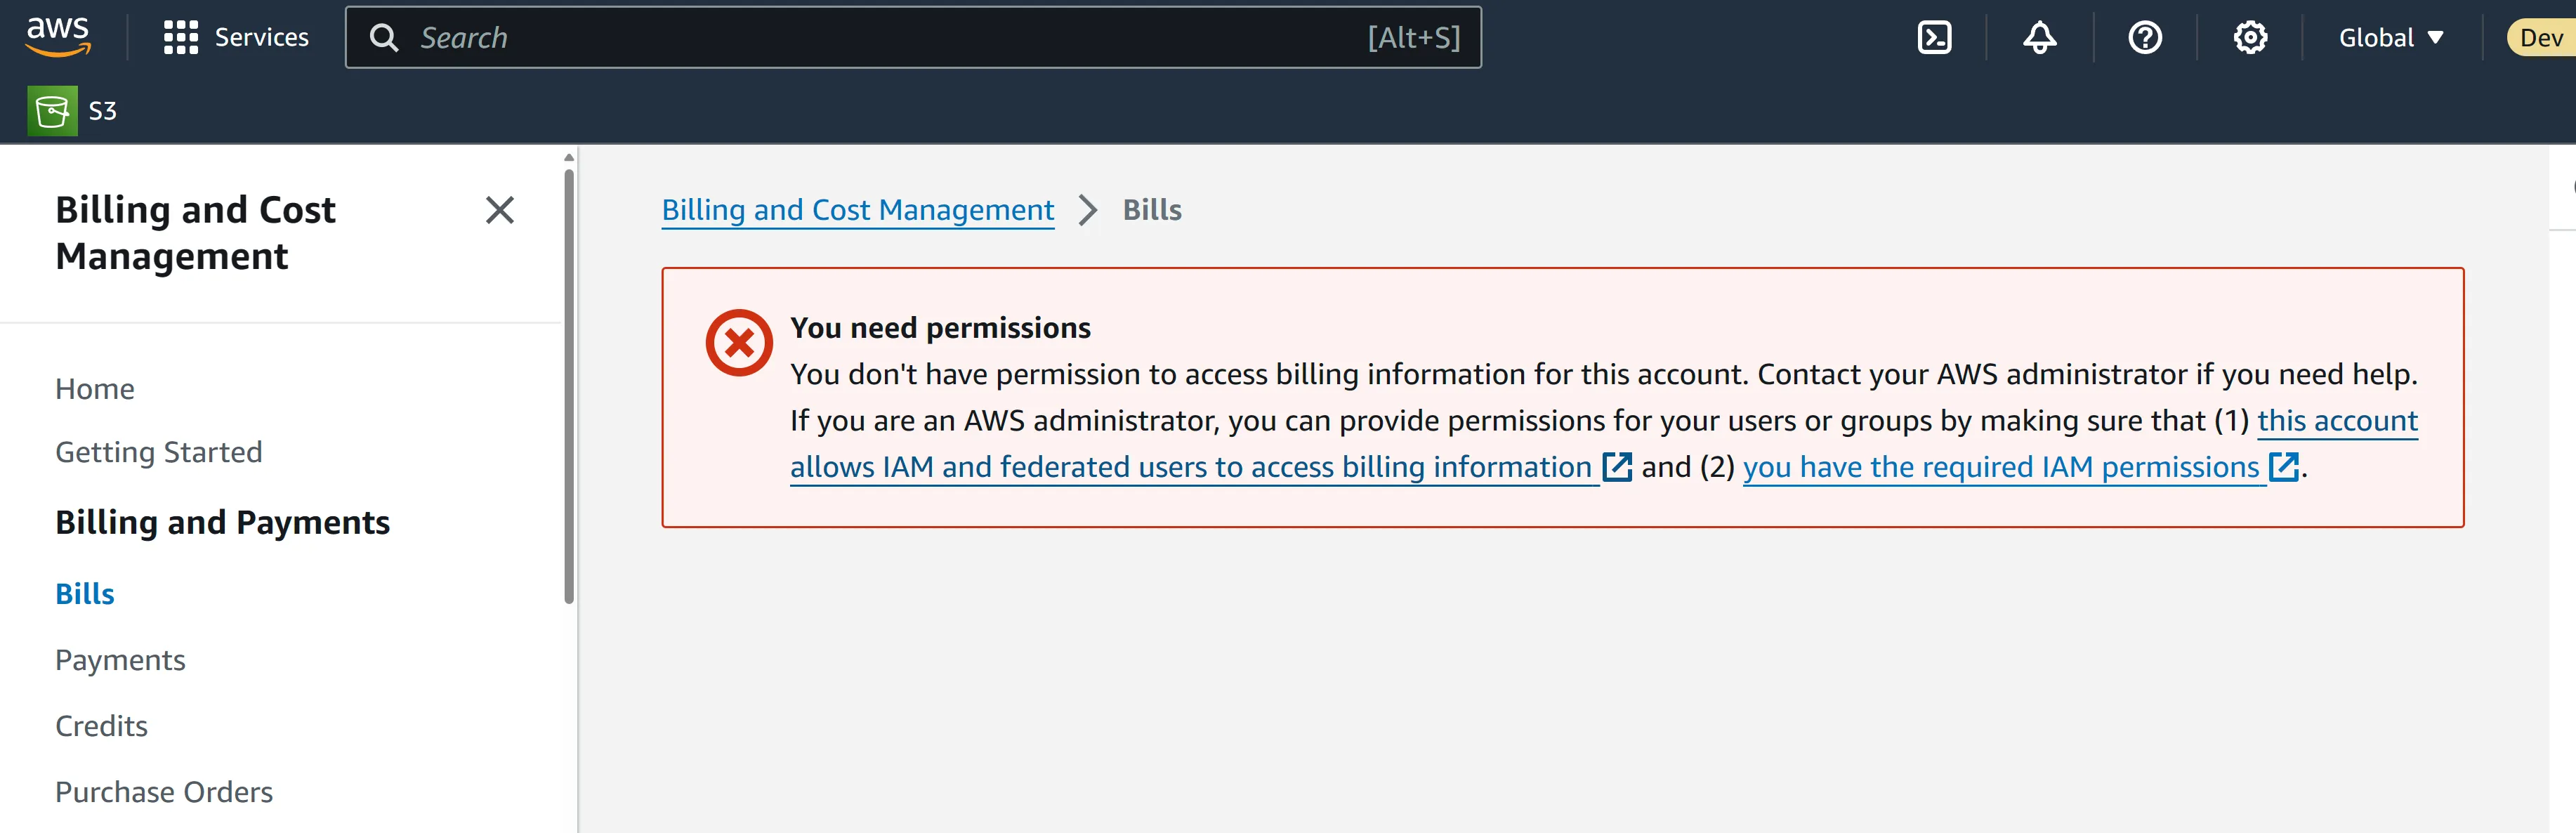
We want to create a SCP which will restrict access to billing and credit details to both member accounts in the OU created earlier. Switch to one of member accounts and navigate to billing and cost management console. You should be able to view billing details. After attaching the SCP, the user will not be able to view these details.
The policy below will restrict access to the billing and credits in billing and management portal in both accounts. The policy snippet below includes the
billing:* actions to the deny list. 1
2
3
4
5
6
7
8
9
10
11
12
13
14
15
16
{
"Version": "2012-10-17",
"Statement": [
{
"Sid": "Statement1",
"Effect": "Deny",
"Action": [
"billing:*",
"aws-portal:*"
],
"Resource": [
"*"
]
}
]
}Now switch back to the management account and navigate to the Service control policies page (under policies section) and create policy. Enter a policy name (e.g.
BillingDenySCP) and paste the policy snippet above (as shown in screenshot below) and create policy.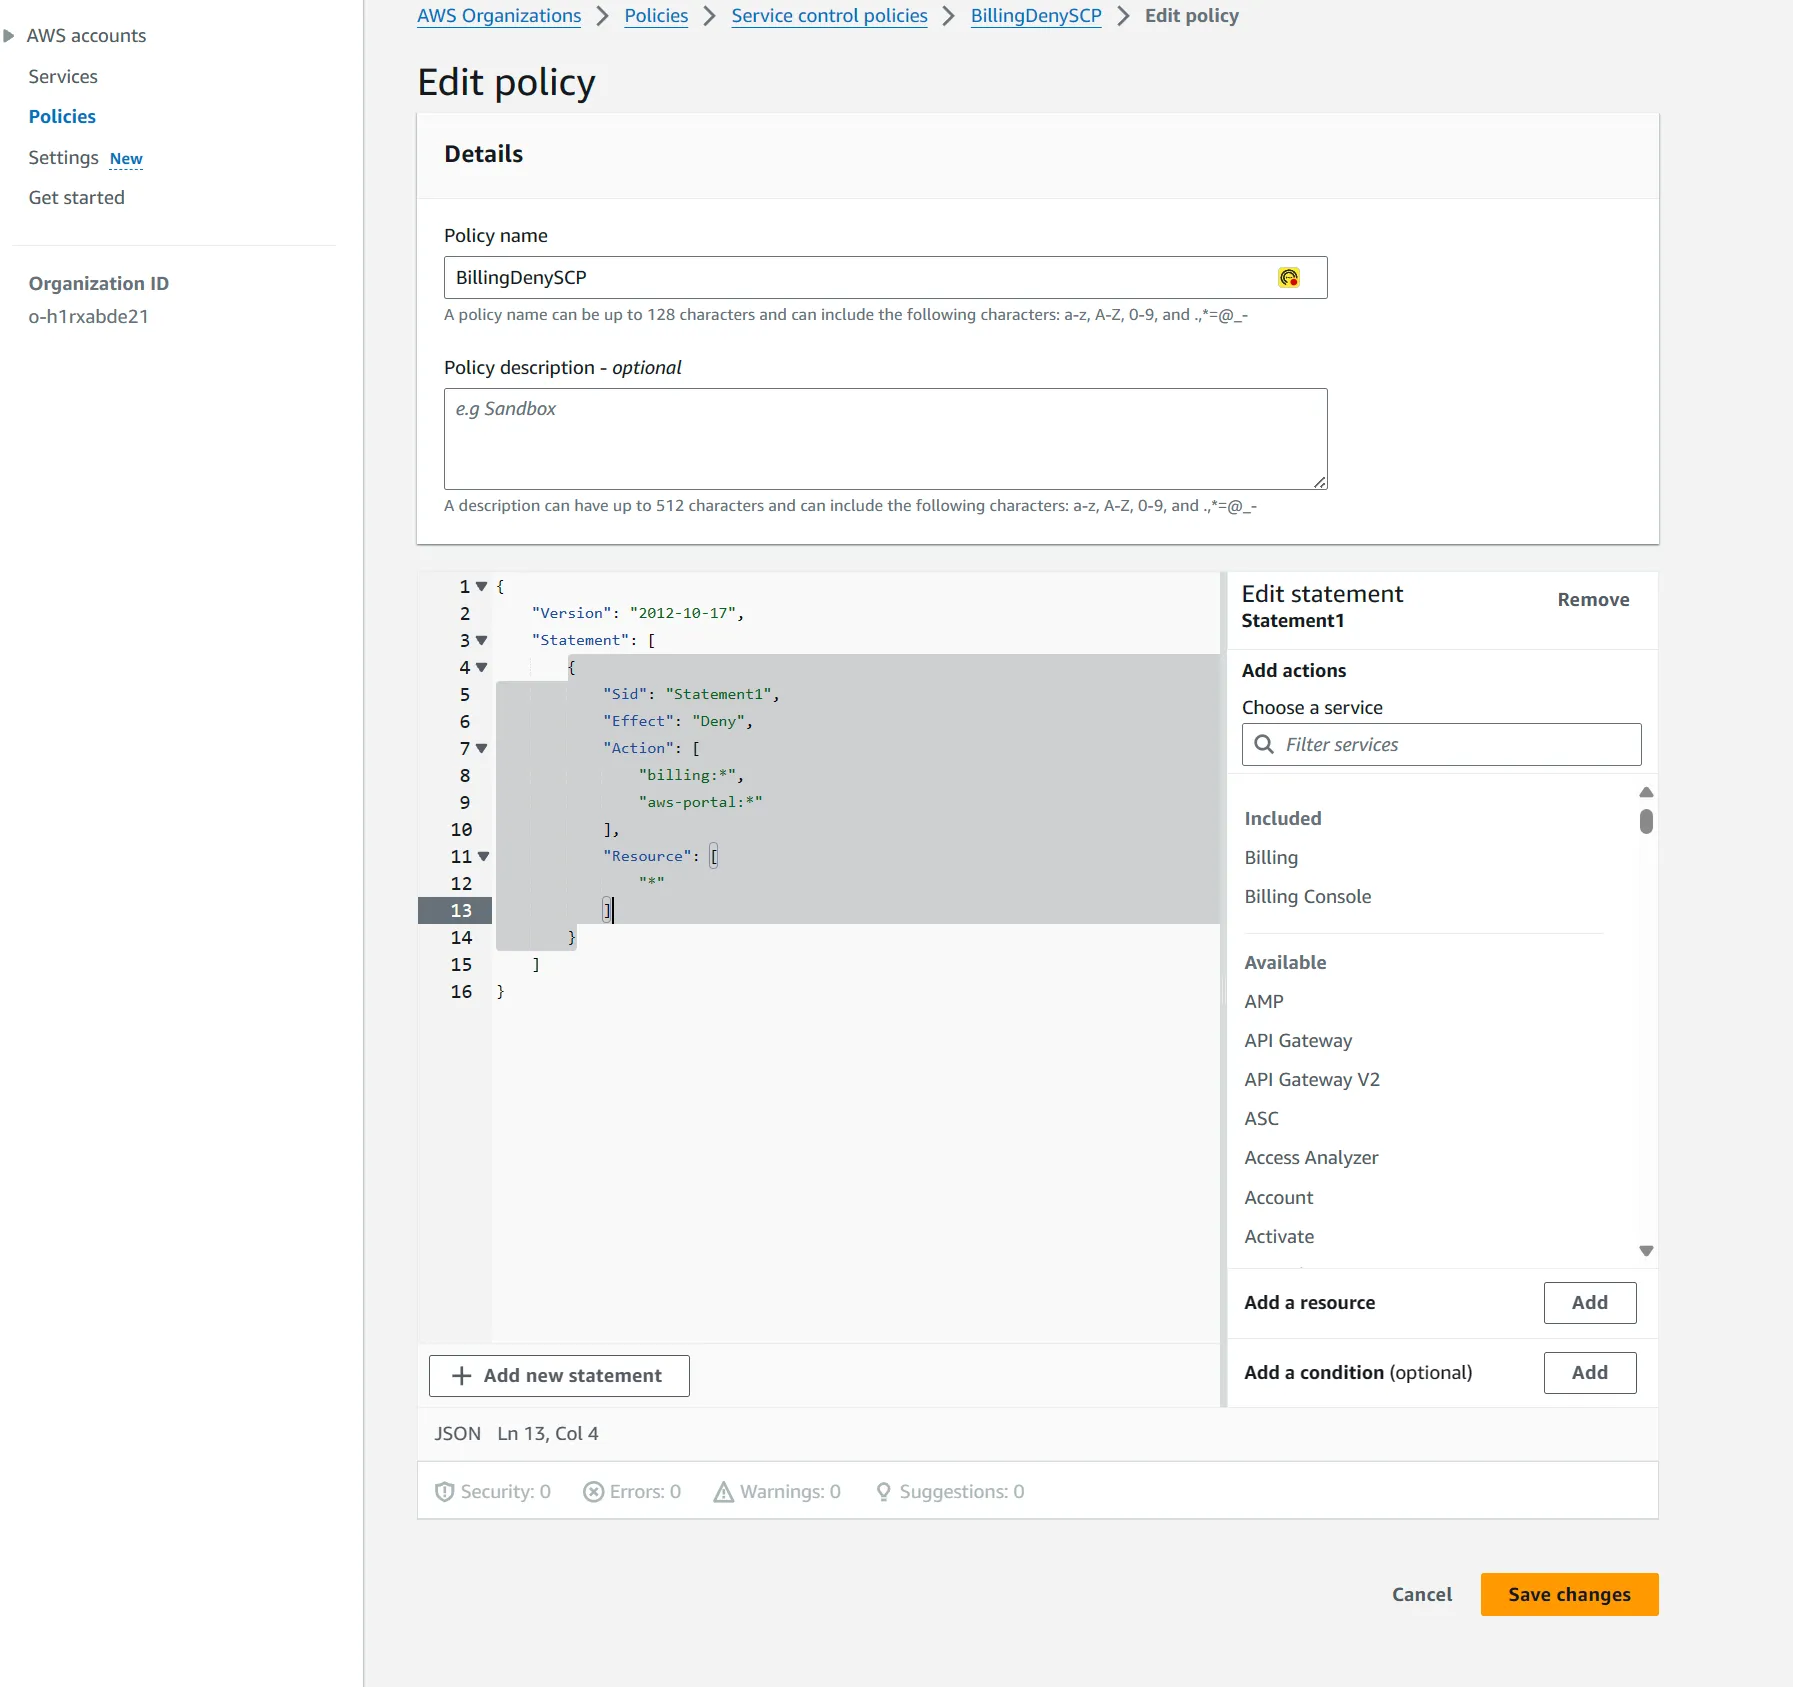
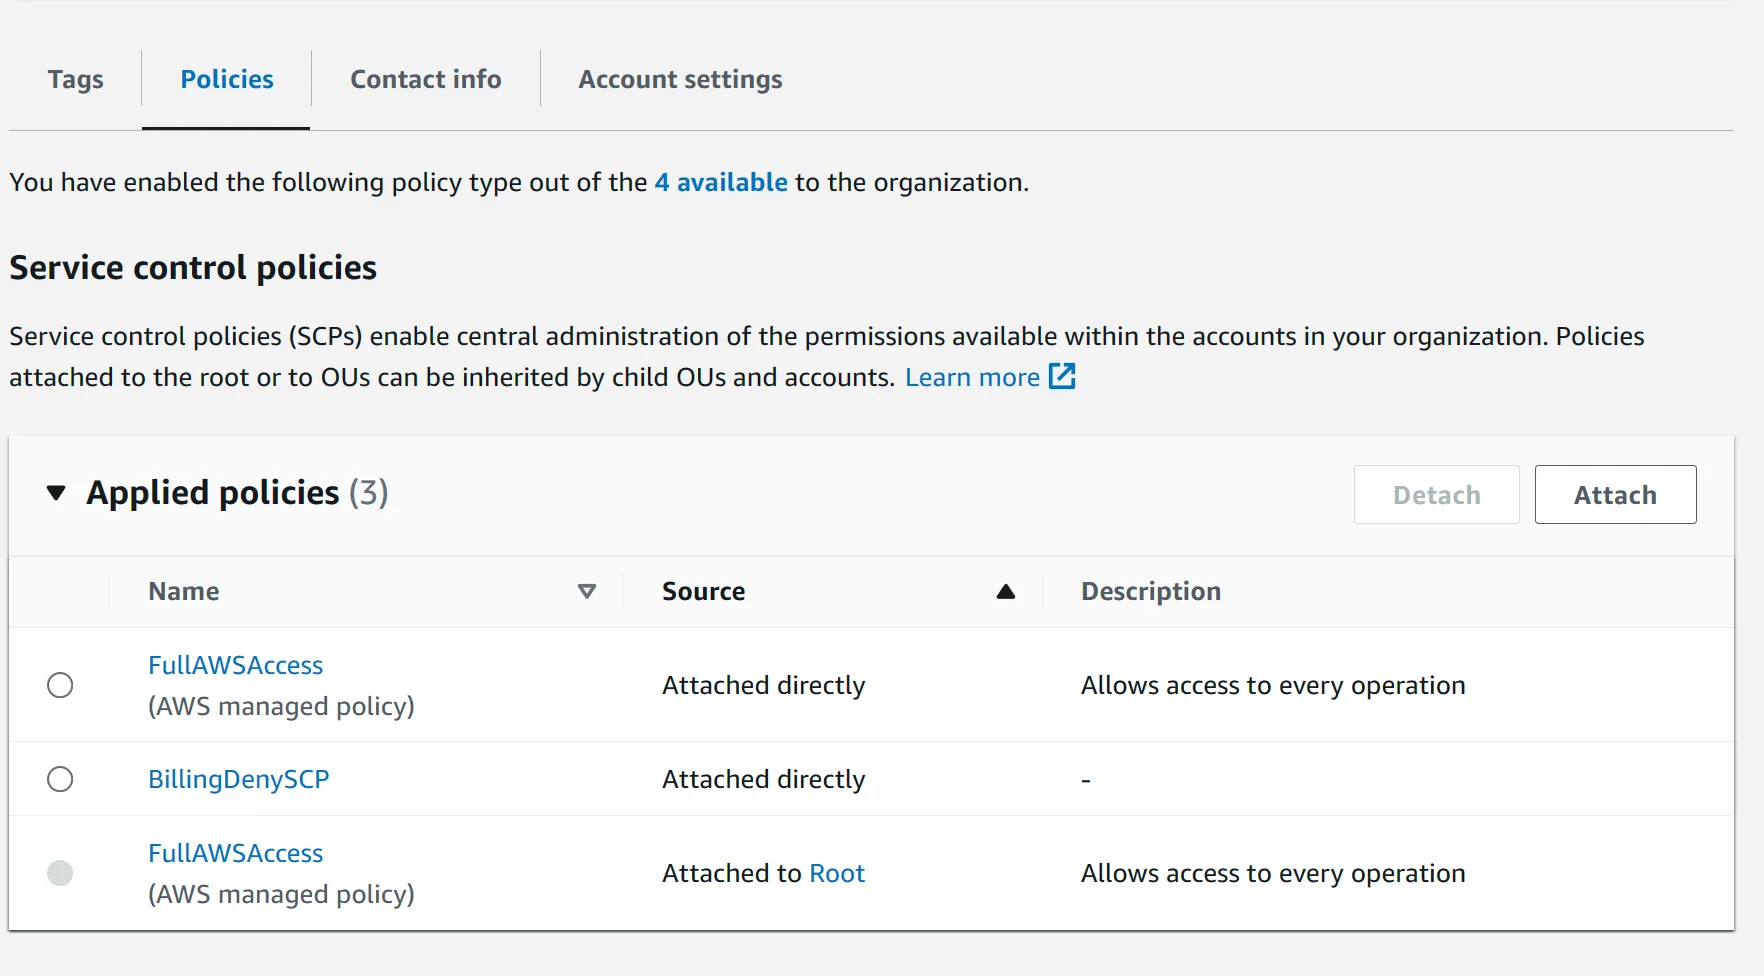
Choose the OU containing the development and production accounts in AWS Accounts page and under policies tab in the details page, you will see the
FullAWSAccess policy already attached. This is propagated down from the root account (management account). By default, all users accessing either member accounts will have full admin access. By attaching the SCP created above, with explicit deny list, we can restrict anyone in the accounts from using any restricted services or if only use certain services if they satisfy some condition.Image not found
Choose Attach in Service Control Policies (circled in the screenshot below), and then in the list of available policies, select the
BillingDenySCP option, and then attach.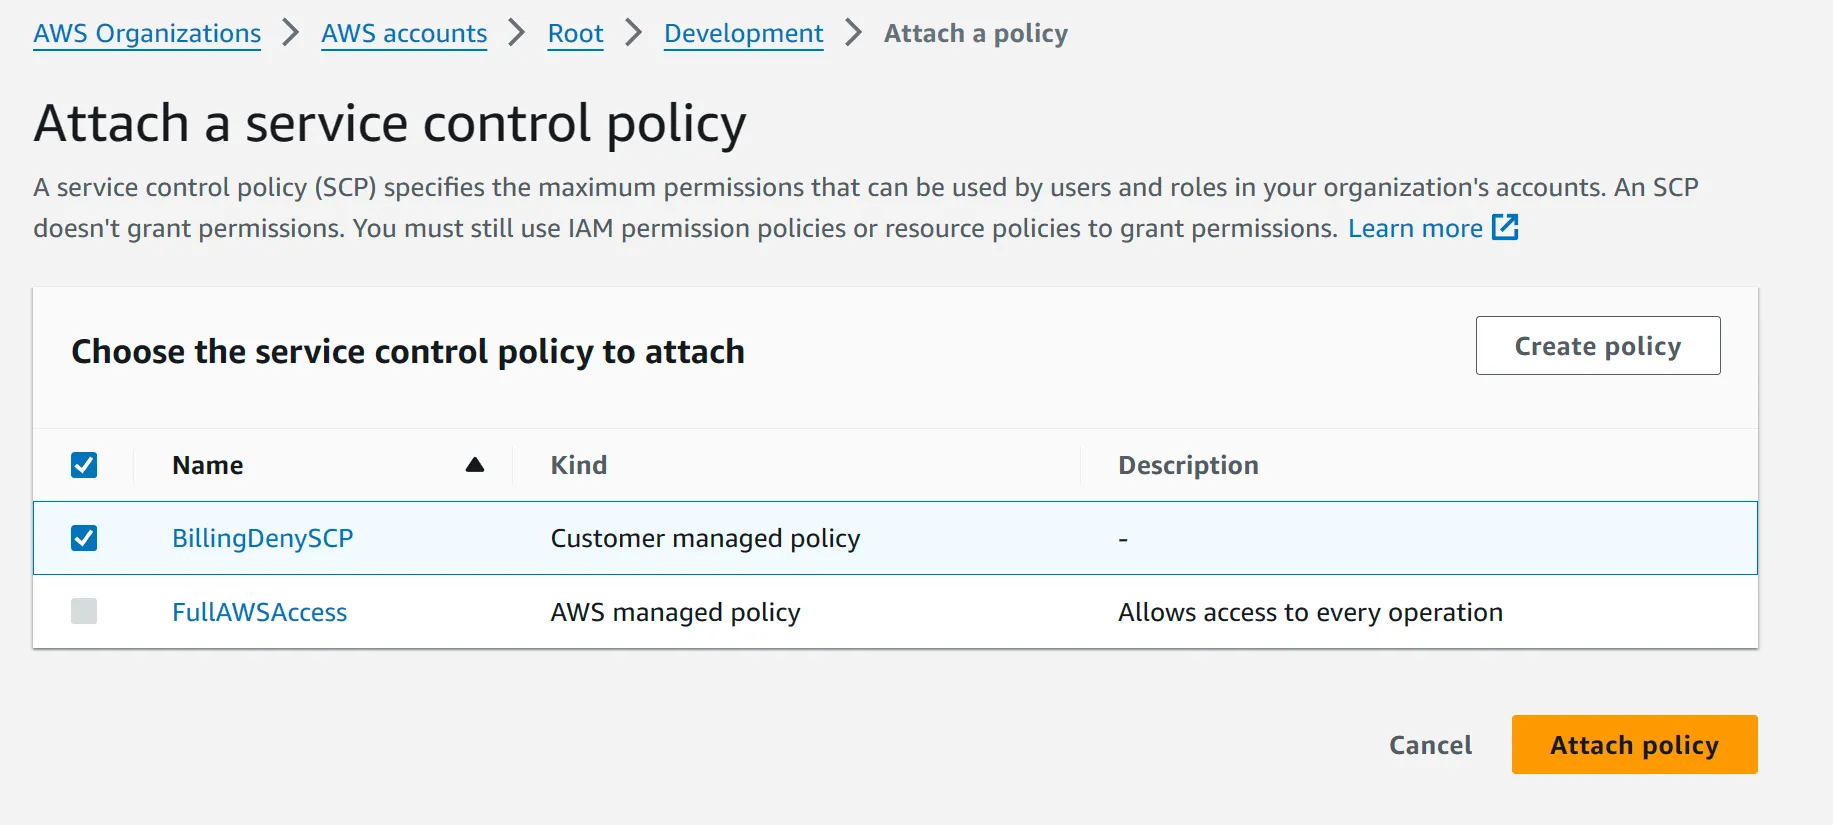
If successful, you should see this added to the list of SCP policies in the development account under the policies tab we navigated to earlier.
Now switch back to the dev or prod account and navigate to the billing section as earlier. This time you will see a permissions error saying you do not have access. The SCP is now in effect.
- AWS Organisations What is AWS Organizations? - AWS Organizations (amazon.com)
- Service Control Policies Service control policies (SCPs) - AWS Organizations (amazon.com)
Comments
Log in to comment