Staff Pick
Building a serverless connected BBQ as SaaS - Part 2 - User Creation
In part two of the series about the world of BBQ, where tradition and technology rarely cross paths. The future of grilling is here, and it’s connected, smart, and runs on the cloud! I continue with user management using an serverless and event-driven approach with Cognito User Pool together with Lambda, EventBridge, and StepFunctions.
Published Jun 13, 2024
Last Modified Aug 23, 2024
The time has come for Part 2 in the series of creating a Serverless Connected BBQ as SaaS. In this second post we'll look into user creation, authentication, and authorization. We'll setup idP using Cognito User Pool, and create an event-driven system to store data in our user service. We'll also start building out the frontend part so users can interact with the solution.
If you have not already checked it out, here is part 1.
In the connected BBQ IoT SaaS solution, I have opted in for a user management strategy that ensure secure and efficient handling of user data. We leverage AWS Cognito User Pools, enhanced with custom attributes to store tenant-specific information, coupled with DynamoDB for external metadata storage. This approach streamlines user authentication and authorization and maintains the scalability and flexibility needed.
Our primary strategy involves using a single Cognito User Pool, enriched with custom attributes to capture tenant information. Each user is assigned attributes that identify their tenant, enabling the system to differentiate and manage users across various organizations within the same pool. This approach simplifies user management by centralizing all users in one pool while still allowing for tenant-specific operations.
To complement our user pool strategy, we store metadata about users in an external DynamoDB table. This can include information such as user preferences, and additional tenant-specific data that might not be suitable for storage within Cognito. This also enables a easy listing of users per tenant, and a quick way to fetch and display user information, instead of querying Cognito. In this solution users will update information in the user service, that stores it in DynamoDB, changes are then reflected into Cognito.
Another common approach in SaaS user management is to use one Cognito User Pool per tenant. This method provides a very strong isolation between tenants, simplifying access control and data segregation.
By using a single user pool with custom attributes and external metadata storage, we have a balanced approach that combines the advantages of centralized management and flexible.
We'll create two parts when it comes to user management, the idP which consists of Cognito User Pool and a user service that will be storing user information and relationships. When a user sign up for our solution the user pool will invoke a Lambda function when the user has been confirmed
Post Confirmation. The function will put a an event on the application event-bus that a user was created. The user service will react on this event and store information about the user in a DynamoDB table. User service ends by posting a new event on the bus saying a new user was created.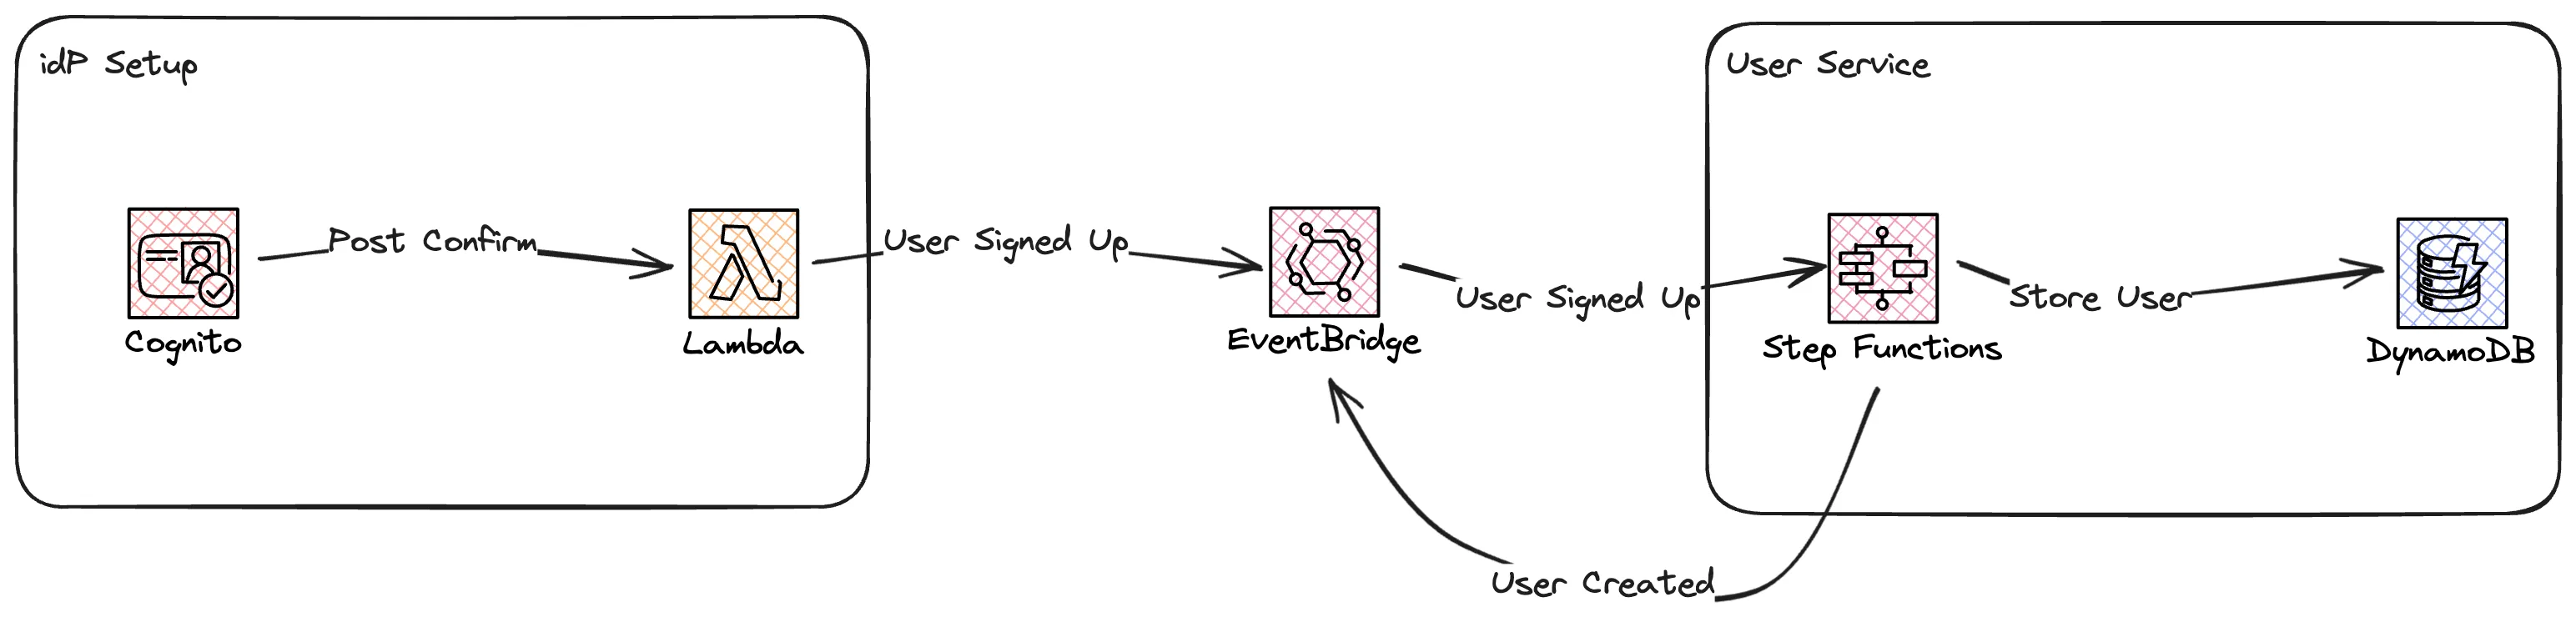
We will also start creating our dashboard, which is a React application. We'll let users sign up for our solution, login / logout, and see some basic information about their profile.
We will use the event-bus design with a single central bus, this design pattern is a good start which makes it easy to expand with more services, and in a later stage maybe move to a multi-bus approach. Starting with a single central bus setup is normally what I recommend. So let's introduce our common stack that will contain our centrally managed resources.
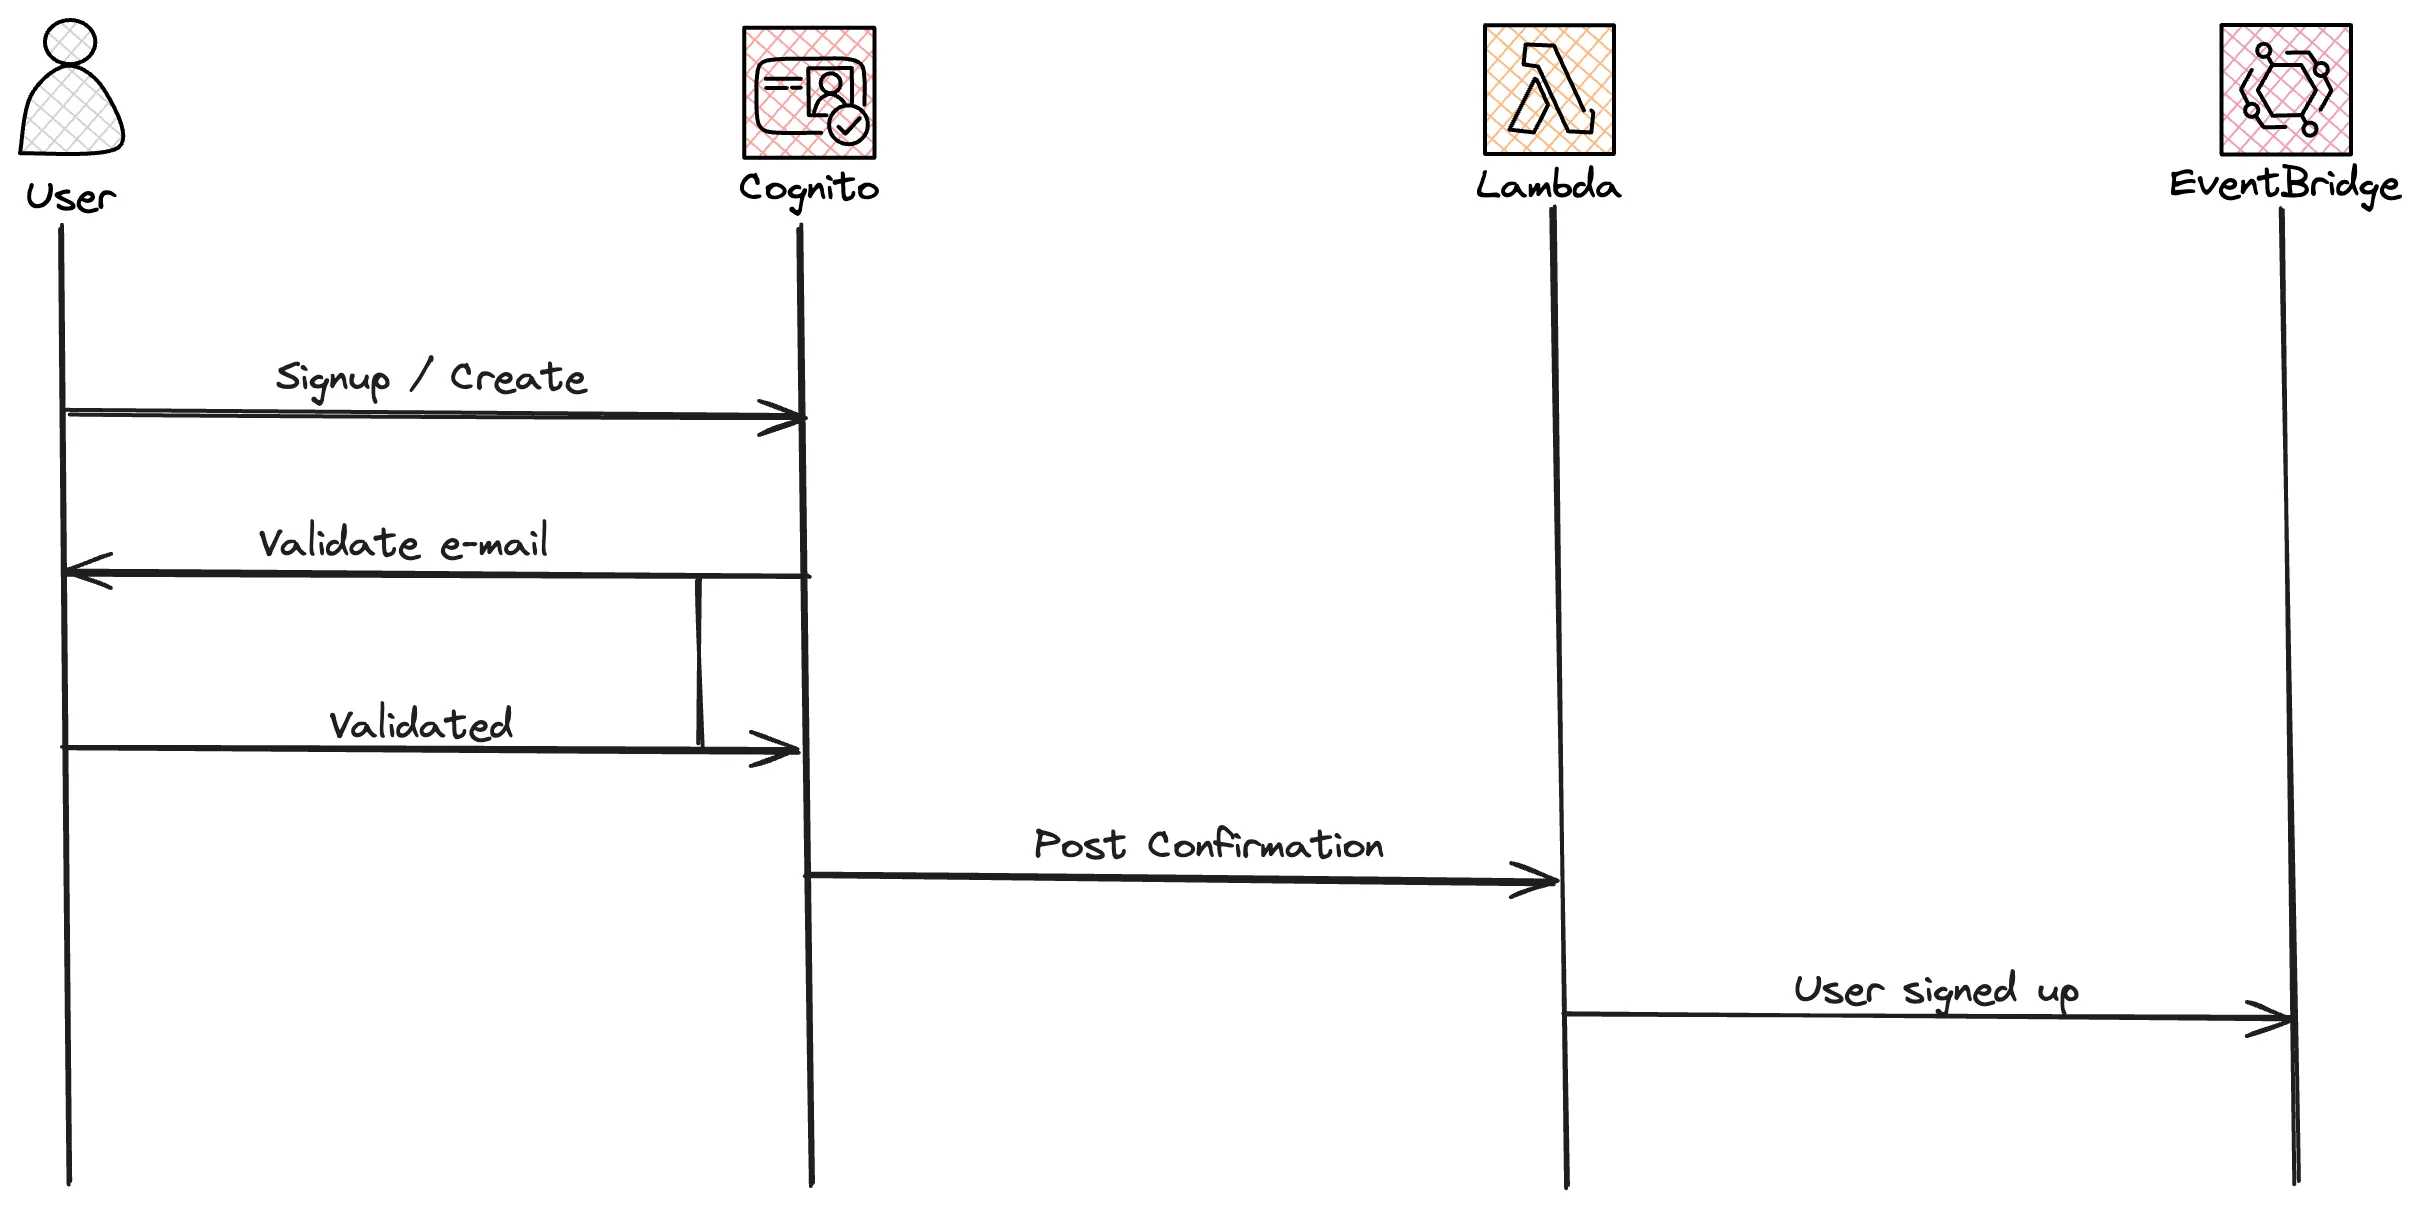
First of all we need to create our idP, for this we use Cognito User Pool. E-mail will be used as username, which also need to be verified. Password policy is created and also a schema where the user need to specify e-mail and name, in the schema we also add a field tenant that will be populated by our system.
When a user sign up, e-mail, password, and name will be added by the user. Cognito will then validate the e-mail and when that is done a Lambda function will be invoked that adds a message on the event-bus.
So let's start by creating the User Pool
To be able to interact with the User Pool from our Webb application we also need to create a User Pool Client. In the webb application we will use Amplify and Amplify UI for user sign up and sign in. For this to work properly it's important that we don't generate an secret, as that will then block Amplify UI. So we need
GenerateSecret: False set. Now let's add the client to the template from before.The final part is to add the Lambda function for the post confirmation hook and integrate that with the User Pool. When posting a event to the event-bus we will use the metadata / data pattern.
Now let's add the Lambda function to the template and set the User Pool to call it. We also need to add Lambda Permission so the User Pool is allowed to invoke the function.
The code for the Lambda function is not that complicated, it will just post a message to the event-bus.
With that created the sign up flow for the User Pool is completed.
The next part in the user handling is the User Service that will be used to store additional metadata about the users in the system. It will also be a crucial part in the permission and data isolation, that will be discussed in later parts.
When a user has signed up, we like to react on the event sent by the User Pool Lambda integration, and create a user in the user database. When user is stored we send an event about that on the bus for other services to react on.

So lets go ahead and create the state machine and user DynamoDB table.
The definition for the state machine is not that complicated.
Let us now start creating our dashboard, that we will continue building on in this series. The dashboard is a react app created with
create-react-app. For styling we will use Tailwind CSS.For user login and signup we will rely on Amplify, so first of all, let's create a small utils class that will check if a user is already logged in.
Next let's create our Login page, that we will route users to when they are not logged in.
This will now create a UI and flow like this, which is the Amplify UI for Cognito User Pools.

To sign up the user click
Create Account and fill in e-mail and password, in the next step the e-mail address must be verified.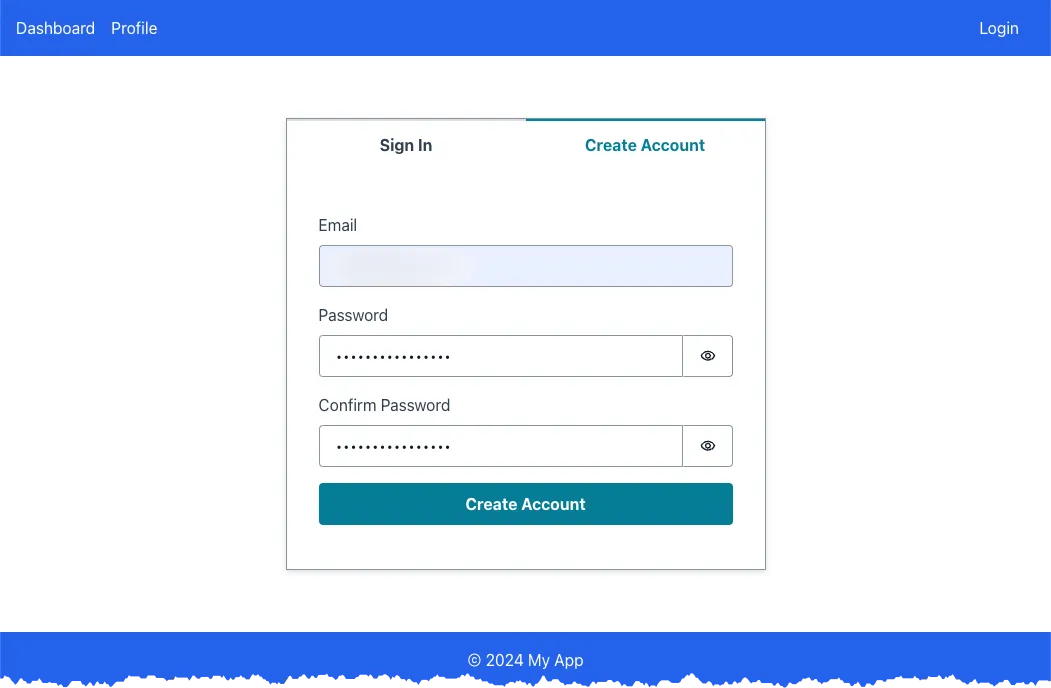
After successful login it's possible to view user attributes on the
Profile tab, also not that the login button now changes to logout.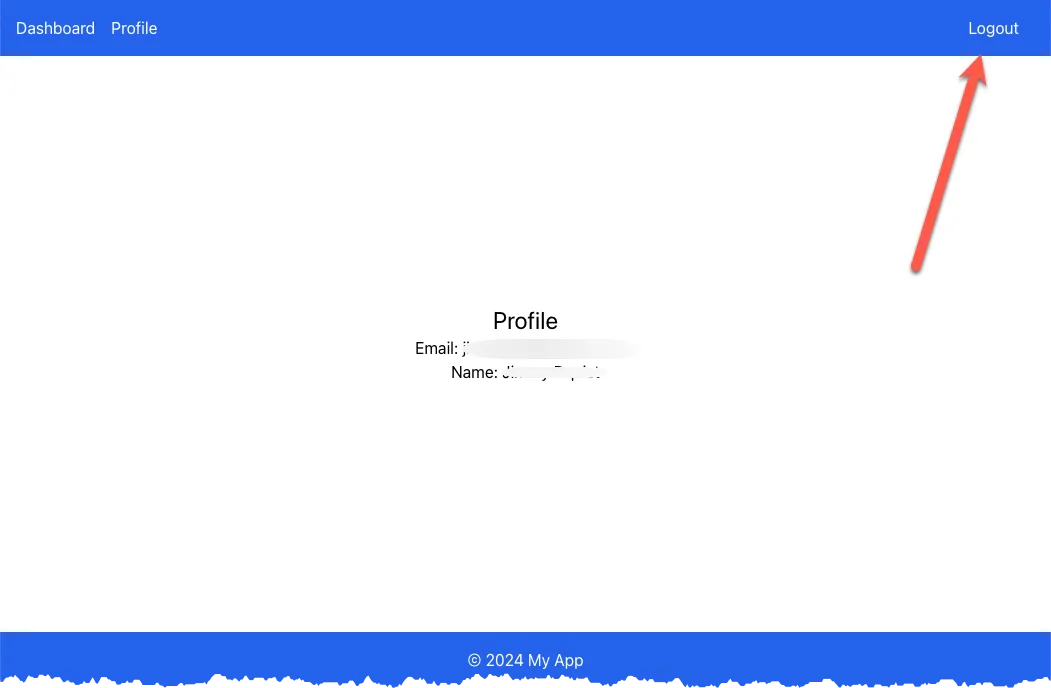
The complete setup with all the code is available on Serverless Handbook
This was the second part in building a connected BBQ as a SaaS solution. Where we start to create the user sign up and registration using Cognito User Pool.
Check out My serverless Handbook for some of the concepts mentioned in this post.
As Werner says! Now Go Build!