We use essential cookies and similar tools that are necessary to provide our site and services. We use performance cookies to collect anonymous statistics, so we can understand how customers use our site and make improvements. Essential cookies cannot be deactivated, but you can choose “Customize” or “Decline” to decline performance cookies.
If you agree, AWS and approved third parties will also use cookies to provide useful site features, remember your preferences, and display relevant content, including relevant advertising. To accept or decline all non-essential cookies, choose “Accept” or “Decline.” To make more detailed choices, choose “Customize.”
Customize cookie preferences
We use cookies and similar tools (collectively, "cookies") for the following purposes.
Essential
Essential cookies are necessary to provide our site and services and cannot be deactivated. They are usually set in response to your actions on the site, such as setting your privacy preferences, signing in, or filling in forms.
Performance
Performance cookies provide anonymous statistics about how customers navigate our site so we can improve site experience and performance. Approved third parties may perform analytics on our behalf, but they cannot use the data for their own purposes.
Allowed
Functional
Functional cookies help us provide useful site features, remember your preferences, and display relevant content. Approved third parties may set these cookies to provide certain site features. If you do not allow these cookies, then some or all of these services may not function properly.
Allowed
Advertising
Advertising cookies may be set through our site by us or our advertising partners and help us deliver relevant marketing content. If you do not allow these cookies, you will experience less relevant advertising.
Allowed
Blocking some types of cookies may impact your experience of our sites. You may review and change your choices at any time by selecting Cookie preferences in the footer of this site. We and selected third-parties use cookies or similar technologies as specified in the AWS Cookie Notice.
Your privacy choices
We display ads relevant to your interests on AWS sites and on other properties, including cross-context behavioral advertising. Cross-context behavioral advertising uses data from one site or app to advertise to you on a different company’s site or app.
To not allow AWS cross-context behavioral advertising based on cookies or similar technologies, select “Don't allow” and “Save privacy choices” below, or visit an AWS site with a legally-recognized decline signal enabled, such as the Global Privacy Control. If you delete your cookies or visit this site from a different browser or device, you will need to make your selection again. For more information about cookies and how we use them, please read our AWS Cookie Notice.
How to build retro games in AWS using Sega Genesis Development Kit (SGDK)
Have fond memories of retro gaming classics? Want to know more on how to build new retro games in the modern world? Today, I walk you through how to setup your Sega game builds using AWS cloud.
Retro gaming isn’t just a thing of the past as many new retro system games are being made in modern times. With that in mind many gaming companies may want to release beta version for demo purposes. Others may want a CI/CD process around their new modern retro games that have artifacts ready to be put onto cartridges. Just because these titles will end up being played on cloned consoles or legacy gaming systems; doesn’t mean that the build process cannot be scaled and modernized with the cloud. In this blog, we will walk you through all the steps necessary to build a Sega Genesis build pipeline using AWS Services.
This blog post will contain various steps that allow you to setup a single EC2 agent that is called by a Jenkins pipeline to build a Sega Genesis game (rom.bin file) and ultimately publish that newly built rom into an S3 bucket. This blog will focus on establishing an MVP pipeline and is not meant for production services.
Disclaimers: The code in this blog is meant for tutorial purposes only and is not production-ready code. Furthermore, this tutorial will teach you how to setup a single agent and build a sample rom. Lastly, using the SGDK doesn’t give you Sega Licensing rights for your games. The SGDK is an open source library that allows developers to build games to run on cloned consoles or the legacy gaming system (Sega MD and Genesis).
Requirements
Ensure you have access to the following before starting this tutorial:
An AWS account A Jenkins Environment in which you will need permissions to add agents. A Code repository that Jenkins can pull from Game or Demo Game built with SGDK Intermediate level knowledge of Jenkins, EC2, and S3
Setting up a new Jenkins Controller
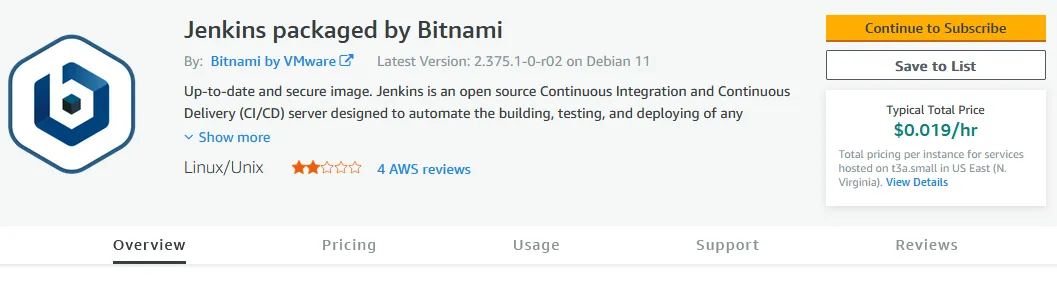
In this tutorial we are going to setup Jenkins from the marketplace. If you have your own Jenkins environment you may skip ahead to setting up your windows agent. We will be installing Jenkins packaged by Bitnami within this tutorial.
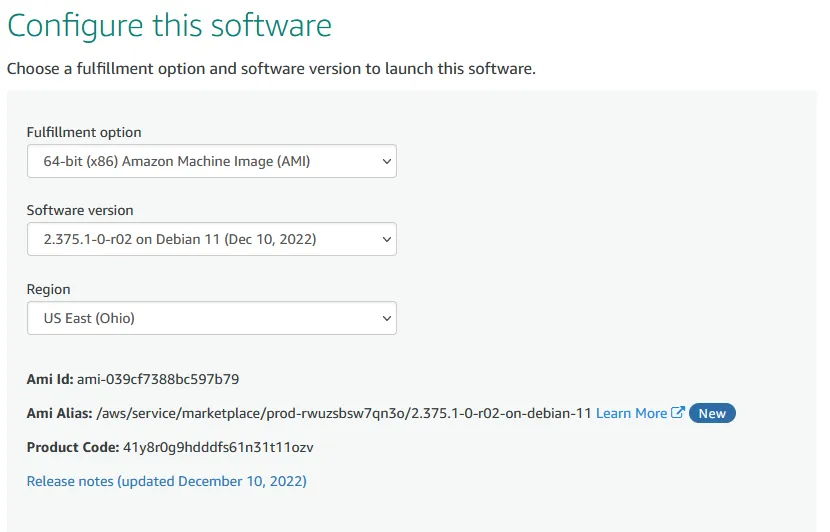
Go ahead and click Continue to Subscribe and then click Continue to Configure. Leave the defaults as they are, but you may chose a different region if you like; just remember that region later on when setting up your agent. In this example, we’ll be using the Ohio region. See below for more details.
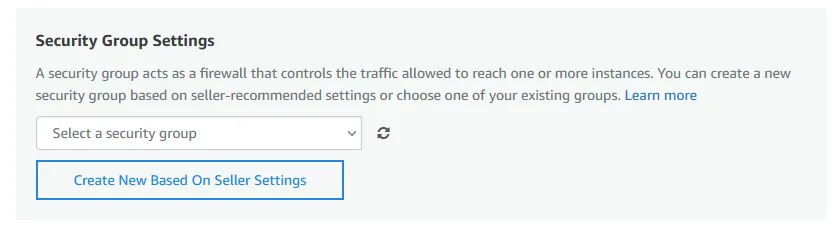
Give your instance a name then scroll down to the Security Group Settings. We chose to create a new security group based upon the seller settings. Within this section give your new security group a name and description. It is not recommended to have your instance open to the public, within our example we’ll be setting the source IP to your local IP for the time being on SSH but leaving port 80 and 443 open to the internet since there is a web portal we need to access.
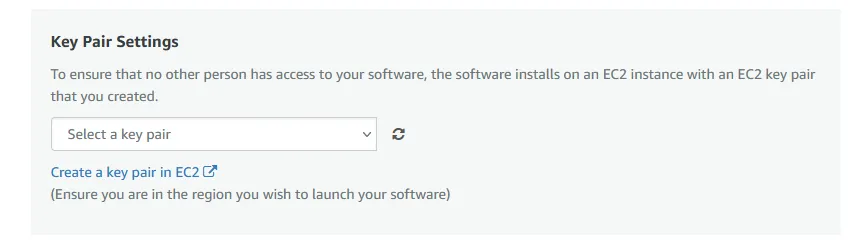
We will also be creating a new key pair within this tutorial in order to access our EC2 instance that will be running our Jenkins pipeline. After clicking on Create a key pair in EC2 you will be directed back to your AWS console. From there, click on the Create Key Pair button located in the upper right hand of the screen.
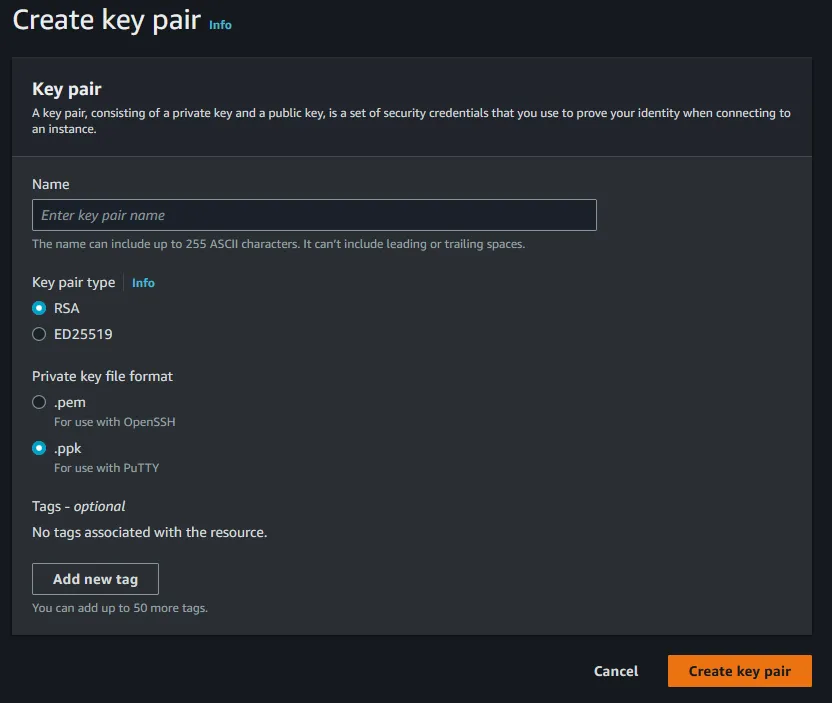
After clicking on Create Key Pair you should see a similar screen as below. Chose RSA and .pem as your radio options. Give your key a descriptive name such as sgdk-jenkins-key and then click Create key pair at the bottom right of the screen. Take note of where you have saved your .pem key as it will be used for a later step.
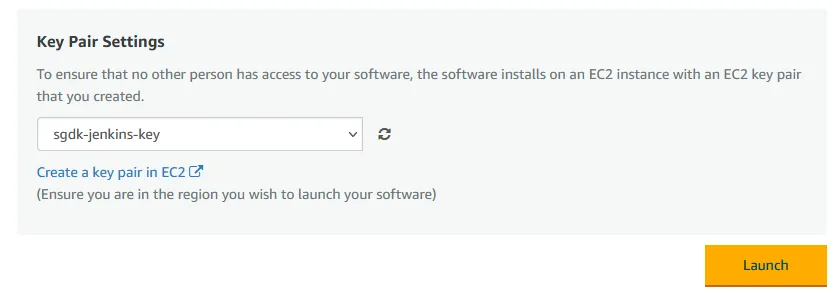
Now go back to your AWS marketplace tab where we were configuring our Jenkins environment for launch. Here, click on the refresh icon within Key Pair Settings and you should see the new key pair show up. Make sure the new key is selected and click on the Launch button.
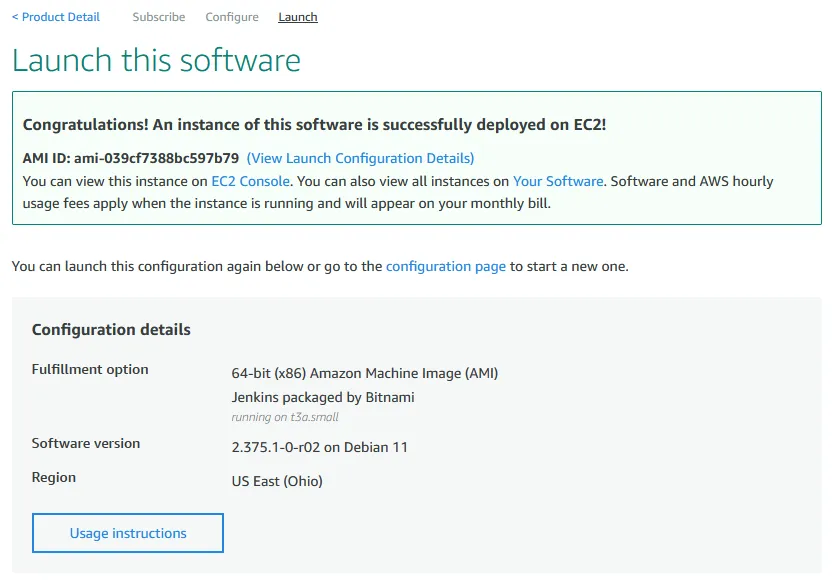
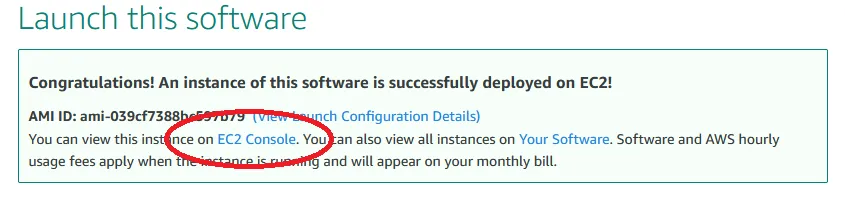
Congratulations! You have now successfully launch a new Jenkins instance. You should see the screen below. At this point, let’s make note of the usage instructions by clicking on Usage Instructions button.
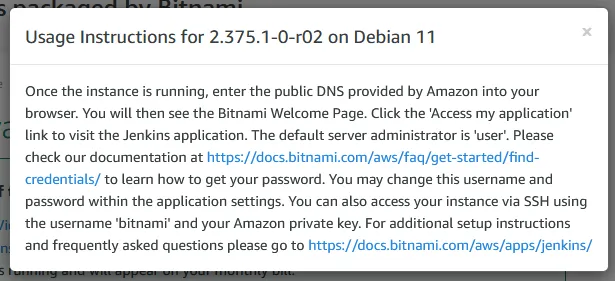
When clicking on the Usage instructions button you should see a popup that looks like below. Click on the link mentioned within the popup about “...learn how to get your password” and open within a new tab. You may also click the link here.
Now let’s go back to the AWS console and check out our new Jenkins instance! You can go back to your previous AWS Console tab and search for EC2 within the search box, or you can chose to click on the link within your congratulations message that should take you directly to your new EC2 instance.
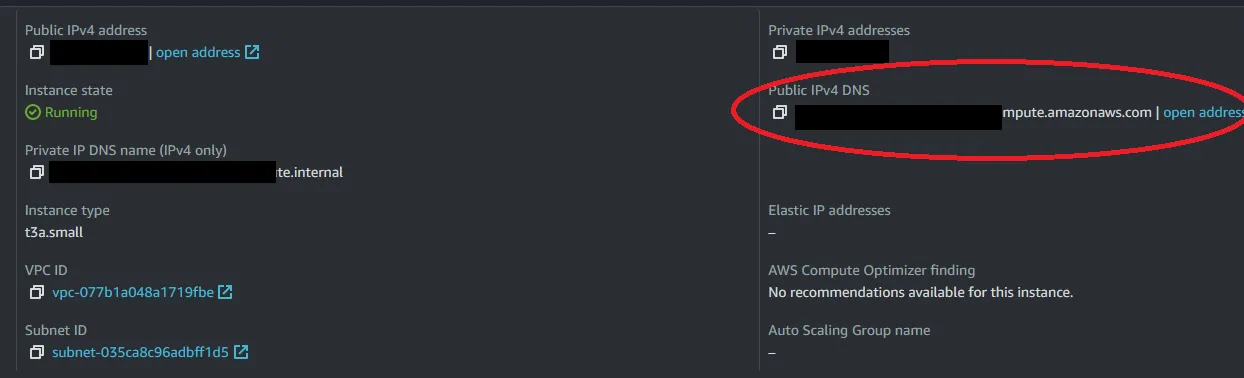
Once you have navigated to the EC2 instances page and find your new instance, click on it and get the dns name that we will use to access the Jenkins environment. You should see something like the image below.
Click on your instance ID to see your instance details. On the details page you will see a section for Public IPv4 DNS. Click on the open address link within a new tab (NOTE: you maybe warned that it’s an unsafe site, you may proceed to the site anyhow as this is your newly created instance).
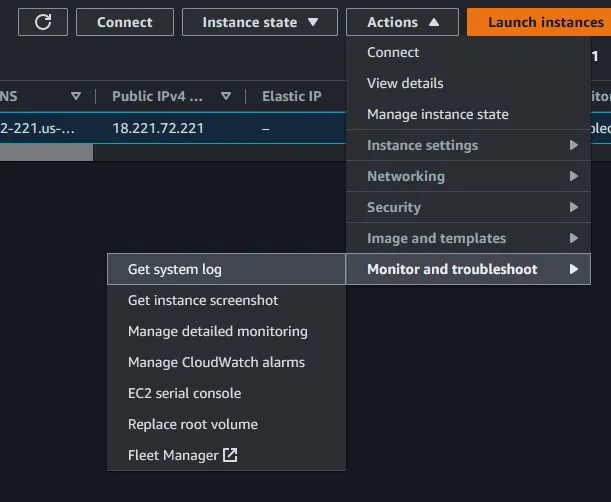
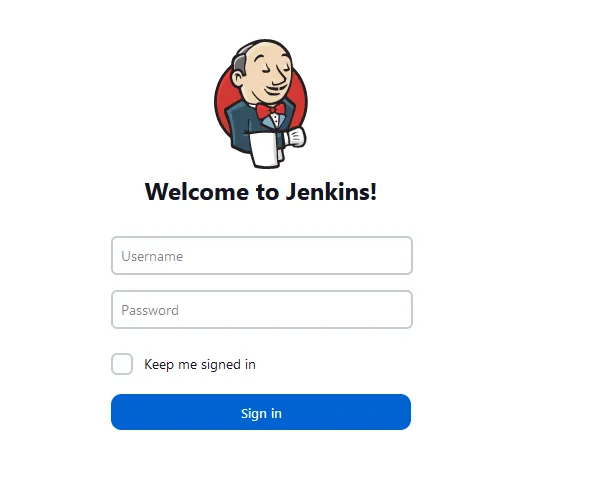
Now you should see your new Jenkins login page. Before we can login we will need to get the username and password that was setup during the initial launching process. In order to do that go back to the AWS console and go back to the list of instances. Select the checkbox by your newly created instance. Then click the down arrow by Actions in the top right of your screen. Select Monitor and troubleshoot. Then select Get System Logs.
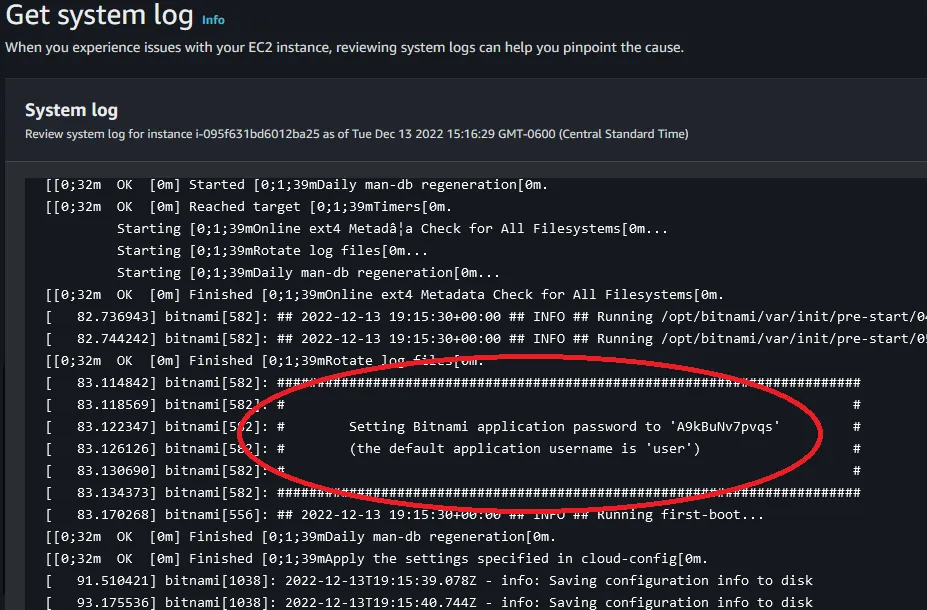
At this point you should see the system logs of your newly created Jenkins controller and what we are looking for is the initial seeded username and password that was generated upon launch (NOTE: you can change the password later one and add more users). Scroll up within the system logs until you see your username and password like the image below. This is the credentials that you will need to login for the first time within your new Jenkins environment.
Go back to the Jenkins login page and enter in the new credentials.
(Optional: Change password) After you login, if you wish to change your password. Click on the user drop down at the top right of the page. Select Configuration. Then scroll down to enter in your new password.
Setting up your S3 bucket for your finished rom.bin file
As mentioned earlier we will be publishing our newly created Sega Genesis game (rom.bin) file into a S3 bucket. Let’s go ahead and knock that out now. Go back to the AWS Console and search for S3.
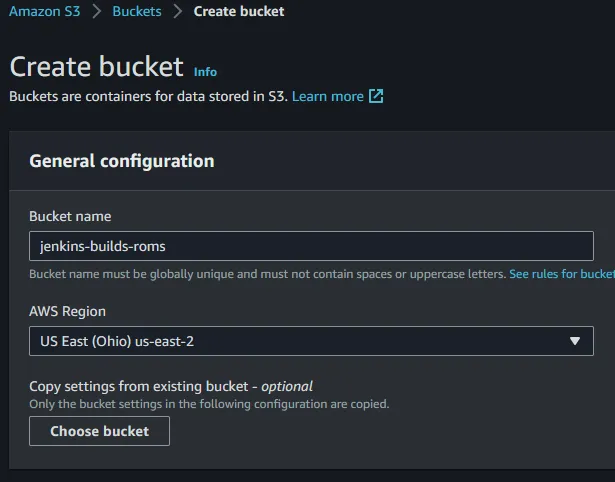
Create a new S3 bucket. In our example we will be using the name “jenkins-build-roms” and we created the bucket within the same region as our Jenkins controller and windows agent which is us-east-2. We kept all the defaults the same (including blocking all public access).
NOTE: S3 buckets are globally unique, so you may want to use “<username>-jenkins-build-roms” for your S3 bucket.
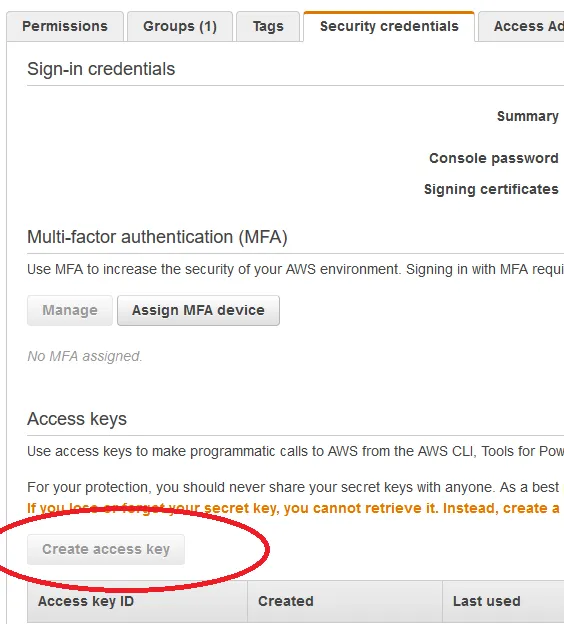
Create a new IAM user (or you may use an existing user that has write access to S3 buckets of your choosing) and give that user write permissions to S3 (if you want to be very specific you may limit the write permissions to only your newly created bucket). Then go into the Security Credentials tab of that newly created user and create access key (please download and save the .csv file as you will need both the access key and secret key for the next steps within Jenkins).
Setting up your SGDK Build Agent
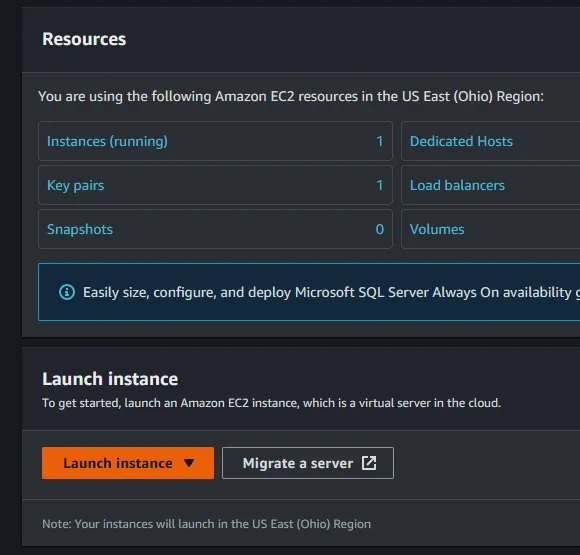
Go back to the AWS console and search for EC2. Click on EC2 and on the dashboard click on the launch instance button to get started. (NOTE: Make sure you create the new agent within the same region as your Jenkins Controller).
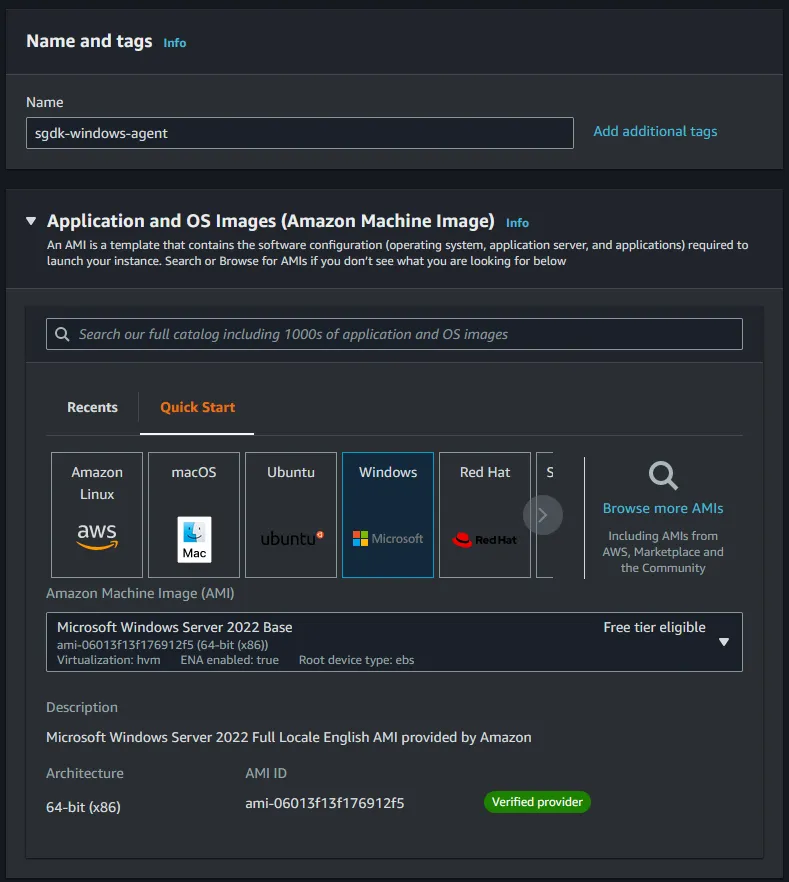
Now, within the launch wizard let’s give our new agent a name sgdk-windows-agent. Then underneath the Application and OS Images drop down, select windows within the Quick Start tab and you may leave the default option of (Microsoft Windows Server 2022 Base - Free Tier eligible). (NOTE: The SGDK only runs on Windows).
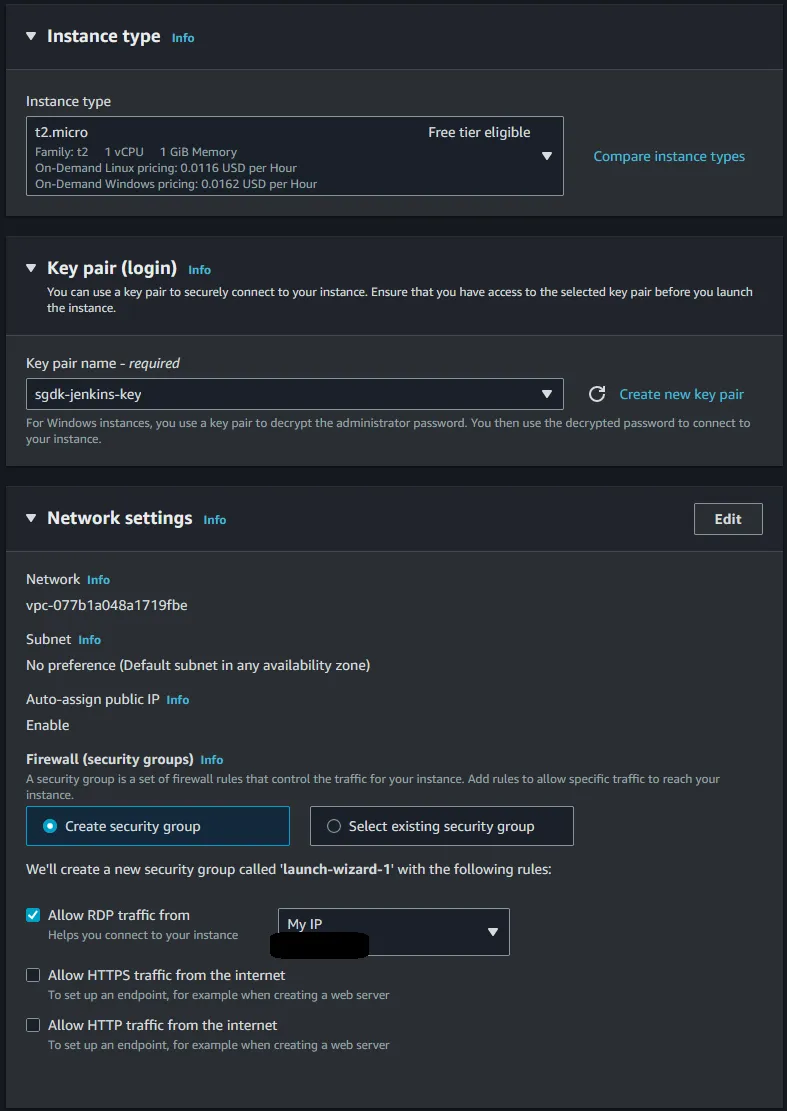
We are going to chose t2.micro for this tutorial. Also note that we are reusing the same key pair generated when standing up our new Jenkin’s Controller. If you skipped the Jenkin’s controller step then create a new key pair at this time and select the new key pair created. Remember where you downloaded your new .pem key as you will need this later. Lastly, we will create a new security group. Within this tutorial we are limiting RDP traffic just to Your IP. We are going to leave the Configure Storage and Advanced Details alone for now, but for future reference within Advanced Details is where you can specify spot instance in order to save cost.
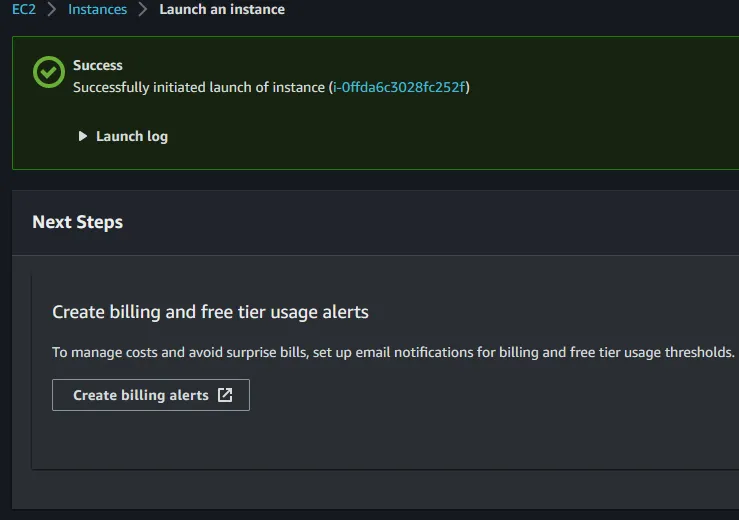
Click on Launch instance located on the right side of the page underneath the summary section. This should only take a few seconds to create but may take a few minutes to initialize. You should see the screen below if everything was successful. When you see the success screen feel free to click on the instance id link or you may navigate back to instances and see your newly created agent instance within the list of instances.
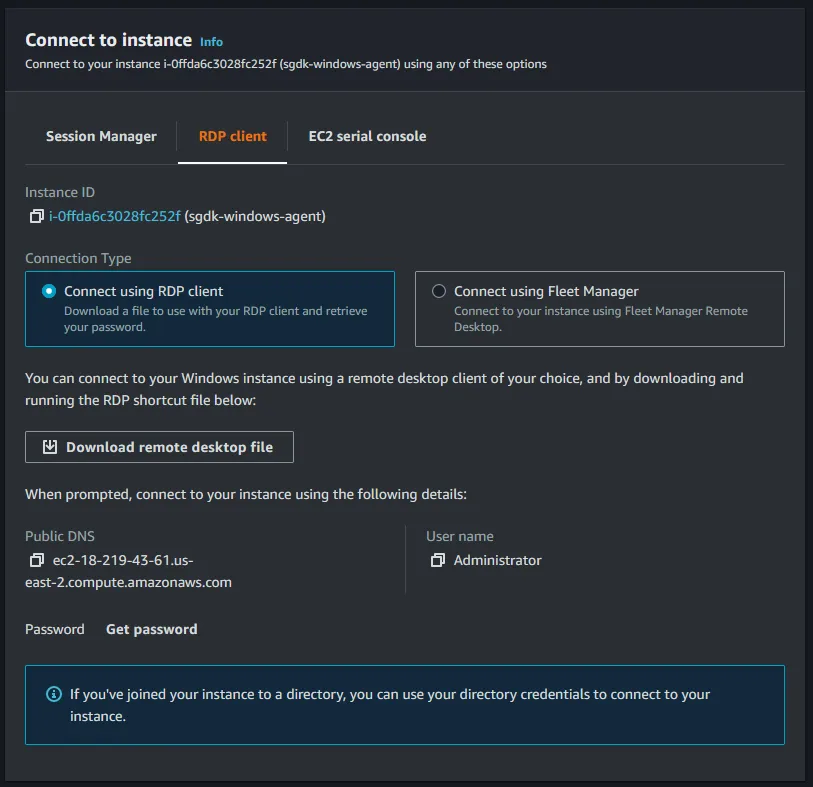
After your new windows agent has launched, let’s go ahead and connect to it and take a look. Navigate back to your list of EC2 instances within the AWS console and select your new agent. At the top right of the page you should see a button that says connect. Click connect to bring up options for that instance.
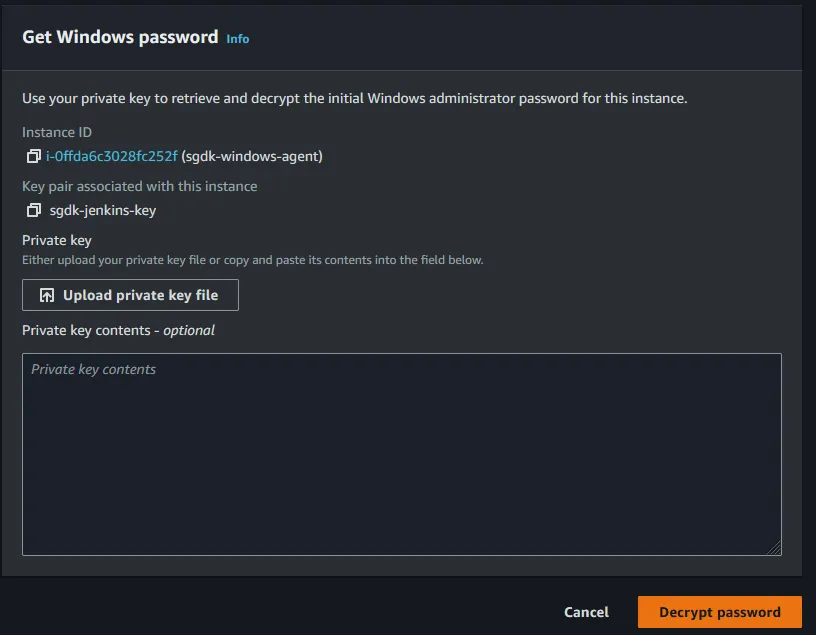
From here we need to click on the RDP client tab. Click on the Download remote desktop file to your local machine. Before you can connect you will need to get the Administrator password. To get the password click on the Get password section.
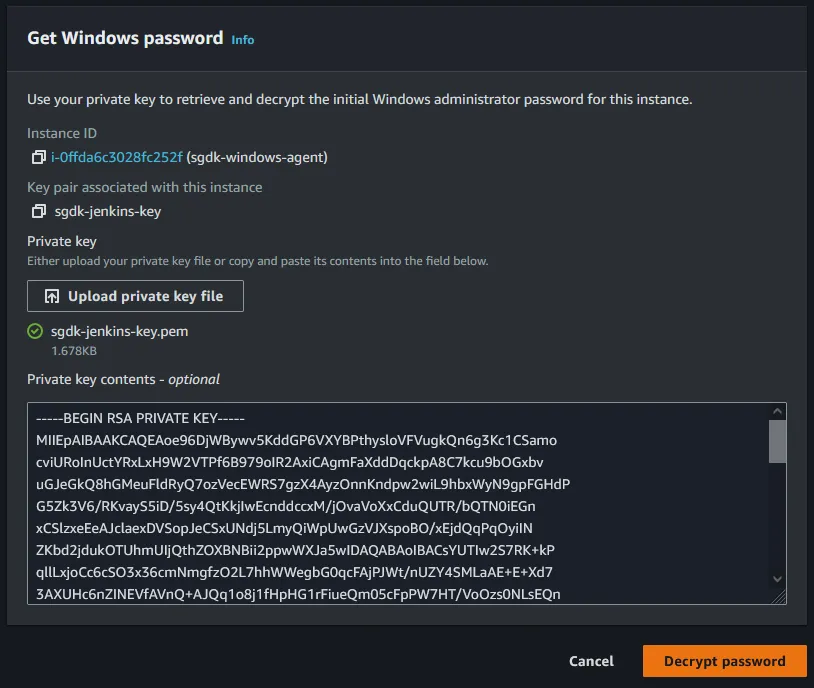
On this screen we need to upload your private key file that you created earlier, so click on upload private key file. After doing that you should see your RSA private key contents populate the textfield and now you can click Decrypt password button.
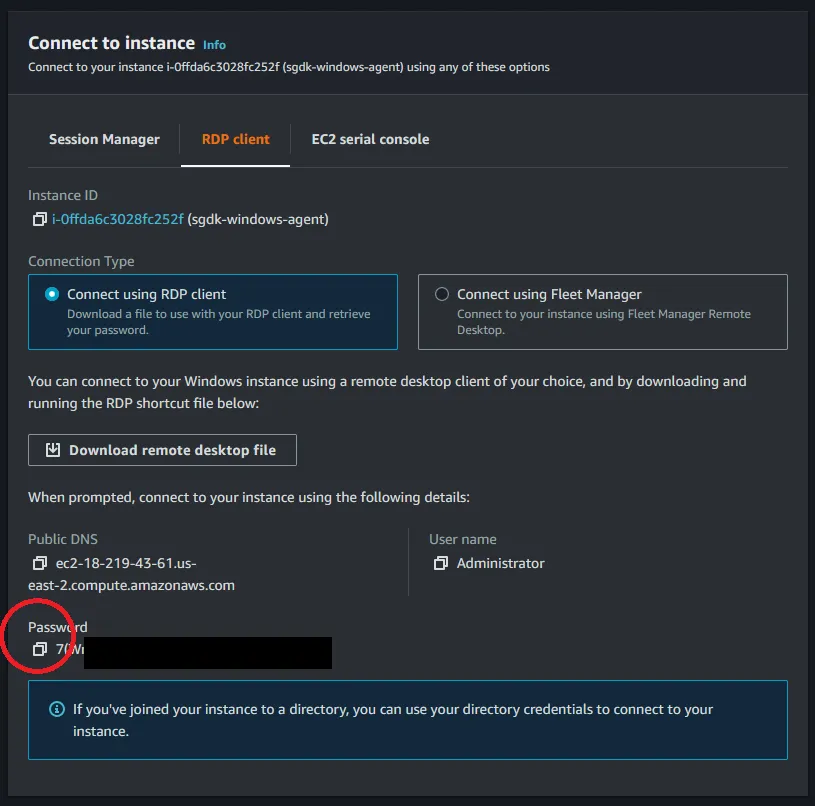
Now at this point you will be brought back to the previous RDP tab section. From here you will notice your password is available that you can copy to your clipboard.
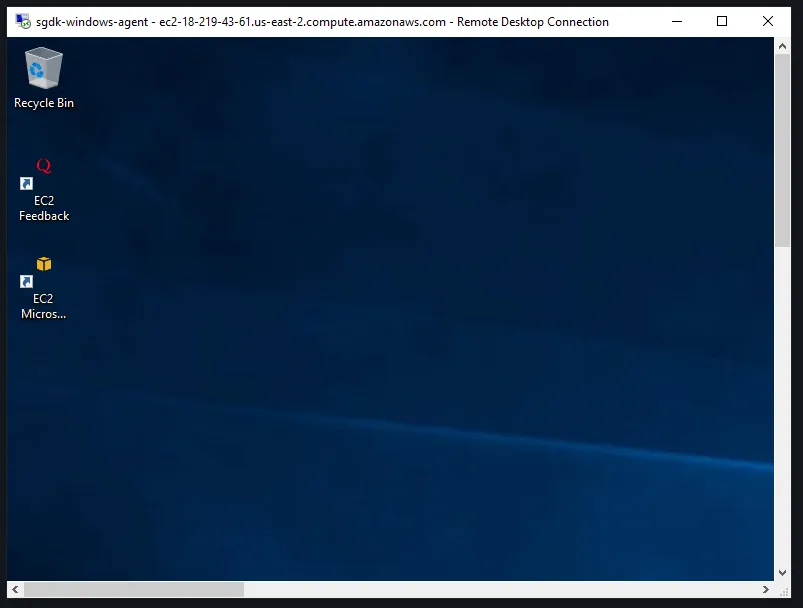
Open up the remote desktop file that you had previously saved and paste in your new password. The initial login may take a few moments to get everything ready, but you should see your new agent’s desktop after a few minutes.
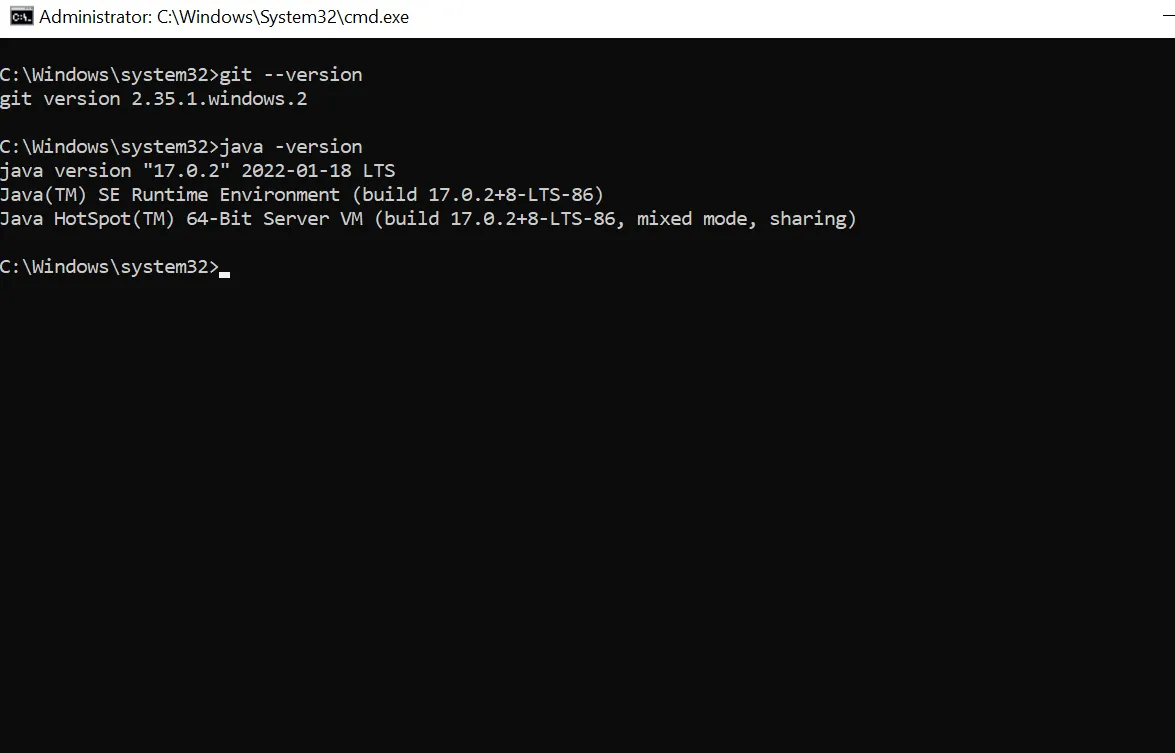
Before we can start configuring we will need a few tools installed that will allow Jenkins to connect and build. First, we will be using JNLP(JAVA NETWORK LAUNCH PROTOCOL) to Connect to/launch from a remote location. In order to do that we need to install Java JDK to our new agent. In writing this blog we had downloaded and installed jdk-17_windows-x64_bin.msi. Then after installing Java we need to install Git and at the time of writing this blog we had installed Git-2.35.1.2-64-bit.exe. Now, you can confirm that both are installed by pulling up command prompt and typing in Git —version and java -version
Let’s go ahead and create a new folder under the C: drive called Jenkins_Agent_Node as we will need this later for our SGDK libraries as well as the agent.jar file that Jenkins uses to communicate with the agent.
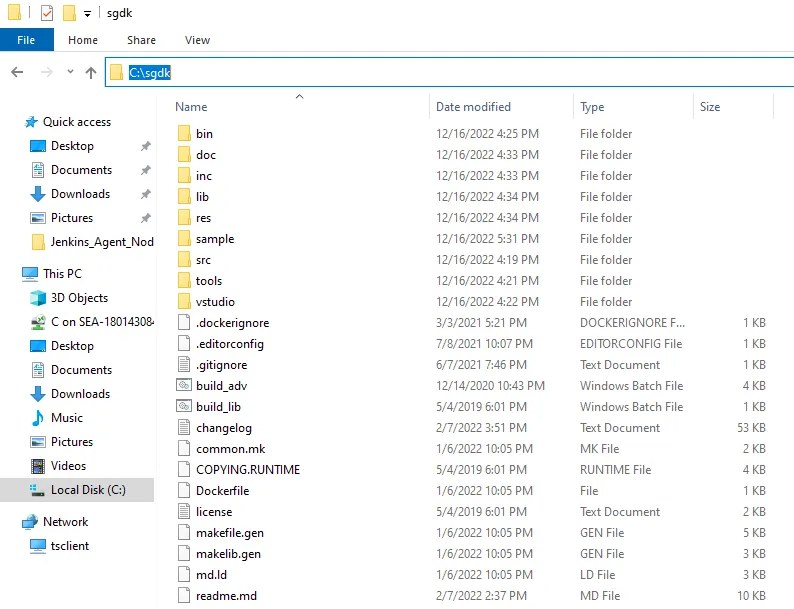
Once both Java and Git have been installed we shall install one more tool and that’s the SGDK libraries. You can download the latest version of the SGDK from here. Once downloaded you will need to unzip the contents and place the contents within the a new folder called sgdk on the C drive of your windows instance(You can technically place this anywhere; but just remember the file path as you will need that later).
Now, one last step is to compile the library within SGDK. In order to do that navigate to where you placed the SGDK contents and open up a command prompt. From there type in the below command and hit enter. Now we are ready to accept Sega builds to the agent!
.\bin\make -f makelib.gen
Configuring your new agent within Jenkins
Go back to your Jenkin’s controller tab (you might have to login back in). Once you login you should see a screen similar below.
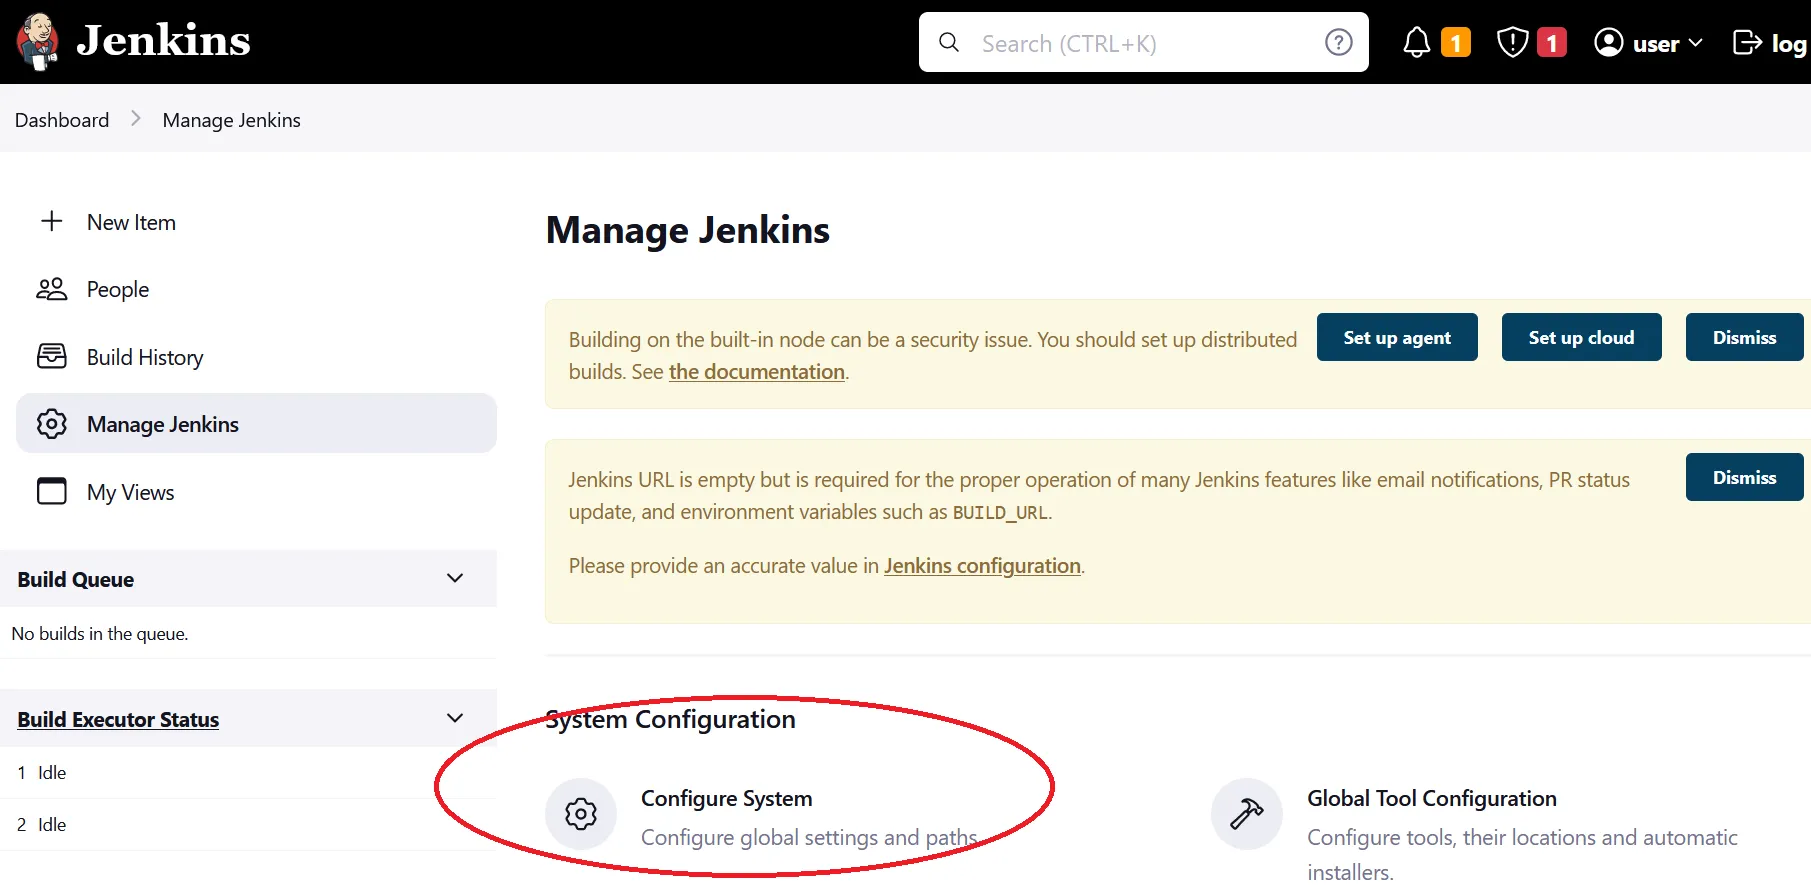
With this tutorial we will be only using the new windows SGDK build agent that we created as build executors. First we will do is disable the default build executors. Click on “Manage Jenkins” on the left side of the screen. Then scroll down and click on “Configure System.”
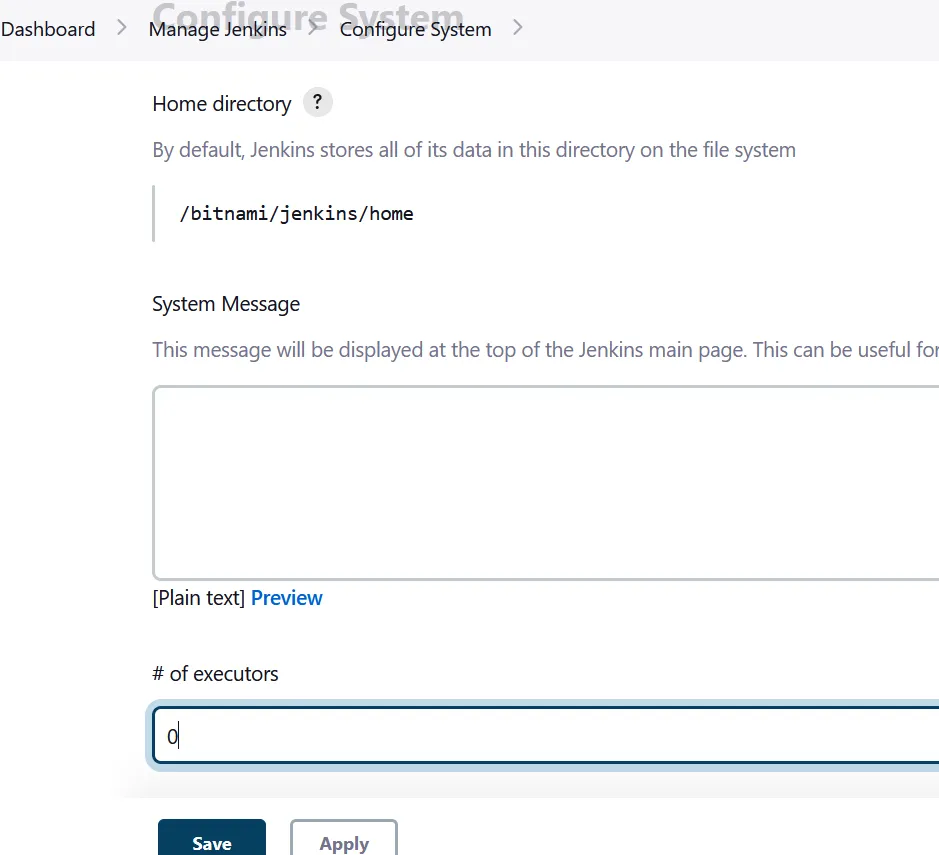
Then scroll down until you see number of executors section and change the value from 2 to 0 and click save.
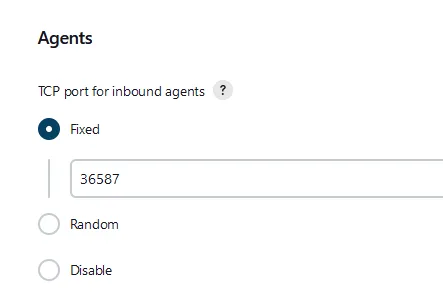
Now, let’s go back to Manage Jenkins to setup remote access for our agent. Once you are back to Manage Jenkins scroll down until you see Configure Global Security. Click on that and then scroll down to the section that says Agents. Here we are going to select a specific port number, so select the fixed radio toggle and put in the port number 36587 (NOTE: you can use other ports if you wish, but for this tutorial we have chosen port 36587). Then click save down below
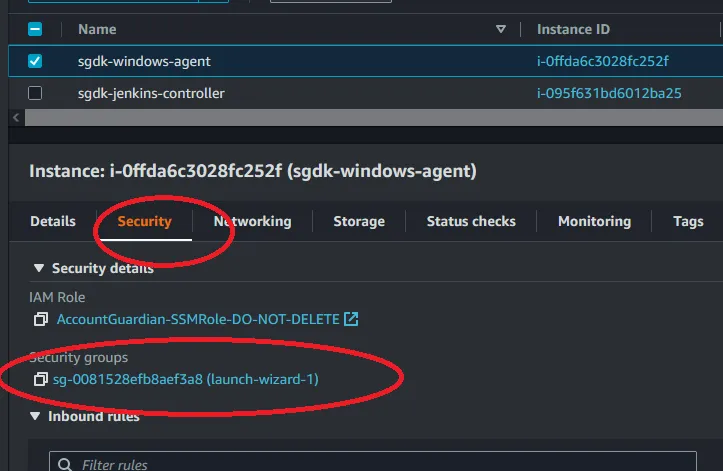
Let’s go back to the AWS Console and make sure we allow the security groups of both the Jenkins Controller and the new agent to communicate through the new fixed port number. First, go back to the list EC2 instances and select the new windows agent that we previously created. Then click on the security tab to find the attached security group. Click on the security group
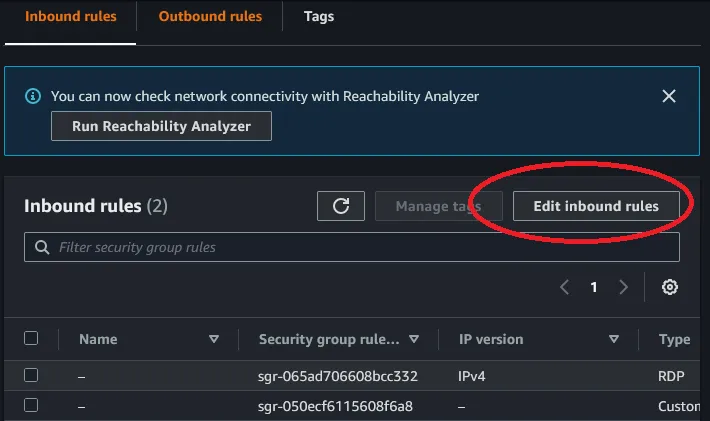
Within the security group be sure to select the inbound rules and then on the far right click on Edit inbound rules.
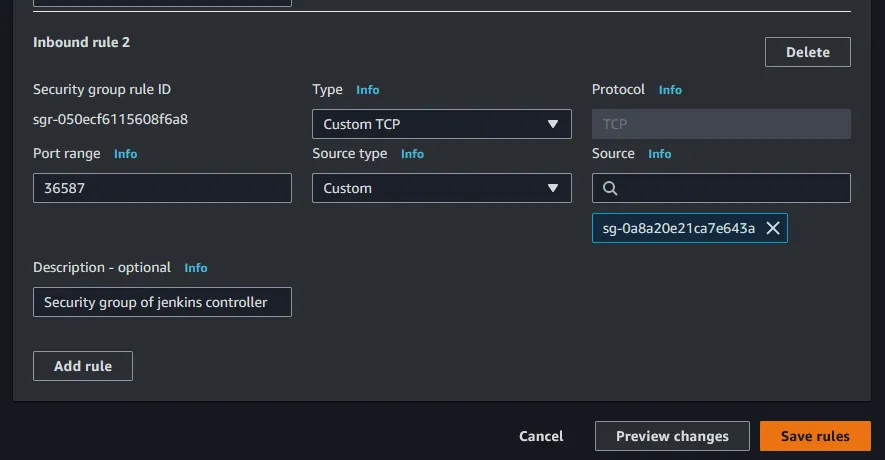
From here we are going to add a new rule with a type of Custom TCP, Port range is set to 36587, and the source will be set to the Jenkins Controller’s security group (NOTE: you can type sg- to filter the options down to just security groups). When that is all in place, click Save rules
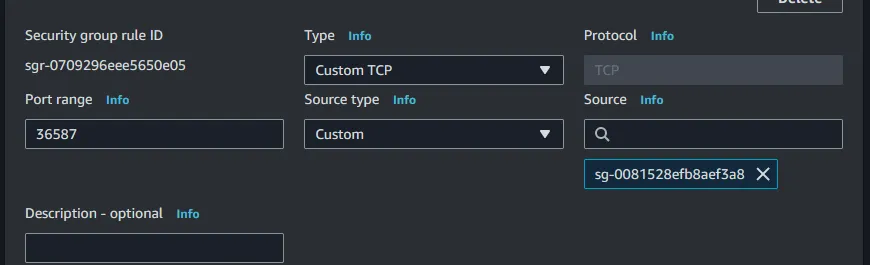
Follow the same steps for the Jenkins Controller security group. Within the AWS Console go back to the EC2 instances and select the Jenkins instance. From there click on the security tab and then click on the security group that is attached. When you are in the security group go ahead and click Edit inbound rules like before. Add a new rule with the Type set to Custom TCP, Port set to 36587, and the Source set to the windows agent’s security group. Then click Save rules. The new rule should look something like below
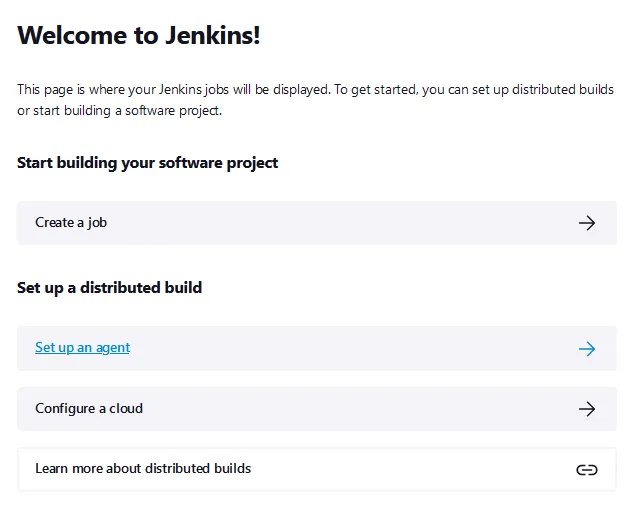
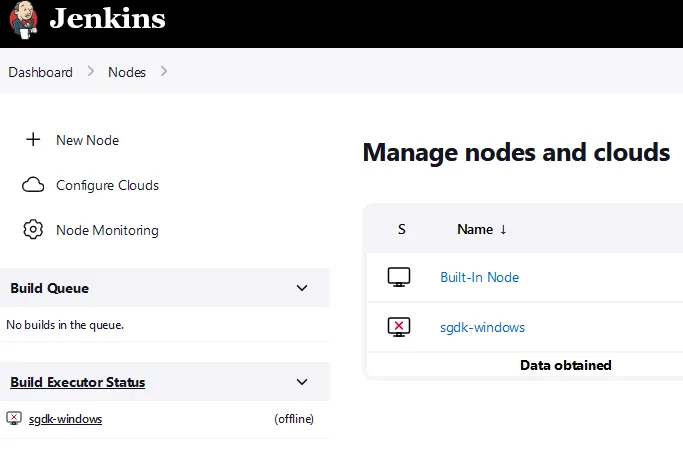
At this point we have both the windows agent and the Jenkins controller able to communicate through port 36587. Let’s move back to the Jenkins web portal (You may need to log back in if your session timed out) and setup the windows build agent. Navigate back to the dashboard and there you should see the screen below. Click on Set up an agent.
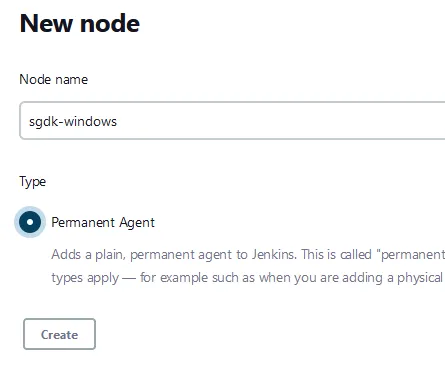
Give your new node a name. In our example we will use sgdk-windows and make sure to select the Permanent Agent radio button; then click create.
On the next screen give your new node a description such as New Sega Genesis Build Agent. Remember that directory we created back on the windows agent (C:\Jenkins_Agent_Node)? We are going to use that folder path within the Remote Root Directory text field. For Labels put in sgdk and change the launch method to Launch agent by connecting it to the controller. Then click save. We will configure more later on when we connect our Jenkins environment to our code repository, but for now we want to make sure Jenkins can see the new agent. After saving you should see a similar screen like below.
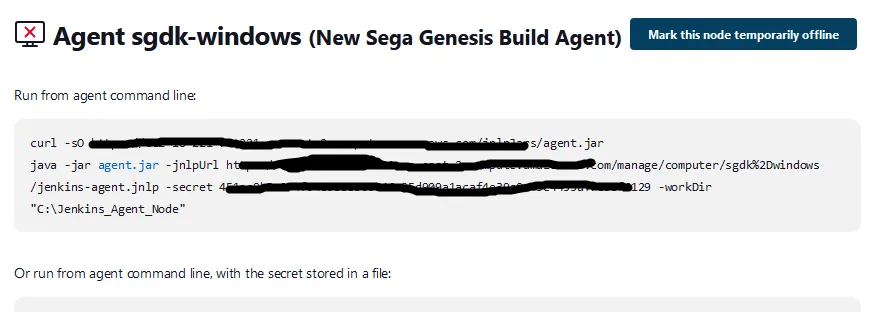
Click on the new node sgdk-windows. You should see a screen similar to below, but it will contain the specific URL to your instance. We will be using the top option Run from agent command line within this tutorial.
Notice the agent.jar file is a hyperlink? Go ahead and click on that link to download the agent.jar file. Then move that agent.jar file to your windows agent into the C:\Jenkins_Agent_Node folder. that we had created previously. The script will need that in order to establish connection to the Jenkins Controller.
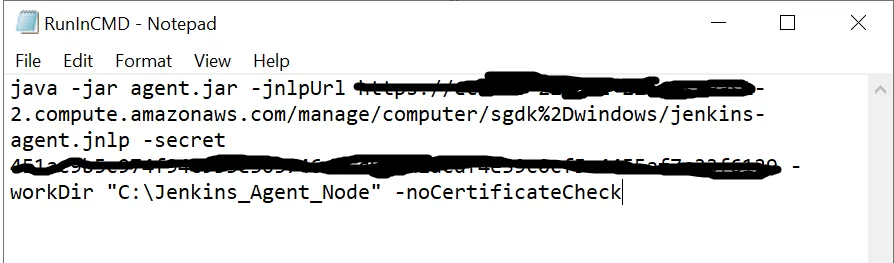
Copy everything from “java - jar” to “C:\Jenkins_Agent_Node.” We won’t be using the top line starting with “curl” as we have downloaded the agent.jar file separately and moved it to our windows agent. Now save that portion of the script to a text file (we called ours RunInCMD.txt and placed it on the desktop) within your windows agent as we will use this later. At the end of the script (for this tutorial purposes) we will be adding in the -noCertificateCheck flag. So, your script should look like this below.
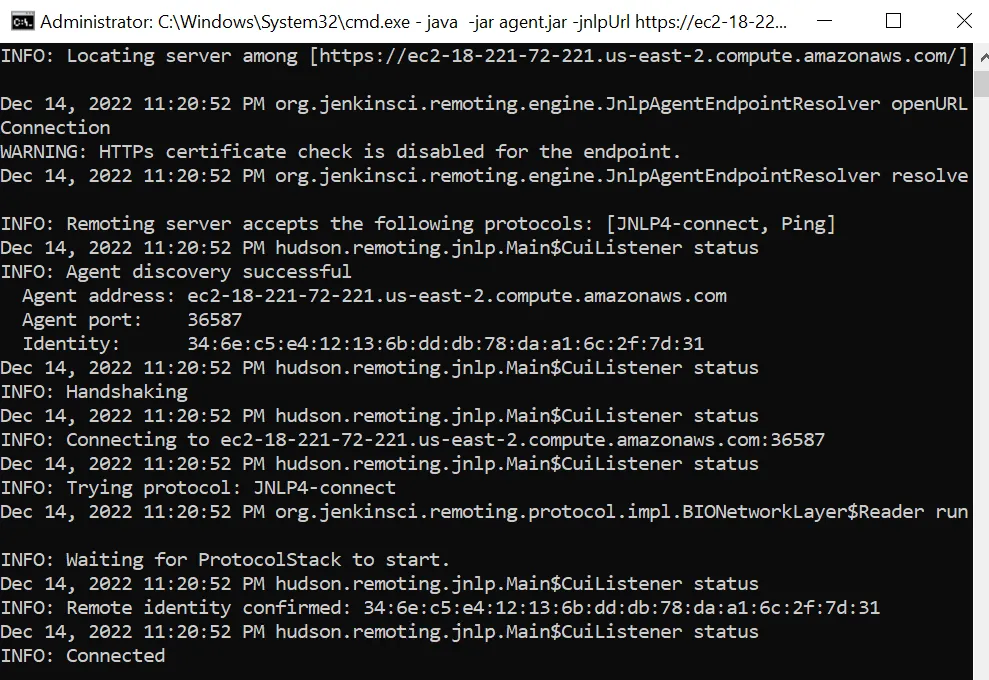
Now that we have our script ready to run and our agent.jar file on our windows agent, let’s start the agent and see if our Jenkin’s controller see’s it come online. Within your windows agent open up a command prompt (NOTE: make sure you are in the same folder as the agent.jar file) and copy and paste the script that we had previously created and run it. If all was successful you should see a similar screen as below.
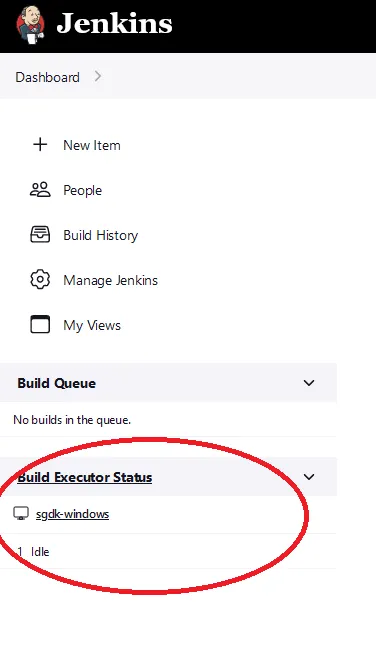
Go back to your Jenkins web portal (You may have to re-login) and click on Dashboard. If everything went well, you should see your new windows agent sitting idle and connected. See the screen shot below.
Connecting and configuring
Now we need to let Jenkins know where to pull the source code from in order to create a build pipeline and call our new agent. In this example we will be using GitLab (but you may use whatever code repository you are most comfortable with). If you already have a code repository configured and working with Jenkins then feel free to skip to the step below called “Setting up the build pipeline.”
If you are integrating with GitLab then the first thing we are going to do is let our GitLab environment know about Jenkins and make sure we have an account we want to use (You may chose to create a new account but in our example we’ll be using an existing GitLab account).
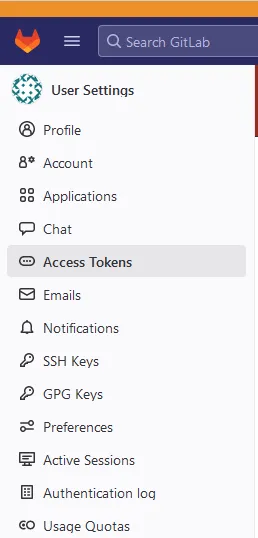
Sign in to your GitLab account (make sure that account has permission for the project you are wanting to build) and on the top right corner where your avatar is shown click it and select edit profile. Then select Access Tokens. We are going to generate a new token that will be used within Jenkins to access our project.
From here give your token a name and if you do not wish to have this token expire simply remove the date from the expiration date field. Then make sure to select the api checkbox and then click Create personal access token. Please remember your Token Name and Token that is generated. In our example we are using sgdk-blog-test as our token name.
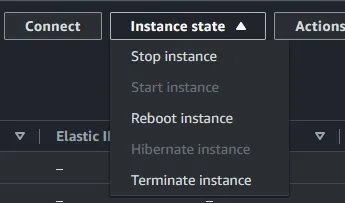
Now we are going to head back into Jenkins for further configuration. Navigate to Manager Jenkins → Manage Plugins. From here we are going to install the GitLab Plugin, so go to the available plugins section and search for GitLab Plugin and select the checkbox. Choose the download now and install after restart option. Restart your Jenkins instance (You can do this by going into the AWS Console again, going to your list of EC2 instances and selecting the Jenkins instance, and then in the top right corner click on instance state to select reboot instance.
Once Jenkins restarts log back in and navigate to Manage Jenkins again. Now, depending upon what version of Jenkins you are running you maybe prompted with other libraries that need to be installed for the GitLab plugin to work (be sure to download and install them as well).
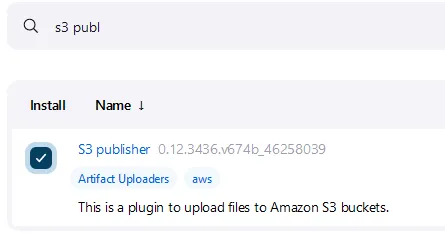
Lastly we will install the S3 publisher. This plugin will be used as our last step of the build process that will publish our newly built rom file to our S3 bucket. Go ahead and search for S3 publisher and select it, then click Install without restart.
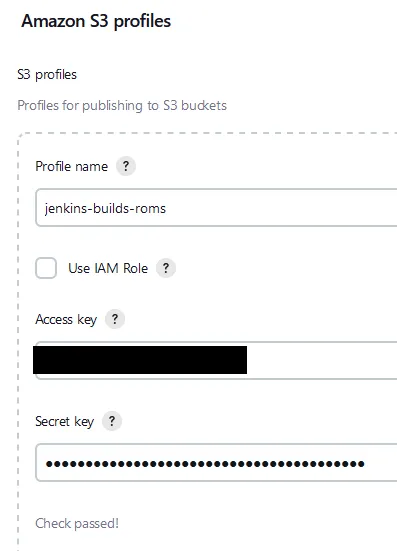
Next we will finish setting up the S3 profile. Navigate to Manage Jenkins from the dashboard page. Then click on Configure System Scroll all the way down to the bottom until you see Amazon S3 Profiles Now give your profile a name and paste in your access and secret keys and then test the connection. If all was successful you should see the “check passed!” message. Now we will be ready for our publishing step later on in the tutorial.
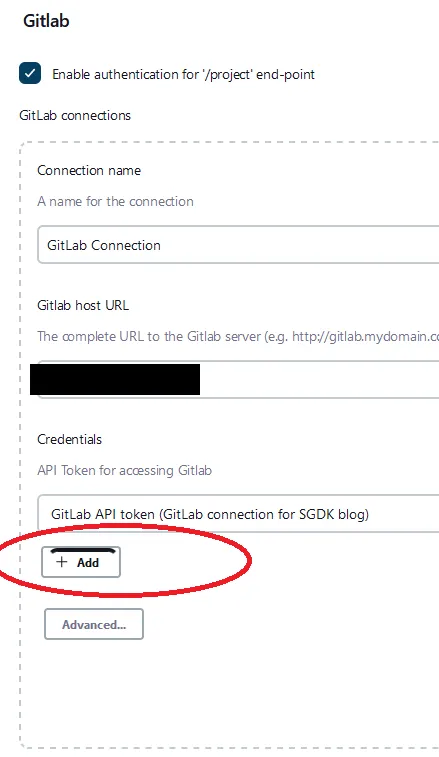
Go back to the dashboard and then from Manage Jenkins click on Configure System. In the GitLab section, select Enable authentication for ‘/project’ end-point. Fill out the connection name and the Gitlab host URL. Then, click on the add button to add in your credentials that we created previous within GitLab. This will be used by Jenkins to communicate to GitLab.
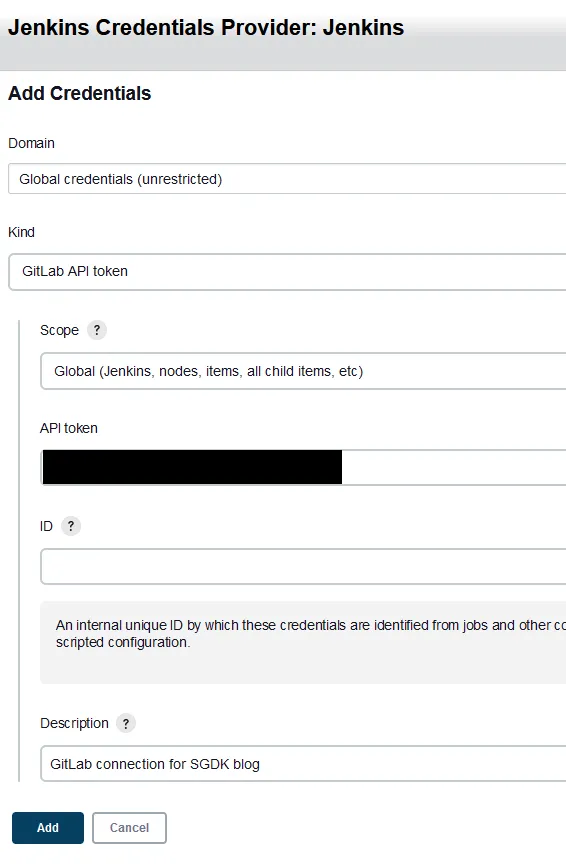
Switch the Kind option to GitLab API Token and keep the scope at Global (Jenkins, nodes, items, all child items, etc). Paste in the GitLab Token you have previous saved within the API Token field. You can leave the ID field blank as that will be auto generated. Feel free to fill in the description as well.
After adding in the credentials, make sure they are selected with the drop down and then click the Test Connection button. You should see success if all went well. Now let’s navigate back to the Jenkin’s dashboard to create our first pipeline.
Setting up the build pipeline
Within this section we will still be setting up the build pipeline with our GitLab repository in mind, so some elements may be different where we specify GitLab; but other steps will remain the same such as the build commands with sgdk that the windows agent executes.
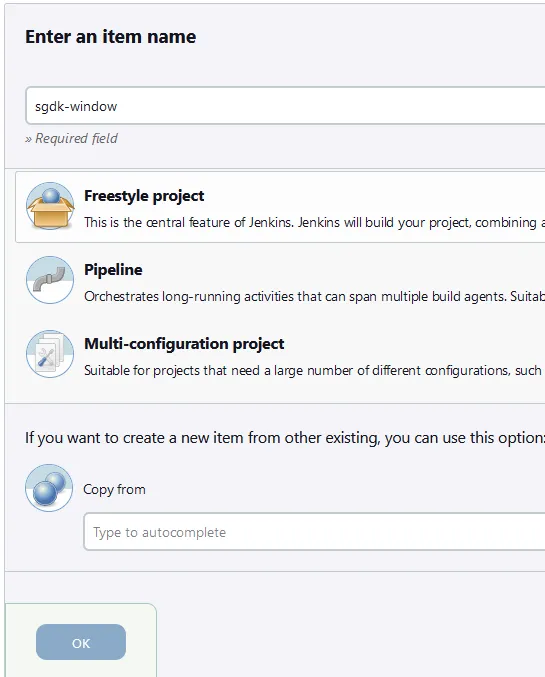
Click on the + New item at the top left of the dashboard screen and from here enter an name for the Jenkins project. In this tutorial we will be using the Freestyle project option. Once selected and a name is given go ahead and click on OK. (NOTE: Remember the Jenkin’s project name, you will need this later on within GitLab)
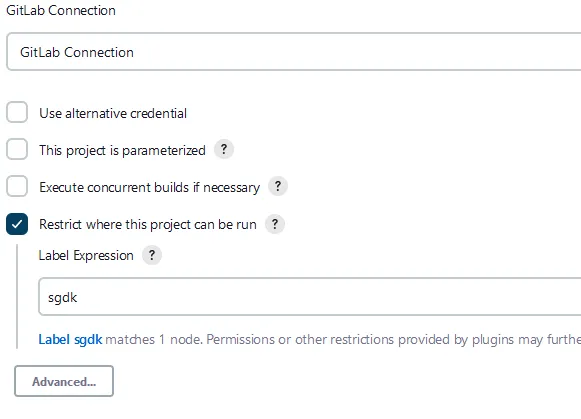
Now it’s time to configure the new Jenkin’s project. You should see a section for GitLab Connection. Make sure the drop down selection is set to GitLab Connection. Then select the Restrict where this project can be run checkbox and specify the label with sgdk.
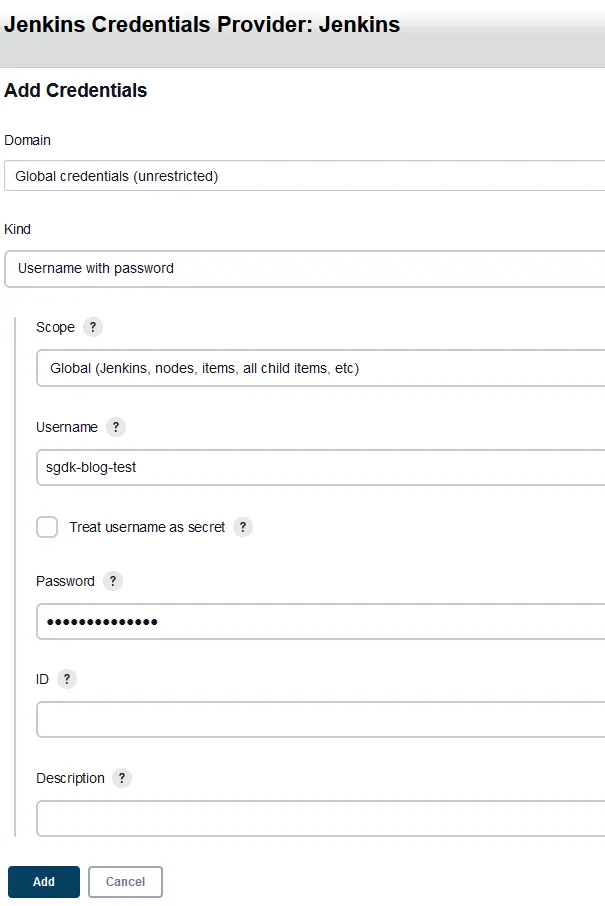
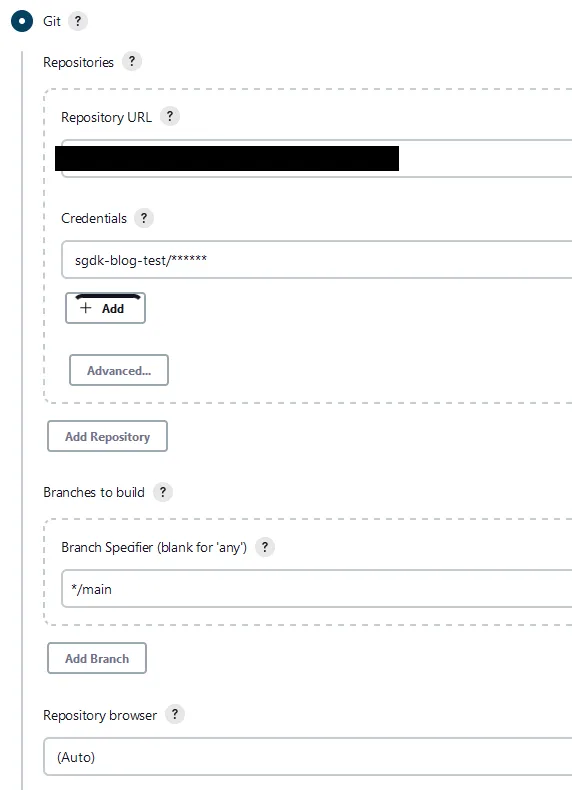
Further down underneath the source code management section, select the Git radio option. Within the Repositories section fill in the URL to your git repository hosted in GitLab within our example. Underneath the Credential section we will be adding another set of credentials so go ahead and click the +add button. From here we will leave the Kind option set to Username with password. In the username field put in the GitLab Token Name that you generated previous (in our example we used sgdk-blog-test) and within the Password supply the GitLab Token. Then click Add.
Make sure that after you’ve added the credentials that you select them from the drop down. Then specify your branch (in our example repository we’ve named the branch we will be building main). Your Source Code Management screen should look similar to the image below.
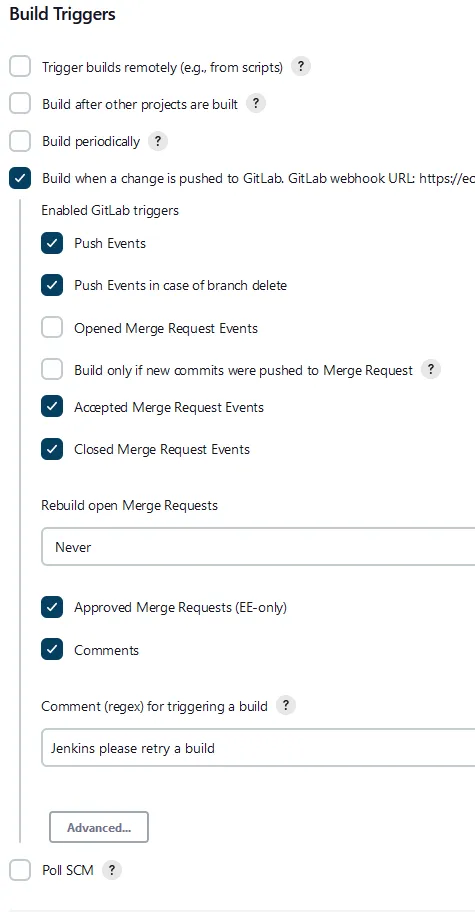
Underneath Build Triggers, select the option Build when change is pushed to GitLab. Enable the GitLab triggers you wish to trigger your build events. In our example we selected the Accepted Merge Requests and Closed Merge Requests options. Whenever these events occur within GitLab it will trigger our build within Jenkins. Your screen should be similar to ours below.
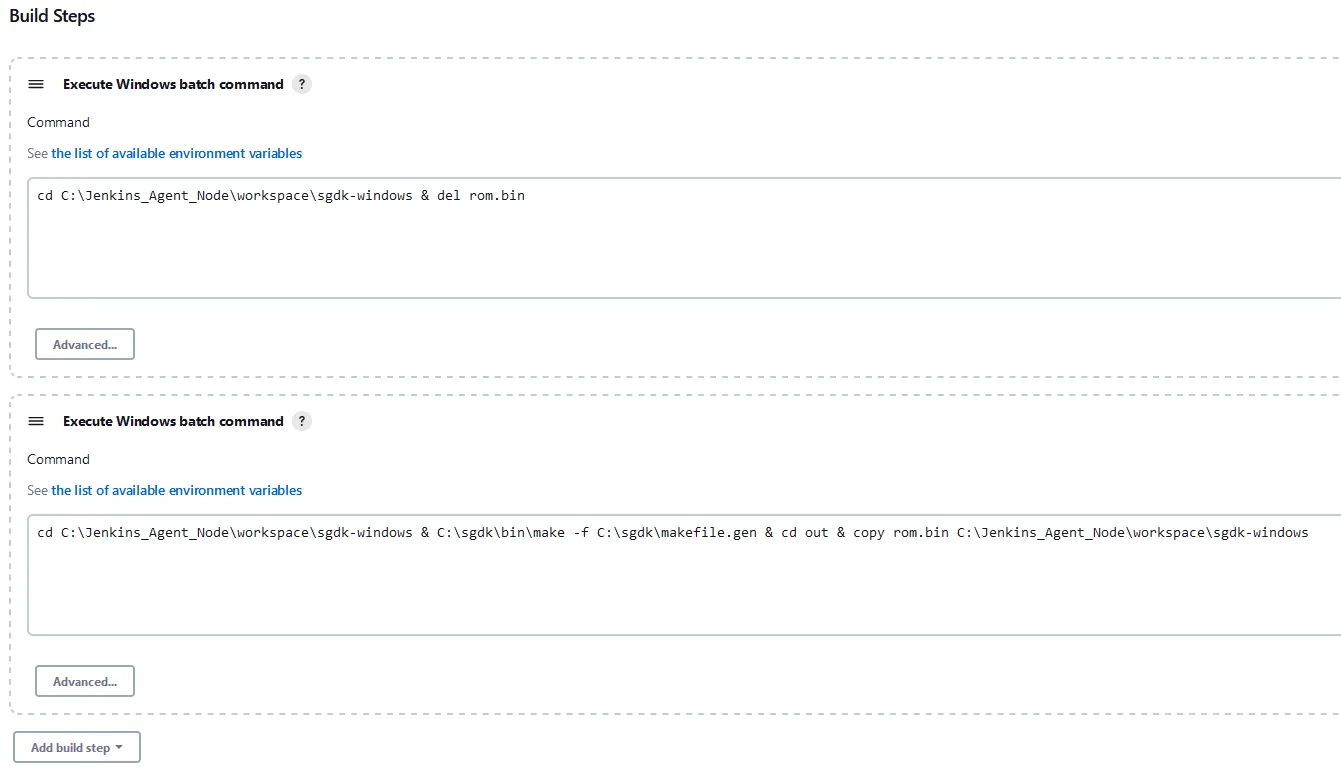
Now we are going to add two Build Steps. The first step is going to clean up any previously built rom.bin file before building a fresh one. The second is going to navigate to the project folder path and issue the SGDK build command to make the new rom.bin file and to copy the new file in preparation to move it to your S3 bucket that you had created earlier. So go ahead and add two build steps.
Copy and paste this line into the first step: cd C:\Jenkins_Agent_Node\workspace\sgdk-windows & del rom.bin
Copy and past this other line into the second step: cd C:\Jenkins_Agent_Node\workspace\sgdk-windows & C:\sgdk\bin\make -f C:\sgdk\makefile.gen & cd out & copy rom.bin C:\Jenkins_Agent_Node\workspace\sgdk-windows
NOTE: If you used a different file path for your sgdk or workspace you will need to adjust each line to match your file paths.
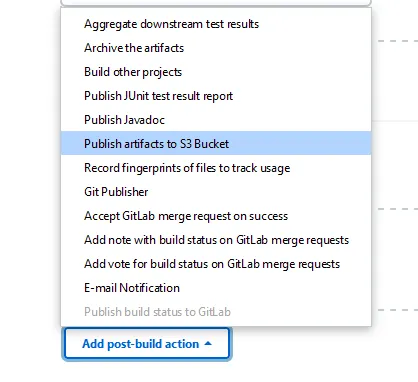
Now we are going to add two more steps. The first is Publish status to GitLab since we are using GitLab (If you are not using GitLab you may skip that step). The second will be Publish artifacts to S3 Bucket. Add both of those new by clicking on the Add post-build-action button at the bottom of the page.
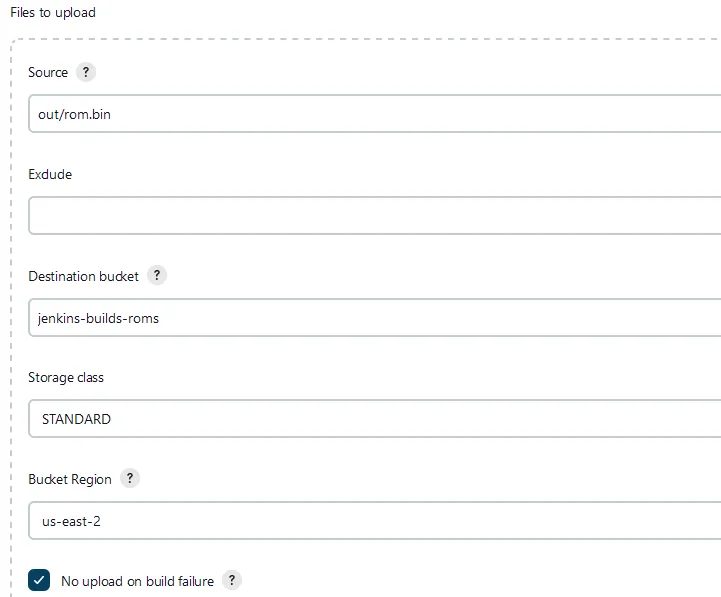
At this point a new box of options should be available to fill in. Your S3 profile should have selected the newly created one from earlier (You may have to select the newly created one if you happen to have multiple profiles to chose from). Leave all options as they are but go ahead and click on Add underneath Files to upload section.
Underneath Source let’s put in the file path that we copied the rom.bin file to during our build step. So in our case that path is out/rom.bin. Be sure you put in the name of our newly created bucket from earlier within the Destination bucket field (we used jenkins-builds-roms). Leave the storage class set to standard and make sure you select the correct region that the bucket was created in (in our case we are using us-east-2). Lastly, check the box No upload on build failure. Your setup should look similar to the image below. Make sure to click save or your changes will be lost!
Let’s make our first build!
Now that all our hard work is complete we are ready to execute our first build! At this point we should have a Jenkins controller, a windows build agent with the SGDK libraries installed, and a S3 bucket to store our finished roms.
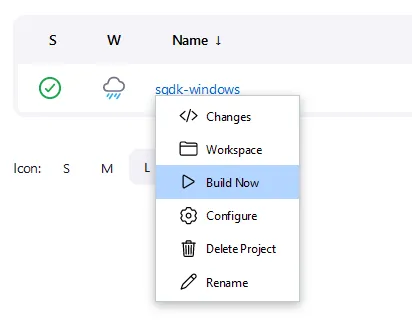
Navigate back to our Jenkins Dashboard and at this point you should see a Jenkin’s project ready to run! Click on the green play arrow to the right of it (or you can hover over the project and click the down arrow to select the build now action).
NOTE: Your agent may show offline, if so RDP back into your windows agent and re run that command line script that we had previously saved. Make sure you’ve navigated to folder containing the agent.jar file before executing the command script via command window.
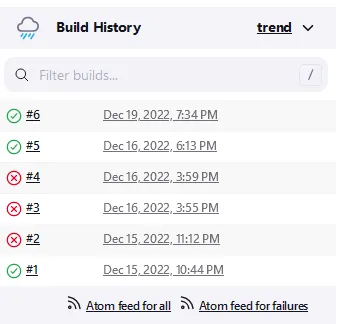
After the build finishes click on the project name and you should see a build history on the left side of the screen. As you can see we had built this a few times already and had to work through a few issues that we had forgotten on our end, so be sure to double check your steps if you run into any issues.
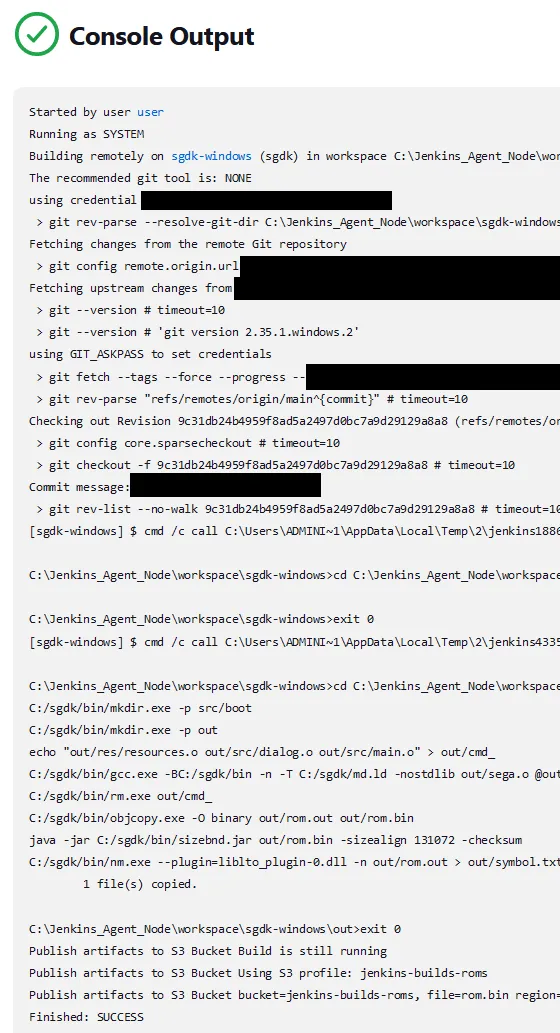
Let’s click on the last build (in our case #6) and then click on the Console Output to see what happened. You should see a similar output like below with a Finished: SUCCESS message at the bottom.
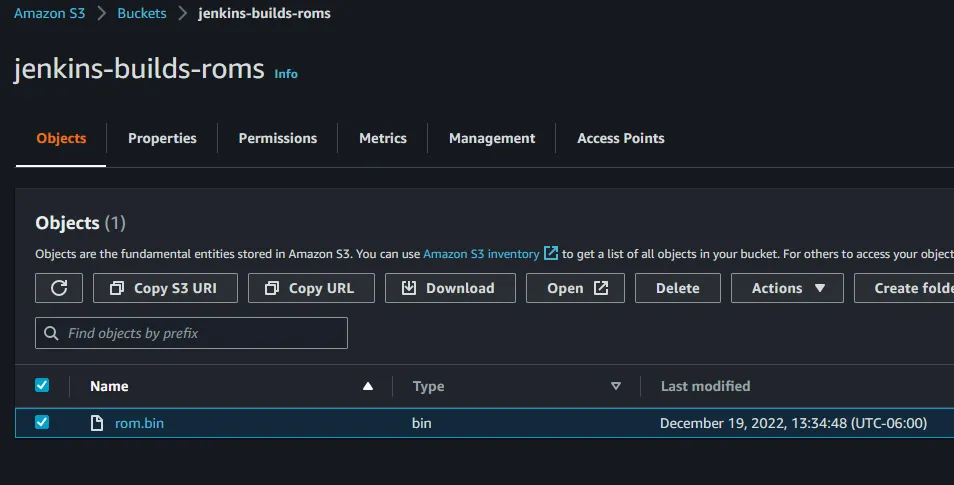
Now, let’s go download the newly created rom.bin file and congratulations on setting up your new SGDK build pipeline!
Troubleshooting
Windows agent showing offline? SGDK build failing on the agent? Failure to publish to S3?
sgdk build agent offline - If your agent reboots or if the command window running the agent.jar file on the agent closes out you will need to open a new command prompt to run the agent.jar file again. Make sure that when you run the agent.jar script that you have navigated to the file path that the agent.jar file lives.
sgdk fails to build on the agent - Make sure that all the files have been copied to the sgdk folder on the agent. Also, might want to confirm that you had built the library files before trying to build any roms. You can build the library files by revisiting Step 13 underneath the Setting up your SGDK Build Agent section.
Job fails to publish to S3 - Make sure that your IAM User has the proper write permissions to that S3 bucket. Also, make sure that you have the correct access and secret key. Be sure to test your profile’s connection during step 5 of Connecting and configuring section. Also, make sure that the rom.bin file was successfully buit as we previously configured S3 publishing to not publish on failures.
Next Steps
Fantastic! Now that you have successfully built your own Sega game within AWS, you have a world of endless possibilities for your retro gaming building needs. From here we recommend exploring other possibilities to enhance your builds such as leveraging events to spin up windows agents on demand instead of having them always running. Also depending on how frequent you may need to build AWS recommends capitalizing on spot instances to reduce cost. Lastly, with all services used within AWS we recommending following best security practices to ensure all EC2 instances stood up are safe.
Other Resources
Don’t have a working Sega game to build with? Want a little bit more information on the SGDK?
OHSAT Games - produces a lot of great tutorials on getting started with SGDK.
SGDK Info - GitHub repository with more information on the open source library along with other resources on how to get started.
Any opinions in this post are those of the individual author and may not reflect the opinions of AWS.