logo
Menu

Building a Multi-region Serverless IoT system

Building a multi-region serverless IoT system can be a huge challenge. IoT resources, Things, and Certificates must be replicated across regions to allow IoT devices seamless multi-region connectivity

Published Aug 18, 2023
Last Modified Apr 28, 2024
In this post we will take a look at how to build a multi-region serverless IoT system. We will dig deep into concepts like how to replicate certificates across regions, and how to setup a DNS record for device connection. All in an event-driven and serverless way.

Why create a multi-region setup ?

There are many reasons why we create multi-region systems on AWS. It can be compliance requirements, resiliency, or latency requirements. In an IoT system, we often have small devices with limited bandwidth which makes latency requirements even more important. With a large system with a global footprint a multi-region solution help us solve that challenge. However, building a multi-region IoT system comes with challenges of its own.
In a multi-region IoT system we don't want our IoT devices to be aware of what or how many AWS Regions we are running in. This should be totally transparent to the device, it should only connect to iot.example.com. For this to work, we must register our IoT Things, Policies, and certificates in all regions. Therefore, we will be able to replicate all of this information across all Regions, despite what Region the device connect to.
We will look at the steps needed to perform this replication in an efficient way. What services to use, and what the setup looks like.

Architectural overview

What we are building in this post is an architecture that will span two AWS Regions, with devices connecting to the closest region using Route53. AWS StepFunctions state-machine will act on incoming events from IoT Core and carry out the needed work. Now let's get started and let's get building.
Image showing the architecture overview.
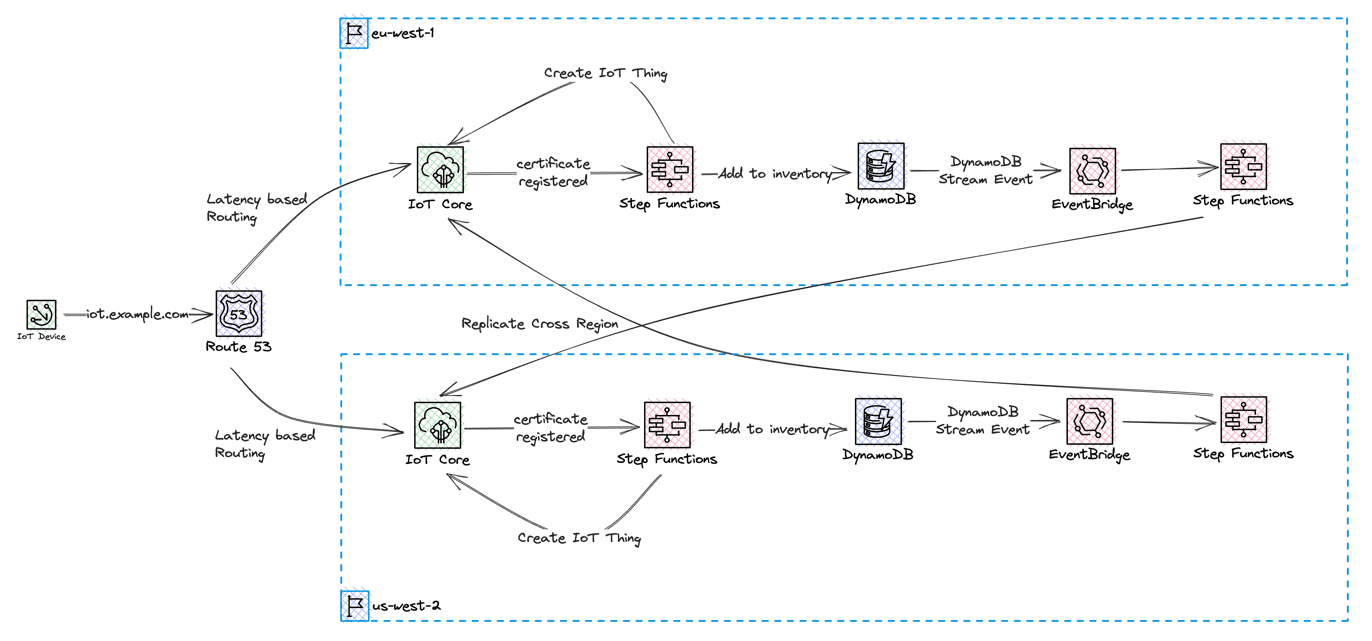
We will use an configurable endpoint with a custom domain: iot.example.com. This will be configured in two regions and we'll use a latency-based record to let devices connect to the Region closest to them. When devices connect for the very first time, the device certificate will be registered in IoT Core, using Just In Time Registration. If a device certificate is successfully registered and activated, it will be stored in an device registry, which is a Global DynamoDB table. By utilizing DynamoDB Streams, the replication of the device certificate can be done in an event-driven way, by utilizing EventBridge Pipes and a custom event-bus. Devices will use certificates issued by a self-signed Root CA. When we authenticate our devices towards AWS IoT Core, we will be using Mutual TLS.
Data from the IoT devices will be stored in a Global DynamoDB table to allow access from both regions. Throughout this blog post we will be using us-west-2 (Oregon) and eu-west-1 (Ireland) region when we build and create resources.
Let’s start off by creating the DynamoDB tables we need.

Creating device registry and data table

We will create two global DynamoDB tables that will only be deployed to a single Region but configured with a replica in a second Region. We need a way to keep track of the devices that have already been registered, despite which Region it was initially registered in. For this, we will create a Device Inventory table. For testing purposes, we will also create a global DynamoDB table where we can store data coming from the devices.
We will deploy these resources using AWS CloudFormation / Serverless Application Model (SAM)
1
2
3
4
5
6
7
8
9
10
11
12
13
14
15
16
17
18
19
20
21
22
23
24
25
26
27
28
29
30
31
32
33
34
35
36
37
38
39
40
41
42
43
44
45
46
47
48
49
50
51
52
53
54
55
56
57
58
59
60
61
62
63
64
65
66
67
68
69
70
AWSTemplateFormatVersion: "2010-09-09"
Transform: AWS::Serverless-2016-10-31
Description: multi-region IoT Global Infrastructure

Parameters:
Application:
Type: String
Description: Name of the application
Default: multi-region-iot
PrimaryRegion:
Type: String
Description: The primary region name
Default: eu-west-1
SecondaryRegion:
Type: String
Description: The secondary region name
Default: us-west-2

Resources:
##########################################################################
# DynamoDB Data Tables
##########################################################################
DeviceInventoryTable:
Type: AWS::DynamoDB::GlobalTable
Properties:
TableName: !Sub ${Application}-device-inventory
BillingMode: PAY_PER_REQUEST
Replicas:
- Region: !Ref PrimaryRegion
- Region: !Ref SecondaryRegion
StreamSpecification:
StreamViewType: NEW_IMAGE
AttributeDefinitions:
- AttributeName: ThingName
AttributeType: S
KeySchema:
- AttributeName: ThingName
KeyType: HASH

IoTDataTable:
Type: AWS::DynamoDB::GlobalTable
Properties:
TableName: !Sub ${Application}-data
BillingMode: PAY_PER_REQUEST
Replicas:
- Region: !Ref PrimaryRegion
- Region: !Ref SecondaryRegion
StreamSpecification:
StreamViewType: NEW_AND_OLD_IMAGES
AttributeDefinitions:
- AttributeName: PK
AttributeType: S
- AttributeName: SK
AttributeType: S
KeySchema:
- AttributeName: PK
KeyType: HASH
- AttributeName: SK
KeyType: RANGE

##########################################################################
# Outputs #
##########################################################################
Outputs:
DeviceInventoryTable:
Description: Name of the created Device Inventory Table
Value: !Ref DeviceInventoryTable
IoTDataTable:
Description: Name of the created IoT Data Table
Value: !Ref IoTDataTable

Creating Certificates

We are going to use a self-signed Root CA when issuing server and device certificates. In a production environment, you should use Root CA signed by a third party trusted source. Our certificate chain will include a Root CA and an Intermediate CA. The Intermediate CA will issue both the server and client certificates. Read this to learn more about SSL/TLS certificates. Read this to learn more about the process that we will be using to create the certificates. We will be using OpenSSL when creating certificates.
We will start by creating the folder structure needed and the files needed to track our certificate creation.
1
2
3
4
5
6
7
8
9
10
11
12
13
14
15
16
mkdir -p ./myCA/rootCA/{certs,crl,newcerts,private,csr}
mkdir -p ./myCA/intermediateCA/{certs,crl,newcerts,private,csr}
mkdir -p ./myCA/server/{certs,crl,newcerts,private,csr}
mkdir -p ./myCA/clients/{certs,crl,newcerts,private,csr}

# Needed to keep track of the last serial number that was used to issue a certificate
echo 1000 > ./myCA/rootCA/serial
echo 1000 > ./myCA/intermediateCA/serial

# This is incremented each time a new Certificate Revocation List (CRL) is generated.
echo 0100 > ./myCA/rootCA/crlnumber
echo 0100 > ./myCA/intermediateCA/crlnumber

# Create index.txt file which is a database of sorts that keeps track of the certificates that have been issued by the CA
touch ./myCA/rootCA/index.txt
touch ./myCA/intermediateCA/index.txt
Next, we create the private key and certificate for the Root CA.
1
2
3
# Root CA:
openssl genrsa -out ./myCA/rootCA/private/ca.key 4096
openssl req -config ./myCA/ca_root.cnf -key ./myCA/rootCA/private/ca.key -new -x509 -days 7300 -sha256 -extensions v3_ca -out ./myCA/rootCA/certs/ca.crt -subj "/C=SE/ST=Scania/L=Malmo/O=MyOrg/OU=/CN=Root CA"
With the Root CA created, we can use this to create and sign the Intermediate CA and create a certificate bundle with the Root and Intermediate CA.
1
2
3
4
5
6
7
# Intermediate CA:
openssl genrsa -out ./myCA/intermediateCA/private/ca_intermediate.key 4096
openssl req -config ./myCA/ca_intermediate.cnf -key ./myCA/intermediateCA/private/ca_intermediate.key -new -sha256 -out ./myCA/intermediateCA/csr/ca_intermediate.csr -subj "/C=SE/ST=Scania/L=Malmo/O=MyOrg/OU=/CN=Intermediate CA"
openssl ca -config ./myCA/ca_root.cnf -extensions v3_intermediate_ca -days 3650 -notext -md sha256 -in ./myCA/intermediateCA/csr/ca_intermediate.csr -out ./myCA/intermediateCA/certs/ca_intermediate.crt

# Create Certificate Bundle / Certificate Chain.
cat ./myCA/intermediateCA/certs/ca_intermediate.crt ./myCA/rootCA/certs/ca.crt > ./myCA/intermediateCA/certs/ca-chain.crt.pem
With the Root CA and Intermediate CA created we can continue to create the server certificate and generate a couple of device certificates as well. The process is very similiar to the one when creating the Intermediate CA. When the server certificate is created, it's very important that the CommonName is set to the server FQDN, in our case iot.example.com.
1
2
3
4
# Server Certificate
openssl genrsa -out ./myCA/server/private/iot.example.com.key 2048
openssl req -config ./myCA/ca_intermediate.cnf -key ./myCA/server/private/iot.example.com.key -new -sha256 -out ./myCA/server/csr/iot.example.com.csr -subj "/C=SE/ST=Scania/L=Malmo/O=MyOrg/OU=/CN=iot.example.com"
openssl ca -config ./myCA/ca_intermediate.cnf -extensions server_cert -days 375 -notext -md sha256 -in ./myCA/server/csr/iot.example.com.csr -out ./myCA/server/certs/iot.example.com.crt
Finally, we create a set of different client certificates. Here we can create a simple bash script that helps us create the certificate, and copy it to clients folder so we can easily access them. For the client certificates we like the common name to match the Thing name we'll use in IoT Core later.
1
2
3
4
5
6
7
8
9
10
11
12
13
14
15
16
17
#!/bin/bash

NAME=$1

if [ -z "$NAME" ]
then
echo "You must enter a device name!"
exit 1
fi

openssl genrsa -out ./myCA/clients/private/$NAME.key 2048
openssl req -config ./myCA/ca_intermediate.cnf -key ./myCA/clients/private/$NAME.key -new -sha256 -out ./myCA/clients/csr/$NAME.csr -subj "/C=SE/ST=Scania/L=Malmo/O=MyOrg/OU=/CN=$NAME"
openssl ca -config ./myCA/ca_intermediate.cnf -extensions usr_cert -days 365 -notext -md sha256 -in ./myCA/clients/csr/$NAME.csr -out ./myCA/clients/certs/$NAME.crt

# For easy access copy the key and cert to a clients folder.
cp ./myCA/clients/certs/$NAME.crt ./clients
cp ./myCA/clients/private/$NAME.key ./clients
The configuration files used is the standard OpenSSL configuration file with the absolute path to the keys set.
With all the certificates created, we can continue with everything and setup the IoT Core endpoints.

Creating configurable endpoint

The first thing we need to do is import the server certificate to AWS Certificate Manager (ACM). We need three things: the server certificate, the server private key, and the certificate chain we also created earlier.
Image showing the import of server certificate to ACM.
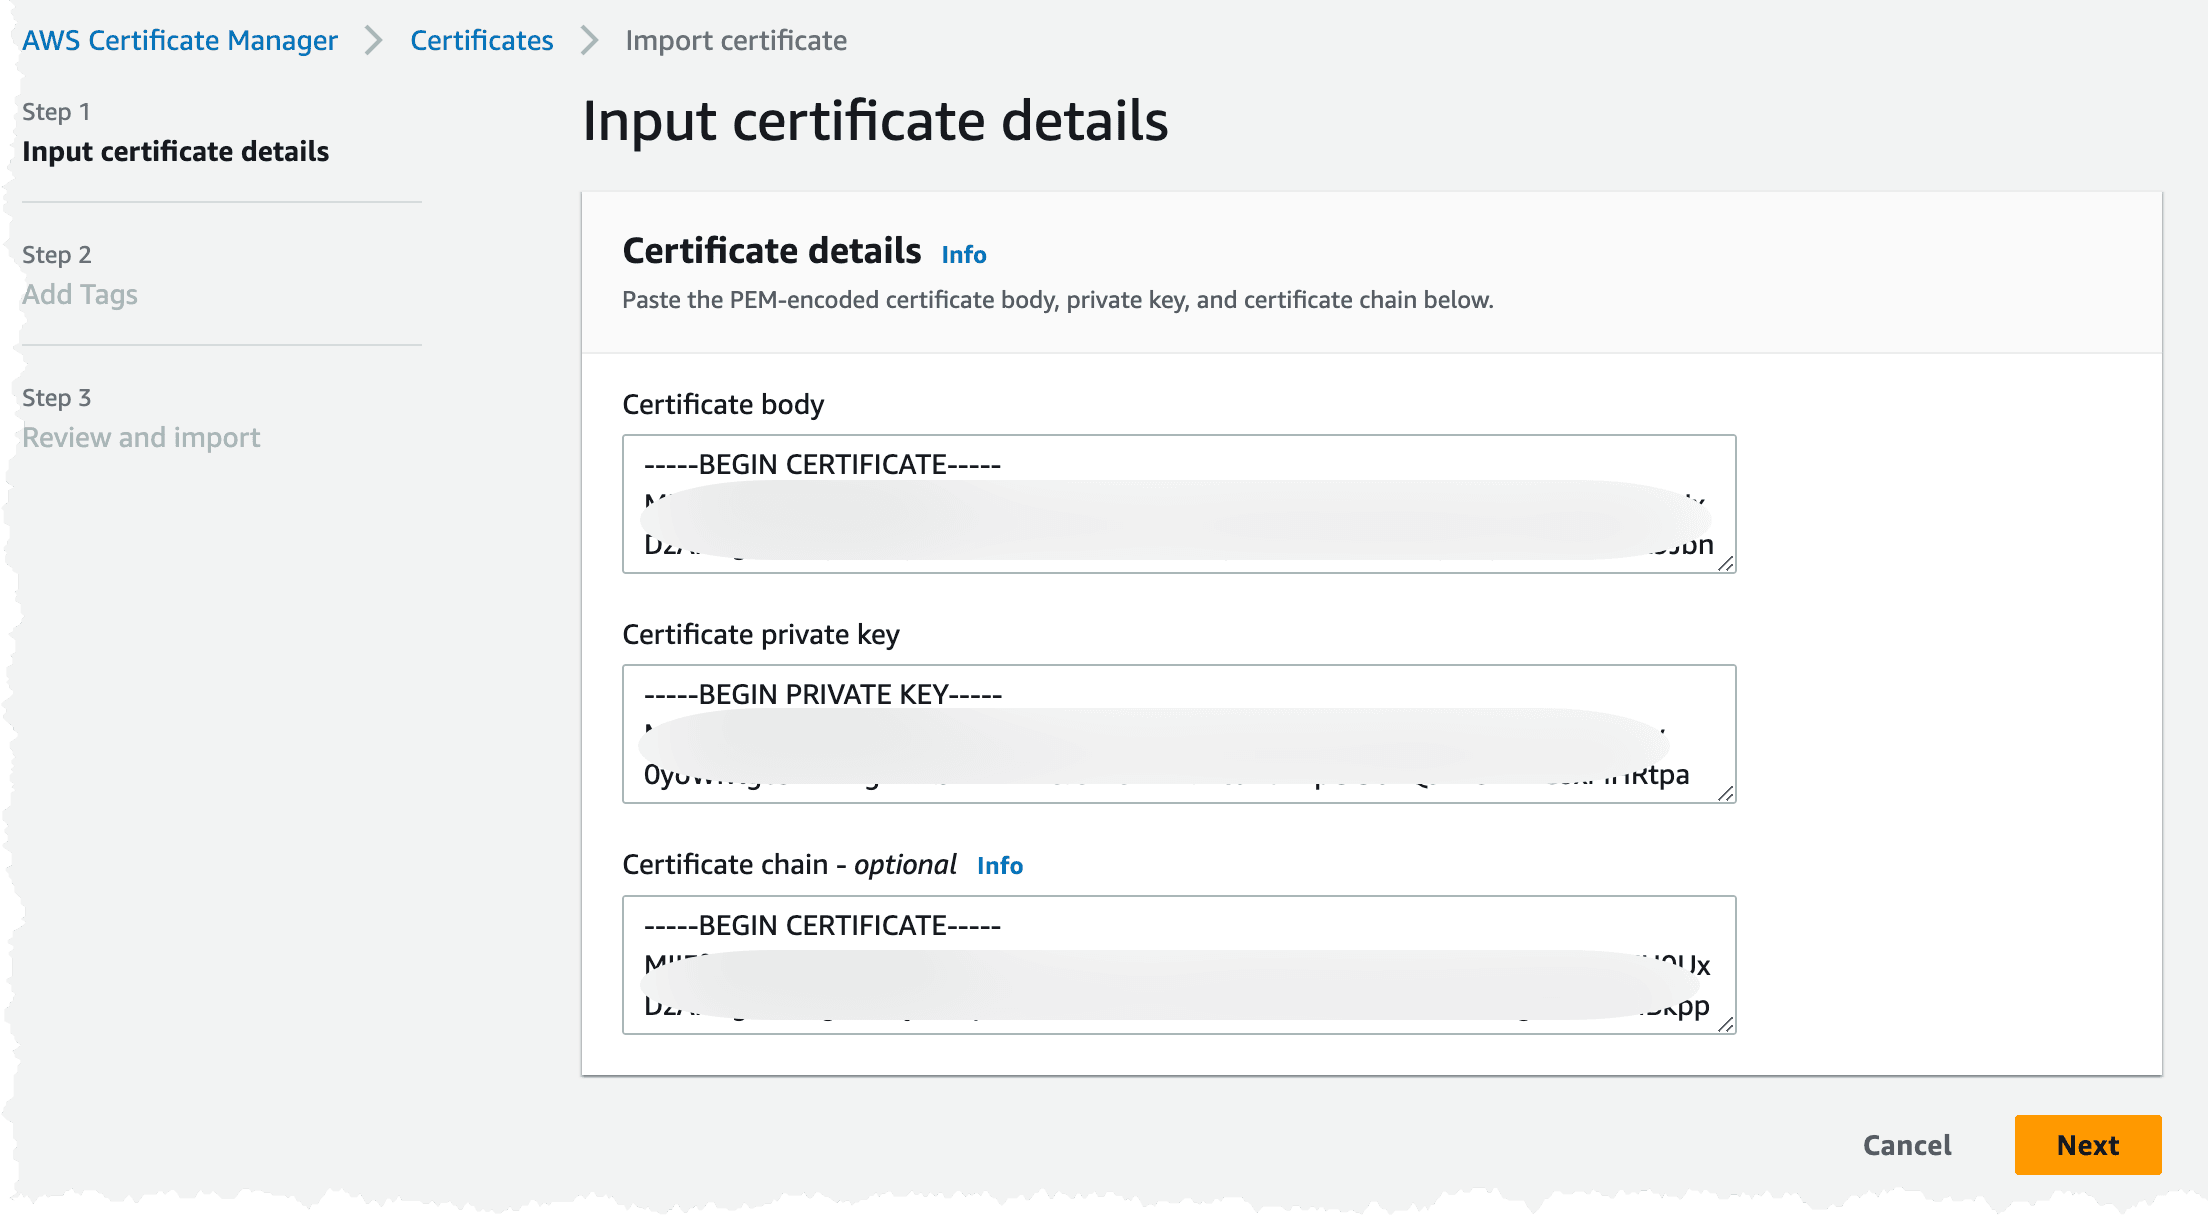
The import can also be done using the AWS CLI.
1
2
3
aws acm import-certificate --certificate fileb://myCA/server/certs/iot.example.com.crt \
--certificate-chain fileb://myCA/intermediateCA/certs/ca-chain.cert.pem \
--private-key fileb://myCA/server/private/iot.example.com.key
1
2
Note!
The server certificate must be imported in both regions for the setup to work properly.
The next step in the process is process is to create the domain configuration and a latency based Route53 record. To prove that we are the rightful owners of the domain name, we also need to create a validation certificate in ACM. To create all of this, we can turn to AWS CloudFormation and SAM. It's assumed that a Hosted Zone for the domain exists in Route53.
We need the IoT Core Endpoint, so we can point the Route53 record to it. There is only one Iot Core endpoint per account and Region. The endpoint can be found under the Settings menu in the IoT Core console.
Image showing the IoT Core Endpoint setting.
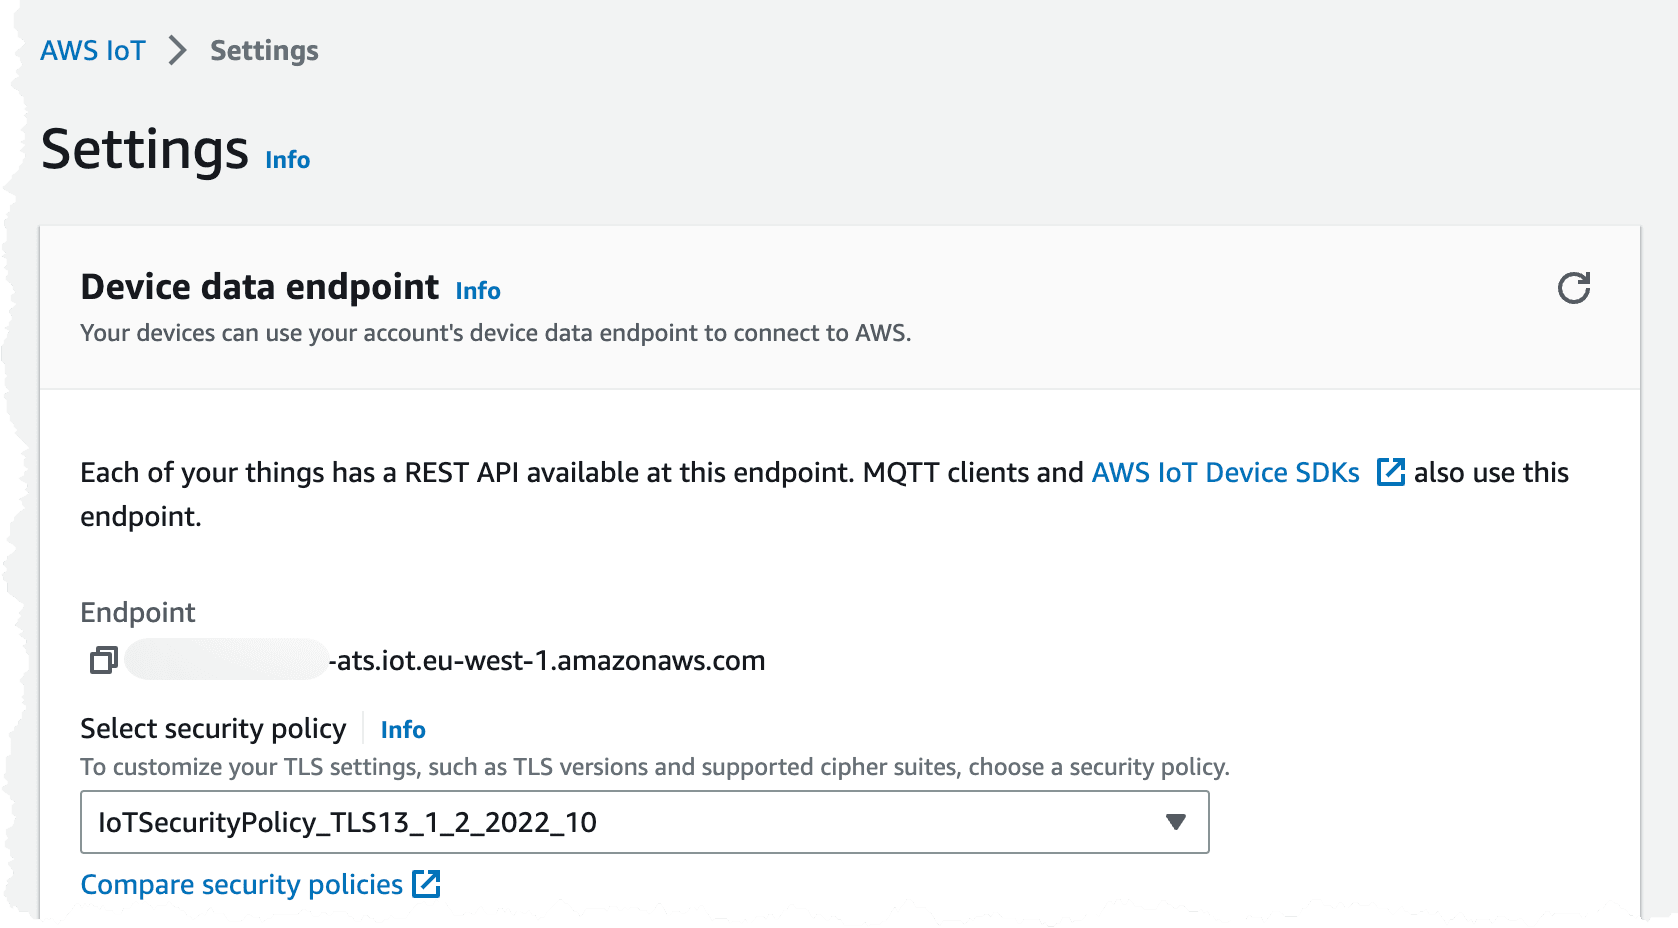
It's also possible to get the endpoint using the CLI. We need to get the Data ATS endpoint.
1
aws iot describe-endpoint --endpoint-type iot:Data-ATS
We will be using the same template through out this blog post and just continue to add resources to it.
1
2
3
4
5
6
7
8
9
10
11
12
13
14
15
16
17
18
19
20
21
22
23
24
25
26
27
28
29
30
31
32
33
34
35
36
37
38
39
40
41
42
43
44
45
46
47
48
49
50
51
52
53
54
55
56
57
58
59
60
61
62
63
64
65
66
AWSTemplateFormatVersion: 2010-09-09
Transform: AWS::Serverless-2016-10-31
Description: multi-region IoT Regional Infrastructure

Parameters:
Application:
Type: String
Description: Name of the application
Default: multi-region-iot
IoTCoreEndpoint:
Type: String
Description: Connection Endpoint for IoT Core
ServerCertificateArn:
Type: String
Description: ARN for the server certificate in ACM
HostedZoneId:
Type: String
Description: The ID of the hosted zone
DNSName:
Type: String
Description: The Name of the DNS record
DeviceInventoryTable:
Type: String
Description: The Name of the DeviceInventoryTable
DeviceInventoryTableStreamArn:
Type: String
Description: The Name ARN to the DeviceInventoryTable DynamoDB Stream
DataTable:
Type: String
Description: The DynemoDB Table to Store data in

Resources:

ValidationCertificate:
Type: AWS::CertificateManager::Certificate
Properties:
DomainName: !Ref DNSName
DomainValidationOptions:
- DomainName: !Ref DNSName
HostedZoneId: !Ref HostedZoneId
ValidationMethod: DNS

IoTCoreDomainConfiguration:
Type: AWS::IoT::DomainConfiguration
Properties:
DomainConfigurationName: !Sub ${Application}-primary
DomainConfigurationStatus: ENABLED
DomainName: !Ref DNSName
ServerCertificateArns:
- !Ref ServerCertificateArn
ServiceType: DATA
TlsConfig:
SecurityPolicy: IotSecurityPolicy_TLS13_1_2_2022_10
ValidationCertificateArn: !Ref ValidationCertificate

LatencyBasedRecord:
Type: AWS::Route53::RecordSet
Properties:
ResourceRecords:
- !Ref IoTCoreEndpoint
SetIdentifier: !Ref AWS::Region
HostedZoneId: !Ref HostedZoneId
Name: !Ref DNSName
TTL: 60
Region: !Ref AWS::Region
Type: CNAME
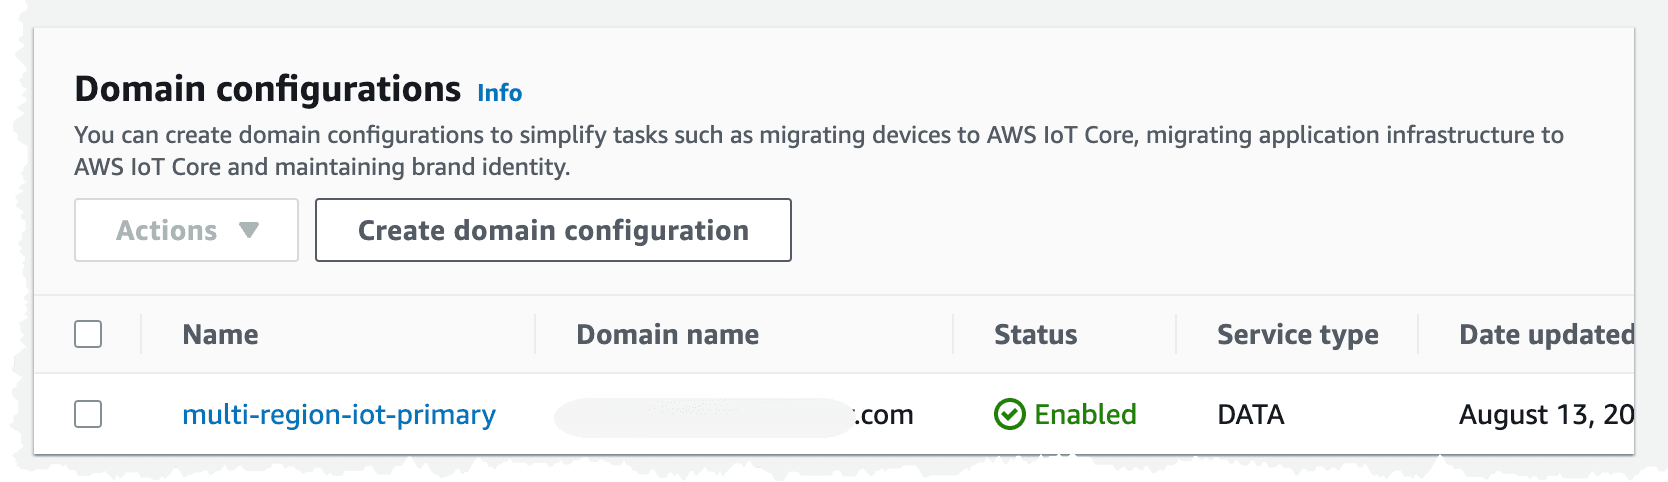
To validate the IoT domain configuration, we can navigate to IoT Core console and check the configuration under settings. The domain configuration should look like the images below.
Image showing the IoT Core domain configuration.
Image showing the IoT Core domain configuration details.
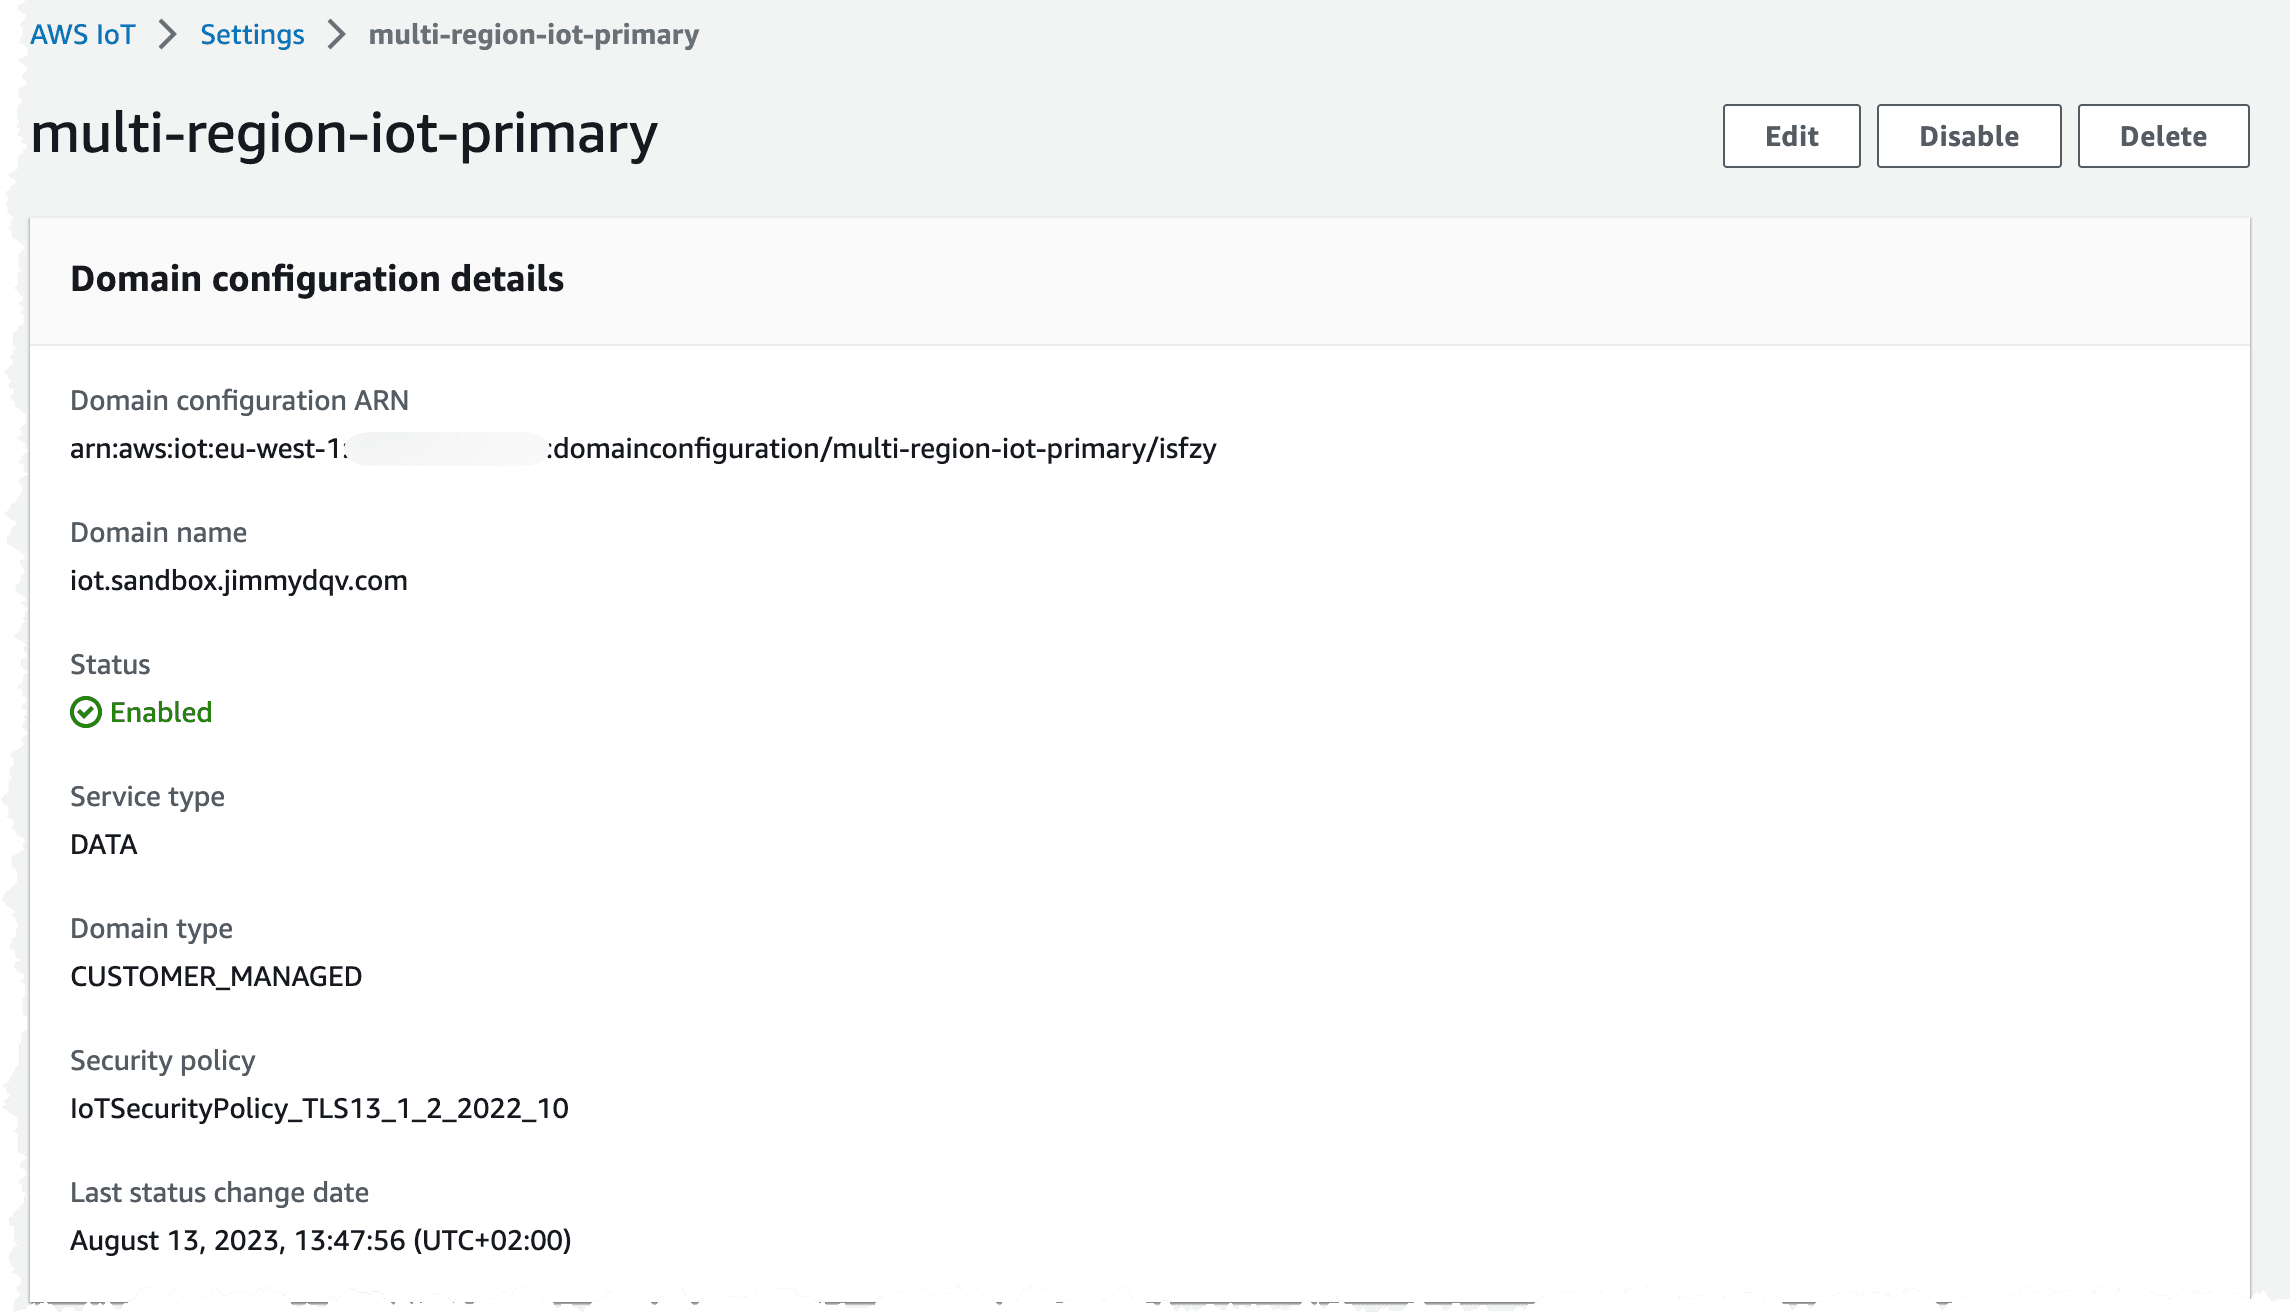
With the endpoint configured, we can move to the next step, activating just in time registration.

Activate Just In Time Registration

The first time a device connects to IoT Core with a certificate signed by our Intermediate CA, the certificate from the device will be registered in IoT Core. This way we can manufacture our devices, bundle them with certificates but not have them registered in IoT Core. The device will receive an immediate disconnect and then need to reconnect. There needs to be some form of wait logic in the device to allow for the cloud to activate the device in IoT Core before reconnecting. We can add our own validation in this activation step, making sure the device is who it claims to be.
We need to run these steps in both regions, because our devices will connect using the configured DNS iot.example.com and will connect to the closest Region.
  1. Register our CA certificate in IoT core and turn on auto-registration.
  2. Create an IoT Core Rule that will invoke an AWS StepFunction to carry out our activation logic.
  3. Replicate our device to the second Region. This step will use an event-driven architecture and react when our device is registered in the primary Region.
To register the CA certificate, we use the CLI to do so. We'll register the certificate in SNI_ONLY mode. This way the same CA can be registered in several accounts and regions.
1
2
3
4
5
## Register in eu-west-1
aws iot register-ca-certificate --allow-auto-registration --ca-certificate file://myCA/intermediateCA/certs/ca_intermediate.crt --certificate-mode SNI_ONLY --set-as-active --region eu-west-1

## Register in us-west-2
aws iot register-ca-certificate --allow-auto-registration --ca-certificate file://myCA/intermediateCA/certs/ca_intermediate.crt --certificate-mode SNI_ONLY --set-as-active --region us-west-2
It is also possible to do the registration using the console. Navigate to the IoT Console, and select Security. When using the console the SNI_ONLY mode is called Multi-account, this is the same as SNI_ONLY, the graphical interface just calls it something different. Upload the ca_intermediate.crt file, that we created in the steps when creating certificates.
Image showing the IoT Core domain configuration.
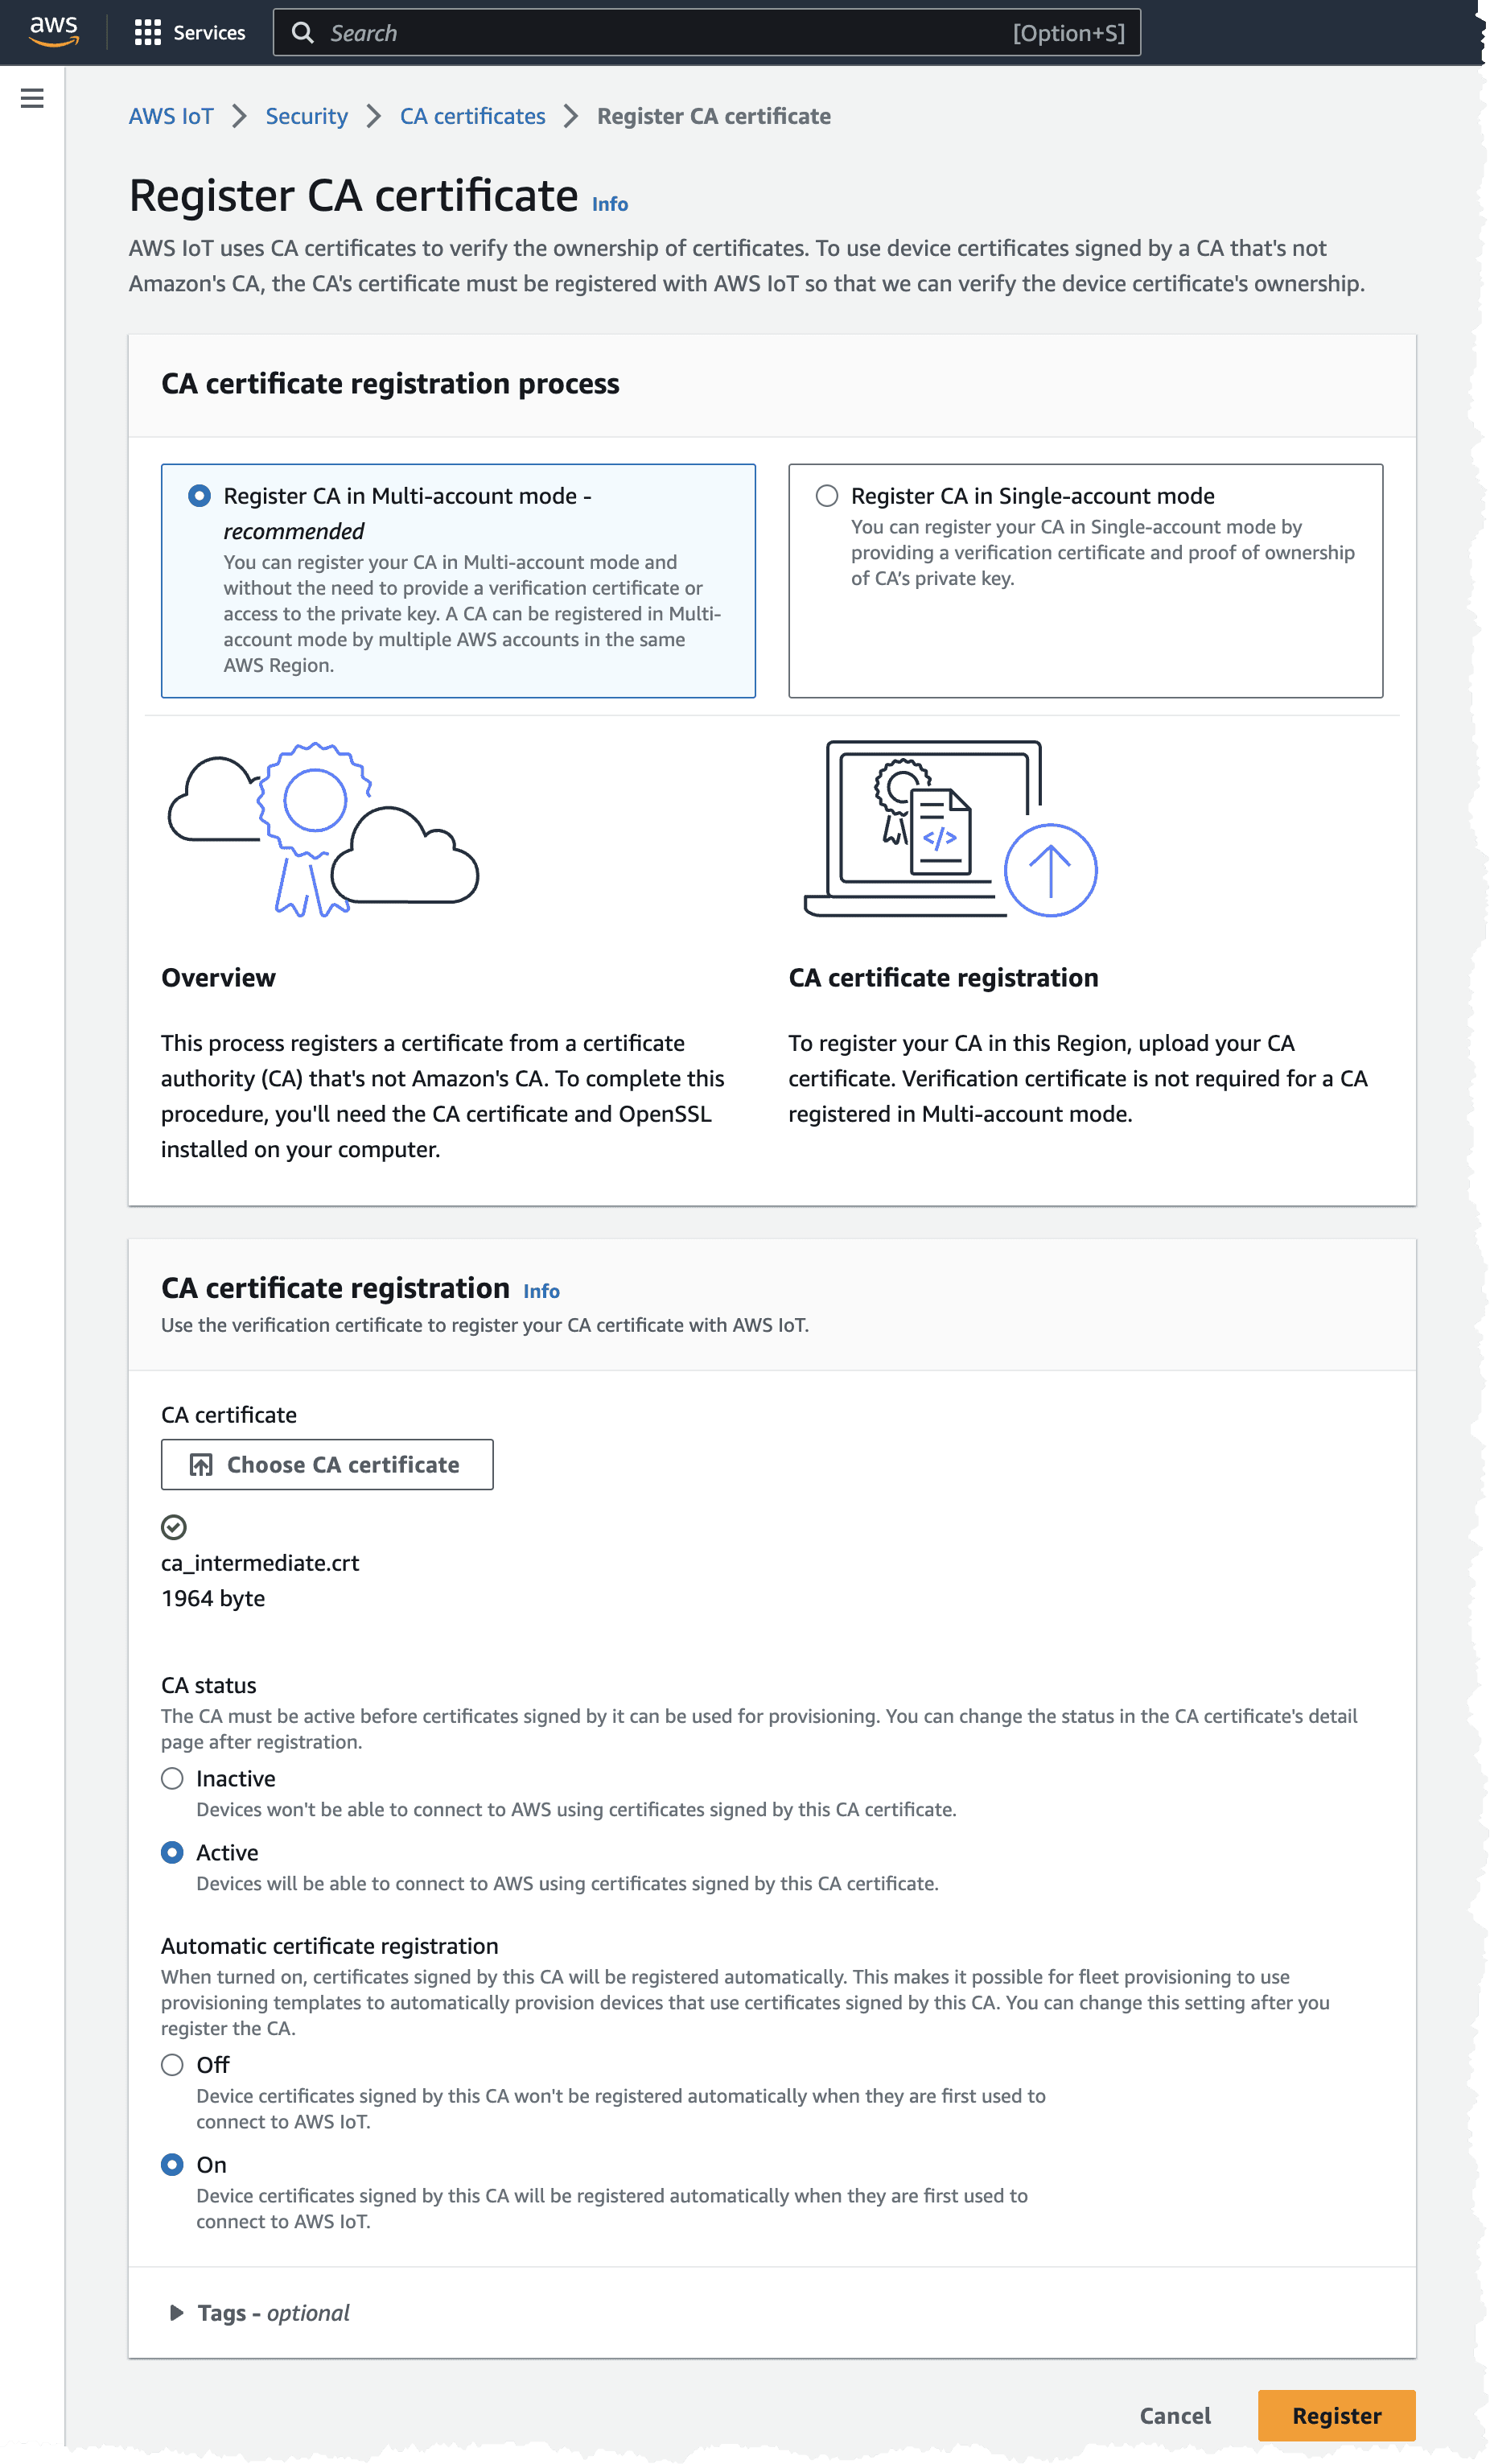
As usual, we can also do this using the CLI
To be able to invoke an AWS StepFunction when a certificate is registered, we must enable IoT Core Events. These events will be posted onto a reserved AWS topic, $aws/events/xyz that we then can create a rule for. The events for registered certificates can ONLY be enabled using the CLI as this option is not available in the console. To enable the events, we need to run the commands.
1
2
3
4
5
6
7
8
9
## Enable in eu-west-1
aws iot update-event-configurations --event-configurations '{"THING":{"Enabled":true},"CERTIFICATE":{"Enabled":true},"CA_CERTIFICATE":{"Enabled":true},"POLICY":{"Enabled":true}}' --region eu-west-1
## Verify
aws iot describe-event-configurations --region eu-west-1

## Enable in us-west-2
aws iot update-event-configurations --event-configurations '{"THING":{"Enabled":true},"CERTIFICATE":{"Enabled":true},"CA_CERTIFICATE":{"Enabled":true},"POLICY":{"Enabled":true}}' --region us-west-2
## Verify
aws iot describe-event-configurations --region us-west-2
Once again, we turn to our CloudFormation / SAM template and add some additional resources. To start we'll, create the IoT Policy that we attach to our devices, the IoT Core Rule, and the StepFunction that implements our logic.
1
2
3
4
5
6
7
8
9
10
11
12
13
14
15
16
17
18
19
20
21
22
23
24
25
26
27
28
29
30
31
32
33
34
35
36
37
38
39
40
41
42
43
44
45
46
47
48
49
50
51
52
53
54
55
56
57
58
59
60
61
62
63
64
65
66
67
68
69
70
71
72
73
74
75
76
77
78
79
80
81
82
83
84
85
86
87
88
89
90
91
92
93
94

JustInTimeRegistrationIoTRule:
Type: AWS::IoT::TopicRule
Properties:
TopicRulePayload:
AwsIotSqlVersion: 2016-03-23
RuleDisabled: false
Sql: SELECT * FROM '$aws/events/certificates/registered/#'
Actions:
- StepFunctions:
RoleArn: !GetAtt JustInTimeRegistrationIoTRuleRole.Arn
StateMachineName: !GetAtt JustInTimeRegistrationStateMachineStandard.Name

JustInTimeRegistrationIoTRuleRole:
Type: AWS::IAM::Role
Properties:
AssumeRolePolicyDocument:
Version: 2012-10-17
Statement:
- Effect: Allow
Principal:
Service: iot.amazonaws.com
Action:
- sts:AssumeRole
Policies:
- PolicyName: InvokeStateMachine
PolicyDocument:
Version: 2012-10-17
Statement:
Action:
- states:StartExecution
Effect: Allow
Resource:
- !Ref JustInTimeRegistrationStateMachineStandard

ReadCertificateFunction:
Type: AWS::Serverless::Function
Properties:
CodeUri: JITRStateMachine/lambda/ReadCertificateData
Handler: data.handler

JustInTimeRegistrationStateMachineStandard:
Type: AWS::Serverless::StateMachine
Properties:
DefinitionUri: JITRStateMachine/jitr.asl.yaml
Tracing:
Enabled: true
DefinitionSubstitutions:
InventoryTable: !Ref DeviceInventoryTable
IoTPolicyName: !Ref IoTDeviceStandardPolicy
ReadCertificateFunctionArn: !GetAtt ReadCertificateFunction.Arn
Policies:
- Statement:
- Effect: Allow
Action:
- logs:*
Resource: "*"
- Statement:
- Effect: Allow
Action:
- iot:*
Resource: "*"
- LambdaInvokePolicy:
FunctionName: !Ref ReadCertificateFunction
- DynamoDBCrudPolicy:
TableName: !Ref DeviceInventoryTable

IoTDeviceStandardPolicy:
Type: AWS::IoT::Policy
Properties:
PolicyDocument:
Version: 2012-10-17
Statement:
- Effect: Allow
Action:
- iot:Connect
Resource:
- arn:aws:iot:*:*:client/${iot:Connection.Thing.ThingName}
- Effect: Allow
Action:
- iot:Publish
Resource:
- arn:aws:iot:*:*:topic/i/${iot:Connection.Thing.ThingName}/*
- Effect: Allow
Action:
- iot:Receive
Resource:
- arn:aws:iot:*:*:topic/e/${iot:Connection.Thing.ThingName}/*
- Effect: Allow
Action:
- iot:Subscribe
Resource:
- arn:aws:iot:*:*:topic/e/${iot:Connection.Thing.ThingName}/*
PolicyName: Iot-Device-Policy

Deep dive JITR logic

The JITR logic includes several steps that need to be coordinated and orchestrated. StepFunctions is an excellent service for this, and we can use the built in error handling to rollback certain steps if we have a failure. We need to fetch information about the registered certificate and read out information from it. We'll check that this is a new device and that it doesn't already exists in our registry of devices. We then create an IoT Thing, attach the registered certificate to that Thing, attach our standard IoT Policy, that we created in pervious part, and then we activate the certificate to allow the device to actually connect to IoT Core. Finally we register the device in our global device registry DynamoDB table.
Image showing the JITR logic.
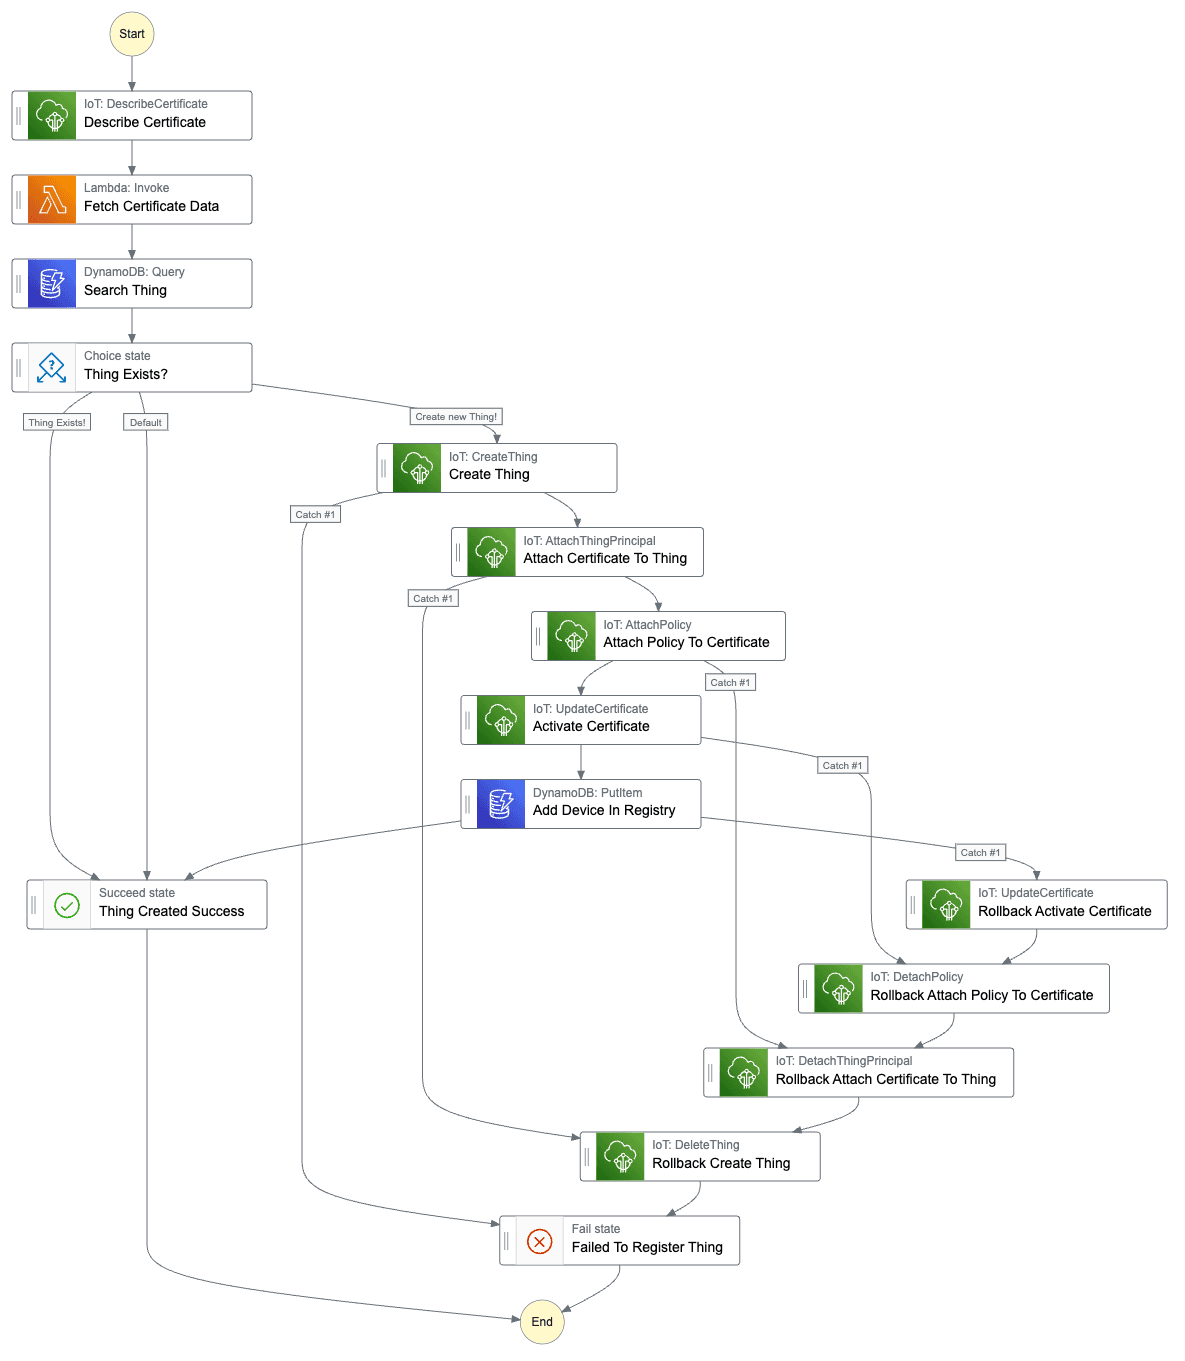
The state-machine definition would be.
1
2
3
4
5
6
7
8
9
10
11
12
13
14
15
16
17
18
19
20
21
22
23
24
25
26
27
28
29
30
31
32
33
34
35
36
37
38
39
40
41
42
43
44
45
46
47
48
49
50
51
52
53
54
55
56
57
58
59
60
61
62
63
64
65
66
67
68
69
70
71
72
73
74
75
76
77
78
79
80
81
82
83
84
85
86
87
88
89
90
91
92
93
94
95
96
97
98
99
100
101
102
103
104
105
106
107
108
109
110
111
112
113
114
115
116
117
118
119
120
121
122
123
124
125
126
127
128
129
130
131
132
133
134
135
136
137
138
139
140
141
142
143
144
145
146
147
148
149
150
151
152
153
154
155
156
157
158
159
160
161
162
163
164
165
166
167
168
169
170
171
172
173
174
175
176
177
178
179
180
Comment: JITR StateMachine
StartAt: Describe Certificate
States:
Describe Certificate:
Type: Task
Next: Fetch Certificate Data
Parameters:
CertificateId.$: $.certificateId
Resource: arn:aws:states:::aws-sdk:iot:describeCertificate
ResultPath: $.CertificateInfo
Fetch Certificate Data:
Type: Task
Resource: ${ReadCertificateFunctionArn}
ResultPath: $.CertificateData
Next: Search Thing
Search Thing:
Type: Task
Next: Thing Exists?
Parameters:
TableName: ${InventoryTable}
KeyConditionExpression: ThingName = :pk
ExpressionAttributeValues:
":pk":
S.$: $.CertificateData.CommonName
ResultPath: $.ThingQueryResult
Resource: arn:aws:states:::aws-sdk:dynamodb:query
Thing Exists?:
Type: Choice
Choices:
- Variable: $.ThingQueryResult.Count
NumericGreaterThan: 0
Comment: Thing Exists!
Next: Thing Created Success
- Variable: $.ThingQueryResult.Count
NumericLessThanEquals: 0
Comment: Create new Thing!
Next: Create Thing
Default: Thing Created Success
Create Thing:
Type: Task
Next: Attach Certificate To Thing
Parameters:
ThingName.$: $.CertificateData.CommonName
Resource: arn:aws:states:::aws-sdk:iot:createThing
ResultPath: $.Thing
Retry:
- ErrorEquals:
- States.ALL
BackoffRate: 2
IntervalSeconds: 1
MaxAttempts: 2
Comment: Retry Create thing
Catch:
- ErrorEquals:
- States.ALL
Comment: Failed to Create Thing
Next: Failed To Register Thing
Attach Certificate To Thing:
Type: Task
Next: Attach Policy To Certificate
Parameters:
Principal.$: $.CertificateInfo.CertificateDescription.CertificateArn
ThingName.$: $.CertificateData.CommonName
Resource: arn:aws:states:::aws-sdk:iot:attachThingPrincipal
ResultPath: null
Retry:
- ErrorEquals:
- States.ALL
BackoffRate: 2
IntervalSeconds: 1
MaxAttempts: 2
Comment: Retry Attach Certificate
Catch:
- ErrorEquals:
- States.ALL
Comment: Failed to Attach Certificate
Next: Rollback Create Thing
Rollback Create Thing:
Type: Task
Next: Failed To Register Thing
Parameters:
ThingName.$: $.CertificateData.CommonName
Resource: arn:aws:states:::aws-sdk:iot:deleteThing
Attach Policy To Certificate:
Type: Task
Next: Activate Certificate
Parameters:
PolicyName: Iot-Device-Policy
Target.$: $.CertificateInfo.CertificateDescription.CertificateArn
Resource: arn:aws:states:::aws-sdk:iot:attachPolicy
ResultPath: null
Retry:
- ErrorEquals:
- States.ALL
BackoffRate: 2
IntervalSeconds: 1
MaxAttempts: 2
Comment: Retry Attach Policy
Catch:
- ErrorEquals:
- States.ALL
Comment: Failed to Attach Policy
Next: Rollback Attach Certificate To Thing
Rollback Attach Certificate To Thing:
Type: Task
Next: Rollback Create Thing
Parameters:
Principal.$: $.CertificateInfo.CertificateDescription.CertificateArn
ThingName.$: $.CertificateData.CommonName
Resource: arn:aws:states:::aws-sdk:iot:detachThingPrincipal
Activate Certificate:
Type: Task
Next: Add Device In Registry
Parameters:
CertificateId.$: $.certificateId
NewStatus: ACTIVE
Resource: arn:aws:states:::aws-sdk:iot:updateCertificate
ResultPath: null
Retry:
- ErrorEquals:
- States.ALL
BackoffRate: 2
IntervalSeconds: 1
MaxAttempts: 2
Comment: Retry Activate Certificate
Catch:
- ErrorEquals:
- States.ALL
Comment: Failed to Activate Certificate
Next: Rollback Attach Policy To Certificate
Rollback Attach Policy To Certificate:
Type: Task
Next: Rollback Attach Certificate To Thing
Parameters:
PolicyName: Iot-Device-Policy
Target.$: $.CertificateInfo.CertificateDescription.CertificateArn
Resource: arn:aws:states:::aws-sdk:iot:detachPolicy
Add Device In Registry:
Type: Task
Resource: arn:aws:states:::dynamodb:putItem
Parameters:
TableName: ${InventoryTable}
Item:
ThingName:
S.$: $.Thing.ThingName
ThingId:
S.$: $.Thing.ThingId
ThingArn:
S.$: $.Thing.ThingArn
CertificateArn:
S.$: $.CertificateInfo.CertificateDescription.CertificateArn
CaCertificateId:
S.$: $.CertificateInfo.CertificateDescription.CaCertificateId
NotAfter:
S.$: $.CertificateInfo.CertificateDescription.Validity.NotAfter
ResultPath: null
Retry:
- ErrorEquals:
- States.ALL
BackoffRate: 2
IntervalSeconds: 1
MaxAttempts: 2
Comment: Retry Store thing
Catch:
- ErrorEquals:
- States.ALL
Comment: Failed to Store Thing
Next: Rollback Activate Certificate
Next: Thing Created Success
Rollback Activate Certificate:
Type: Task
Next: Rollback Attach Policy To Certificate
Parameters:
CertificateId.$: $.certificateId
NewStatus: INACTIVE
Resource: arn:aws:states:::aws-sdk:iot:updateCertificate
Thing Created Success:
Type: Succeed
Failed To Register Thing:
Type: Fail
All but one of the tasks can be completed using the powerful service and SDK integration that exists in StepFunctions. For the task to read out information from the actual certificate, we need to use an AWS Lambda Function. We need to get the name of the thing, and this should match the common name in the certificate.
1
2
3
4
5
6
7
8
9
10
11
12
13
14
15
16
# Read the CommonName from the certificate PEM
from cryptography import x509
from cryptography.x509.oid import NameOID


def handler(event, context):
certificatePEM = event["CertificateInfo"]["CertificateDescription"]["CertificatePem"]

return {"CommonName": read_certificate_data(certificatePEM)}


def read_certificate_data(certificatePem):
cert = x509.load_pem_x509_certificate(certificatePem.encode("utf-8"))

subject = cert.subject
return subject.get_attributes_for_oid(NameOID.COMMON_NAME)[0].value

Replicate device to the second region

When a device has been registered and activated in one Region, we need to copy all of that information to the second Region. This will include the actual device certificate and we need to create the Thing, attach policy and certificate. We do this so our devices then can connect to any of our Regions, creating a multi-region setup with failover possibilities. This part of the system will be event-driven and invoked when a new device is stored in our device inventory. To accomplish this we will use DynamoDB streams, we will use EventBridge Pipes to publish an event to an EventBridge event-bus when there is a new record in the stream. From the event-bus we can invoke a StepFunction that will carry out the work. This StepFunction state-machine will be running in the destination Region, meaning we need to fetch information cross-region from the source Region.
We add some additional resources to our template and deploy this to both Regions.
1
2
3
4
5
6
7
8
9
10
11
12
13
14
15
16
17
18
19
20
21
22
23
24
25
26
27
28
29
30
31
32
33
34
35
36
37
38
39
40
41
42
43
44
45
46
47
48
49
50
51
52
53
54
55
56
57
58
59
60
61
62
63
64
65
66
67
68
69
70
71
72
73
74
75
76
77
78
79
80
81
82
83
84
85
86
87
88
89
90
91
92
93
94
95
96
97
98
99
100
101
102
103
ServiceEventBus:
Type: AWS::Events::EventBus
Properties:
Name: !Sub ${Application}-${AWS::Region}-event-bus

EventBridgePipeRole:
Type: AWS::IAM::Role
Properties:
AssumeRolePolicyDocument:
Version: 2012-10-17
Statement:
- Effect: Allow
Principal:
Service:
- pipes.amazonaws.com
Action:
- sts:AssumeRole
Policies:
- PolicyName: ReadDynamoDB
PolicyDocument:
Version: 2012-10-17
Statement:
- Effect: Allow
Action:
- dynamodb:DescribeStream
- dynamodb:GetRecords
- dynamodb:GetShardIterator
- dynamodb:ListStreams
Resource: !Ref DeviceInventoryTableStreamArn
- PolicyName: WriteEventBridge
PolicyDocument:
Version: 2012-10-17
Statement:
- Effect: Allow
Action:
- events:PutEvents
Resource: !GetAtt ServiceEventBus.Arn

Pipe:
Type: AWS::Pipes::Pipe
Properties:
Name: !Sub ${Application}-deviceinventory-to-eventbridge
Description: Pipe to connect DeviceInventoryTable Stream to EventBridge event bus
RoleArn: !GetAtt EventBridgePipeRole.Arn
Source: !Ref DeviceInventoryTableStreamArn
SourceParameters:
DynamoDBStreamParameters:
StartingPosition: LATEST
BatchSize: 1
Target: !GetAtt ServiceEventBus.Arn
TargetParameters:
EventBridgeEventBusParameters:
DetailType: DeviceTableUpdate
Source: !Sub ${Application}.devices

GetCertificatePemFunction:
Type: AWS::Serverless::Function
Properties:
CodeUri: CopyDeviceStateMachine/lambda/GetCertificatePem
Handler: get-pem.handler
Policies:
- Statement:
- Effect: Allow
Action:
- iot:*
Resource: "*"

CopyDeviceStateMachineStandard:
Type: AWS::Serverless::StateMachine
Properties:
DefinitionUri: CopyDeviceStateMachine/copy.asl.yaml
Tracing:
Enabled: true
DefinitionSubstitutions:
InventoryTable: !Ref DeviceInventoryTable
IoTPolicyName: !Ref IoTDeviceStandardPolicy
GetCertificatePemFunctionArn: !GetAtt GetCertificatePemFunction.Arn
Policies:
- Statement:
- Effect: Allow
Action:
- logs:*
Resource: "*"
- Statement:
- Effect: Allow
Action:
- iot:*
Resource: "*"
- DynamoDBCrudPolicy:
TableName: !Ref DeviceInventoryTable
- LambdaInvokePolicy:
FunctionName: !Ref GetCertificatePemFunction
Events:
Delete:
Type: EventBridgeRule
Properties:
EventBusName: !Ref ServiceEventBus
InputPath: $.detail
Pattern:
source:
- !Sub ${Application}.devices
detail-type:
- DeviceTableUpdate
The state-machine is very similar to the one used to register a new device. The main difference is that the device is not written to the device table. We also need to fetch certification data cross-region.
1
2
3
4
5
6
7
8
9
10
11
12
13
14
15
16
17
18
19
20
21
22
23
24
25
26
27
28
29
30
31
# Read certificate data cross-region
import boto3
import json

from cryptography import x509
from cryptography.x509.oid import NameOID


def handler(event, context):
certificateId = event["CertificateId"]
region = event["ThingRegion"]
certificateData = describe_certificate(certificateId, region)

certificatePem = certificateData["certificateDescription"]["certificatePem"]
commonName = read_certificate_data(certificatePem)

return {"Pem": certificatePem, "CommonName": commonName}


def describe_certificate(certificateId, region):
client = boto3.client("iot", region_name=region)
response = client.describe_certificate(certificateId=certificateId)
return response


def read_certificate_data(certificatePem):
print(certificatePem)
cert = x509.load_pem_x509_certificate(certificatePem.encode("utf-8"))

subject = cert.subject
return subject.get_attributes_for_oid(NameOID.COMMON_NAME)[0].value
The StepFunctions state-machine definition for replication of IoT resources would be like this.
1
2
3
4
5
6
7
8
9
10
11
12
13
14
15
16
17
18
19
20
21
22
23
24
25
26
27
28
29
30
31
32
33
34
35
36
37
38
39
40
41
42
43
44
45
46
47
48
49
50
51
52
53
54
55
56
57
58
59
60
61
62
63
64
65
66
67
68
69
70
71
72
73
74
75
76
77
78
79
80
81
82
83
84
85
86
87
88
89
90
91
92
93
94
95
96
97
98
99
100
101
102
103
104
105
106
107
108
109
110
111
112
113
114
115
116
117
118
119
120
121
122
123
124
125
126
127
128
129
130
131
132
133
134
135
136
137
138
139
140
141
Comment: Replicate IoT Resources State Machine
StartAt: Start
States:
Start:
Type: Pass
Parameters:
EventType.$: $.eventName
ThingRegion.$: States.ArrayGetItem(States.StringSplit($.dynamodb.NewImage.ThingArn.S,':'),3)
ThingName.$: $.dynamodb.NewImage.ThingName.S
ThingId.$: $.dynamodb.NewImage.ThingId.S
CaCertificateId.$: $.dynamodb.NewImage.CaCertificateId.S
CertificateArn.$: $.dynamodb.NewImage.CertificateArn.S
CertificateId.$: States.ArrayGetItem(States.StringSplit($.dynamodb.NewImage.CertificateArn.S,'/'),1)
RuntimeRegion.$: States.ArrayGetItem(States.StringSplit($$.Execution.Id,':'),3)
ResultPath: $
Next: Choice
Choice:
Type: Choice
Choices:
- Variable: $.ThingRegion
StringEqualsPath: $.RuntimeRegion
Next: No Op
Default: Fetch Certificate Data
No Op:
Type: Pass
End: true
Fetch Certificate Data:
Type: Task
Resource: ${GetCertificatePemFunctionArn}
ResultPath: $.CertificateData
Next: Register Certificate
Register Certificate:
Type: Task
Next: Create Thing
Parameters:
CertificatePem.$: $.CertificateData.Pem
Resource: arn:aws:states:::aws-sdk:iot:registerCertificate
ResultPath: $.RegisteredCertificate
Create Thing:
Type: Task
Next: Attach Certificate To Thing
Parameters:
ThingName.$: $.CertificateData.CommonName
Resource: arn:aws:states:::aws-sdk:iot:createThing
ResultPath: $.Thing
Retry:
- ErrorEquals:
- States.ALL
BackoffRate: 2
IntervalSeconds: 1
MaxAttempts: 2
Comment: Retry Create thing
Catch:
- ErrorEquals:
- States.ALL
Comment: Failed to Create Thing
Next: Failed To Register Thing
Attach Certificate To Thing:
Type: Task
Next: Attach Policy To Certificate
Parameters:
Principal.$: $.RegisteredCertificate.CertificateArn
ThingName.$: $.CertificateData.CommonName
Resource: arn:aws:states:::aws-sdk:iot:attachThingPrincipal
ResultPath: null
Retry:
- ErrorEquals:
- States.ALL
BackoffRate: 2
IntervalSeconds: 1
MaxAttempts: 2
Comment: Retry Attach Certificate
Catch:
- ErrorEquals:
- States.ALL
Comment: Failed to Attach Certificate
Next: Rollback Create Thing
Rollback Create Thing:
Type: Task
Next: Failed To Register Thing
Parameters:
ThingName.$: $.CertificateData.CommonName
Resource: arn:aws:states:::aws-sdk:iot:deleteThing
Attach Policy To Certificate:
Type: Task
Next: Activate Certificate
Parameters:
PolicyName: Iot-Device-Policy
Target.$: $.RegisteredCertificate.CertificateArn
Resource: arn:aws:states:::aws-sdk:iot:attachPolicy
ResultPath: null
Retry:
- ErrorEquals:
- States.ALL
BackoffRate: 2
IntervalSeconds: 1
MaxAttempts: 2
Comment: Retry Attach Policy
Catch:
- ErrorEquals:
- States.ALL
Comment: Failed to Attach Policy
Next: Rollback Attach Certificate To Thing
Rollback Attach Certificate To Thing:
Type: Task
Next: Rollback Create Thing
Parameters:
Principal.$: $.RegisteredCertificate.CertificateArn
ThingName.$: $.CertificateData.CommonName
Resource: arn:aws:states:::aws-sdk:iot:detachThingPrincipal
Activate Certificate:
Type: Task
Next: Thing Created Success
Parameters:
CertificateId.$: $.RegisteredCertificate.CertificateId
NewStatus: ACTIVE
Resource: arn:aws:states:::aws-sdk:iot:updateCertificate
ResultPath: null
Retry:
- ErrorEquals:
- States.ALL
BackoffRate: 2
IntervalSeconds: 1
MaxAttempts: 2
Comment: Retry Activate Certificate
Catch:
- ErrorEquals:
- States.ALL
Comment: Failed to Activate Certificate
Next: Rollback Attach Policy To Certificate
Rollback Attach Policy To Certificate:
Type: Task
Next: Rollback Attach Certificate To Thing
Parameters:
PolicyName: Iot-Device-Policy
Target.$: $.RegisteredCertificate.CertificateArn
Resource: arn:aws:states:::aws-sdk:iot:detachPolicy
Failed To Register Thing:
Type: Fail
Thing Created Success:
Type: Succeed
With the replication done, we are ready to start testing the solution using our two regions.

Testing

What we will do during testing is set up an IoT Rule that will invoke a StepFunction state-machine, which will store the incoming data in our global data DynamoDB table.
To imitate devices, we will use EC2 instances, running in the different regions, add use Eclipse Mosquitto and mosquitto_pub.
First of all, let's create the resources we need, we addon to our CloudFormation template.
1
2
3
4
5
6
7
8
9
10
11
12
13
14
15
16
17
18
19
20
21
22
23
24
25
26
27
28
29
30
31
32
33
34
35
36
37
38
39
40
41
42
43
44
45
46
47
48
49
50
51
52
53
54
55
56
57
58
59
60
61
62
63
64
65
66
67
68
69
70
71
72
73
74
75
76
77
78
79
##########################################################################
# Test Resources
##########################################################################
StoreDataIoTRuleRole:
Type: AWS::IAM::Role
Properties:
AssumeRolePolicyDocument:
Version: 2012-10-17
Statement:
- Effect: Allow
Principal:
Service: iot.amazonaws.com
Action:
- sts:AssumeRole
Policies:
- PolicyName: InvokeStateMachine
PolicyDocument:
Version: 2012-10-17
Statement:
Action:
- states:StartExecution
Effect: Allow
Resource:
- !Ref StoreDataStateMachineStandard

StoreDataStateMachineStandard:
Type: AWS::Serverless::StateMachine
Properties:
DefinitionUri: StoreMessagesStateMachine/store.asl.yaml
Tracing:
Enabled: true
DefinitionSubstitutions:
DataTable: !Ref DataTable
Policies:
- Statement:
- Effect: Allow
Action:
- logs:*
Resource: "*"
- DynamoDBCrudPolicy:
TableName: !Ref DataTable

CertificateStoreBucket:
Type: AWS::S3::Bucket
Properties:
BucketEncryption:
ServerSideEncryptionConfiguration:
- ServerSideEncryptionByDefault:
SSEAlgorithm: AES256
BucketName: !Sub ${Application}-certificate-store-${AWS::Region}

InstanceRole:
Type: AWS::IAM::Role
Properties:
Policies:
- PolicyName: AccessCertificateStoreBucket
PolicyDocument:
Version: 2012-10-17
Statement:
- Effect: Allow
Action: s3:*
Resource: !Sub arn:aws:s3:::${CertificateStoreBucket}/*
- Effect: Allow
Action: s3:*
Resource: !Sub arn:aws:s3:::${CertificateStoreBucket}
AssumeRolePolicyDocument:
Version: 2012-10-17
Statement:
- Effect: Allow
Principal:
Service:
- ec2.amazonaws.com
Action: sts:AssumeRole

EC2InstanceProfile:
Type: AWS::IAM::InstanceProfile
Properties:
Roles:
- !Ref InstanceRole
1
2
3
4
5
6
7
8
9
10
11
12
13
14
15
16
17
18
19
20
21
22
23
24
25
26
27
28
29
Comment: Store Incoming IoT Data
StartAt: Refine data
States:
Refine data:
Type: Pass
Parameters:
Message.$: $.message
Device.$: $.device
TS.$: $.ts
Region.$: States.ArrayGetItem(States.StringSplit($$.StateMachine.Id,':'),3)
Next: Add Data Item
Add Data Item:
Type: Task
Resource: arn:aws:states:::dynamodb:putItem
Parameters:
TableName: ${DataTable}
Item:
PK:
S.$: $.Device
SK:
S.$: States.Format('{}',$.TS)
Device:
S.$: $.Device
Region:
S.$: $.Region
Message:
S.$: $.Message
ResultPath: null
End: true
Make sure to upload the Root CA certificate, the intermediate CA certificate, the device certificates and private keys, that you have created, to the 
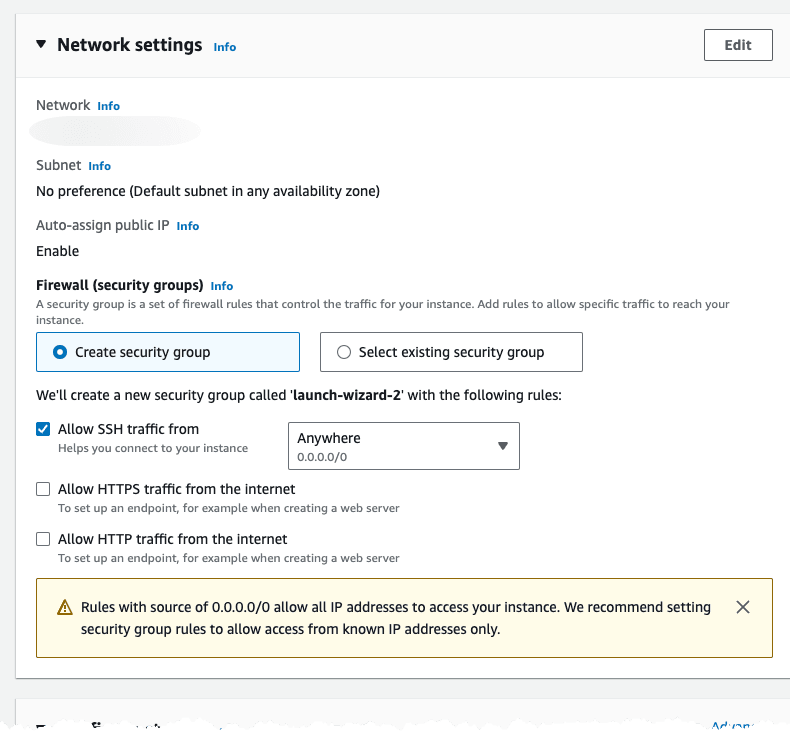
CertificateStoreBucket bucket in both Regions. Since we use our self-signed CA certificate to sign the server certificate we must present this during the connection attempt.
From the EC2 console, let's create an Ubuntu 22.04 instance.
Image showing the first part of creating an EC2 instance.
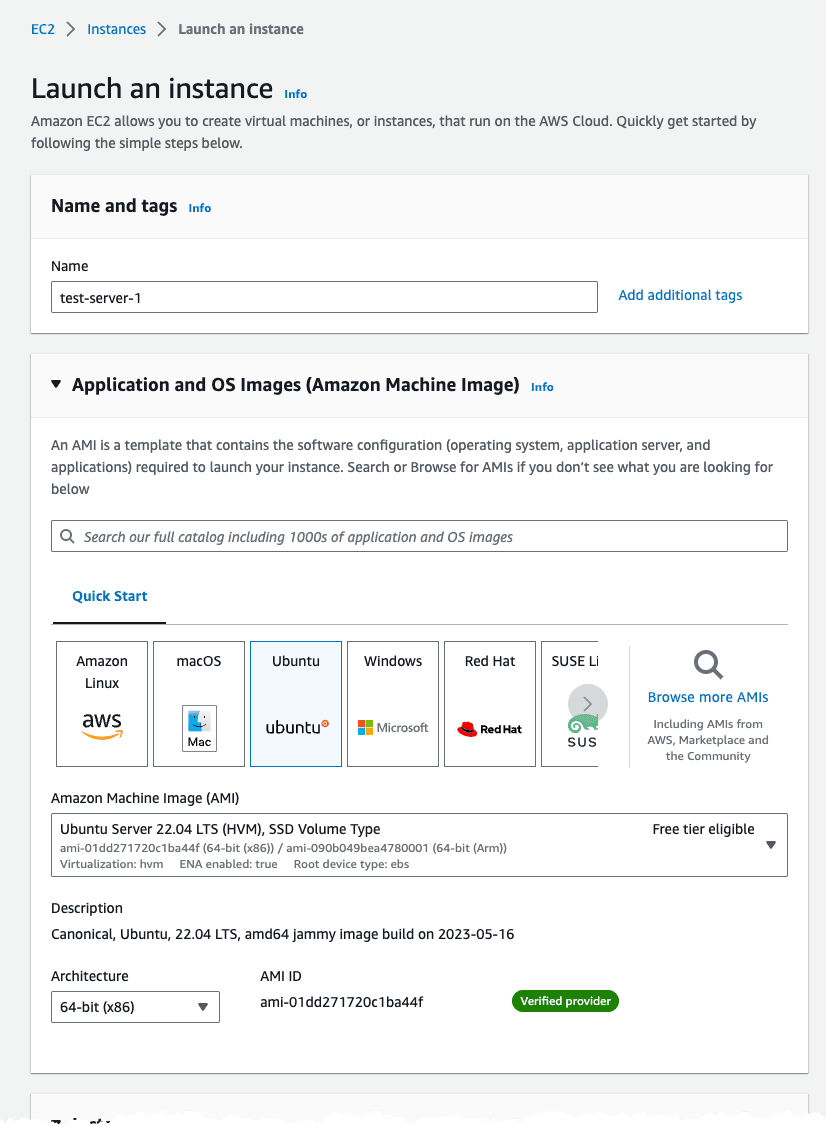
For network setting use the default VPC and allow SSH access from anywhere.
1
2
3
4
5
6
!!IMPORTANT!!

This is only for testing purposes using an transient EC2 instance!
It's not recommended to allow SSH from anywhere on a long running instance!!

!!IMPORTANT!!
Image showing the EC2 instance network settings.
Under advanced settings, select the Instance Profile, in the Region, that we created using the CloudFormation template.
Image showing the EC2 instance advanced settings.
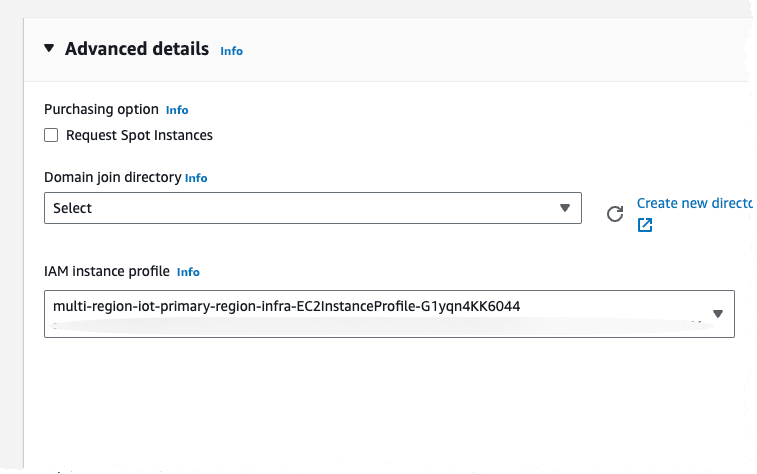
Make sure to create an test instance in both Regions.
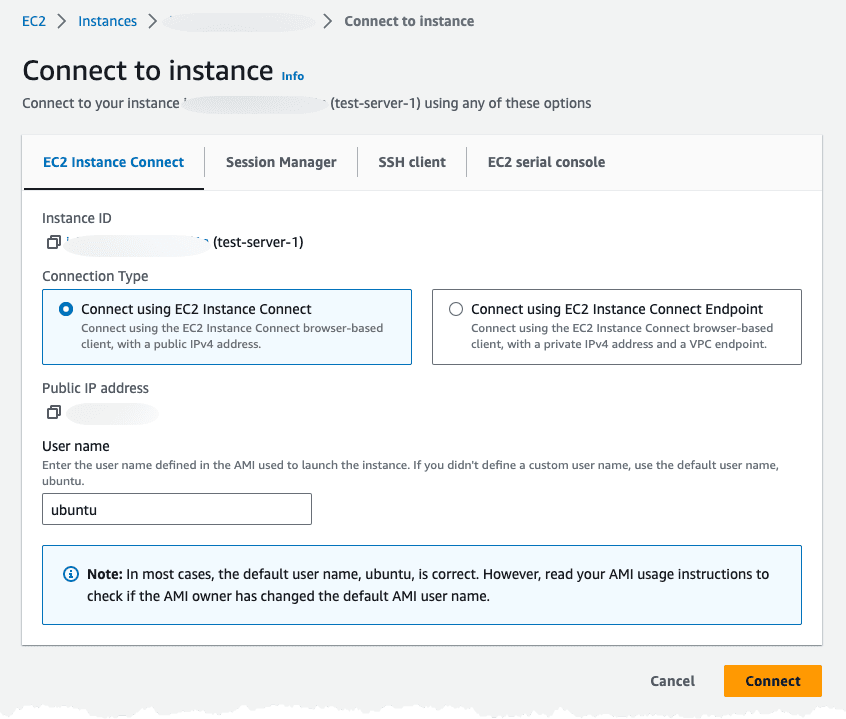
We can now connect to the instance using Instance Connect from the console.
Image showing connecting to EC2 instance using instance connect.
When connected to the instance install AWS CLI, Mosquitto using snap, and download the device certificates from the S3 Bucket.
1
2
3
4
5
6
7
8
9
10
11
12
## Install AWS CLI
sudo apt update
sudo apt install awscli

## Create a test folder and download certificates
mkdir mqtt-test
cd mqtt-test
aws s3 sync s3://multi-region-iot-certificate-store-eu-west-1 .

## Install Mosquitto
sudo snap install mosquitto
sudo snap connect mosquitto:home snapd:home
With this installed with can use 
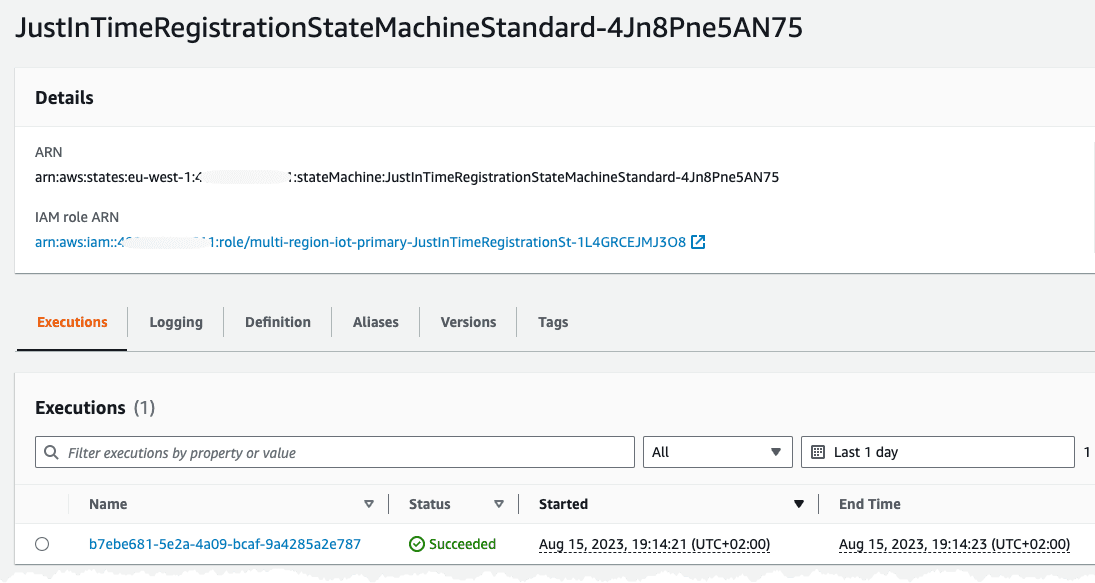
mosquitto_pub to connect and publish a message. The first time we try to connect the device will receive an immediate disconnect, this since the device certificate is not registered and active.
1
2
3
4
5
mosquitto_pub -h iot.example.com --cafile ./ca.crt --cert ./test_001.crt --key ./test_001.key -p 8883 -q 1 -d -t i/test_001/m -i test_001 -m "{\"message\": \"Hello From Test-001\"}"

## You will see message saying
Client test_001 sending CONNECT
Error: The connection was lost.
Navigating to StepFunctions console in our current (primary) test Region, should show at least one invocation of the JITR state-machine with a success.
Image showing the invocation of the JITR state-machine.
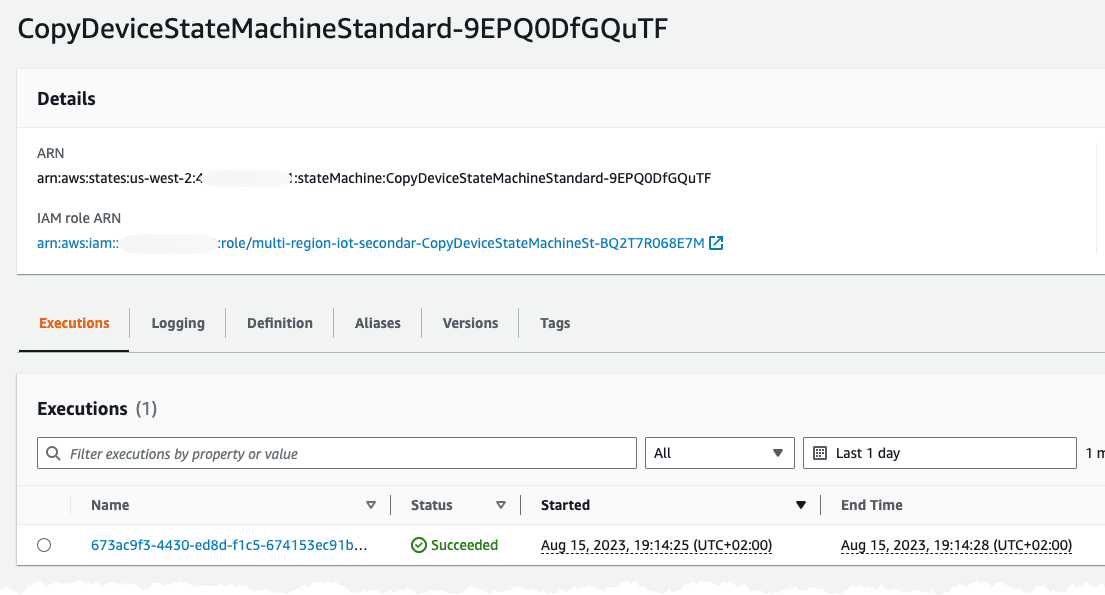
In our other (replication) Region we should see a successful invocation of the replication state-machine.
Image showing the invocation of the JITR state-machine.
Returning to our instance connect session and issuing the command again will now generate a different result.
1
2
3
4
5
6
7
8
mosquitto_pub -h iot.example.com --cafile ./ca.crt --cert ./test_001.crt --key ./test_001.key -p 8883 -q 1 -d -t i/test_001/m -i test_001 -m "{\"message\": \"Hello From Test-001\"}"

## You will see message saying
Client test_001 sending CONNECT
Client test_001 received CONNACK (0)
Client test_001 sending PUBLISH (d0, q1, r0, m1, 'i/test_001/m', ... (32 bytes))
Client test_001 received PUBACK (Mid: 1, RC:0)
Client test_001 sending DISCONNECT
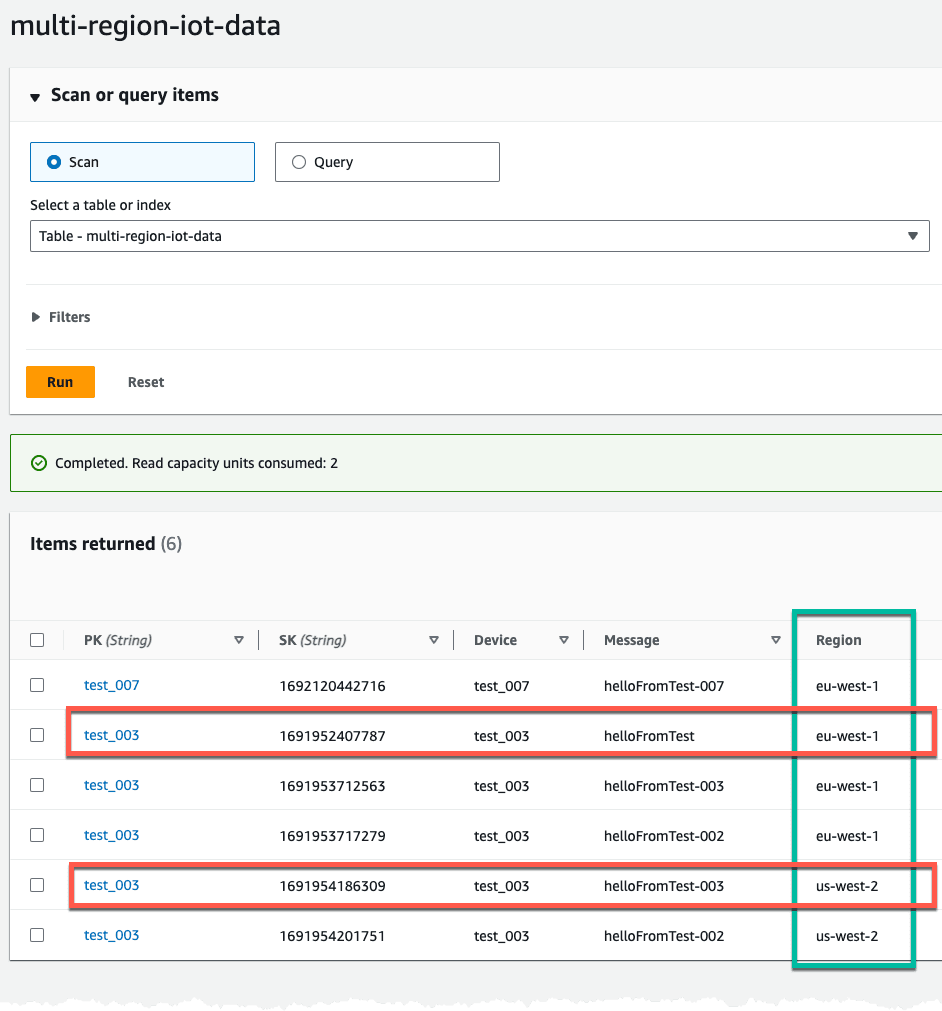
Repeat the above using an EC2 instances in both Region. You can imitate the same device from both regions. After sending some data we can navigate to the DynamoDB table, containing our IoT data. Verify what Region the data was written to the table from this is from our test state-machine writing ingress data to the table.
Image showing the invocation of the JITR state-machine.

Conclusion

Creating a multi-region IoT system can be a challenge, with replication of Things and certificates. As shown in this post it can be automated in an event-driven and serverless way that allows our IoT devices to connect and send data to several Regions using FQDN custom endpoint.

Comments