AWS Logo
Menu

Automate your Apache Airflow Environments

In this tutorial you will learn how to scale the deployment of your workflows into your Apache Airflow environments.

Ricardo Sueiras
Amazon Employee
Published Apr 14, 2023
Last Modified Mar 19, 2024
Businesses everywhere are striving to provide value for their customers by making data driven decisions. Data analytics is core to this success, but building scalable, reusable data pipelines is hard. Apache Airflow is an open source orchestration tool that many have adopted to automate and streamline how they build those data pipelines. As you scale usage and adoption, staying on top of how you manage and make Airflow available to your users can become overwhelming. The good news is that we can borrow heavily from modern development techniques - and specifically DevOps - to help reduce the time needed to create and scale those data pipelines.

What You Will Learn

In this tutorial you will learn how you can apply DevOps techniques to help you effortlessly manage your Apache Airflow environments. We will look at some of the common challenges you are likely to encounter, and then look at the use of automation using infrastructure as code to show you how you can address these through automation. You will learn:
  • What are the common challenges when scaling Apache Airflow, and how can you address those problems
  • How to automate the provisioning of the Apache Airflow infrastructure using AWS CDK
  • How to automate the deployment of your workflows and supporting resources

Sections

About
โœ… AWS Level200 - Intermediate
โฑ Time to complete90 minutes
๐Ÿ’ฐ Cost to completeApprox $25
๐Ÿงฉ Prerequisites- This tutorial assumes you have a working knowledge of Apache Airflow
- AWS Account
- You will need to make sure you have enough capacity to deploy a new VPC - by default, you can deploy 5 VPCs in a region. If you are already at your limit, you will need to increase that limit or clean up one of your existing VPCs
- AWS CDK installed and configured (I was using 2.60.0 build 2d40d77)
- Access to an AWS region where Managed Workflows for Apache Airflow is supported
- git and jq installed
- The code has been developed on a Linux machine, and tested/working on a Mac. It should work on a Windows machine with the Windows Subsystem for Linux (WSL) installed although I have not tested this. If you do encounter issues, I recommend that you spin up an Amazon Cloud9 IDE environment and run through the code there.
๐Ÿ’ป Code SampleCode sample used in tutorial on GitHub
๐Ÿ“ข FeedbackHelp us improve how we support Open Source at AWS
โฐ Last Updated2023-04-14

Scaling Apache Airflow

Like many open source technologies, there are many ways in which you can configure and deploy Apache Airflow. For some, self managing Apache Airflow is the right path to take. For others, the availability of managed services, such as Managed Workflows for Apache Airflow (MWAA), has helped reduce the complexity and operation burden for running Apache Airflow, and opened this up for more Builders to start using it.
It is worth spending some time to understand some of the challenges scaling Apache Airflow. So what are some of the challenges?
  • Apache Airflow is a complex technology to manage, with lots of moving parts. Do you have the skills or the desire to want to manage this?
  • There is constant innovation within the Apache Airflow community, and your data engineers will want to quickly take advantage of the latest updates. How quickly are you able to release updates and changes to support their need?
  • How do you ensure that you can provide the best developer experience and to help minimise the issues with deploying workflows to production?
  • Ensuring that you bake security from the beginning, how can you separate concerns and make sure that you minimise the number of secrets that developers need access to?
  • Deploying workflows to production can break Apache Airflow, so how do you minimise this?
  • New Python libraries are released on a frequent basis, new data tools are also constantly changing. How do you enable these for use within your Apache Airflow environments?
One of the first decisions you have to make is whether you want to use a managed versus self-managed Apache Airflow environment. Typically this choice depends on a number of factors based on your particular business or use case. These include:
  • Whether you need the increase level of access, a greater level of control of the configuration of Apache Airflow
  • Whether have the need to have the very latest versions or features of Apache Airflow
  • Whether you have the need to run workflows that use more resources that managed services provide (for example, need significant compute)
Total Cost Ownership One thing to consider when assessing managed vs self-managed is the cost of the managed service against the total costs of you having to do the same thing. It is important to assess a true like for like, and we often see just the actual compute and storage resources being compared without all the additional things that you need to make this available.
If the answer to these is yes, then it is likely that using a managed service may frustrate you.

How to navigate this tutorial

This tutorial will cover how to automate the provisioning of managed and self-managed Apache Airflow environments, before looking at how some options to help you improve the developer experience and making it easier to get their workflows into production.
We will start off with how we can automate managed Apache Airflow environments, using Amazon Managed Workflows for Apache Airflow (MWAA). We will look at automating the provisioning of the infrastructure using AWS Cloud Development Kit (AWS CDK). We will then show how to build a pipeline that automates the deployment of your workflow code. Finally, we will provide an end to end example that uses a GitOps approach for managing both the infrastructure and workflows via your git repository.
Watch for the next tutorial, where we will cater to those looking to achieve the same thing with self-managed Apache Airflow. In that tutorial we will explore some options you can take, before walking through and building a GitOps approach to running your self-managed Apache Airflow environments.

Automating Your Managed Workflow for Apache Airflow Environments (MWAA)

Overview

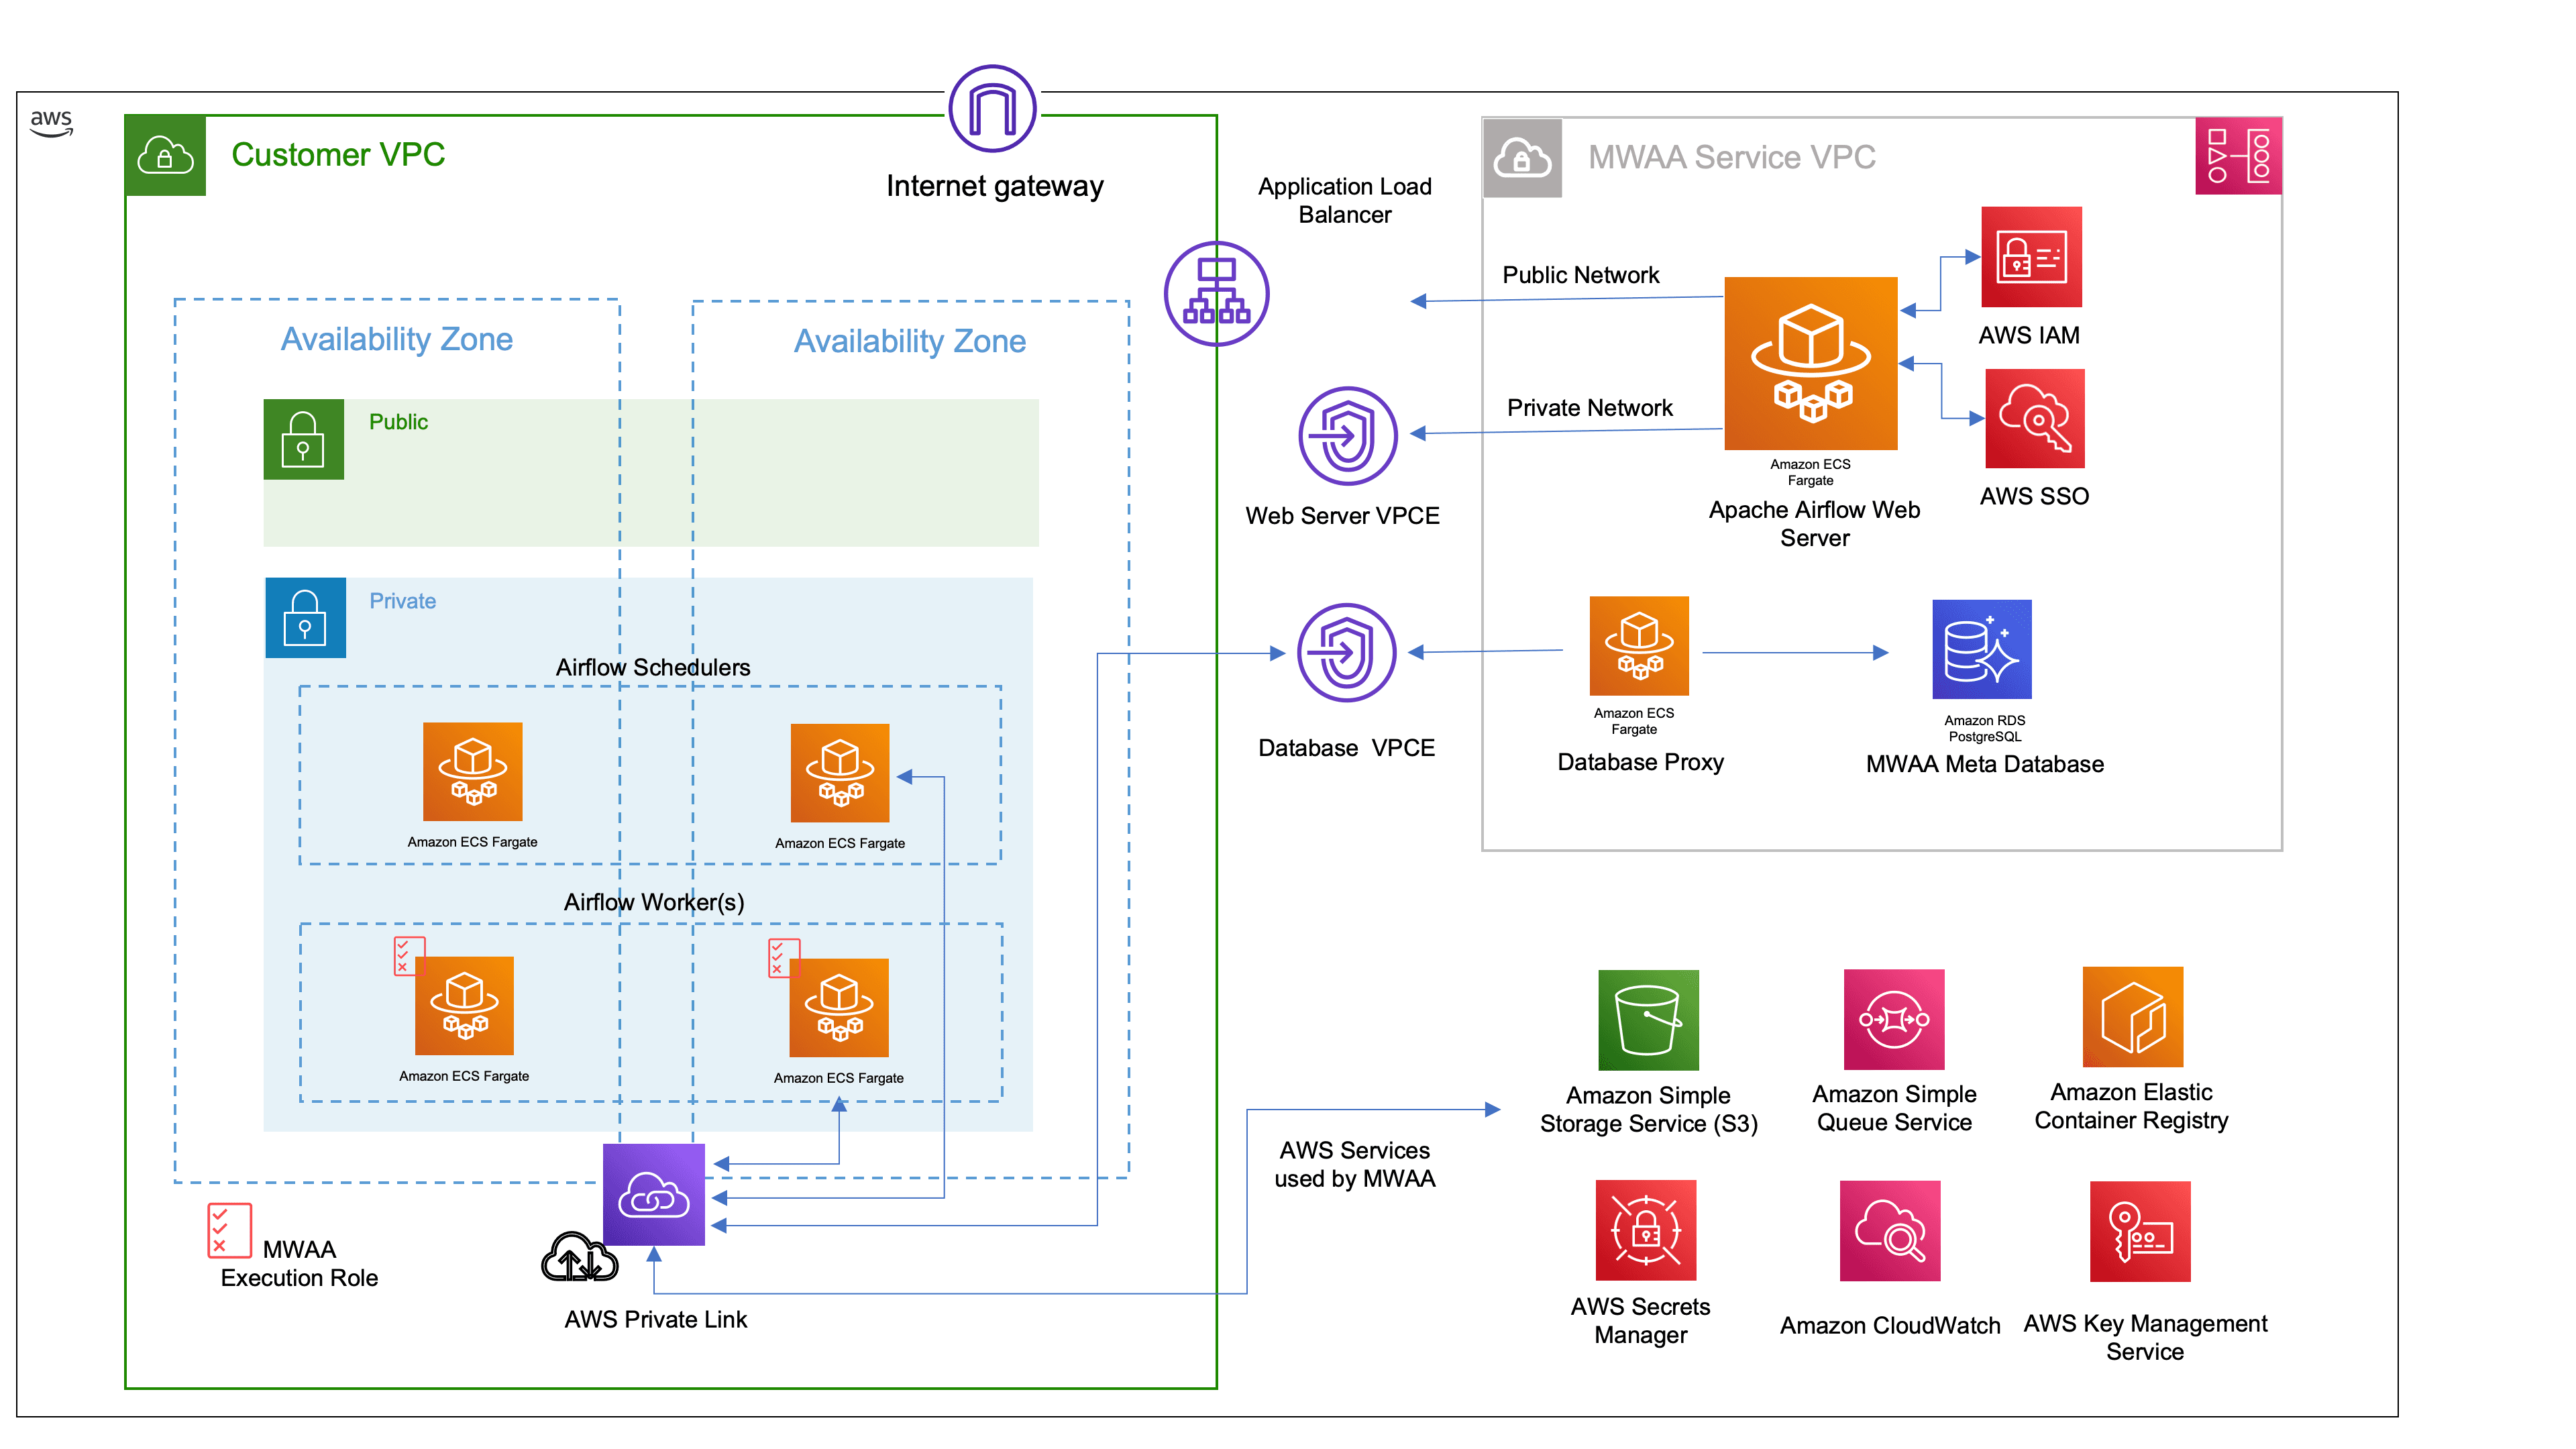
MWAA is a fully managed service that allows you to deploy upstream versions of Apache Airflow. In this section we are going to show you how you can deploy MWAA environments using Infrastructure as Code. We will be using AWS CDK as our infrastructure as code tool of choice. The end result will be that you build an Apache Airflow environment on AWS that looks like this:
MWAA Architecture overview
When deploying a MWAA environment it is helpful to understand the key components that we need, to help us understand what we need to automate. When you deploy MWAA, you have to:
  • create a VPC into which MWAA resources will be deployed (See the architecture diagram above)
  • ensure we have a unique S3 bucket that we can define for our Airflow DAGs folder
  • determine whether we want to integrate Airflow Connections and Variables with AWS Secrets Manager
  • create our MWAA environment

Our CDK stack

We will be using AWS CDK to automate the deployment and configuration of our MWAA environments. As Apache Airflow is a tool for Python developers, we will develop this "stack" (CDK terminology for an application that builds AWS resources) in Python.
The code is available in the supporting repository.
When we look at the code, you will notice that our stack has a number of files and resources:
Our stack contains a number of key elements which we will explore in detail. We want to ensure that we can create code that is re-usable based on different requirements, so we will define configuration parameters to enable that re-use so we can use the code to create multiple environments.
The app.py file is our CDK app entry point, and defines what we will deploy. You will see that we define our AWS environment and region we want to deploy, as well as some MWAA specific parameters:
The parameters we define in this stack are:
  • dagss3location - this is the Amazon S3 bucket that MWAA will use for the Airflow DAGs. You will need to ensure that you use something unique or the stack will fail
  • mwaa_env - the name of the MWAA environment (that will appear in the AWS console and all cli interactions)
The next two we will see in the next part of the tutorial, so don't worry too much about these for the time being.
  • mwaa_secrets_var - this is the prefix you will use to integrate with AWS Secrets Manager for Airflow Variables
  • mwaa_secrets_conn - this is the prefix, as the previous, but for Airflow Connections.
There are two stacks that are used to create resources. MwaaCdkStackVPC is used to create our VPC resources where we deploy MWAA. MwaaCdkStackDevEnv is used to create our MWAA environment. MwaaCdkStackDevEnv has a dependency on the VPC resources, so we will deploy this stack first. Let us explore the code:
We can deploy the VPC by running:
And in a few moments, it should start deploying. It will take 5-10 minutes to complete.
We can now look at the MwaaCdkStackDevEnv stack that creates our MWAA environment into the VPC that we just created. The code is documented to help you understand how it works and help you customise it to your own needs. You will notice that we bring in parameters we defined in the app.py using f"{mwaa_props['dagss3location'], so you can adjust and tailor this code to your own needs if you wanted to add additional configuration parameters.
First we create and tag our S3 bucket that we will use to store our workflows (the Airflow DAGS folder).
Note: This code creates an S3 Bucket with the name of the configuration parameter and then appends -dev, so using our example code the S3 Bucket that would get created is mwaa-094459-devops-demo-dev.
The next section create the various IAM policies needed for MWAA to run. This uses the parameters we have defined, and is scoped down to the minimum permissions required. I will not include the code here as it is verbose, but you can check it out in the code repo.
The next section is also security related, and configures security groups for the various MWAA services to communicate with each other.
The next section defines what logging we want to use when creating our MWAA environment. There is a cost element associated with this, so make sure you think about what is the right level of logging for your particular use case. You can find out more about the different logging levels you can use by checking out the documentation here.
The next section allows us to define some custom Apache Airflow configuration options. These are documented on the MWAA website, but I have included some here so you can get started and tailor to your needs.
The next section create a KMS key and supporting IAM policies to make sure that MWAA encrypts everything.
The final section actually creates our MWAA environment, using all the objects created beforehand. You can tailor this to your needs.
Before proceeding you should make sure that the S3 bucket you have selected has not been created and is unique. If the CDK deployment fails, it it typically due to this issue.
We can now deploy MWAA using the following command:
This time you will be prompted to proceed. This is because you are creating IAM Policies and additional security configurations and CDK wants you to make sure that you review these before proceeding. After you have checked it, answer Y to start the deployment
This will take between 25-30 minutes, so time to grab that well earned tea, coffee, or whatever your preference is. Once it has finished, you should see similar output:

Checking our environment

Congratulations, you have automated the deployment of your MWAA environment! This is just the beginning however, and there are more steps you need to automate, so lets look at those next. Before we do that, lets make sure that everything is working ok and check our installation.
We can go to the MWAA console and we should see our new environment listed, together with a link to the web based Apache Airflow UI.
The Managed Workflows for Apache Airflow console listing our newly created Apache Airflow environment
We can also get this via the command line using the following command:
Which will output the link to the Apache Airflow UI:
When we enter this into a browser, we see the Apache Airflow UI.
The Apache Airflow UI for our newly created Apache Airflow environment

Recap of Automating Your Managed Workflow for MWAA and next steps

In the first part of this tutorial, we looked at how we could use AWS CDK to create a configurable stack that allows us to deploy Apache Airflow environments via the Managed Workflows for Apache Airflow managed service. In the next part, we will build upon this and start to look how we can automate another important part of Apache Airflow - Connections and Variables.

Automating Connections and Variables

Apache Airflow allows you to store data in its metastore that you can then rely upon when you are writing your workflows. This allows you to parameterise your code and create more re-usable workflows. The two main ways Airflow helps you do this is by storing Variables and Connections. Variables are key pair values that you can then refer to via Airflow code. Connections are used by Operators to abstract connection and authentication details, thus allowing you to separate what the sys admins and security folk know (all the secret stuff that goes into connecting to stuff like passwords which you do not want to make generally available) versus what your developer need to know (the Connection id). Both Variables and Connections are encrypted in the Airflow metastore.
Read more Check out this detailed post to dive even deeper into this topic.
The Apache Airflow UI provides a way to store variables and connections details, but ideally you want to provision these in the same way you provision your infrastructure. We can integrate MWAA to use AWS Secrets Manager for this, meaning we can manage all our Variables and Connection information using the same tools we are using to manage MWAA. The way this works is that we define a prefix, we store our Variables and Connections in AWS Secret Manager using that prefix, and then finally, we integrate AWS Secrets Manager into Airflow using the defined prefix, at which point when it looks for Variables and Connections it will do a lookup to AWS Secrets Manager.

Integrating AWS Secret Manager

We first have to enable the integration. There are two Airflow configuration settings we need to set. We can adjust our original CDK code and add the following. You will notice that we are using configuration parameters we define in the app.py to allow us to easily set what we want the prefix to be. We do not want to hard code the prefix for Connections and Variables, so we define some additional configuration parameters in our app.py file that will use airflow/variables and airflow/connections as the integration points within MWAA:
The code should now look like:
How does this work? To define variables or connections that MWAA can use, you create these in AWS Secrets Manager using the prefix you defined. In the above example, we have set these to airflow/variables and airflow/connections. If I create a new secret called airflow/variable/foo then from within my Airflow workflows, I can reference the variable as foo using Variable.get within our Airflow code.
Dive Deeper Read the blog post from John Jackson that looks at this feature in more detail -> Move your Apache Airflow connections and variables to AWS Secrets Manager
If we were to update and redeploy our CDK app, once MWAA has finished updating, the integration will now attempt to access AWS Secrets for this information. This would fail however, as we have not enabled our MWAA environment to access those Secrets in AWS Secrets Manager so we need to modify our CDK app to add some additional permissions:
We can update our environment by running:
And after being prompted to review security changes, CDK will make the changes and MWAA will update. This will take between 20-25 minutes, so grab yourself another cup of tea! When it finishes, you should see something like:

Testing Variables

We can now test this by creating some Variables and Connections within AWS Secrets Manager and then creating a sample workflow to see the values presented.
First we will create a new secret, remembering to store this in the same AWS region as where our MWAA environment is deployed. We can do this at the command line using the AWS cli.
Tip! If you wanted to provide a set of standard Variables or Connections when deploying your MWAA environments, you could add these by updating the CDK app and using the AWS Secrets constructs. HOWEVER make sure you understand that if you do this, those values will be visible, so do not share "secrets" that you care about. It is better to deploy and configure these outside of the provisioning of the environment so that these are not stored in plan view.
Now we can create a workflow that tests to see if we can see this value.
You will notice that we use the standard Airflow way of working with variables (from airflow.models import Variable) and then we just create a new variable within our workflow that grabs the variable we defined in AWS Secrets Manager (/airflow/variables/buildon), but we just refer to it as buildon. We also add a default value in case that fails, which can be helpful when troubleshooting issues with this.
We deploy this workflow by copying it to the MWAA Dags Folder S3 bucket, and after a few minutes you can enable and then trigger this workflow. When you look at the Log output, you should see something like:

Connections

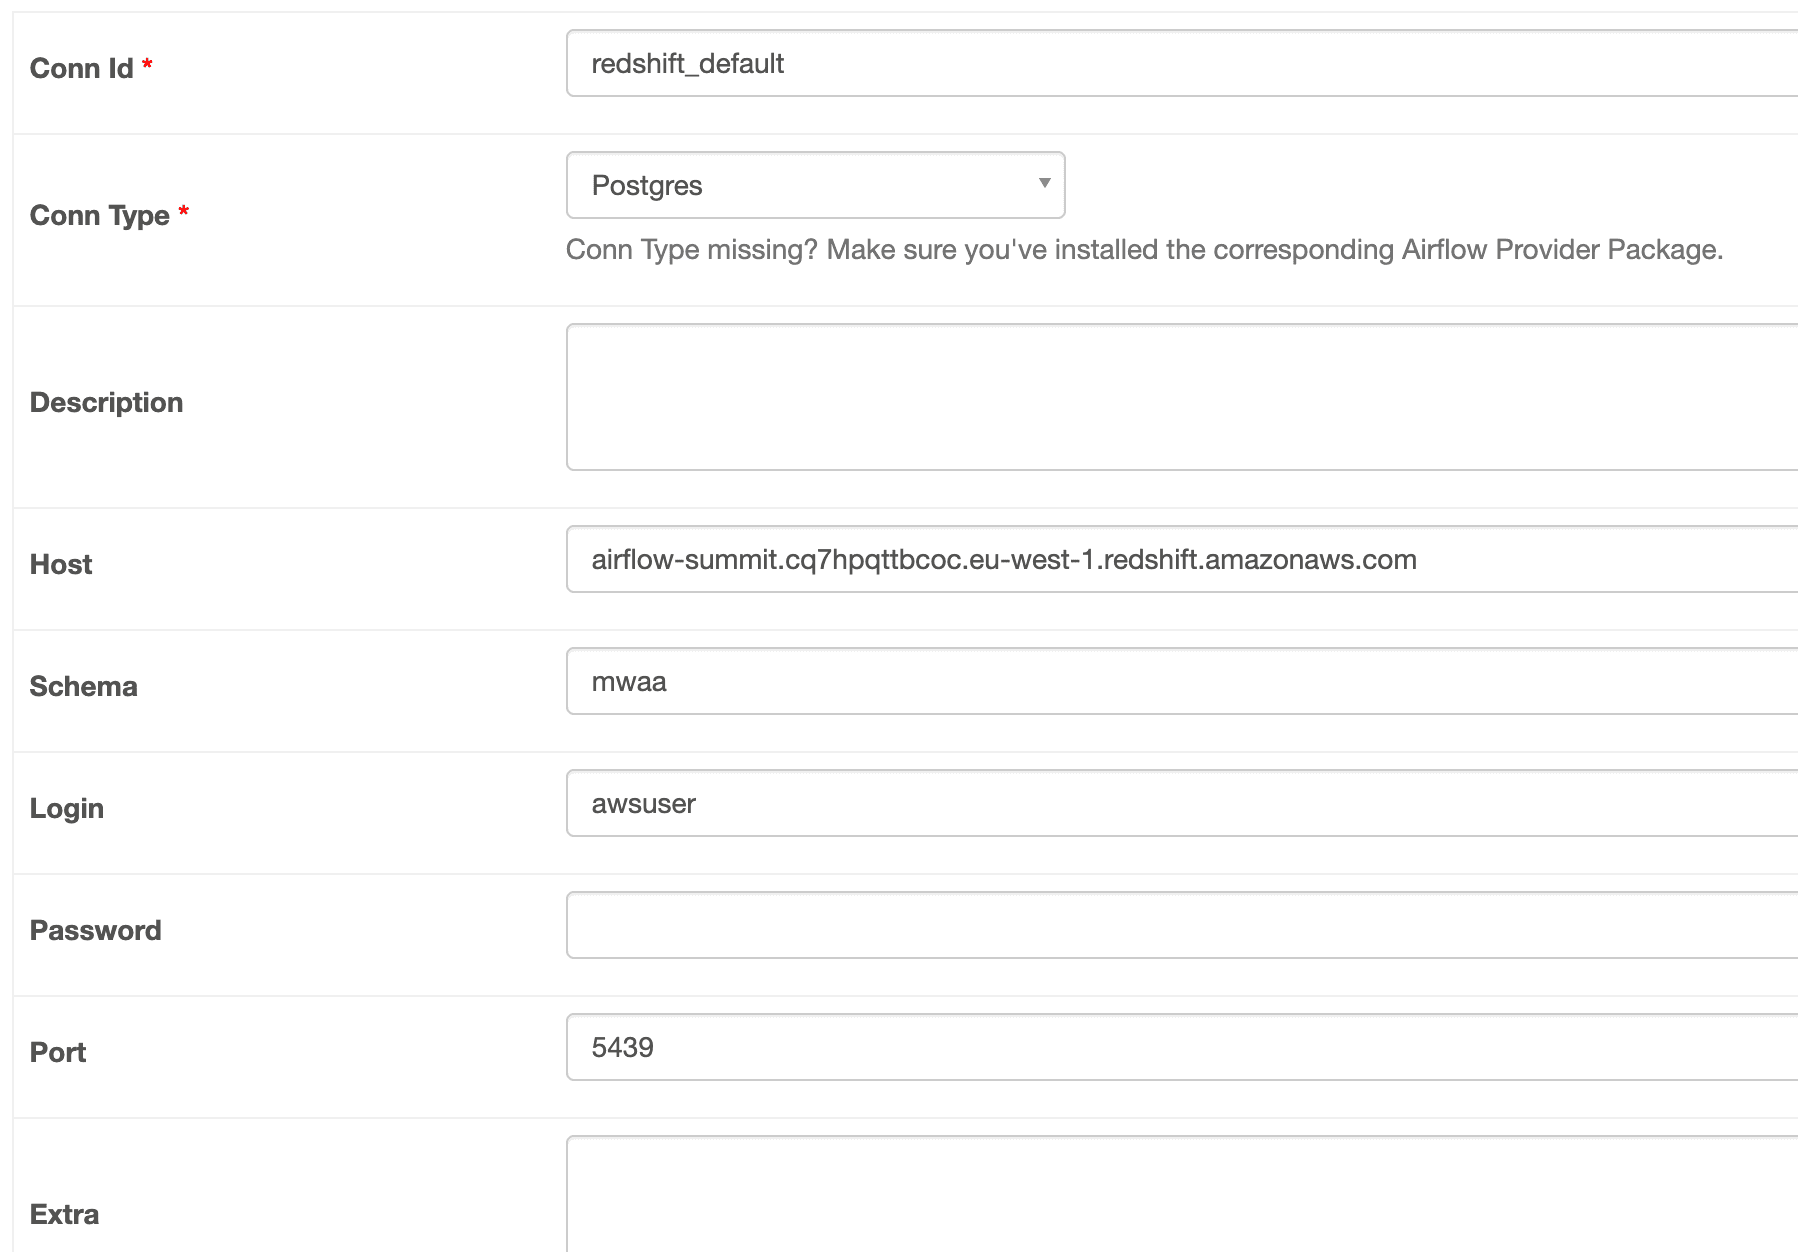
One area of confusion I have seen is how to handle Connections when they are stored in AWS Secrets Manager. So let us look at that now. If we wanted to create a connection to an Amazon Redshift cluster. From the Apache Airflow UI, we would typically configure this as follows:
example screenshot from apache airflow ui configuring amazon redshift connection
We would store this in AWS Secrets Manager as follows:
When you now reference redshift_default as a connection within Apache Airflow, it will use these values. Some Connections require addition information in the Extras field, so how do you add these? Lets say the Connection needed some Extra data, we would add this by appending the extra info with ?{parameter}={value}&{parameter}={value}. Applying this to the above we would create our secret like:

Advanced features

The AWS integration with AWS Secrets Manager is part of the Apache Airflow Amazon Provider package. This package is regularly updated, and provides all the various Airflow Operators that enable you to integrate with AWS services. If you are using a newer version of the Amazon Provider package (version 7.3 or newer) then you can do some additional things when configuring the AWS Secrets Manager, such as:
  • configure whether you want to use both Variables and Connections, or just one of them
  • allow you to specify regular expressions to combine both native Airflow Variables and Connections (that will be stored in the Airflow metastore), and AWS Secrets Manager
In the following example, Airflow would only do lookups to AWS Secrets Manager for any Connections that were defined as aws-*, so for example aws-redshift, or aws-athena.
Check out the full details on the Apache Airflow documentation page, AWS Secrets Manager Backend

Recap of Automating Connections and Variables and next steps

In this part of this tutorial, we looked at how we could automate Variable and Connections within Apache Airflow, and how these are useful in helping us creating re-usable workflows. In the next part of this tutorial, we will look at how we can build an automated pipeline to deliver our workflows into our Apache Airflow environment.

Building a Workflow Deployment Pipeline

So far we have automated the provisioning of our MWAA environments using AWS CDK, and sh we now have Apache Airflow up and running. In this next part of the tutorial we are going to automate how to deploy our workflows to these environments. Before we do that, a quick recap on how MWAA loads its workflows and supporting resources.
MWAA uses an Amazon S3 bucket as the DAGs Folder. In addition to this, additional libraries are specified in a configuration value which points to a specific version of a requirements.txt file which we upload to an S3 bucket. Finally, if you want to deploy your own custom Airflow plugins, then these also need to be deployed to an S3 bucket and then the MWAA configuration updated.
We will start by creating a simple pipeline that takes our workflows from a git repository hosted on AWS CodeCommit, and then automatically deploys this to our MWAA environment.

Creating your Pipeline

We are going to automate the provisioning of our pipeline and all supporting resources. Before we do that, let us consider what we need. In order to create an automated pipeline to deploy our workflows into our MWAA environment, we will:
  • need to have a source code repository where our developers will commit their final workflow code
  • once we have detected new code in our repository, we want to run some kind of tests
  • if our workflow code passes all test, we might want to get a final review/approval before it is pushed to our MWAA environment
  • the final step is for the pipeline to deliver the workflow into our MWAA DAGs Folder
We will break this down into a number of steps to make it easier to follow along. If we look at our code repository we can see we have some CDK code which we will use to provision the supporting infrastructure, but we also have our source DAGs that we want to initially populate our MWAA environments with.
Our CDK app is very simple, and contains the initial entry point file where we define configuration values we want to use, and then the code to build the pipeline infrastructure (MWAAPipeline). If we look at app.py:
We can see that we define the following:
  • code_repo_name and branch_name which will create an AWS CodeCommit repository,
  • dags_s3_bucket_name which is the name of our DAGs Folder for our MWAA environment
The actual stack itself (MWAAPipeline) is where we create the CodeCommit repository, and configure our CodePipeline and the CodeBuild steps. If we look at this code we can see we start by creating our code repository for our DAGs.
We define a CodeBuild task to deploy our DAGs to the S3 DAGs folder that was created when we deployed the MWAA environment. We define an environment variable for the S3 Bucket that will be created in the CodeBuild runner ($BUCKET_NAME) so that we can re-use this pipeline.
You will notice that we are simply using the AWS CLI to sync the files from the checked out repo to the target S3 bucket. Now if you tried this as it stands, it would fail, and that is because CodeBuild needs permissions. We can add those easily enough. We scope the level of access down to just the actual DAGs bucket.
The final part of the code are the different stages of the pipeline. As this is a very simple pipeline, it only has two stages:
We can deploy our pipeline using the following command, answering y after reviewing the security information that pops up.
After a few minutes, you can check over in the AWS CodePipelines console, and you should now have a new pipeline. This should have started to execute, and it will most likely be in the process of running. When it finishes, you should now see the two workflow DAGs appear in your Apache Airflow UI. (Note: This could take 4-5 minutes before your MWAA environment picks up these DAGs.)
The Apache Airflow UI showing two DAGs now in the console

Implementing intermediary Step

The workflow created so far is very simple. Every time a commit is made, the build pipeline will automatically sync this to the MWAA S3 DAGs folder. This might be fine for simple development environments, but you would ideally need to add some additional steps within your build pipeline. For example:
  • running tests - you might want to ensure that before deploying the files to the S3 DAGs folder, that you run some basic tests to make sure they are valid and will reduce the likelihood of errors when deployed
  • approvals - perhaps you want to implement an additional approval process before deploying to your production environments
We can easily add additional steps to achieve these by augmenting our CDK code.

Adding a testing stage

It is a good idea to implement some kind of test stage before you deploy your DAGs to your S3 DAGs folder. We will use a very simplified test in this example, but in reality you would need to think about a number of different tests you want to do to ensure you deploy your DAGs reliable into your MWAA environment.
We will use our CodeCommit repository to store any assets we need for running tests - scripts, resource files, binaries.
We can use the existing pipeline we have created and add a new stage where we can execute some testing. To do this we add a new build step where we define what we want to do:
and then we add the stage and modify the existing ones as follows:
We can update the pipeline by just redeploying our CDK app:
And after a few minutes, you should now have a new test stage. In our example we just echo test, but you would add all the commands you would typically use and define them in this step. You could also include additional resources within the git repository and uses those (for example, unit tests or configuration files for your testing tools).

Adding an approval stage

You may also need to add an approval gate. We can easily add this to our pipeline, and is as simple as adding this code:
You also need to make sure that this step is added BEFORE the deployment stage, so in the final code in the repo we have:
When you redeploy the CDK app using cdk deploy mwaa-pipeline, you will receive an email to confirm that you are happy to receive notifications from the approval process we have just setup (otherwise you will receive no notifications!).
When you make a change to your workflow code, once your pipeline runs, you will now get an email notification asking you to review and approve the change. Until you do this (click on the Approval link), the DAGs will not get deployed. This is an example mail that I got when using this code:
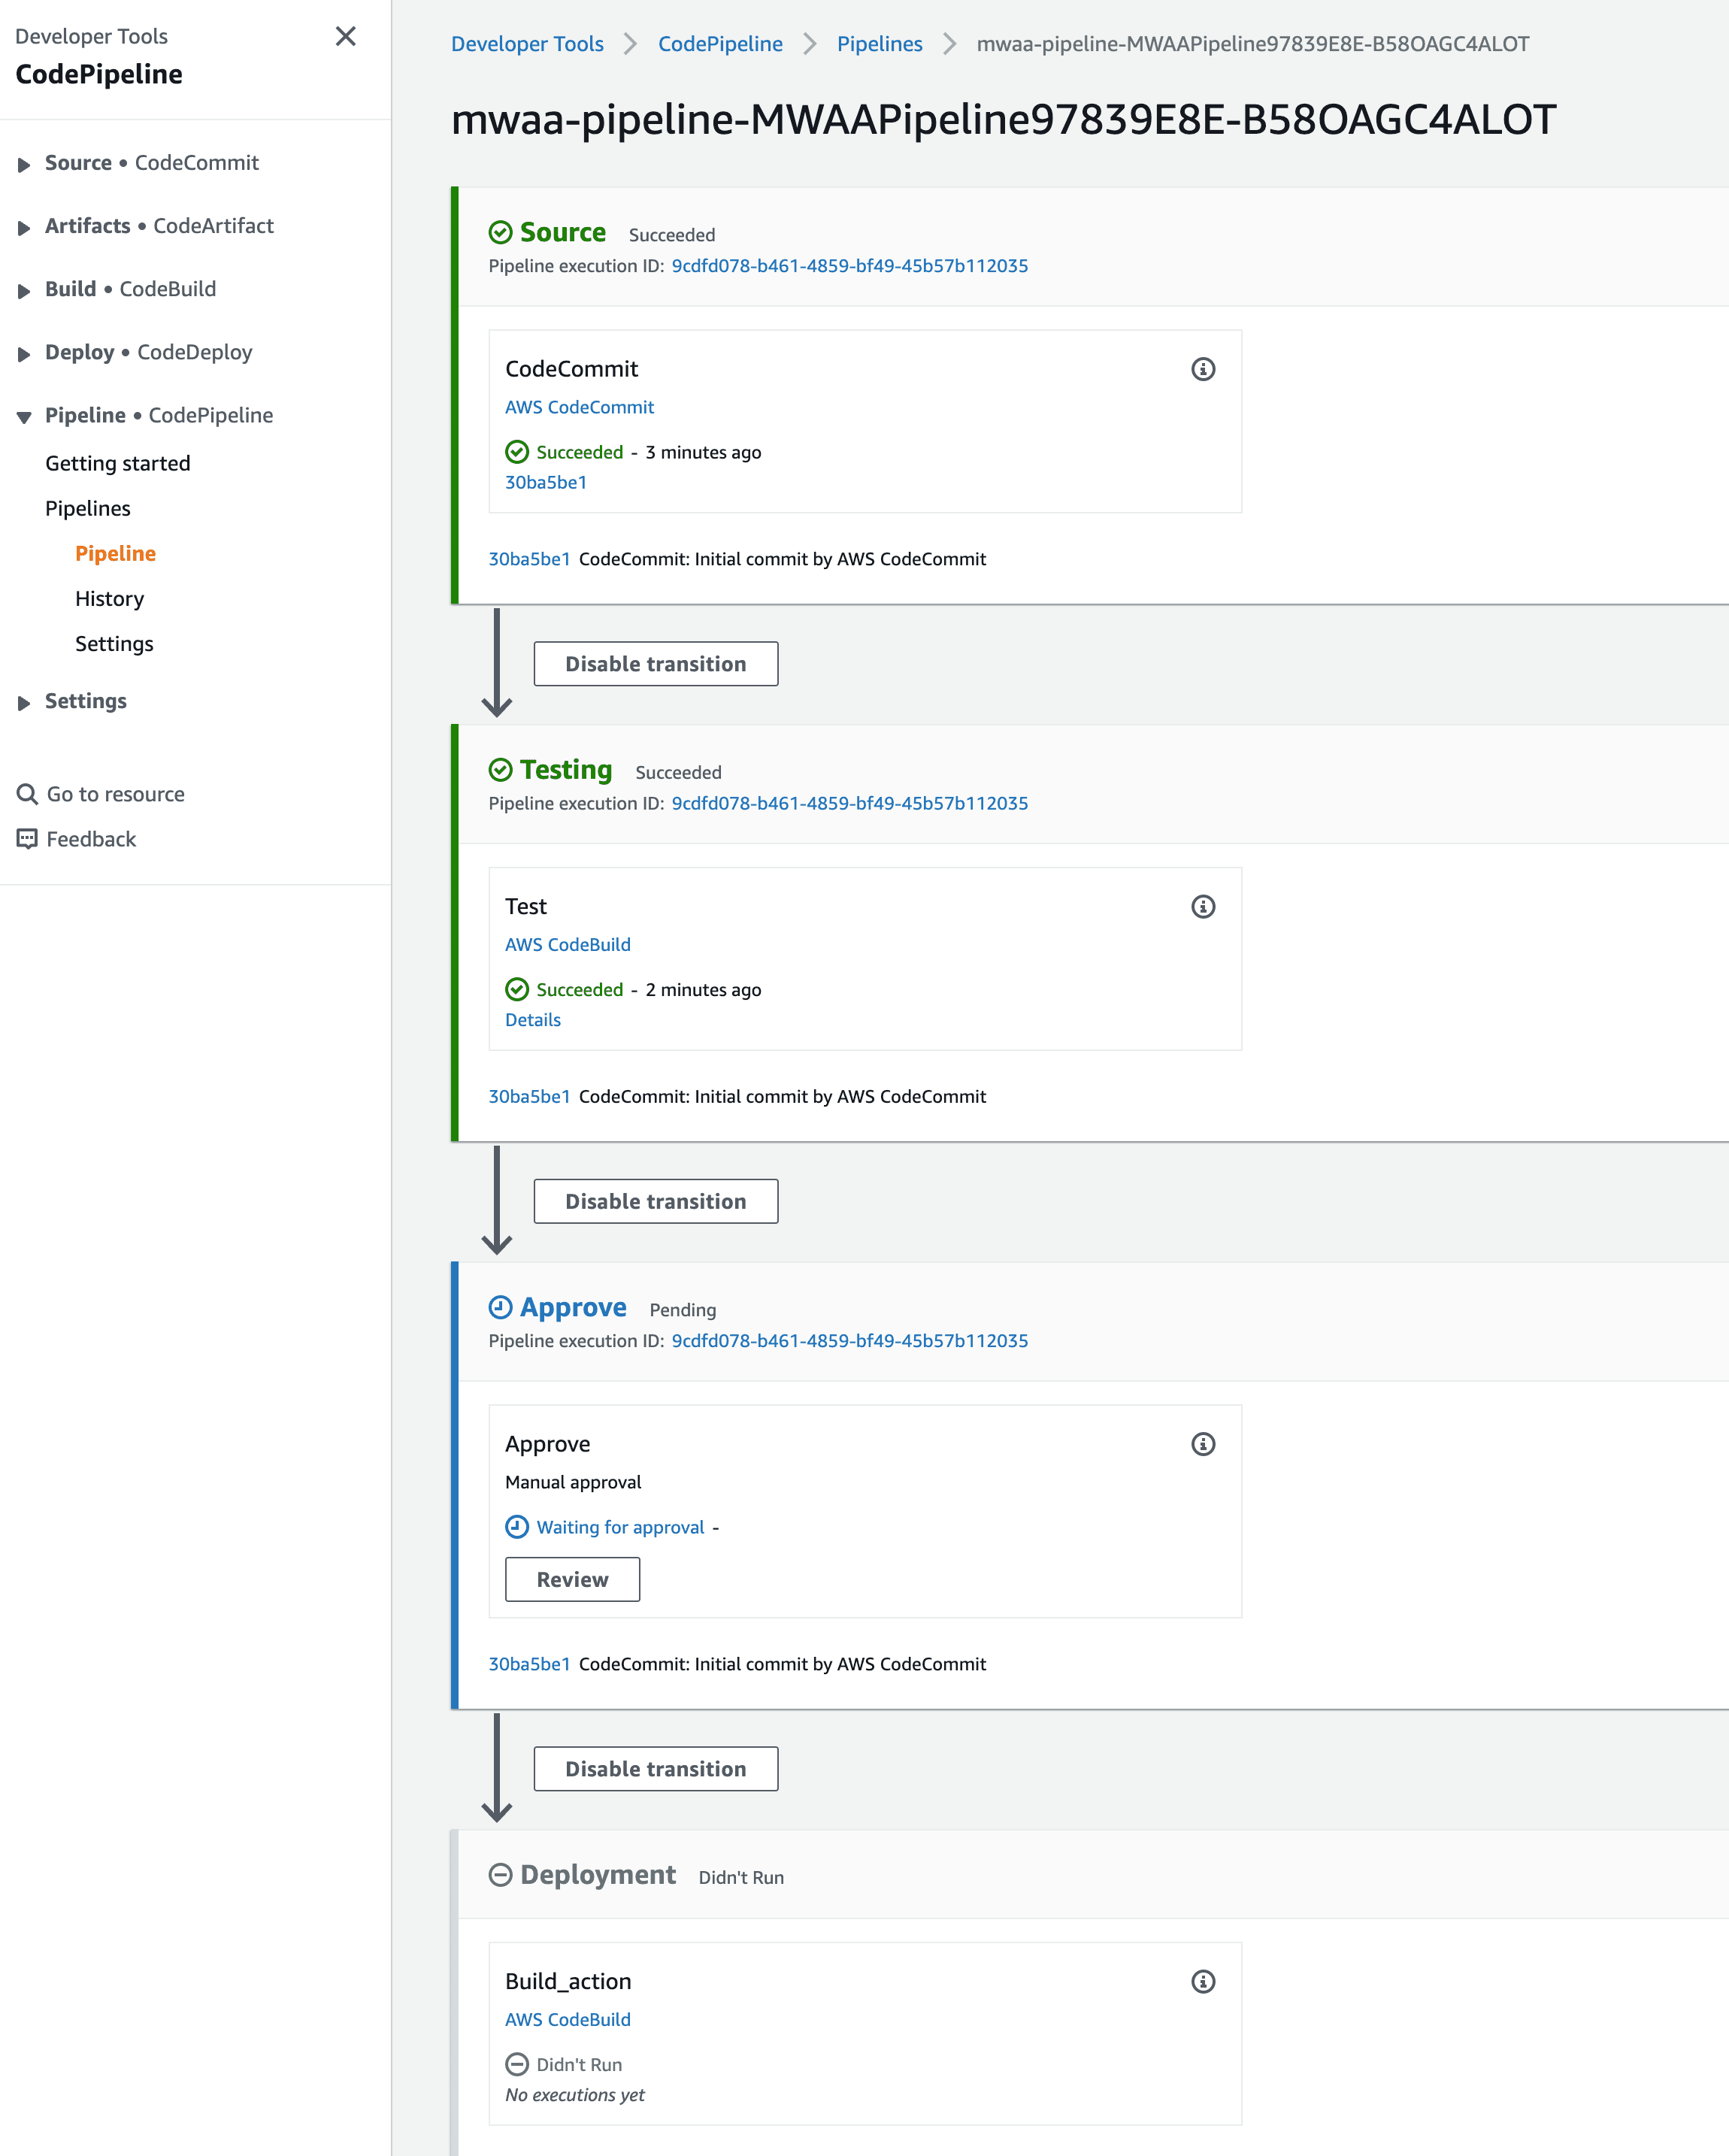
I can use that link which will take me straight to the AWS Console and I can then review and approve if needed.
Sample screen from codepipeline that shows waiting for approval
Once we approve it, the pipeline will continue and the deployment step will update the DAGs. Congratulations, you have now automated the deployment of your DAGs!

Advanced Automation Topics

So far we have just scratched the surface of how you can apply DevOps principles to your data pipelines. If you want to dive deeper, there are some additional topics that you can explore to further automate and scale your Apache Airflow workflows.

Parameters and reusable workflows

Creating re-usable workflows will help scale how your data pipelines are used. A common technique is to create generic workflows that are driven by parameters, driving up re-use of those workflows. There are many approaches to help you increase the reuse of your workflows, and you can read more about this by checking out this post, Working with parameters and variables in Amazon Managed Workflows for Apache Airflow.

Using private Python library repositories

When building your workflows, you will use Python libraries to help you achieve your tasks. For many organisations, using public libraries is a concern and they look to control where those libraries are loaded from. In addition, Development teams are also creating in-house libraries that need to be stored somewhere. Builders often use private repositories to help them solve this. In the post, Amazon MWAA with AWS CodeArtifact for Python dependencies, shows you how you how to integrate Amazon MWAA with AWS CodeArtifact for Python dependencies.

Observability - CloudWatch dashboard and metrics

Read the post, Automating Amazon CloudWatch dashboards and alarms for Amazon Managed Workflows for Apache Airflow which provides a solution that automatically detects any deployed Airflow environments associated with the AWS account and then builds a CloudWatch dashboard and some useful alarms for each.
In the post, Introducing container, database, and queue utilization metrics for the Amazon MWAA environment, dives deeper into metrics you can better understand the performance of your Amazon MWAA environment, troubleshoot issues related to capacity, delays, and get insights on right-sizing your Amazon MWAA environment.
Recap of Building a Workflow Deployment Pipeline and next steps

In this part of this tutorial, we showed how to build a pipeline to automate the process of delivering your workflows from your developers to your Apache Airflow environments. In the next part of this tutorial, we will bring this all together and look at an end-to-end fully automated solution for both infrastructure and workflows.

Building an End-to-End Pipeline

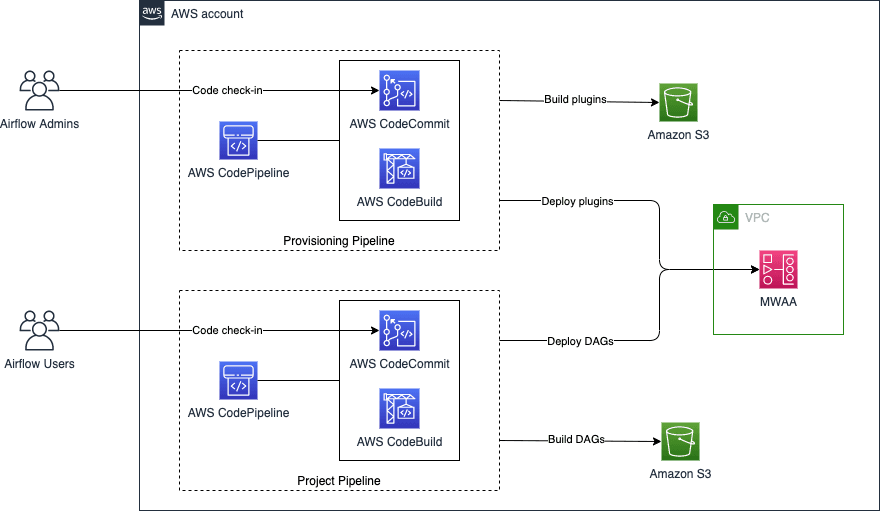
So far we have built a way of automating the deployment of your MWAA environments and implemented a way of automating how to deploy your workflows to your MWAA environments. We will now bring this all together and build a solution that enables a GitOps approach that will automatically provision and update your MWAA environments based on configuration details stored in a git repository, and also deploy your workflows and all associated assets (for example, additional Python libraries you might define in your requirements.txt, or custom plugins you want to use in your workflows).
This is what we will build. There will be two different git repositories used by two different groups of developers. Our MWAA admins who look after the provisioning of the infrastructure (including the deployment of support packages, Python libraries, etc) will manage the MWAA environments using one git repository. Our Airflow developers will create their code in a separate repository. Both groups will interact using git to update and make changes.
An end-to-end fully automated GitOps pipeline for MWAA
We will use AWS CDK to automate this again. First of all, lets explore the files for this solution. If we look at the expanded file tree, we can see what this looks like.
setup.py is used to initialise Python, and makes sure that all the dependencies for this stack are available. In our instance, we need the following:
The entry point for the CDK app is app.py, where we define our AWS Account and Region information. We then have a directory called mwaairflow which contains a number of key directories:
  • assets - this folder contains resources that you want to deploy to your MWAA environment, specifically a requirements.txt file that allows you to amend which Python libraries you want installed and available, and then packages up and deploys a plugin.zip which contains some sample code for custom Airflow operators you might want to use. In this particular example you can see we have custom Salesforce operator
  • nested_stacks - this folder contains the CDK code that provisions the VPC infrastructure, then deploys the MWAA environment, and then finally deploys the Pipeline
  • project - this folder contains the Airflow workflows that you want to deploy in the DAGs folder. This example provides some additional code around Python linting and testing which you can amend to run before you deploy your workflows
Makefile in our previous pipeline we defined the mechanism to deploy our workflows via the AWS CodeBuild Buildspec file. This time we have created a Makefile, and within it created a number of different tasks (test, validated, deploy, etc). To deploy our DAGs this time, all we need to do is run a make deploy $bucket_name= specifying the target S3 bucket we want to use.
In the previous example where we automated the MWAA environment build, we defined configuration values in our app.py file. This time, we are using a different way of passing in configuration parameters. With AWS CDK you can use the -- context when performing the cdk deploy command, to pass in configuration values in a key/value.
  • vpcId - If you have an existing VPC that meets the MWAA requirements (perhaps you want to deploy multiple MWAA environments in the same VPC for example) you can pass in the VPCId you want to deploy into. For example, you would use --context vpcId=vpc-095deff9b68f4e65f.
  • cidr - If you want to create a new VPC, you can define your preferred CIDR block using this parameter (otherwise a default value of 172.31.0.0/16 will be used). For example, you would use --context cidr=10.192.0.0/16.
  • subnetIds - Is a comma separated list of subnets IDs where the cluster will be deployed. If you do not provide one, it will look for private subnets in the same AZ.
  • envName - a string that represents the name of your MWAA environment, defaulting to MwaaEnvironment if you do not set this. For example, --context envName=MyAirflowEnv.
  • envTags - allows you to set Tags for the MWAA resources, providing a json expression. For example, you would use --context envTags='{"Environment":"MyEnv","Application":"MyApp","Reason":"Airflow"}'.
  • environmentClass - allows you to configure the MWAA Workers size (either mw1.small, mw1.medium, mw1.large, defaulting to mw1.small). For example, --context environmentClass=mw1.medium.
  • maxWorkers - change the number of MWAA Max Workers, defaulting to 1. For example, --context maxWorkers=2.
  • webserverAccessMode - define whether you want a public or private endpoint for your MWAA Environment (using PUBLIC_ONLY or PRIVATE_ONLY). For example, you would use --context webserverAccessMode=PUBLIC_ONLY mode (private/public).
  • secretsBackend - configure whether you want to integrate with AWS Secrets Manager, using values Airflow or SecretsManager. For example, you would use --context secretsBackend=SecretsManager.
We can see how our CDK app uses this by examining the mwaairflow_stack file, which our app.py file calls.
To deploy this stack, we use the following command:
This will take about 25-30 minutes to complete, so grab a cup of your favourite warm beverage. When it finishes, you can see a new MWAA environment appear in the console.
Screenshot of MWAA console showing a new environment
If we go to AWS CodeCommit, we see we have two repositories: mwaa-provisioning and mwaaproject.

mwaa-provisioning

When we look at the source files in this repo, we will see that they are a copy of the stack we used to initially deploy it.
As a system administrator, if we wanted to update our MWAA environments from a configuration perspective (for example, maybe we wanted to change an Airflow configuration settings, or perhaps change the size of our MWAA Workers, or maybe change logging settings), we just need to check the repo out, make our change to the code (in our mwaairflow_stack file), and then push the change back to the git repository. This will kick off the AWS CodePipeline and trigger the reconfiguration.
If we wanted to update our Python libraries, or maybe we have been sent some updated plugins we want available on the workers, we do the same thing. We just need to adjust the files in the assets folder, and when we commit this back to the git repository, it will trigger a reconfiguration of our MWAA environment.
In both examples, depending on the change, you may trigger a restart of your MWAA environment so make sure you are aware of this before you kick that off.
Lets do a quick example of making a change. It is a typical operation to update the requirements.txt file to update the Python libraries. We are going to update our MWAA environment to use a later version of the Amazon Provider package. We need to check out the repo, make the change and then commit it back.
We update the Amazon Provider package from:
to:
We then push this change to the repo:
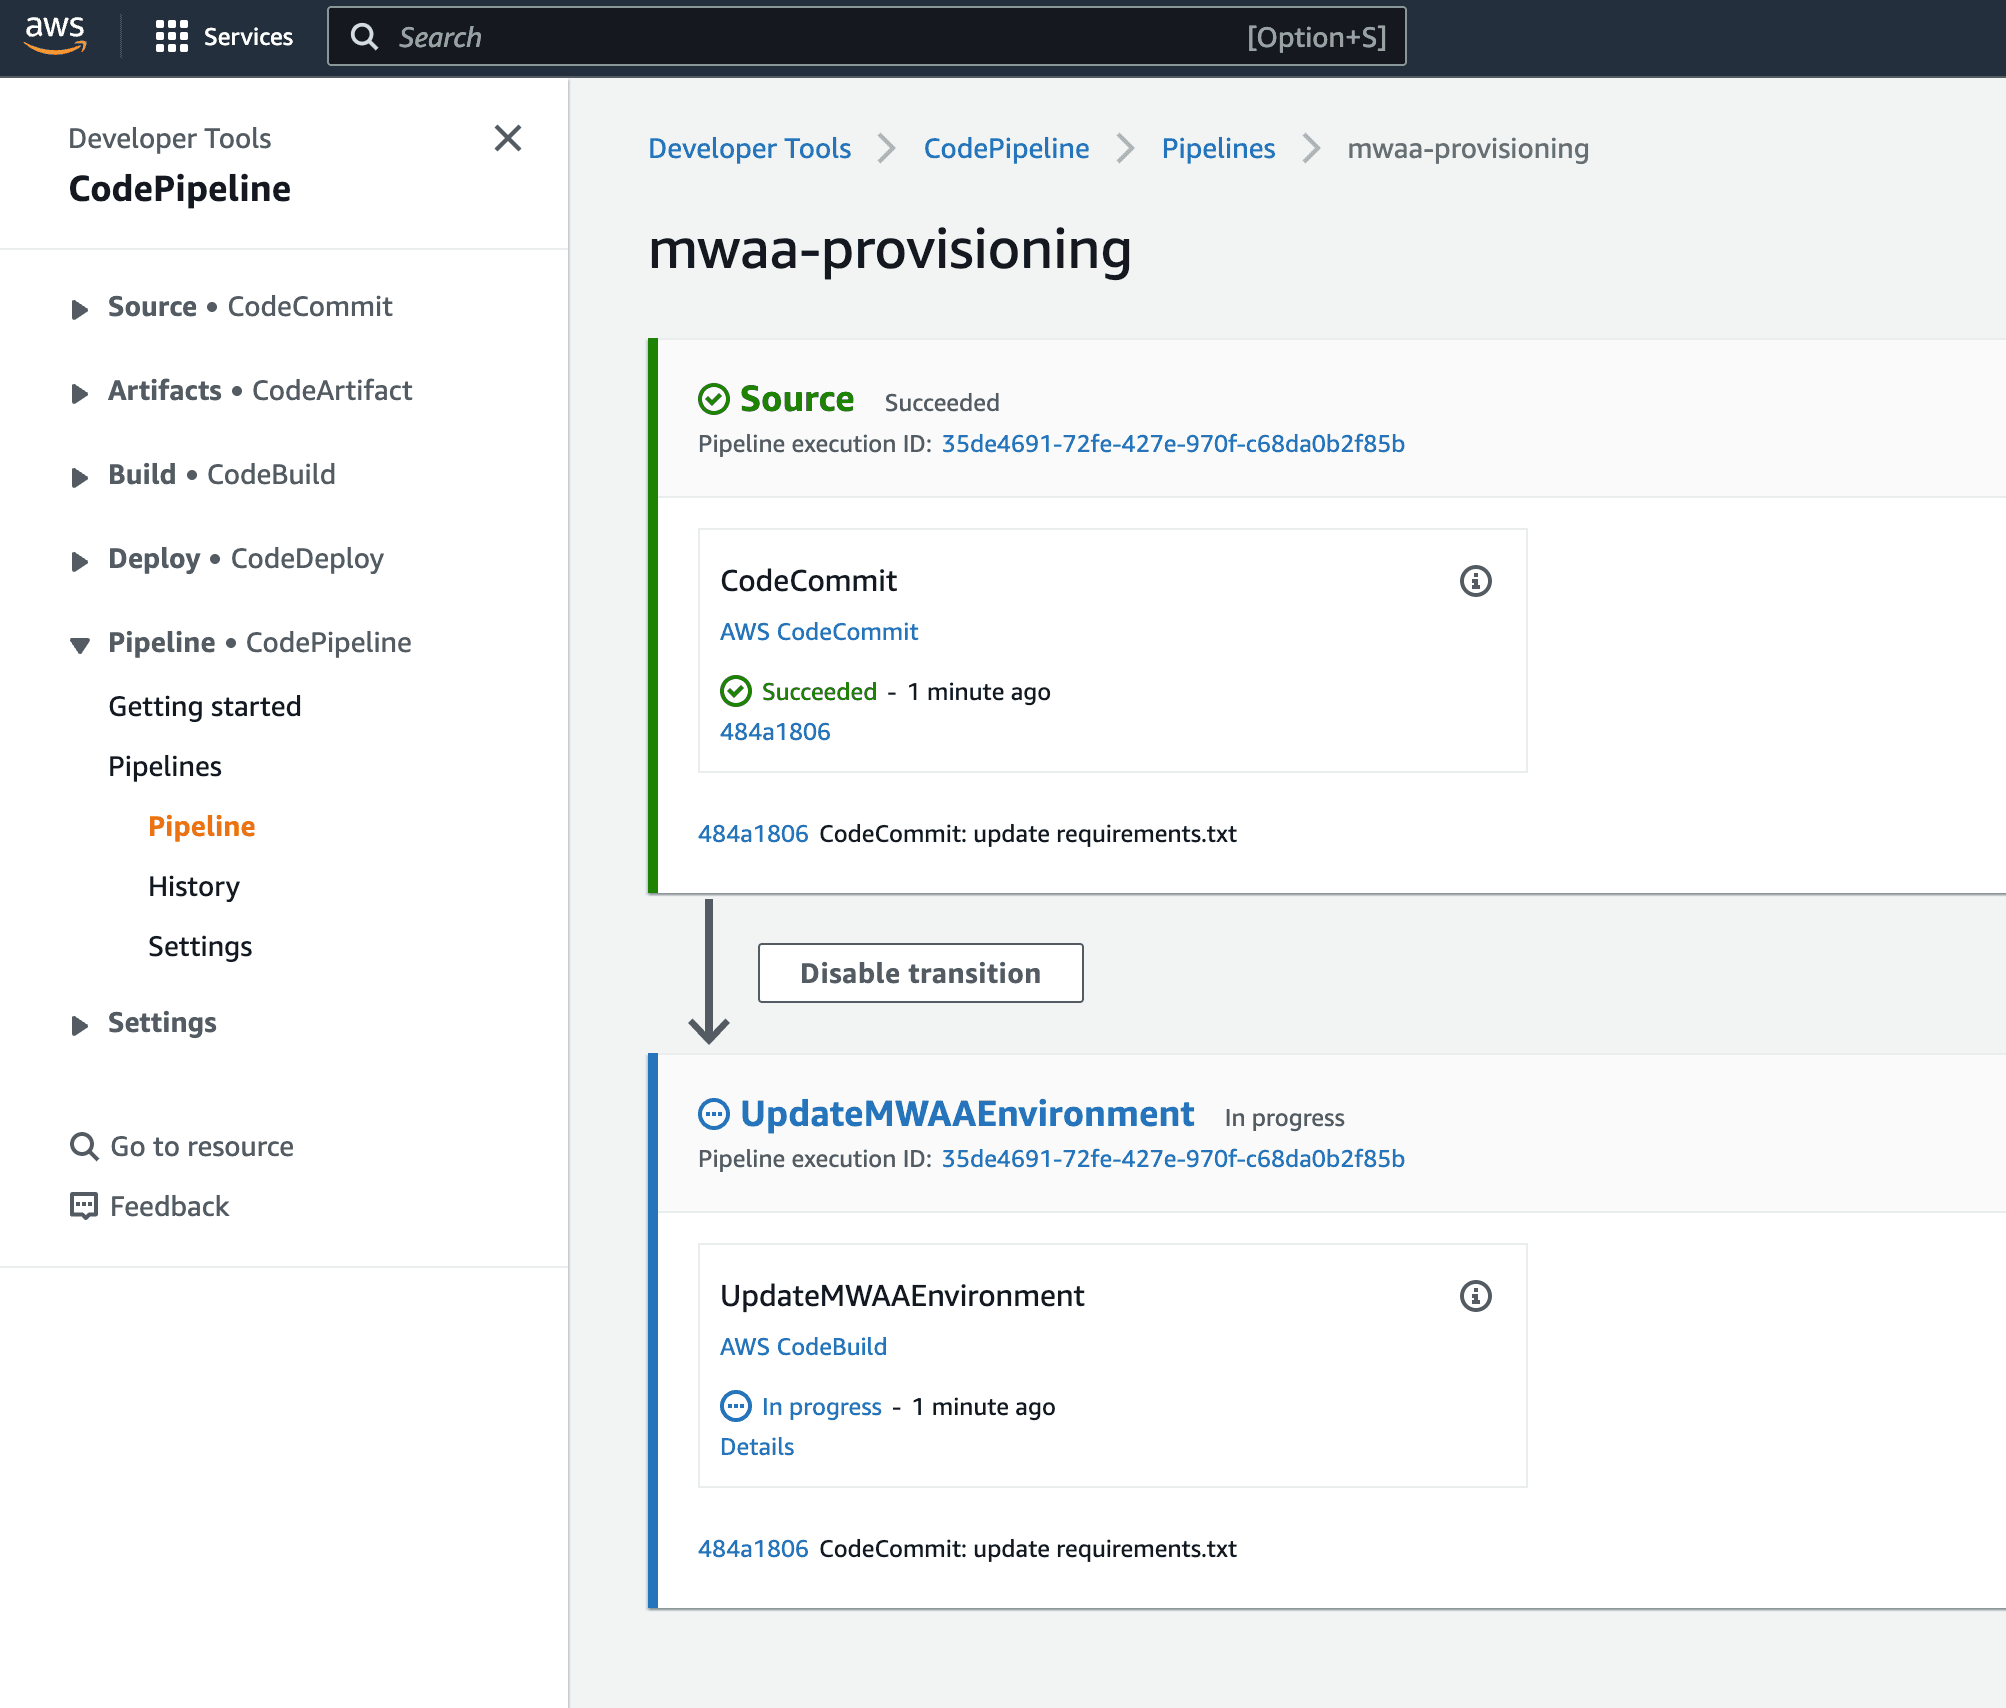
And we see that we have kicked off the pipeline:
Screenshot of pipeline running
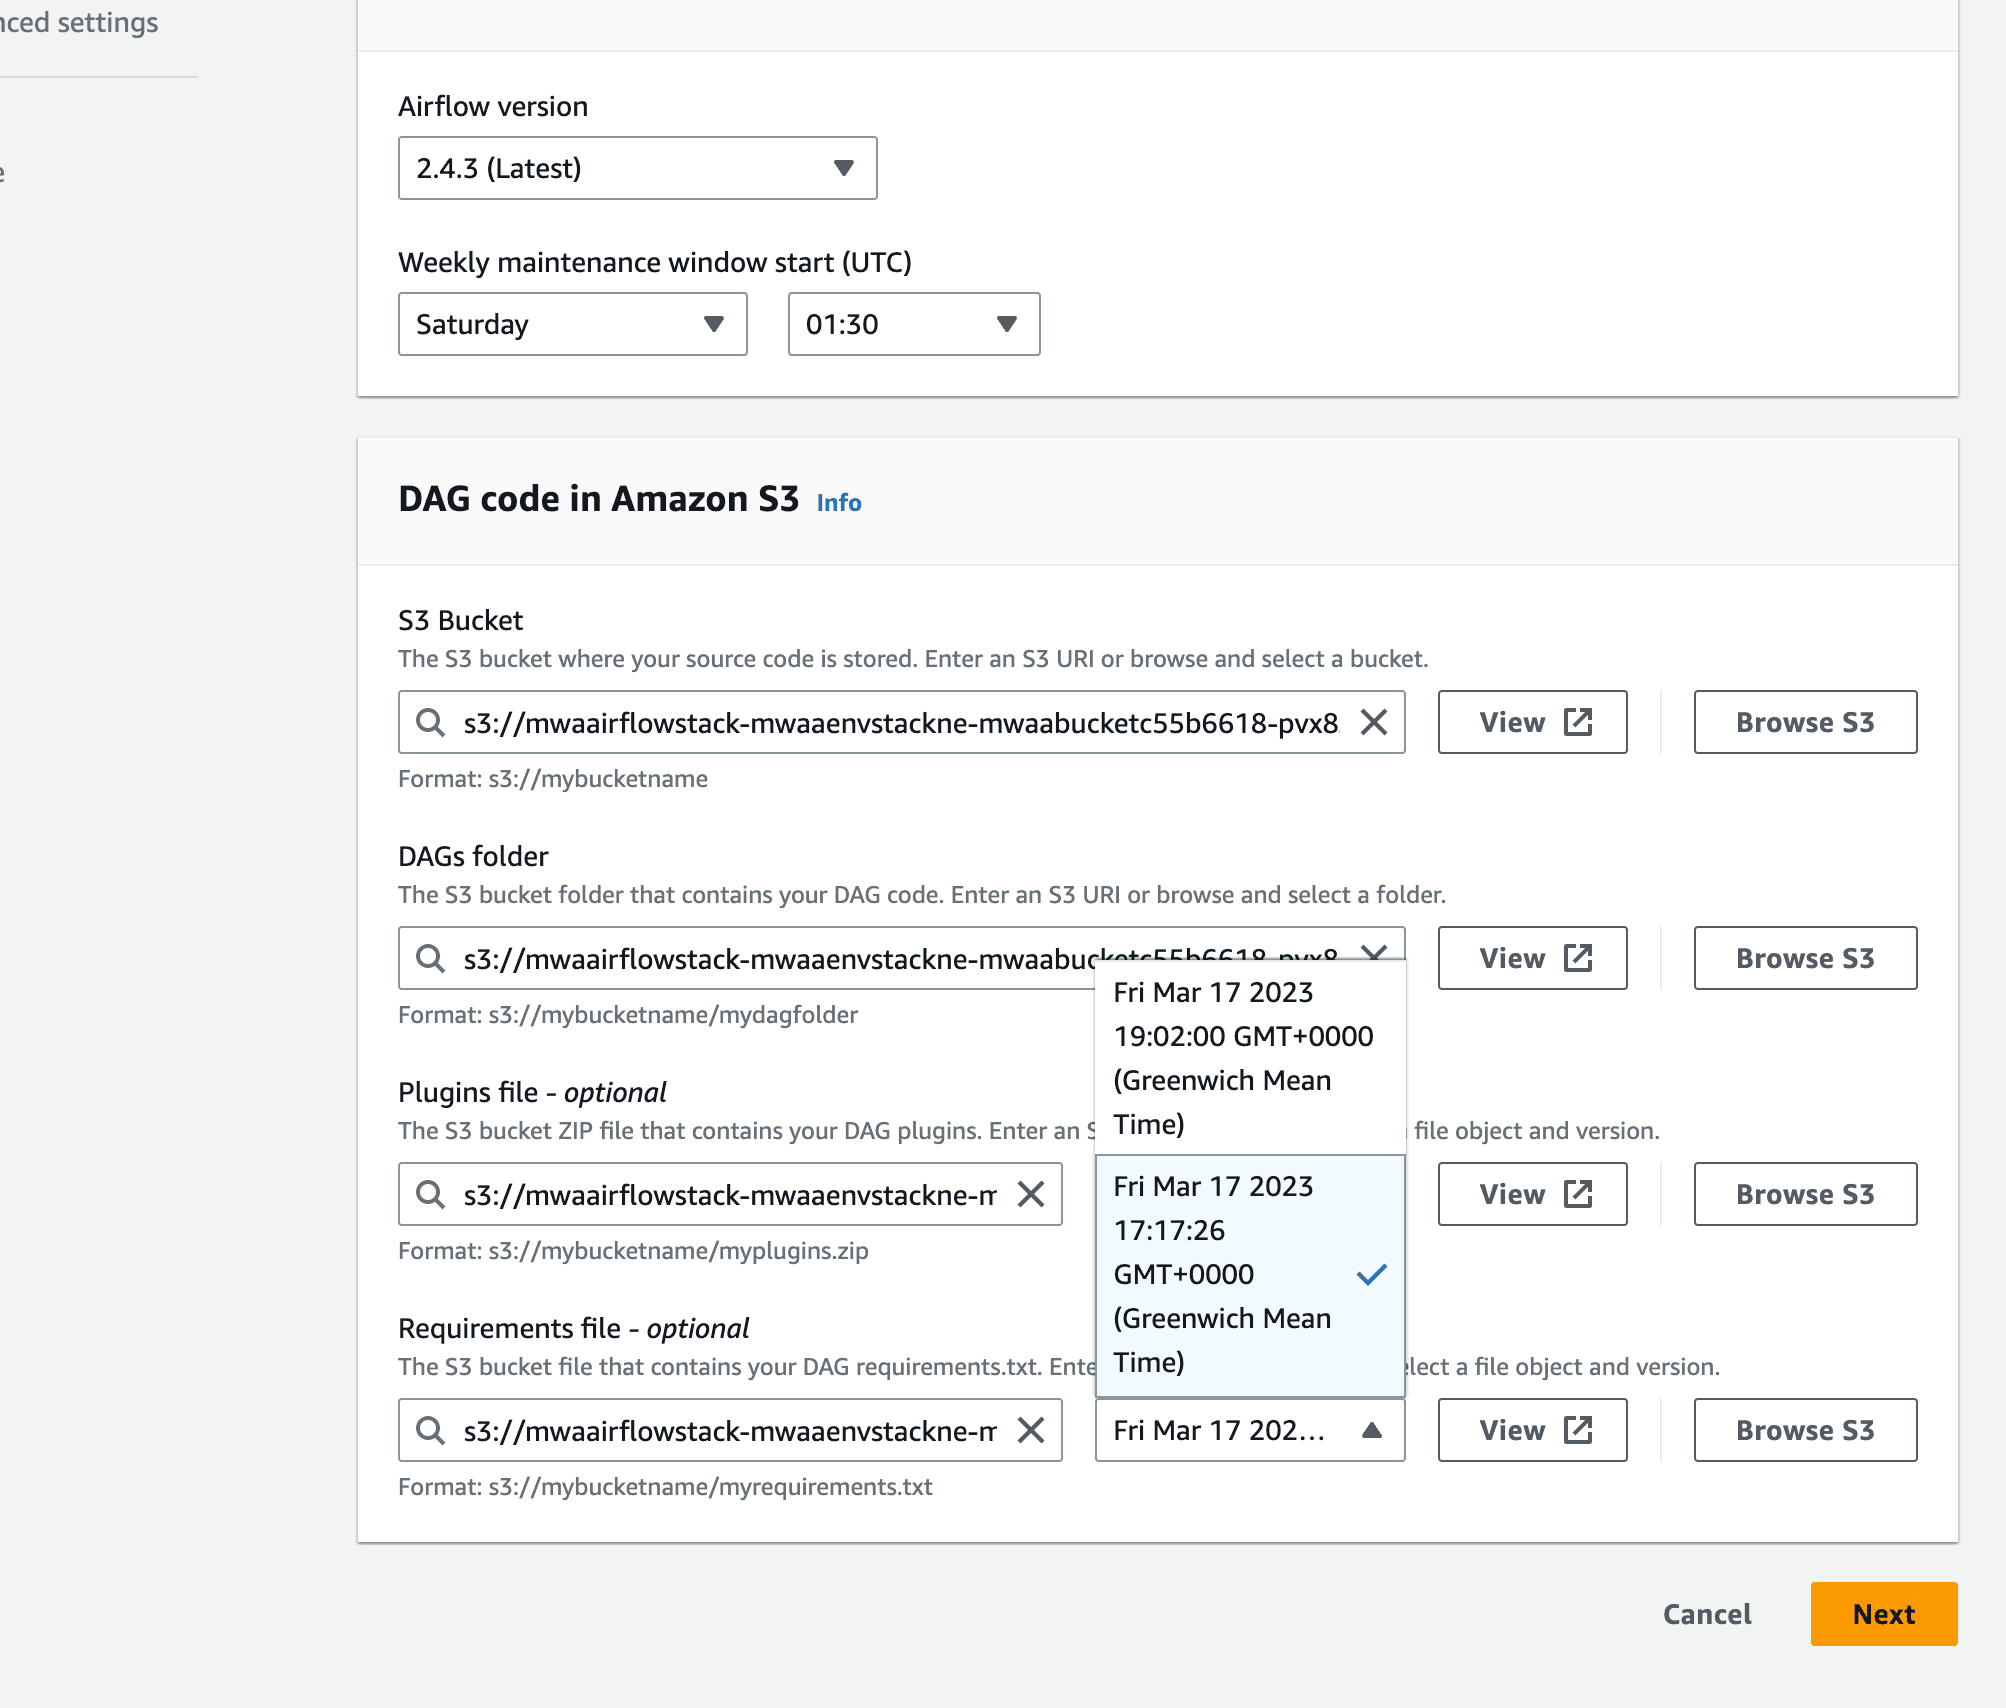
When it is finished, when we go to the MWAA environment we can see that we have a newer file, but the older one is still active.
Screenshot of MWAA environment showing plugin and requirements.txt

Updating the requirements.txt

You may be wondering why the latest requirements.txt has not been set by the MWAA environment. The reason for this is that this is going to trigger an environment restart, and so this is likely something you want to think about before doing. You could automate this, and we would add the following to the deploy part of the CodeBuild deployment stage:
Tip! If you wanted to run this separately, just set the bucket_name and mwaa_env variables to suit your environment.
This will trigger an environment update, using the latest version of the requirements.txt file.

mwaaproject

When we look at the source files in this repo, we will see that they contain files that we can deploy to our Airflow DAGs folder (which for MWAA is an S3 bucket).
In our example, we are only using the DAGs folder to store our workflows. When we add or change our workflows, once these are committed to our git repository, it will trigger the AWS CodePipeline to run the Makefile deploy task, copying the DAGs folder to our MWAA environment. You can use and adjust this workflow to do more complex workflows, for example, developing support Python resources that you might use within your workflows.
In our example, we are only using the dags folder to store our workflows. When we add or change our workflows, once these are committed to our git repository, this will trigger the AWS CodePipeline to run the Makefile deploy task, copying the dags folder to our MWAA environment. You can use and adjust this workflow to do more complex workflows, for example, developing support Python resources that you might use within your workflows.
We can see this in motion by working through a simple example of adding a new workflow. We first check out the repo locally and add our new workflow file (demo.py) which you can find in the source repository.
We now commit this back to the repo:
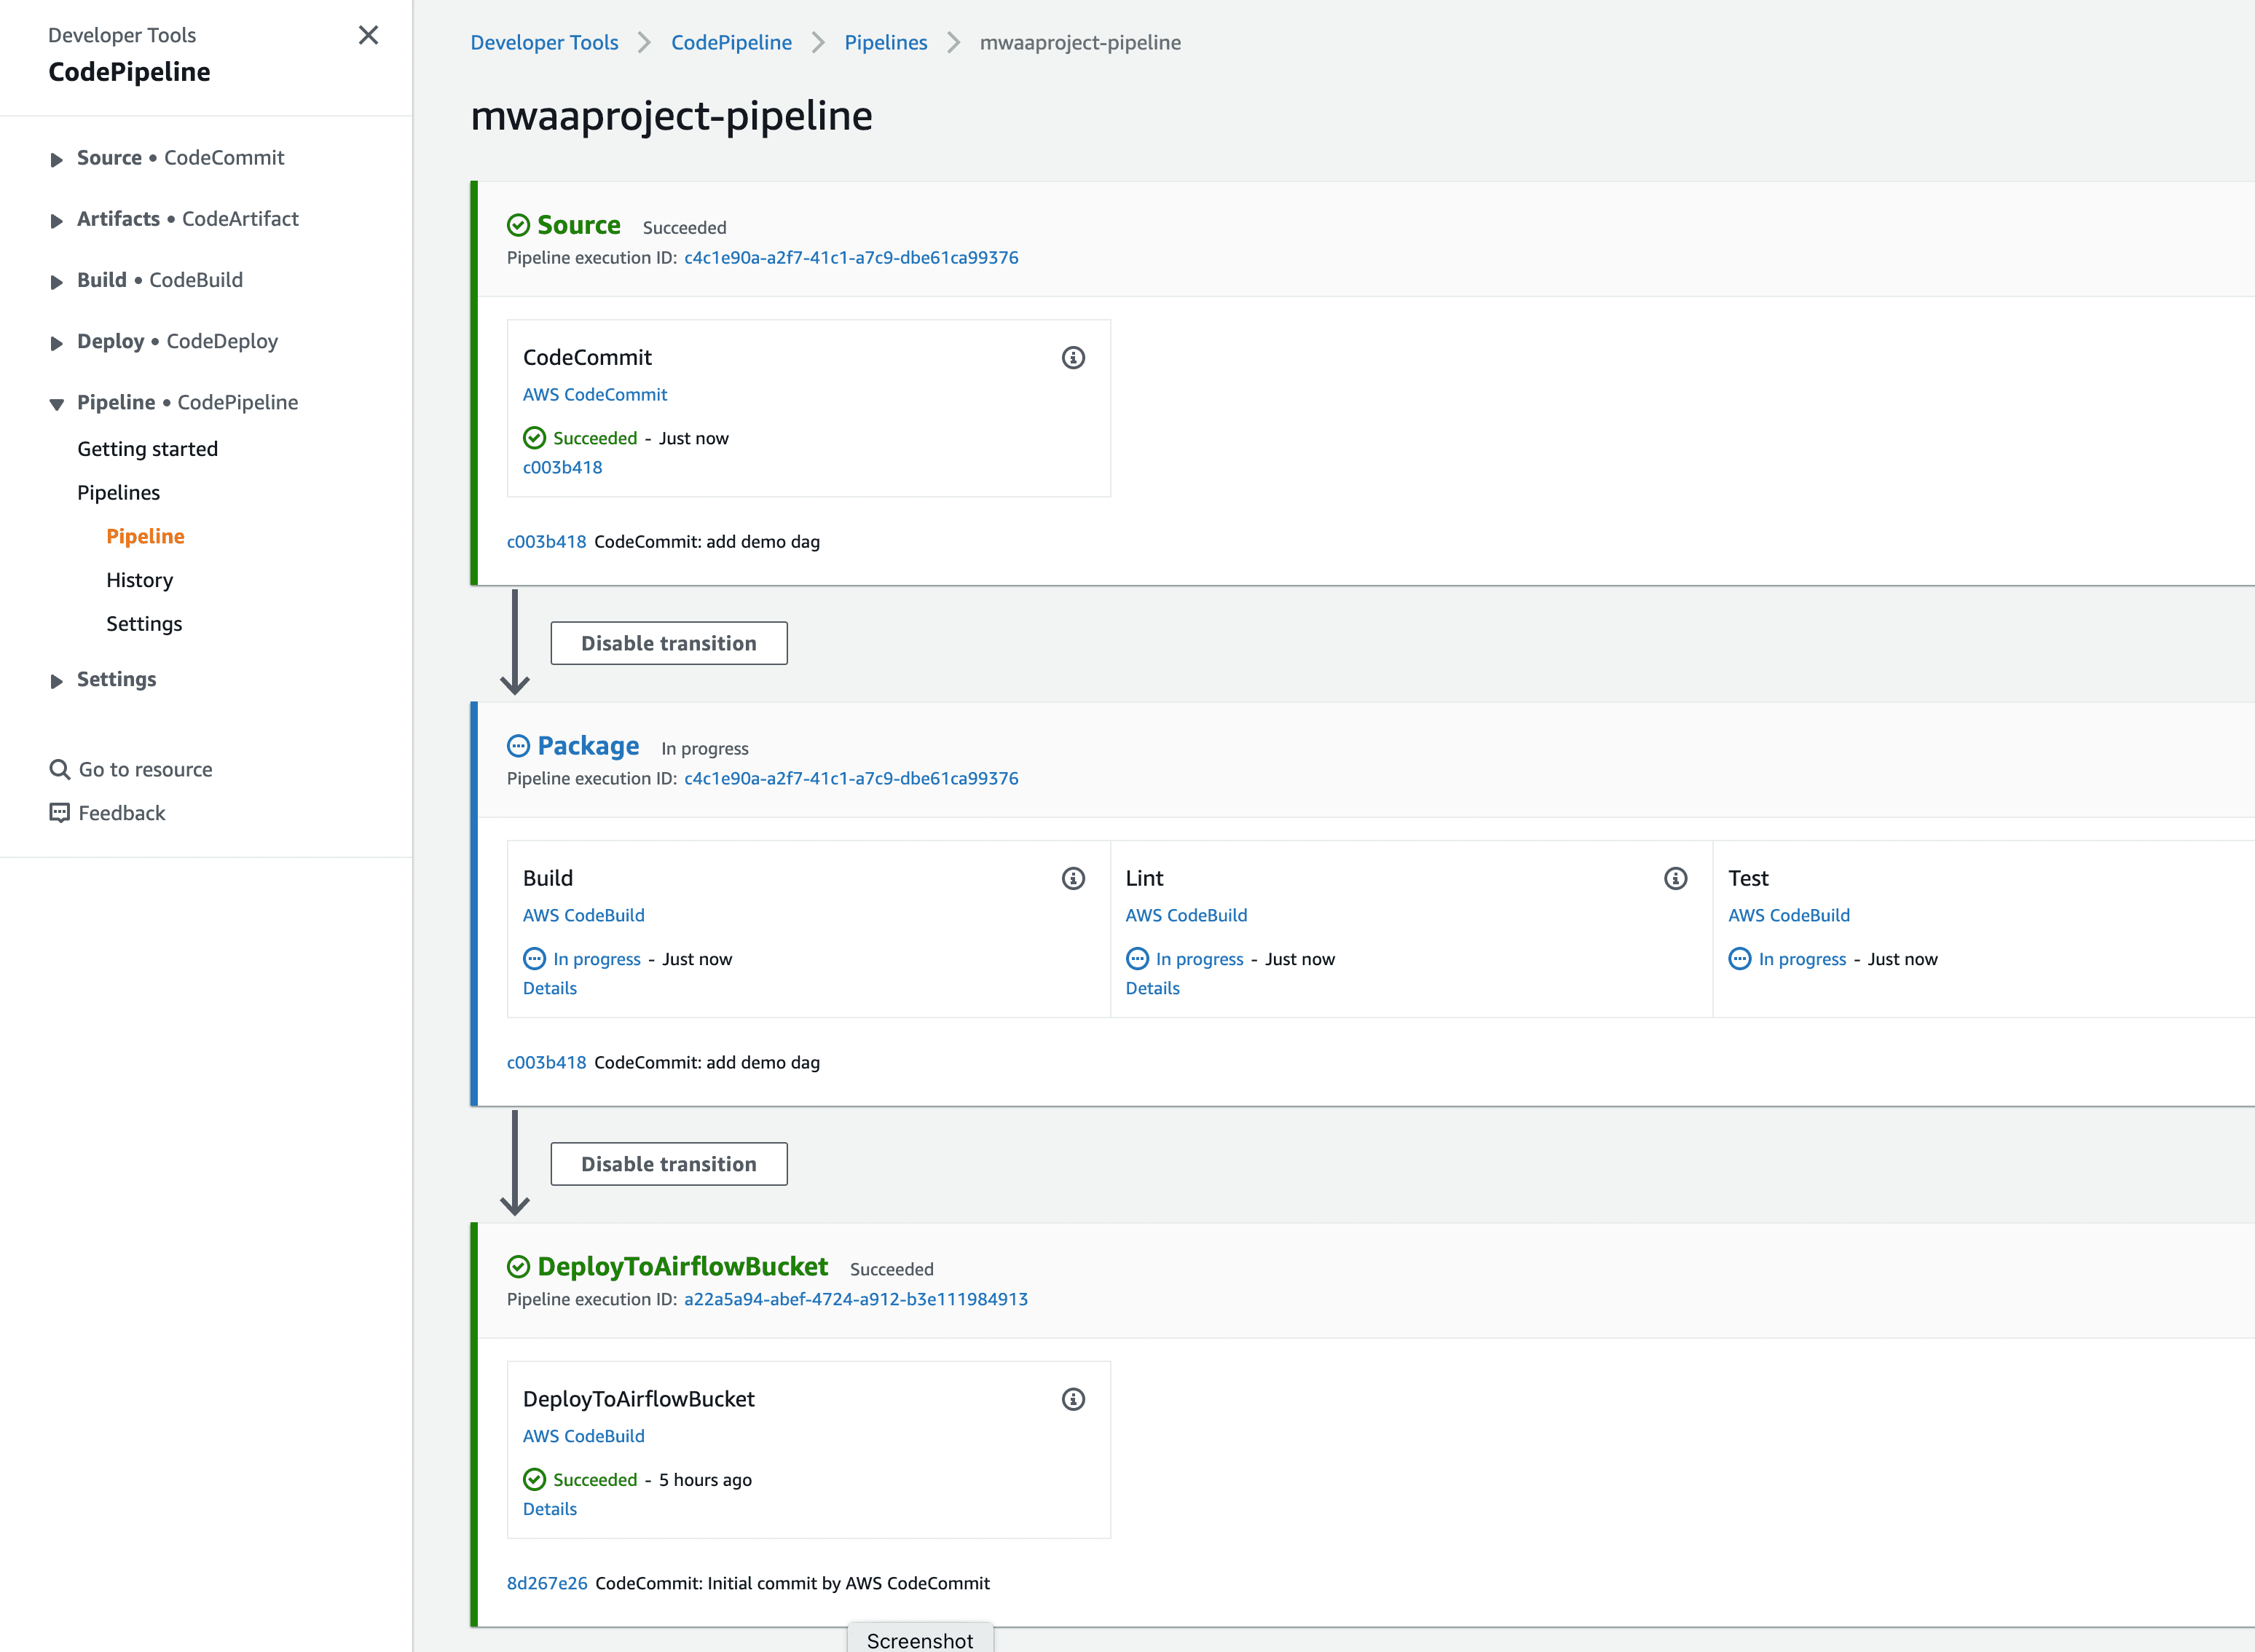
Which we can now see triggers our CodePipeline.
Screenshot of AWS CodePipline deploying new DAG
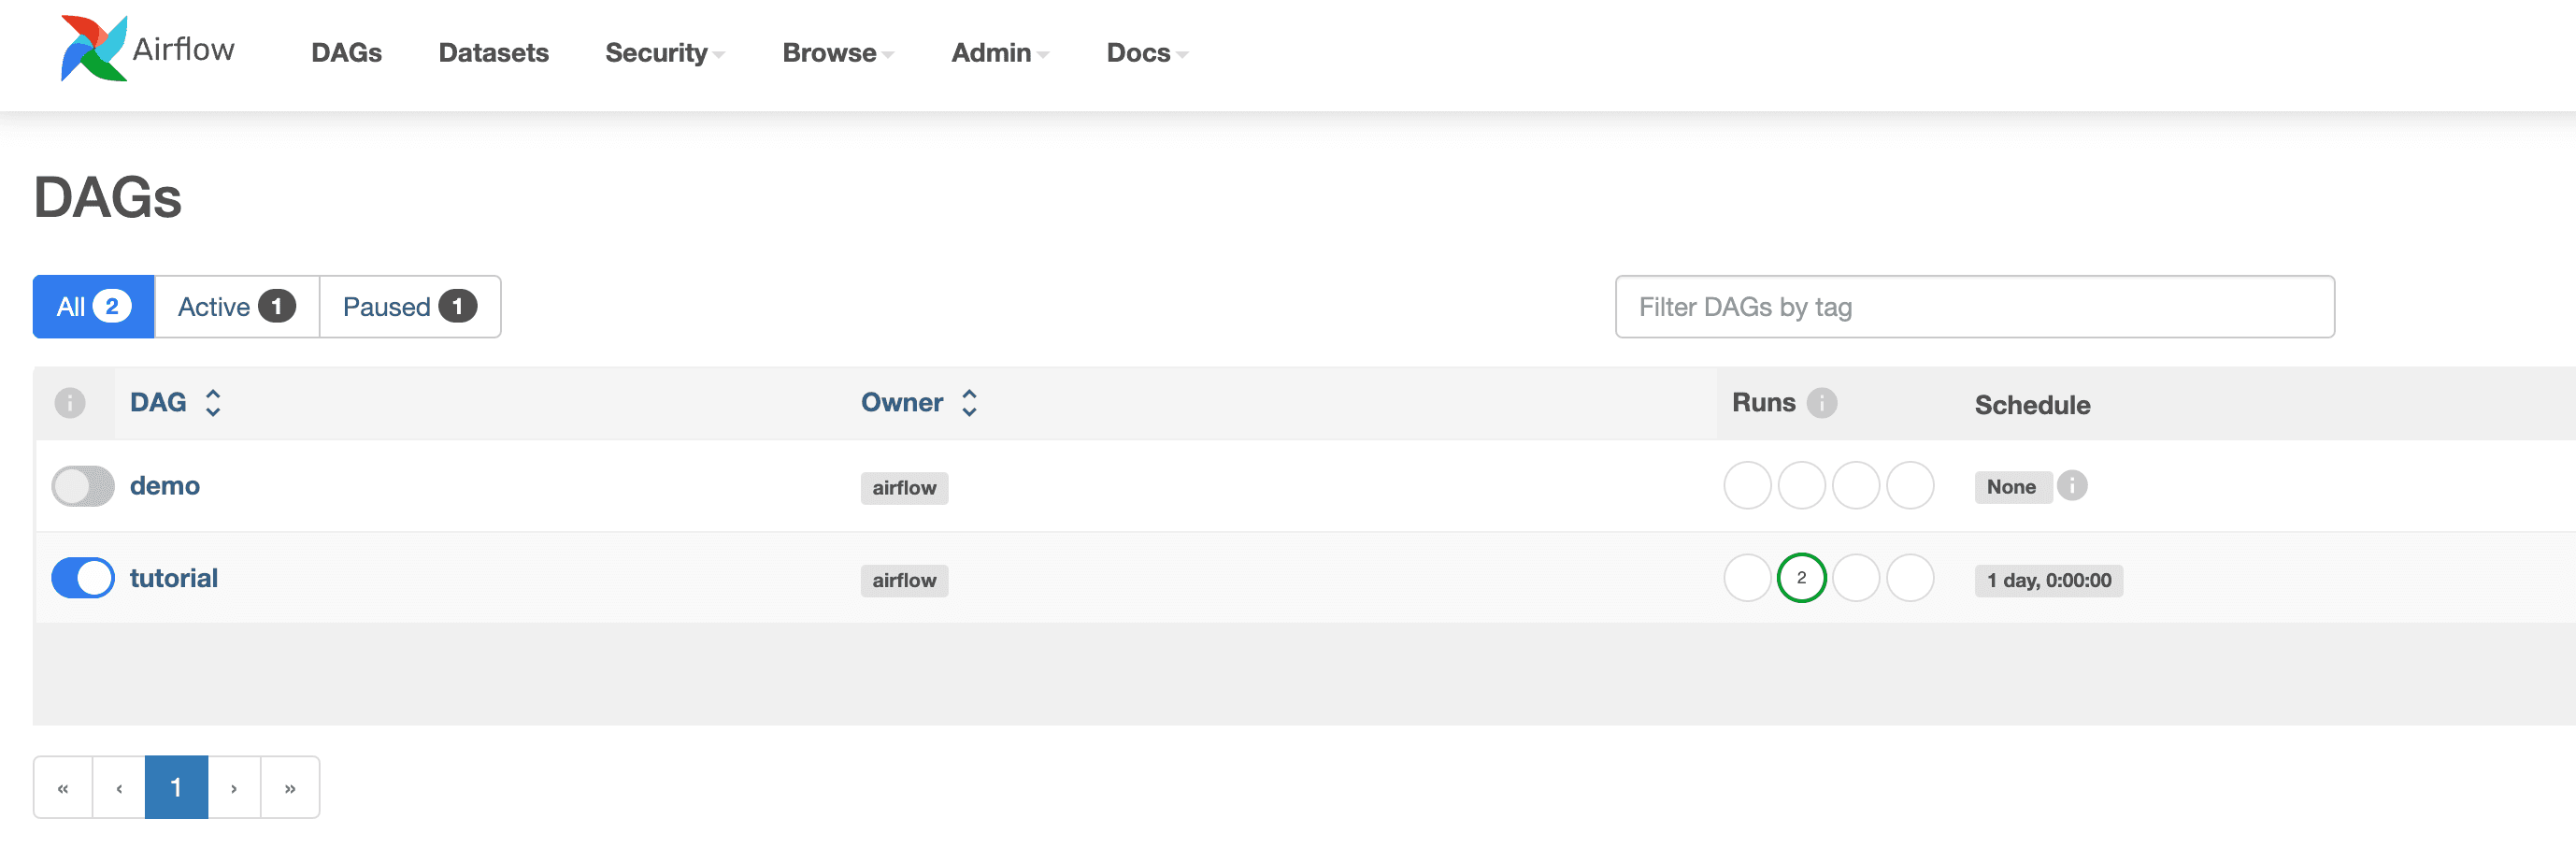
After a few minutes, we can see this has been successful and when we go back to the Apache Airflow UI, we can see our new workflow.
Screenshot of Apache Airflow UI showing new DAG
Check the CodeBuild logs If you want more details as to what happened during both the environment and workflow pipelines, you can view the logs from the CodeBuild runners.
Congratulations, you have now completed this tutorial in helping you apply DevOps principals to automate how you deliver your MWAA environments, and how you streamline how you deploy your workflows. Before you leave, make sure you clean up you environment so that you do not leave any resources running.

Cleaning up

To remove all the resources created following this post, you can use CDK and run the following commands:
To delete the first part of this tutorial,
To delete the second part of the tutorial, the end-to-end stack,
Note: The delete process will fail at some point due to not being able to delete the S3 buckets. You should delete these buckets via the AWS Console (using Empty and then Delete), and then manually delete the stacks via the CloudFormation console.

That's All, Folks!

In this tutorial we looked at some of the challenges automating Apache Airflow, and how we can apply DevOps principals to address those. We looked at how you do that with Amazon's Managed Workflow for Apache Airflow (MWAA), and in the next tutorial post, we will look at how you can do the same but with self-managed Apache Airflow environment.
If you enjoyed this tutorial, please let us know how we can better serve open source Builders by completing this short survey. Thank you!

Any opinions in this post are those of the individual author and may not reflect the opinions of AWS.

1 Comment