Bootstrapping an Amazon EC2 Instance Using User-data to Run a Python Web App
Deploy a Python web application to an EC2 instance running Nginx and uWSGI, using a CI/CD Pipeline created with Amazon CDK.
Cobus Bernard
Amazon Employee
Published Apr 21, 2023
Last Modified Mar 19, 2024
Co-authored with Darko Mesaros, image generated with Amazon Bedrock.
Manually setting up and configuring the packages required to run a Python web app using Nginx and uWSGI on a server can be time consuming — and it's tough to accomplish without any errors. But why do that hard work when you can automate it? Using AWS CDK, we can set up user data scripts and an infrastructure to preconfigure an EC2 instance - which in turn will turn a manual, time-intensive process into a snap. In this tutorial, we will be using a combination of bash scripts and AWS CodeDeploy to install and configure Nginx and uWSGI, set up a
systemd service for uWSGI, and copy our application using CDK. Then, we are going to deploy our Python-based web application from a GitHub repository. We will cover how to:- Create an AWS CDK stack with an Amazon EC2 instance, a CI/CD Pipeline, and the required resources for it to operate.
- Install software packages on the EC2 instance's first launch by creating a user data asset.
- Test, Deploy and Configure the web application using the CI/CD pipeline.
| About | |
|---|---|
| ✅ AWS experience | 200 - Intermediate |
| ⏱ Time to complete | 60 minutes |
| 💰 Cost to complete | Free tier eligible |
| 🧩 Prerequisites | - AWS account -CDK installed: Visit Get Started with AWS CDK to learn more. |
| 💻 Code Sample | Code sample used in tutorial on GitHub |
| 📢 Feedback | Any feedback, issues, or just a 👍 / 👎 ? |
| ⏰ Last Updated | 2024-01-29 |
To deploy this web application we will be using AWS CDK to create and deploy the underlying infrastructure. This infrastructure will consist of an EC2 instance, a VPC, CI/CD pipeline, and accompanying resources required for it to operate (Security Groups and IAM permissions).
First, let's check if our CDK version is up to date — this guide is based on v2 of the CDK. If you are still using v1, please read through the migration docs. To check the version, run the following:
If you see output showing
1.x.x, or you just want to ensure you are on the latest version, run the following:We will now create the skeleton CDK application using TypeScript as our language of choice:
CDK uses the folder name for the files it generates. For this tutorial, we will be using
ec2-cdk. If you named your directory differently, please replace this with the folder name you used. To start adding infrastructure, go to the file lib/ec2-cdk-stack.ts. This is where we will write the code for the resource stack you are going to create.A resource stack is a set of cloud infrastructure resources (in your particular case, they will be all AWS resources) that will be provisioned into a specific account. The account and Region where these resources are provisioned can be configured in the stack — which we will cover later on.
In this resource stack, you are going to create the following resources:
- IAM roles: This role will be assigned to the EC2 instance to allow it to call other AWS services.
- EC2 instance: The virtual machine you will use to host your web application.
- Security group: The virtual firewall to allow inbound requests to your web application.
- Secrets manager secret: This is a place where you will store your Github Token that we will use to authenticate the pipeline to it.
In this segment we will create the EC2 instance and its required resources. During the course of this tutorial, there will be code checkpoints where we show what the full file should look like at that point. We do recommend following step-by-step by typing out or copying and pasting the sample code blocks to ensure you understand what each code block does.
To start off, we will create the needed IAM role for your EC2 instance. This role will be used to give your instance permission to interact with AWS Systems Manager and AWS CodeDeploy. This will be important later in the tutorial. To get started, make sure you import the following modules into your main stack. (
lib/ec2-cdk-stack.ts):Then add the following lines to create a role and attach the needed managed IAM Policies:
Next step is to create a VPC where our EC2 instance will be residing. We are creating a VPC with three Public subnets only, so there will be no NAT Gateways, or private subnets.
We also need to be able to access our instance via
http (port 80). To allow traffic to this port, we need to set up firewall rules by creating a security group. We will set up port 80 to allow HTTP traffic to come to the instance from any location on the internet.We're now ready to create the EC2 instance using a pre-built Amazon Machine Image (AMI - pronounced "Ay-Em-Eye") — for this tutorial, we will be using the Amazon Linux 2023 AMI for X86_64 CPU architecture. We will also pass the IAM role and VPC created earlier, and the instance type to run on, in your case, a
t2.micro that has 1 vCPU and 1GB of memory. If you are running this tutorial in one of the newer AWS Regions, the t2.micro type may not be available. Just use the t3.micro one instead. To view all the different instance types, see the EC2 instance types page.Finally we are attaching User Data and tagging the instance with specific tags. The user data is used to bootstrap the EC2 instance and install specific application packages on the instance's first boot. The tags are used by Systems Manager to identify the instance later on for deployments.
Here is the user data bash script we will be attaching to the EC2 Instance. Make sure this code sits in a file named
configure_amz_linux_sample_app.sh in the assets directory in the root of your CDK Application.Now, use CDK to attach the user data script and add tags to the instance:
Additionally, we will configure outputs to easily track down the EC2 instance's IP address:
We have now defined our AWS CDK stack to create an EC2 instance, a VPC, a security group with inbound access rules, and an IAM role, attached to the EC2 instance as an IAM instance profile. On top of that, we have tagged the EC2 instance and attached a user data script to it.
Your
lib/ec2-cdk-stack.ts file should now look like this:Now we are going to fork the sample application to your own GitHub account and configure a Github Token to be used by the CI/CD pipeline.
It is best practice to use tokens instead of passwords to access your GitHub account via GitHub API or command line. Read more about creating a personal access token.
Save the token in a safe place for later use. We will be using this token for two purposes:
- To provide authentication to stage, commit, and push code from local repo to the GitHub repo. You may also use SSH keys for this.
- To connect GitHub to CodePipeline, so whenever new code is committed to GitHub repo it automatically triggers pipeline execution.
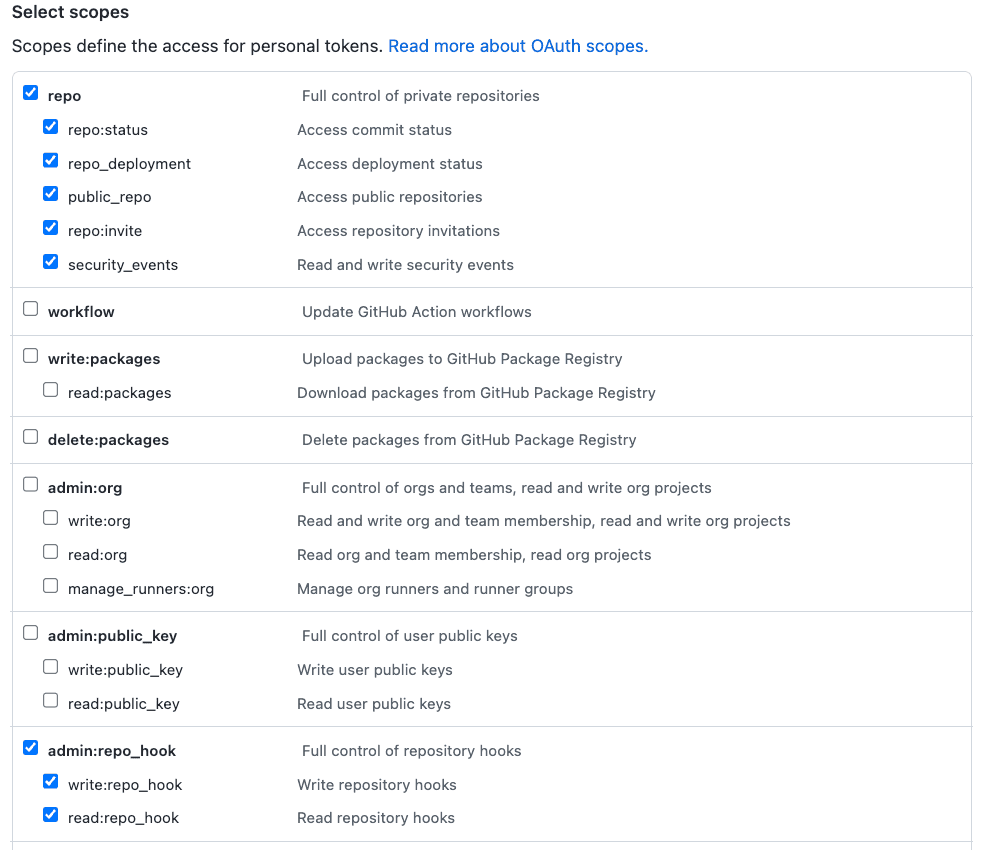
The token should have the scopes repo (to read the repository) and admin:repo_hook (if you plan to use webhooks, true by default) as shown in the image below.
Now, for AWS CodePipeline to read from this GitHub repo, we need to configure the GitHub personal access token we just created. This token should be stored as a plaintext secret (not a JSON secret) in AWS Secrets Manager under the exact name
github-oauth-token.Replace
GITHUB_ACCESS_TOKEN with your plaintext secret and REGION in following command and run it:For more help, see Creating and Retrieving a Secret.
Finally, let's now go ahead and fork the Sample Application repo into our own GitHub Account. This is how we will be interacting with this application from now on. More information on forking repositories can be found here.
It's time to create a CI/CD Pipeline. This CI/CD pipeline will be responsible for testing, deploying, and configuring our Web app on our EC2 Instance. The pipeline itself will consist of three phases: 1/ Source - This is where the pipeline extracts the commit from your GitHub repository we forked earlier; 2/ Build - A stage where we test the Application code using the
unittest Python Unit Testing Framework; and 3/ Deploy - Deploying and configuring the web application on the EC2 instance using AWS CodeDeploy. Let's get back to CDK.To start off, let's import additional modules into our main CDK stack file
lib/ec2-cdk-stack.ts:Let's now create the pipeline and its stages, this is just us defining the pipeline and the skeleton of different stages/phases:
We will start with the
Source stage, as here is where we connect the pipeline to Github, so it can retrieve our code commits to be passed down the pipeline. Some important parts to take note of here: make sure to set up the github token as a secret in AWS Secrets Manager (check the steps above), and ensure to change the owner parameter to match that of your GitHub username:On to the
Build stage: we are not actually building anything, but rather testing the code. In this stage, we are running unit tests against our code (which we will set up later), and if successful, it continues along to the next next stage.And finally the
Deploy stage: this stage uses CodeDeploy to deploy and configure the web application on the EC2 instance. For this to work, we need to have the CodeDeploy agent installed and running on the instance (which we did before with the user data), and also we need to tell CodeDeploy which instances to target for deployment. We will be using tags for this. If you recall, earlier in this tutorial we tagged the EC2 instance with specific tags. Now we are using those tags to target the instances with CodeDeploy, and deploy the code.We have now completed all code changes to our CDK app, and the
lib/ec2-cdk-stack.ts file should look like this:To properly test and deploy our application, we will need to add some additional content to the sample repository we forked earlier. These files are used by the CodeBuild and CodeDeploy services. On top of that, we will write a simple Python unit test. Let's start with that.
To create our tests, in the root directory of the sample application create a
tests directory, and add the following test_sample.py file to it:This test will run the Flask application and see if it returns a
200 HTTP status code. Simple as that. On top of this file, just for posterity, let's create a __init__.py file in the same directory. This file can be empty so you can just create it with the following command:We are now ready to create the
buildspec.yml file. This file is used by CodeDeploy as an instruction set of what it needs to do to build your code. In our case, we are instructing it on how to run the tests. In the root directory of the sample application, add the buildspec.yml file with the following contents:Finally, let's add some much needed files for CodeDeploy. Similarly to CodeBuild, CodeDeploy takes a file called
appspec.yml as an instruction set on how to deploy your application to its final destination. On top of that file, we will be adding a few shell scripts to configure and launch the application on the server. This is needed as we need to create a specific nginx website, and do some service restarts. But let's first create the appspec.yml file in the root of the sample application directory, with the following contents:As you can see, here we are involving 4 different scripts in different phases of the deployment. This is required to properly set up the EC2 instance before and after code deployment. These scripts should sit in a directory called
scripts in the root of the sample application. These scripts should be named as follows, and should contain the following contents:setup_dirs.shsetup_services.shpipenv.shstart_server.shLastly, make sure to update the
Pipfile at the root of your sample application repository so it reflects the following:Once all these files are created, the sample application directory should look like this:
Now make sure to add, commit, and push your changes to the sample code to your GitHub Repository before we continue to the next step and deploy the infrastructure.
Before we can deploy our CDK app, we need to configure CDK on the account you are deploying to. Edit the
bin/ec2-cdk.ts and uncomment line 14:This will use the account ID and Region configured in the AWS CLI—if you have not yet set this up, please follow this tutorial section. We also need to bootstrap CDK in our account. This will create the required infrastructure for CDK to manage infrastructure in your account, and it only needs to be done once per account. If you have already done the bootstrapping, or aren't sure, you can just run the command again. It will only bootstrap if needed. To bootstrap CDK, run
cdk bootstrap (your account ID will be different from the placeholder ones below):Once the bootstrapping has completed, we're ready to deploy all the infrastructure. Run the following:
You will be presented with the following output and confirmation screen. Because there are security implications for our stack, you will see a summary of these and need to confirm them before deployment proceeds. This will always be shown if you are creating, modifying, or deleting any IAM policy, role, group, or user, and when you change any firewall rules.
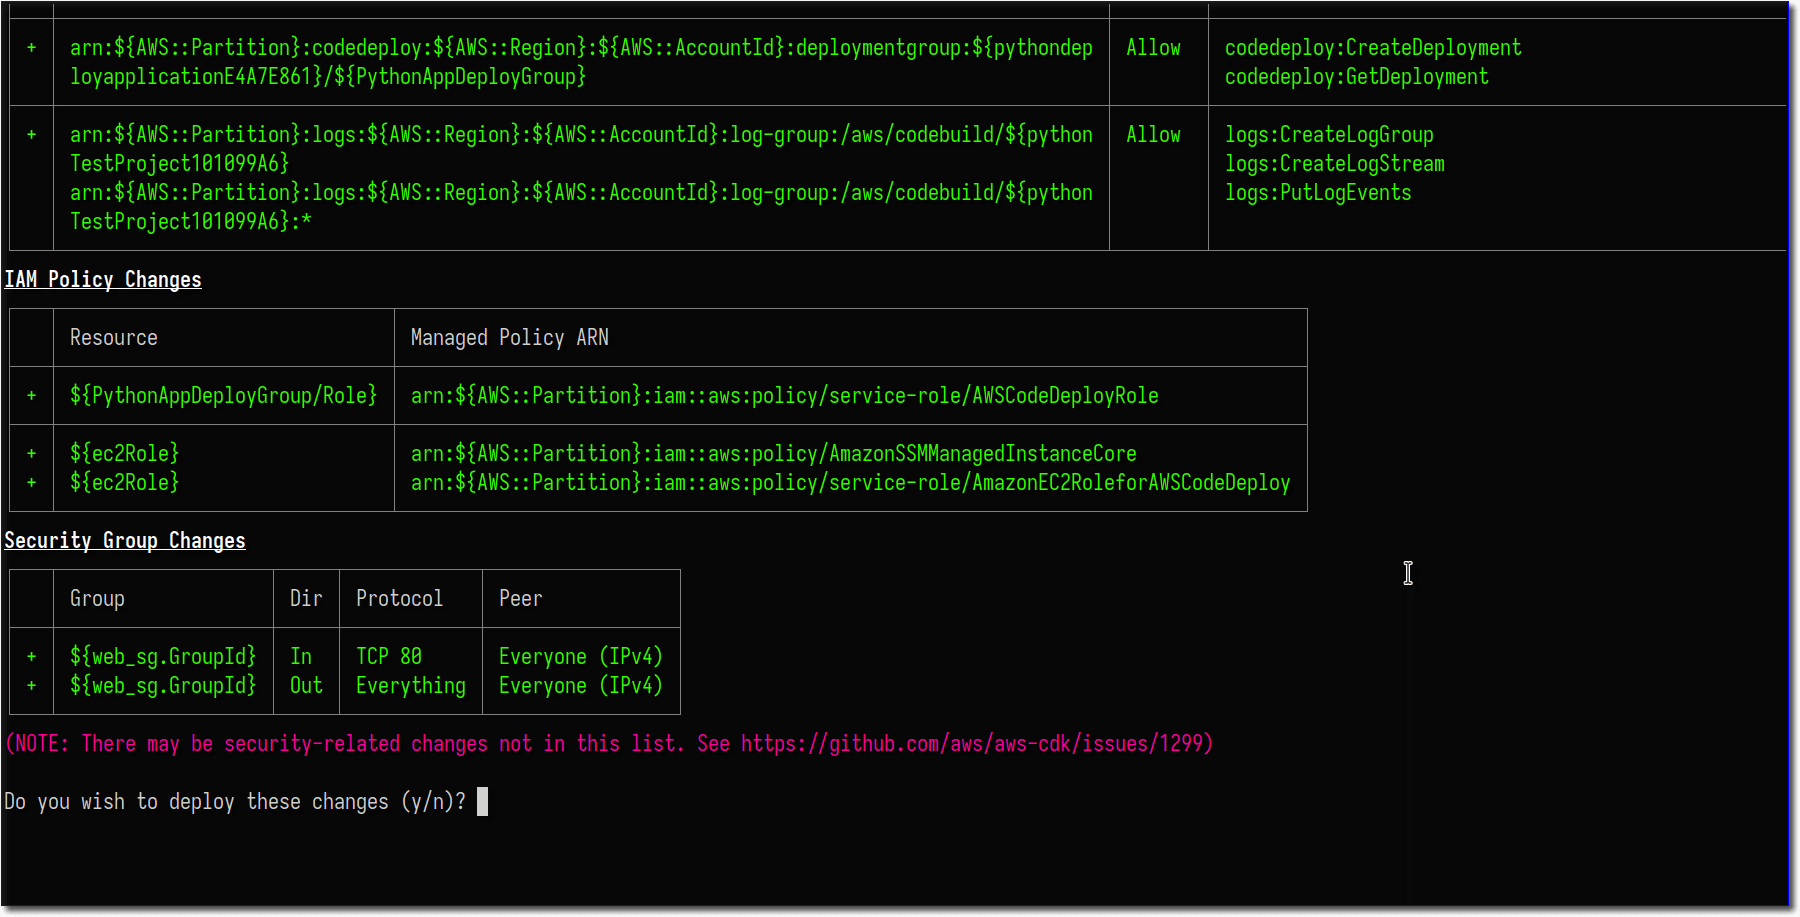
Enter
y to continue with the deployment and create the resources. The CLI will show the deployment progress, and in the end, the output we defined in our CDK app.Your infrastructure is now deployed, the instance is spinning up, and you can use the outputs at the bottom that indicate the IP address of your web server. The application will not be immediately available, as it needs to be deployed. To check the status of the deployment, head over to the AWS CodePipeline console and find the
python-webApp pipeline. There you should see something similar to this: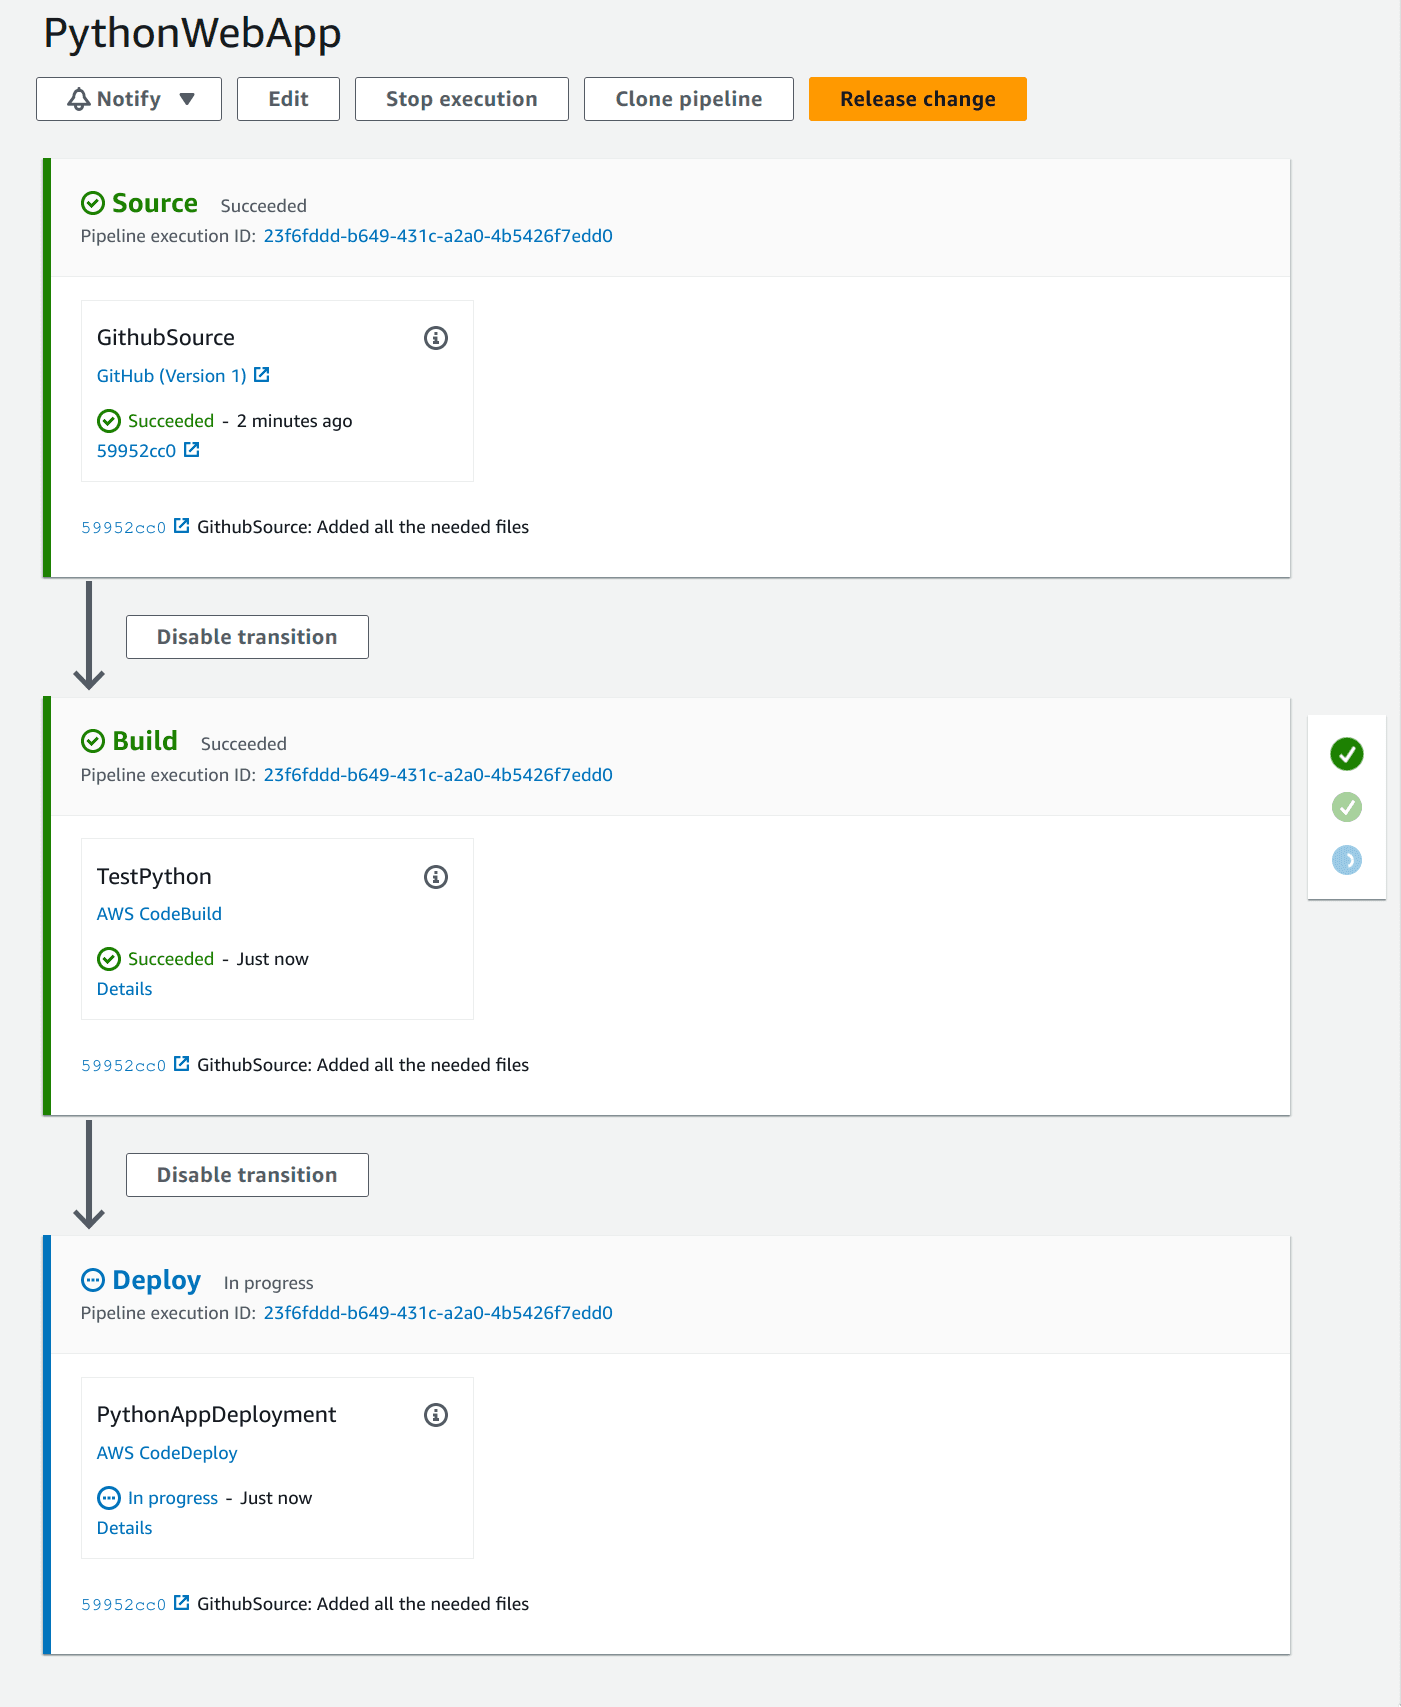
After the deployment is successful (the
Deploy stage should be green), copy and then paste the IP address of your EC2 instance in your browser, and your sample application should be up and running. Congratulations! You have set up a Python web application running on an EC2 instance, with a CI/CD pipeline to test and deploy and changes!You have now completed this tutorial, but we still need to clean up the resources created during this tutorial. If your account is still in the Free Tier, there will not be any monthly charges. Once out of the Free Tier, it will cost ~$9.45 per month, or $0.0126 per hour.
To remove all the infrastructure we created, use the
cdk destroy command. This will only remove infrastructure created during this tutorial in our CDK application. You will see a confirmation:When the output shows
PythonEc2BlogpostStack: destroyed, your resources have been removed. There is one more step for the cleanup: removing the S3 bucket used by CDK to upload the scripts and sample application. These resources aren't deleted by CDK as a safety precaution. Open the S3 console in your browser, and look for a bucket with a name like pythonec2blockpoststack-<randonmunbers>-us-east-1 (yours will have a different random number and your account number instead of 123456789012). If you see more than one (usually if you have used the CDK asset feature before), you can sort by Creation Date to see the latest created one. Open the bucket to confirm that you see a directory called python-webApp. Select all the directory, then choose actions -> delete, and follow the prompts to delete the objects. Lastly, go back to the S3 console, and delete the bucket.Congratulations! You have finished the Build a Web Application on Amazon EC2 tutorial using CDK to provision all infrastructure, and configured your EC2 instance to install and configure OS packages to run the sample Python web app. If you enjoyed this tutorial, found any issues, or have feedback for us, please send it our way!
Any opinions in this post are those of the individual author and may not reflect the opinions of AWS.