I built a WordPress AI plugin to make authors more productive. Here's how
Learn how to build WordPress plugin from scratch and integrate it with Amazon Bedrock to build an AI content generator plugin.
Rio Astamal
Amazon Employee
Published Apr 24, 2024
Last Modified Apr 28, 2024
WordPress powers over 40% of the entire web, making it the leading content management system (CMS). With that massive reach, I figured a plugin for WordPress would have access to a massive pool of potential users. So I decided to build an AI content generator for WordPress with Amazon Bedrock — a plugin that almost anyone creating content on WordPress could use. Here's how.
Amazon Bedrock is a fully managed service that offers a choice of high-performing foundation models (FMs) along with a broad set of capabilities that you need to build generative AI applications, simplifying development with security, privacy, and responsible AI. With single API access you can choose different models from companies like AI21 Labs, Anthropic, Cohere, Meta, Mistral AI, Stability AI, and Amazon.
This AI plugin will allow WordPress authors to seamlessly integrate AI-powered content generation directly into the editor, streamlining their content creation workflow. Authors will be able to select and configure inference parameters of various AI models. Authors just need to hit a button and the plugin will automatically update the content editor and the excerpt with contents generated by AI. With quick content generation, the plugin should help authors be more productive.
In this post I will show you to build this AI plugin. You will learn how to build a plugin for WordPress and how to use AWS SDK for PHP to call Amazon Bedrock API. After completing this post you should have a fully working WordPress AI plugin to generate contents. No prior WordPress plugin development experience needed.
To give you an overview, here is what the end result would look like.
Before you dive into building the WordPress AI content generator plugin, there are a few prerequisites you'll need to have in place:
- AWS Account: You'll need an active Amazon Web Services (AWS) account to access Amazon Bedrock and its associated resources.
- Docker: The guide will utilize Docker containers to run WordPress and MySQL, so you'll need to have Docker installed on your development machine. You can skip this if you already have a working WordPress environment.
Since WordPress 5.0, Gutenberg is the default editor. To extends Gutenberg’s functionality you need to know React. Yes I hear you! But — no need to worry, I've got you covered! I promise there will be no build steps and JSX involved here, just plain vanilla Javascript you already know and love!
Note: If you’re using Windows, you can follow the guide on this post using Windows Subsystem for Linux (WSL).
The plugin will use credentials associated with this IAM user to call Amazon Bedrock API. As part of best practices, you should follow the principle of "least-privilege" by only granting permissions that you need. But, for the purpose of this post I will use an AWS managed policy called “AmazonBedrockFullAccess”.
- Log in to your AWS Management Console and navigate to the IAM service page.
- Click on Users in the left-hand menu, then click Create user.
- Enter
wp-ai-user
as User name and click Next - For the Permissions options, choose Attach policies directly
- Enter “bedrock” in the Search box
- Choose AmazonBedrockFullAccess and click Next
- On the Review and create step click Create user
Next step is to give the newly created user access keys so it can call AWS services.
- On the Users list click
wp-ai-user
. - Click Security credentials tab, then click Create access key button
- For the use case, choose Local code and make sure to tick the confirmation and click Next
- Click Create access key
Your access keys should be created. Once you have downloaded, keep them in safe place. You will need this Access key and Secret access key in the next section of this post.
This is long-term credentials with IAM user, I recommend to rotate the access key frequently to increase the security.
To give the plugin the ability to display a list of models that the author can choose to generate content, you need to activate the foundation models from the Amazon Bedrock service. Amazon Bedrock is a region specific service, so make sure you’re in correct region. In this example I’m using US East (N. Virginia) or us-east-1.
- Log in to your AWS Management Console and change the region to US East (N. Virginia)
- Navigate to Amazon Bedrock service page
- Click Model access in the left-hand menu
- Click Manage model access button in the top right corner
- Activate the base models that you want. In my case I activated all the base models so the WordPress administrator will have a broad of choices of models when generating content.
- Click Save changes to apply
You can skip this section if you already have a working WordPress environment.
Start by creating a root directory for this project. Let’s call it
wp-ai-plugin-tutorial
.Next create a root directory for our AI plugin. Let’s call it
my-ai-content-generator
and put it under ./wordpress/wp-content/plugins
. This directory will be mounted to the WordPress container.Run WordPress and MySQL containers using Docker compose command. Create a
docker-compose.yml
file.Now run the containers.
Open your browser and go to
http://localhost:8080/
where you should see the WordPress installation page. Follow the instructions to complete the installation.This is the fun part - let’s start to code! At very minimum a WordPress plugin is just PHP file with a special header (comments) and some hooks to attach your functions to.
Make sure you’re in
wp-content/plugins/my-ai-content-generator/
directory.Create a new PHP file. I named it the same as the directory,
my-ai-content-generator.php
. Run the following command to create the file.Use following code for
my-ai-content-generator.php
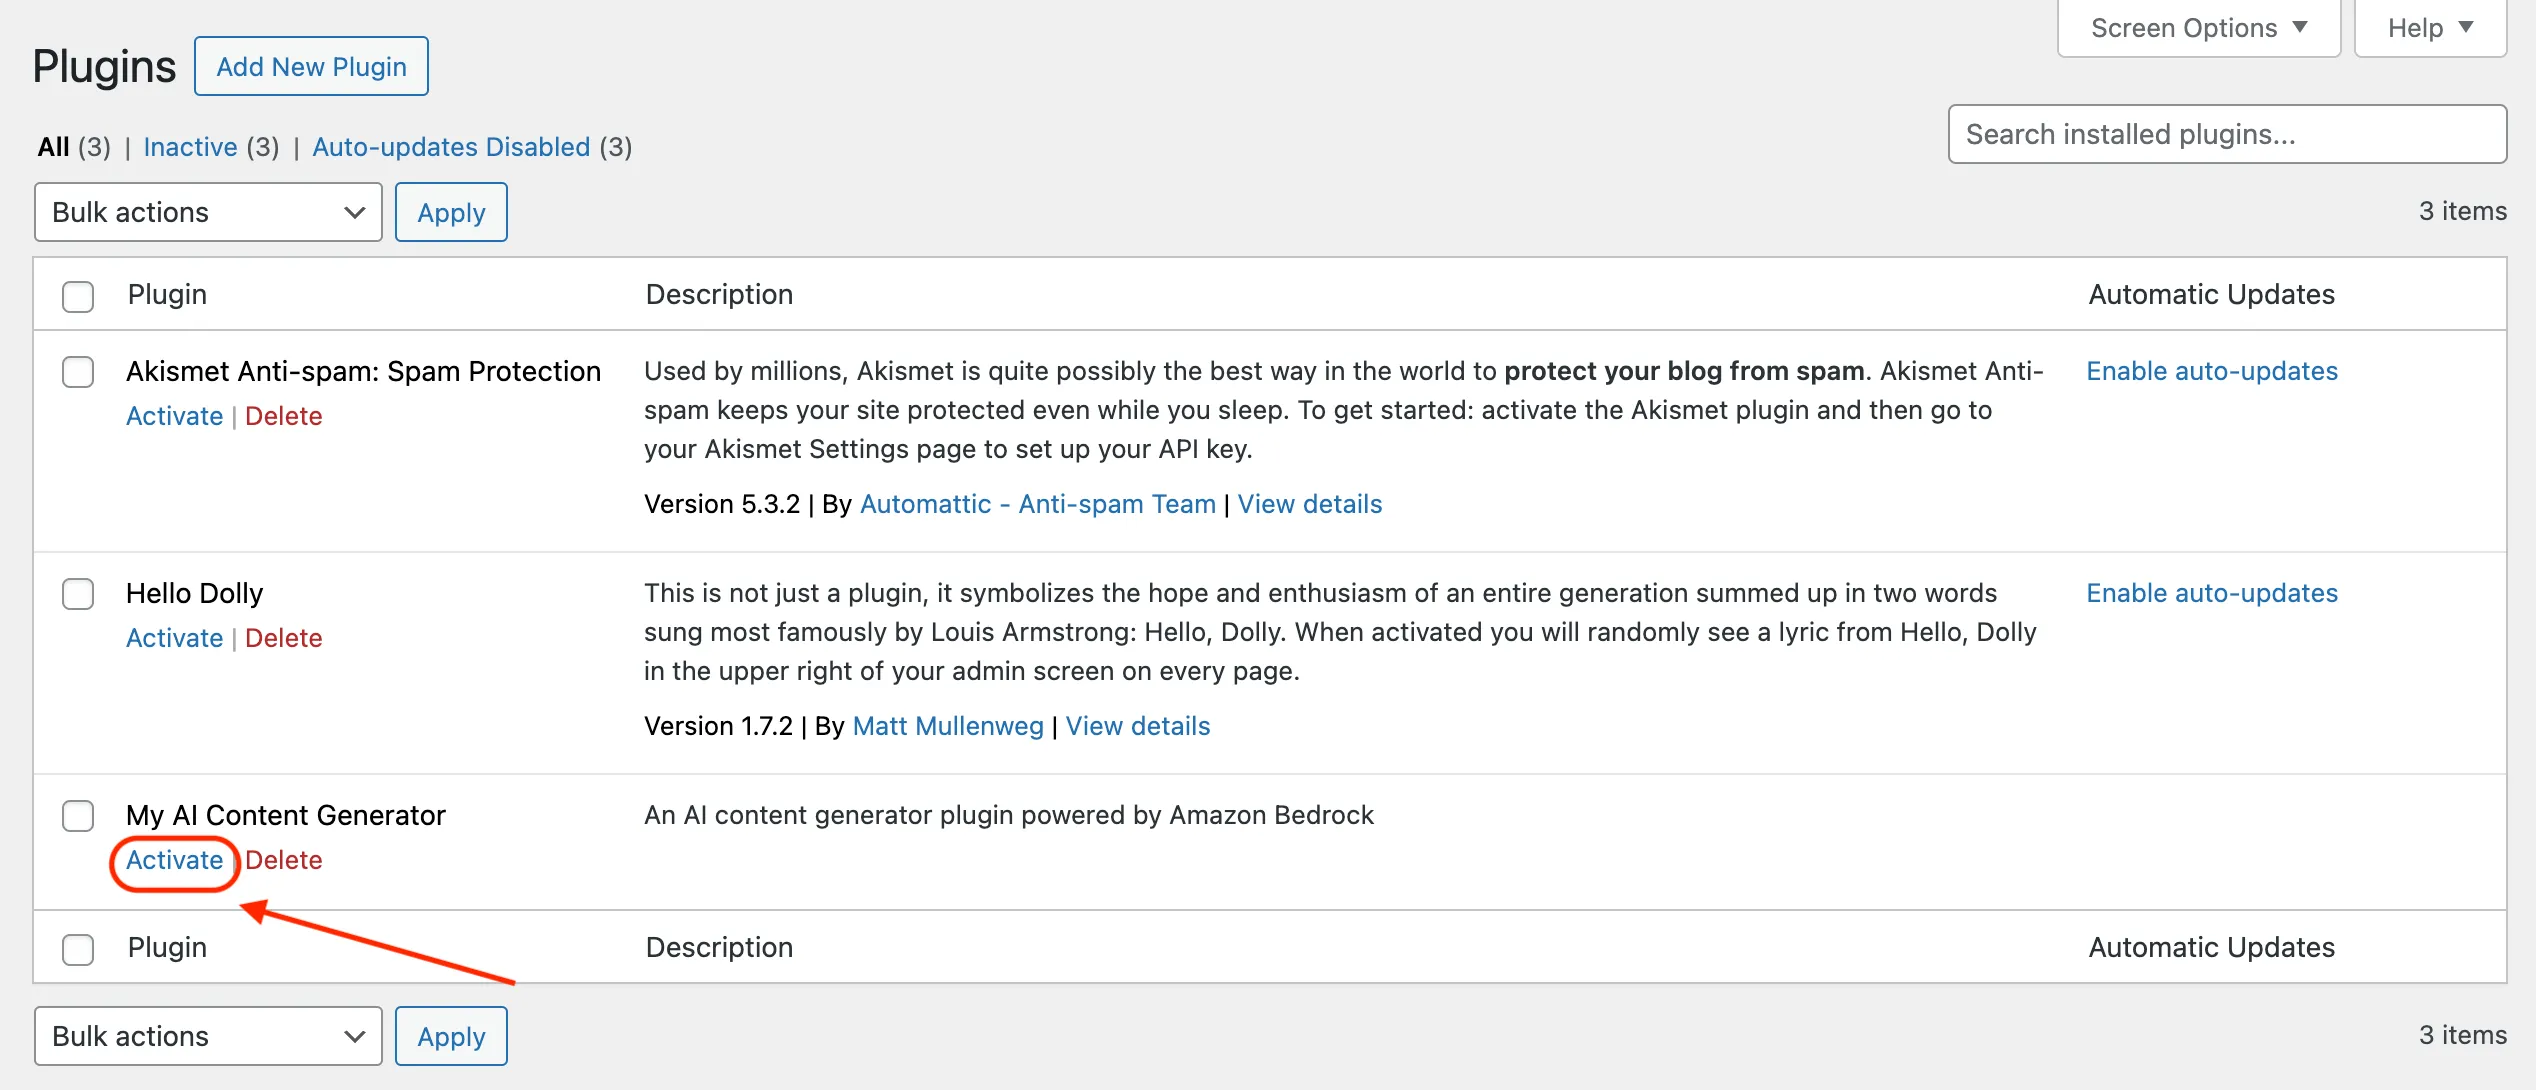
.Go to the WordPress Admin dashboard and click the Plugins page from the menu in the left side. You should see the plugin appears in the list. Now click Activate to enable the plugin.
Right now the plugin does nothing. I will gradually add functionalities to the plugin in the next sections.
To call the Amazon Bedrock API, I will use the AWS SDK for PHP v3. Install the SDK using composer. Run this command inside
my-ai-content-generator/
directory.Once finished you should see following new files and directory.
Output:
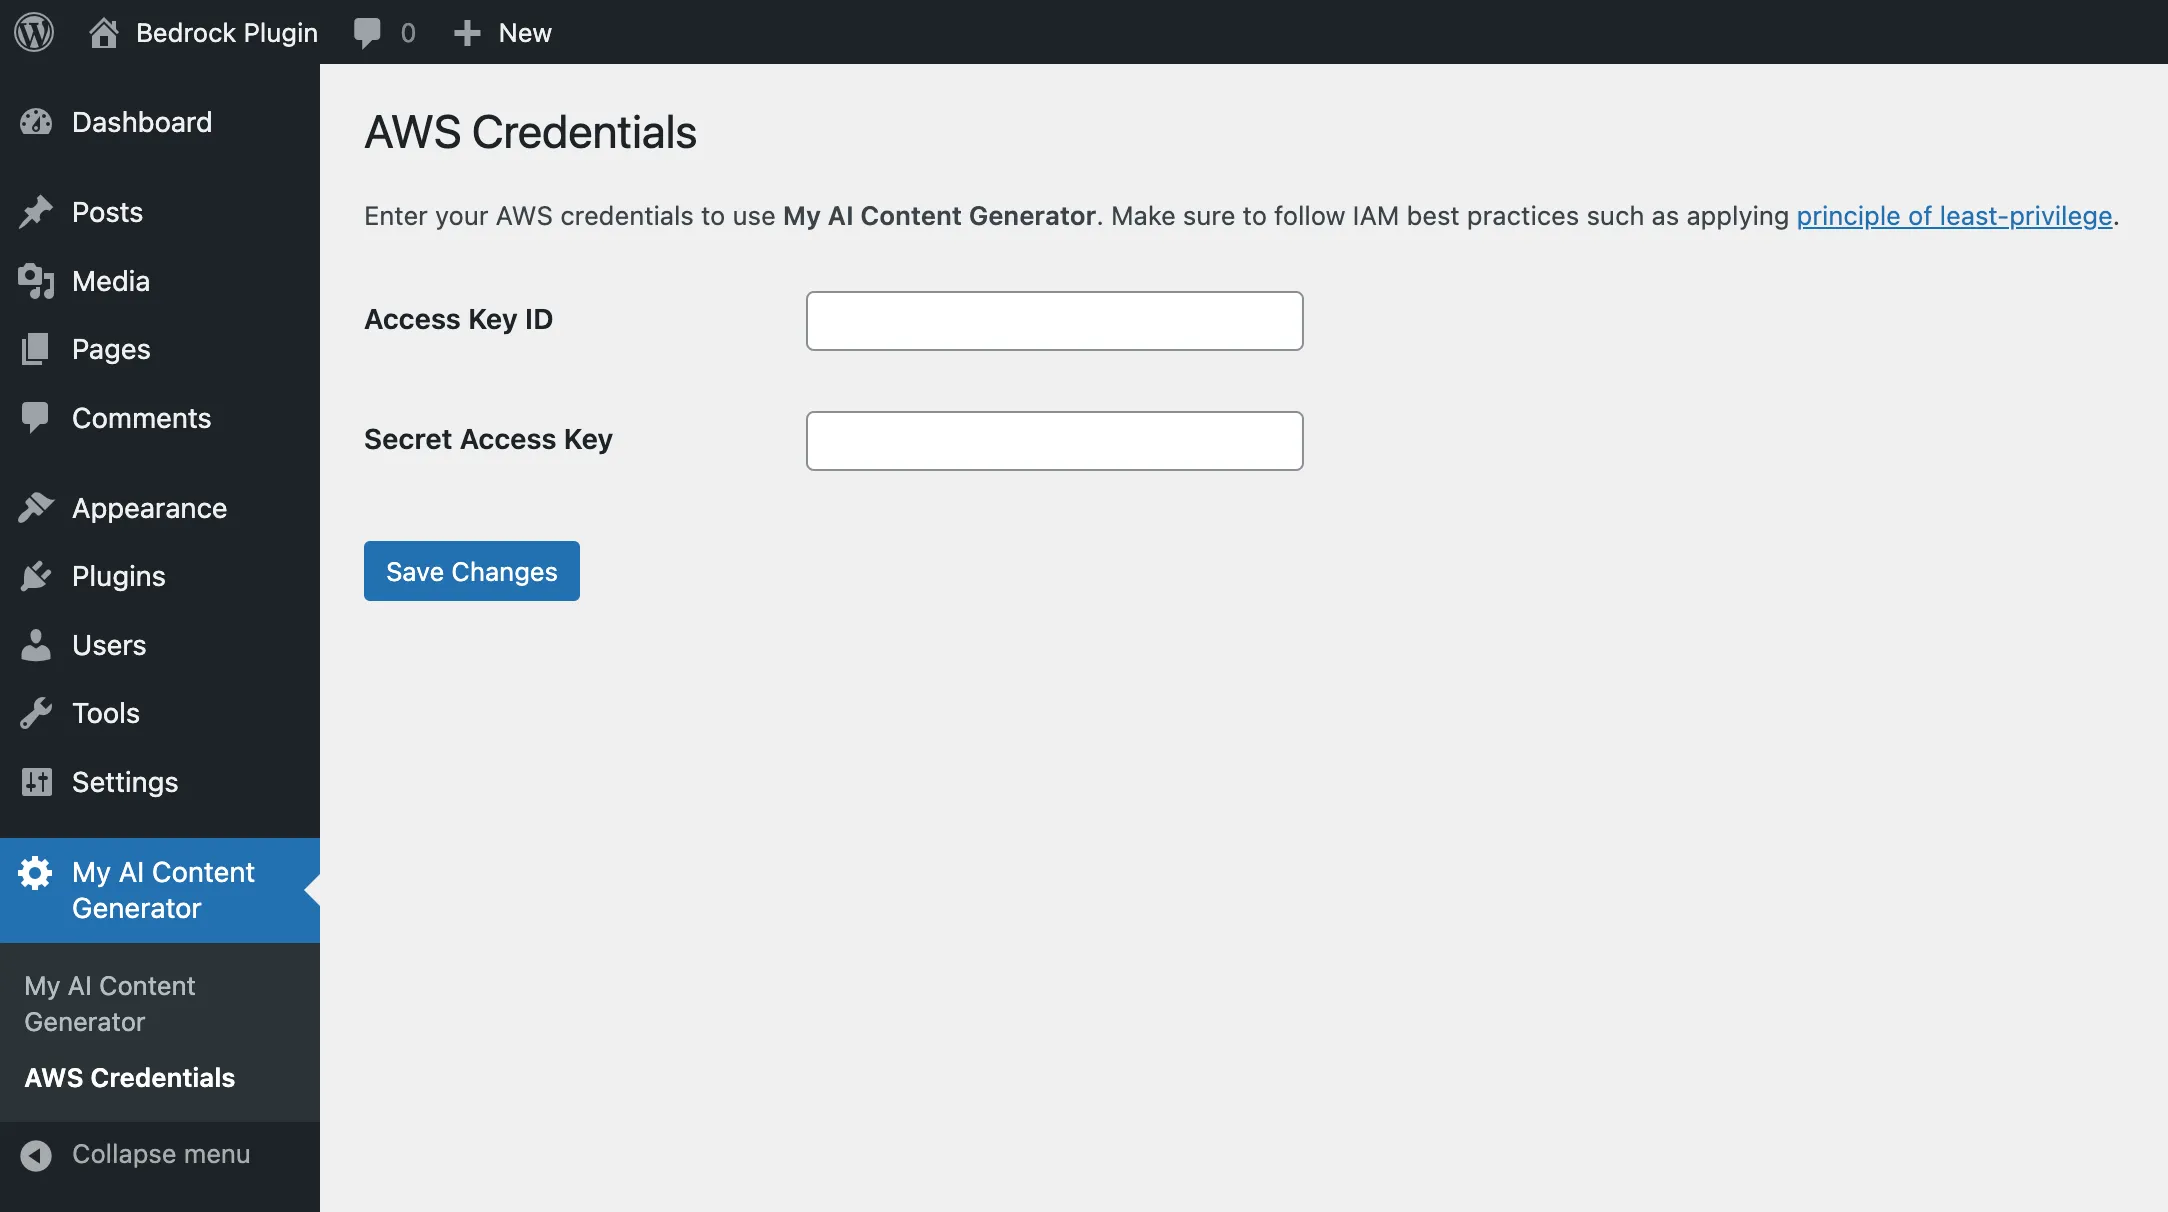
To allow the plugin to call the Amazon Bedrock API, it needs to be authenticated. This page allows the administrator to enter their AWS Access key id and Secret access key. The keys are then saved to the database.
As part of best practices, you should encrypt the AWS credentials. You could use
openssl_encrypt
function or similar. However, for the purpose of this post, I will save it as plain text to the database.Let's continue by modifying the file
my-ai-content-generator.php
as shown below.Create a new directory
views/
to store HTML pages.Create new PHP file
views/aws-credentials-page.php
for displaying AWS Credentials page.Now use the following code for the Credentials page.
By the end of the this step your
my-ai-content-generator/
directory should look like this.Output:
Reload your WordPress Admin dashboard. You should see new menu option on the left side. Click the AWS Credentials link and it will brings you to the AWS Credentials setup page. Enter the Access key and Secret key of
wp-ai-user
that you created in previous steps.Make sure you have completed the “Activate Amazon Bedrock foundation models” step before proceeding. It’s time to use the AWS SDK for PHP v3 to call the Amazon Bedrock API. Here’s how to do it.
You may be wondering why there are two similar classes to call Bedrock’s API. The first one
BedrockClient
is used to manage the foundation models e.g list available foundation models. The other, BedrockRuntimeClient
is used to run inference API to the model.To get all the foundation models, you need to call the
listFoundationModels()
method.Now let’s modify file
my-ai-content-generator.php
to provide authors the ability to select models which are going to be displayed when creating a post. Replace all the contents of my-ai-content-generator.php
with the one below.If you pay attention closely on
my_ai_get_foundation_models()
function, it caches the result for 1 day. This is to improves the performance of the page, so it does not need to call listFoundationModels()
API each time the page is loaded.Next is to create a view file for displaying selection of foundation models. I will name this file
views/foundation-models-page.php
.Use following code for the newly created file.
At this stage you should have working AWS Credentials and Foundation Models Selection pages. Now
my-ai-content-generator/
directory should like this:Output:
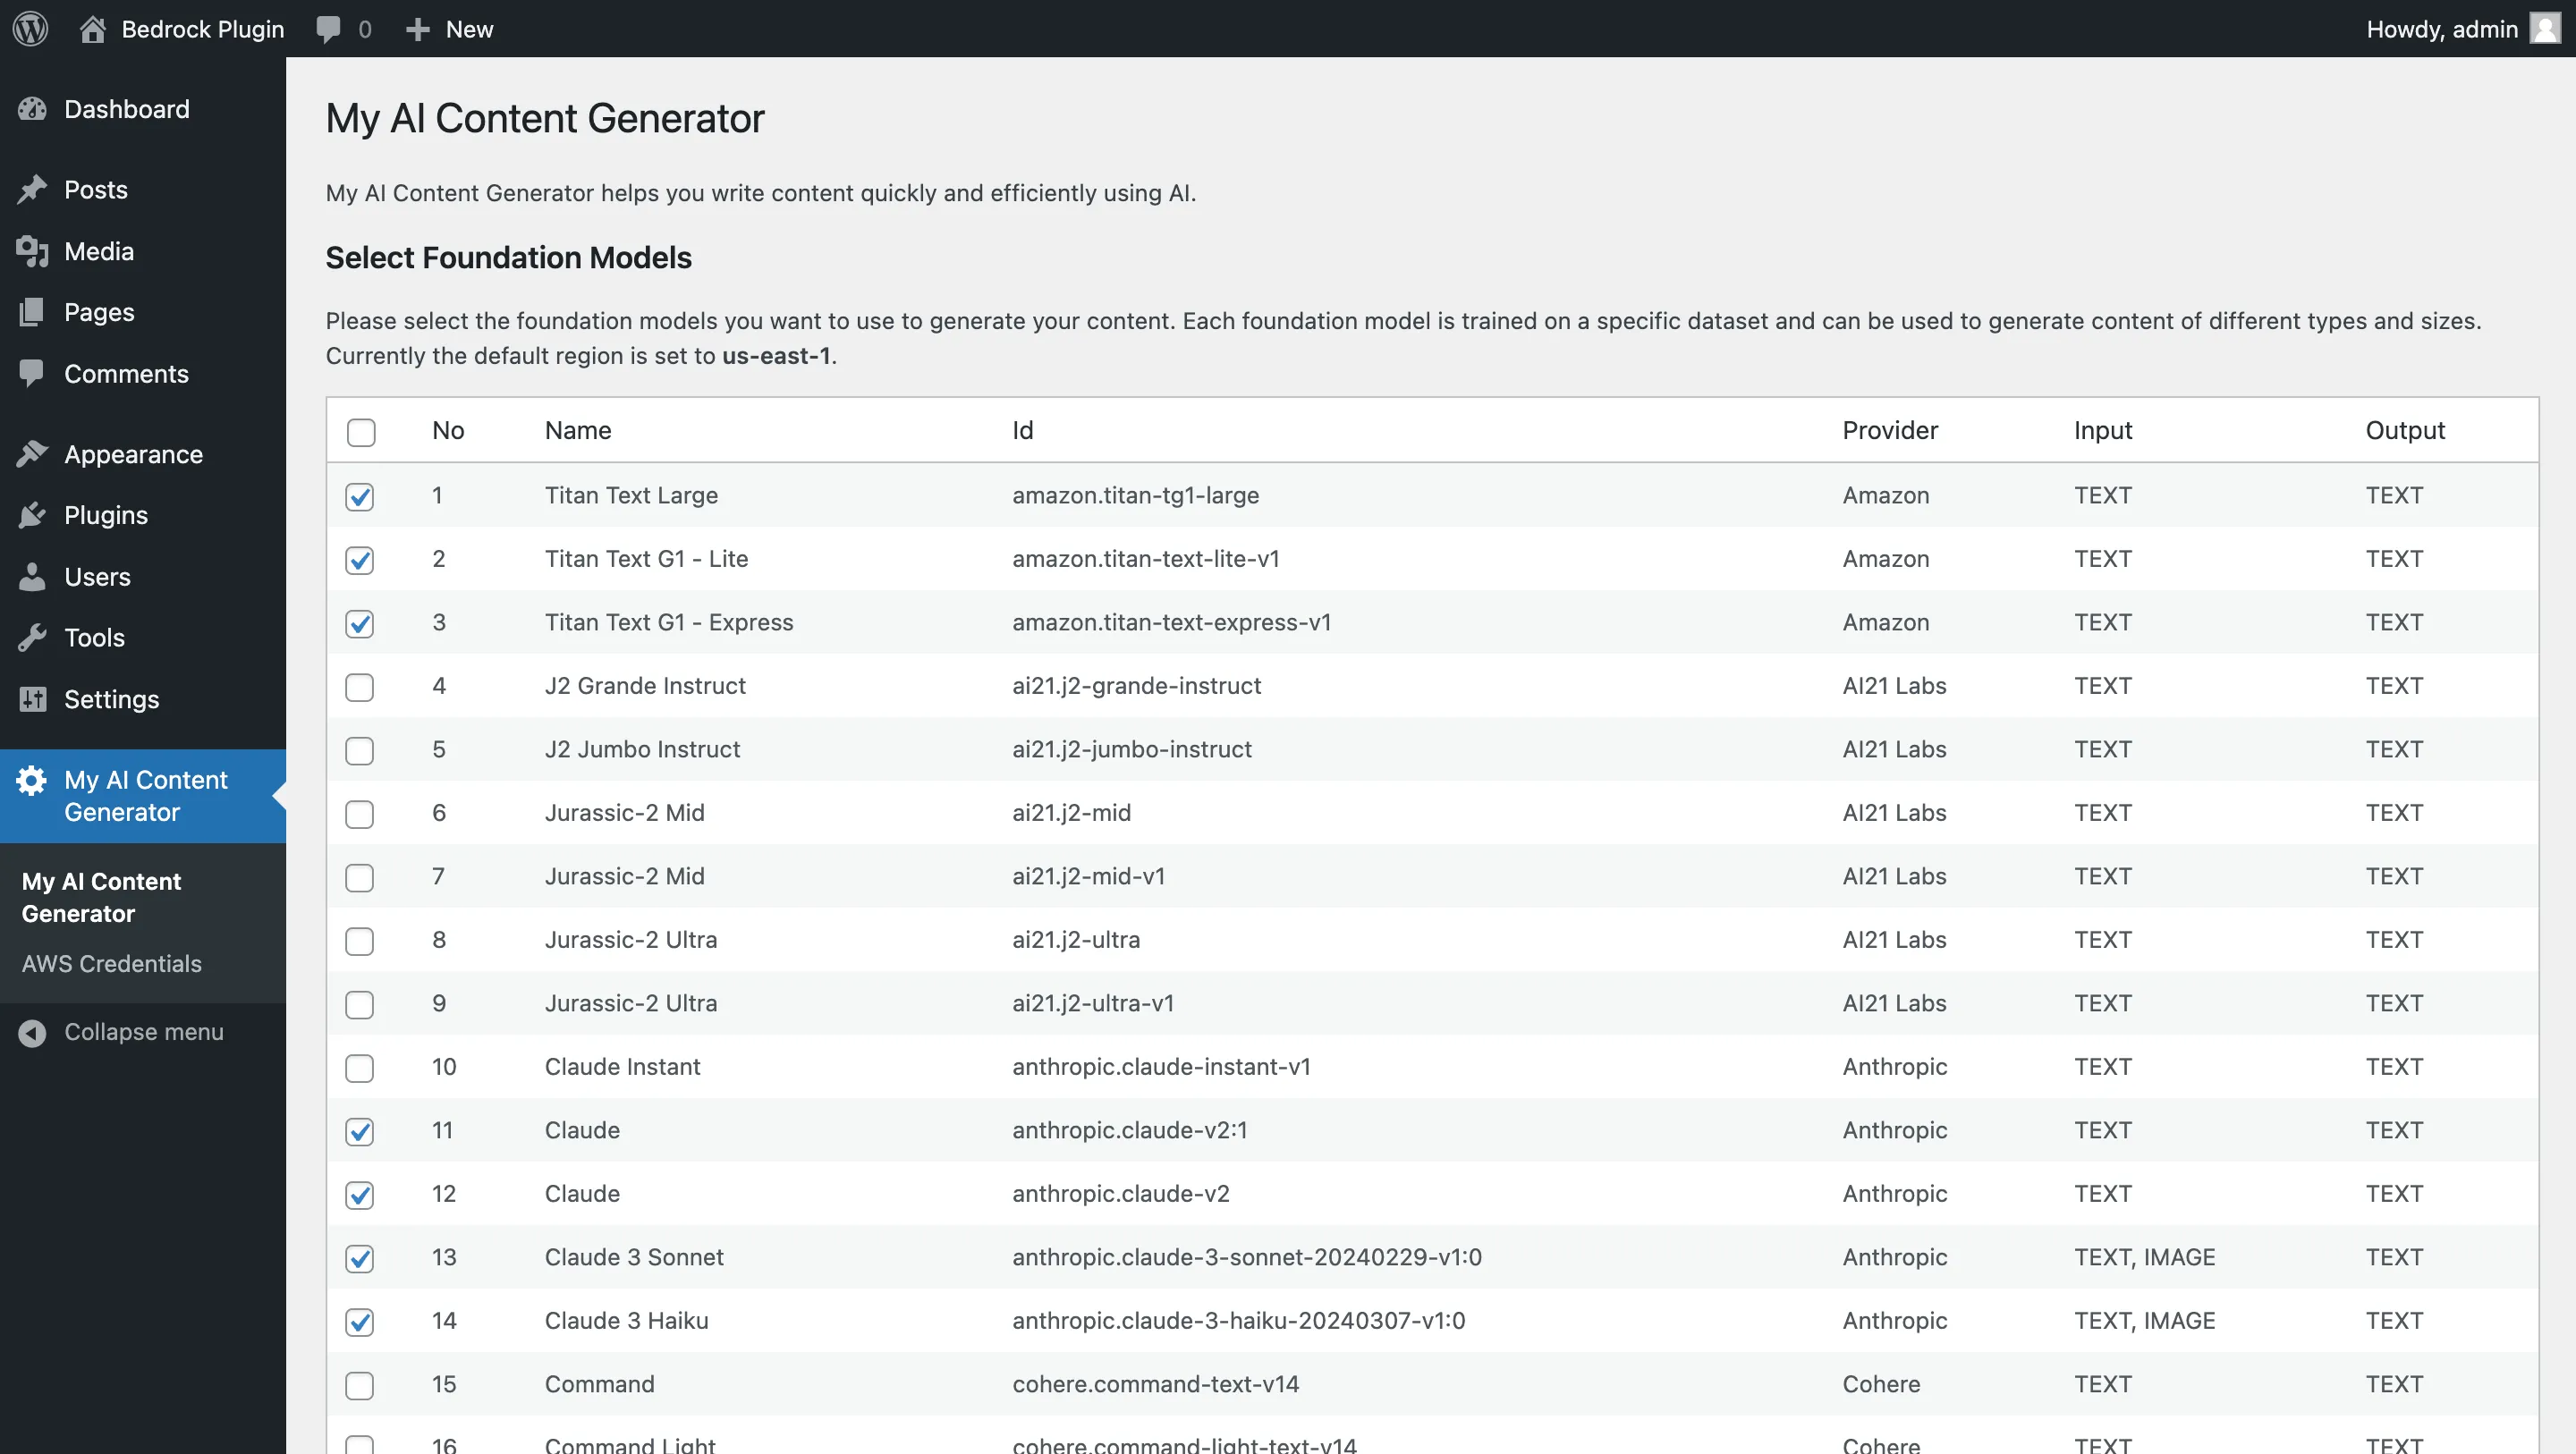
Reload your WordPress Admin dashboard and click My AI Content Generator from the left side of the menu. You should see the Foundation Models Selection page. Models that have been selected on this page by the administrator will be displayed as a list in the sidebar of the WordPress block editor. Here is the screenshot of the Foundation Models Selection page.
This REST API endpoint will be called by the content generator from the sidebar. This is where you will run inference to the Amazon Bedrock service for the selected model. Behind the scenes it calls the InvokeModel API.
To run the inference using AWS SDK for PHP you need to call
invokeModel()
method from BedrockRuntimeClient object.Here is an example how to run inference for the Mistral 7B Instruct model from Mistral AI.
The challenge is that each model has a different set of parameters and response. Take the model from Mistral AI as an example: the prompt needs to be wrapped inside
<s>[INST]Your prompt[/INST]
. So, creating a function to abstract the invoke and response retrieval would be a good move. Following are some functions to abstract those tasks:To make it easy for client side Javascript to parse the response, I add “application prompt” to instruct the model to wrap the response inside specified tags. The application prompt:
To register new WordPress REST API endpoints you need to hook into
rest_api_init
and call the register_rest_route()
function. Here’s an example:I will use
/my-ai-content-generator/v1/contents
as my REST endpoint to generate the AI content. The full endpoint with the hostname should look like this:If you activate pretty URLs in your WordPress configuration then you can also access the endpoint via:
This REST API can only be accessed by user who has edit_posts permissions. Now let’s create the REST API endpoint. Create a new file
my-ai-rest-api.php
under my-ai-content-generator/
directory.Copy and paste the following code to your text editor.
Modify the main plugin file
my-ai-content-generator.php
to include my-ai-rest-api.php
. Put following code at the end of my-ai-content-generator.php
.Now
my-ai-content-generator/
should like the following:Output:
The content generator sidebar allows authors to generate content using the AI model of their choice. Authors are able to tune the inference parameters such as temperature, Top P, Top K, and maximum tokens for the output. This sidebar will be displayed when authors edit a post or a page.
To hook into Gutenberg (the default editor for WordPress) you need to create a React element. As I promised earlier no need to worry. I will not using neither any build steps like webpack nor JSX. WordPress exposes React in the global context
window.React
so you can access this object anywhere in your Javascript code.WordPress itself creates a Javascript object in
window.wp
which holds many client side functionalities. In this case I am interested in window.wp.plugins
and the method registerPlugin()
. It allows registering the content generator sidebar. Here is an example:The sidebar that holds model selection and its parameters will appear at the right side of the block editor when editing a post or a page. To hook into the sidebar block editor, a custom React element
PluginSidebar
is used.To call the AI content generator REST endpoint
/my-ai-content-generator/v1/contents
, I will use the fetch()
API. Fetch API should be available in most modern browsers both on mobile and desktop. I am using standard form data content type application/x-www-form-urlencoded
for the POST body.One of the most important thing to do when calling a WordPress REST endpoint is to include the nonce in the request via query string, body or HTTP header. You can get the nonce by accessing global object
wpApiSettings
provided by WordPress before making the request:After receiving the content from the API you need to dispatch it to the editor. To update Gutenberg contents I will use two Block Editor data modules:
core/block-editor
for updating the contents and core/editor
for updating title and the excerpt.Create a new Javascript file
my-ai-sidebar.js
in my-ai-content-generator/js/
directory.Use the following code for
my-ai-sidebar.js
.Now I need to load this script when an author edits a post or a page. To do so I need to hook into WordPress
enqueue_block_editor_assets
. Modify my-ai-content-generator.php
and add following code at the end of the file.At this stage your
my-ai-content-generator
directory should look like following:Output:
Let’s see our plugin in action. Create a new blog post by clicking Post then Add New Post. It will open the WordPress default editor, Gutenberg. Take a look at the top right corner on your screen you should see a small pencil icon. See following image.
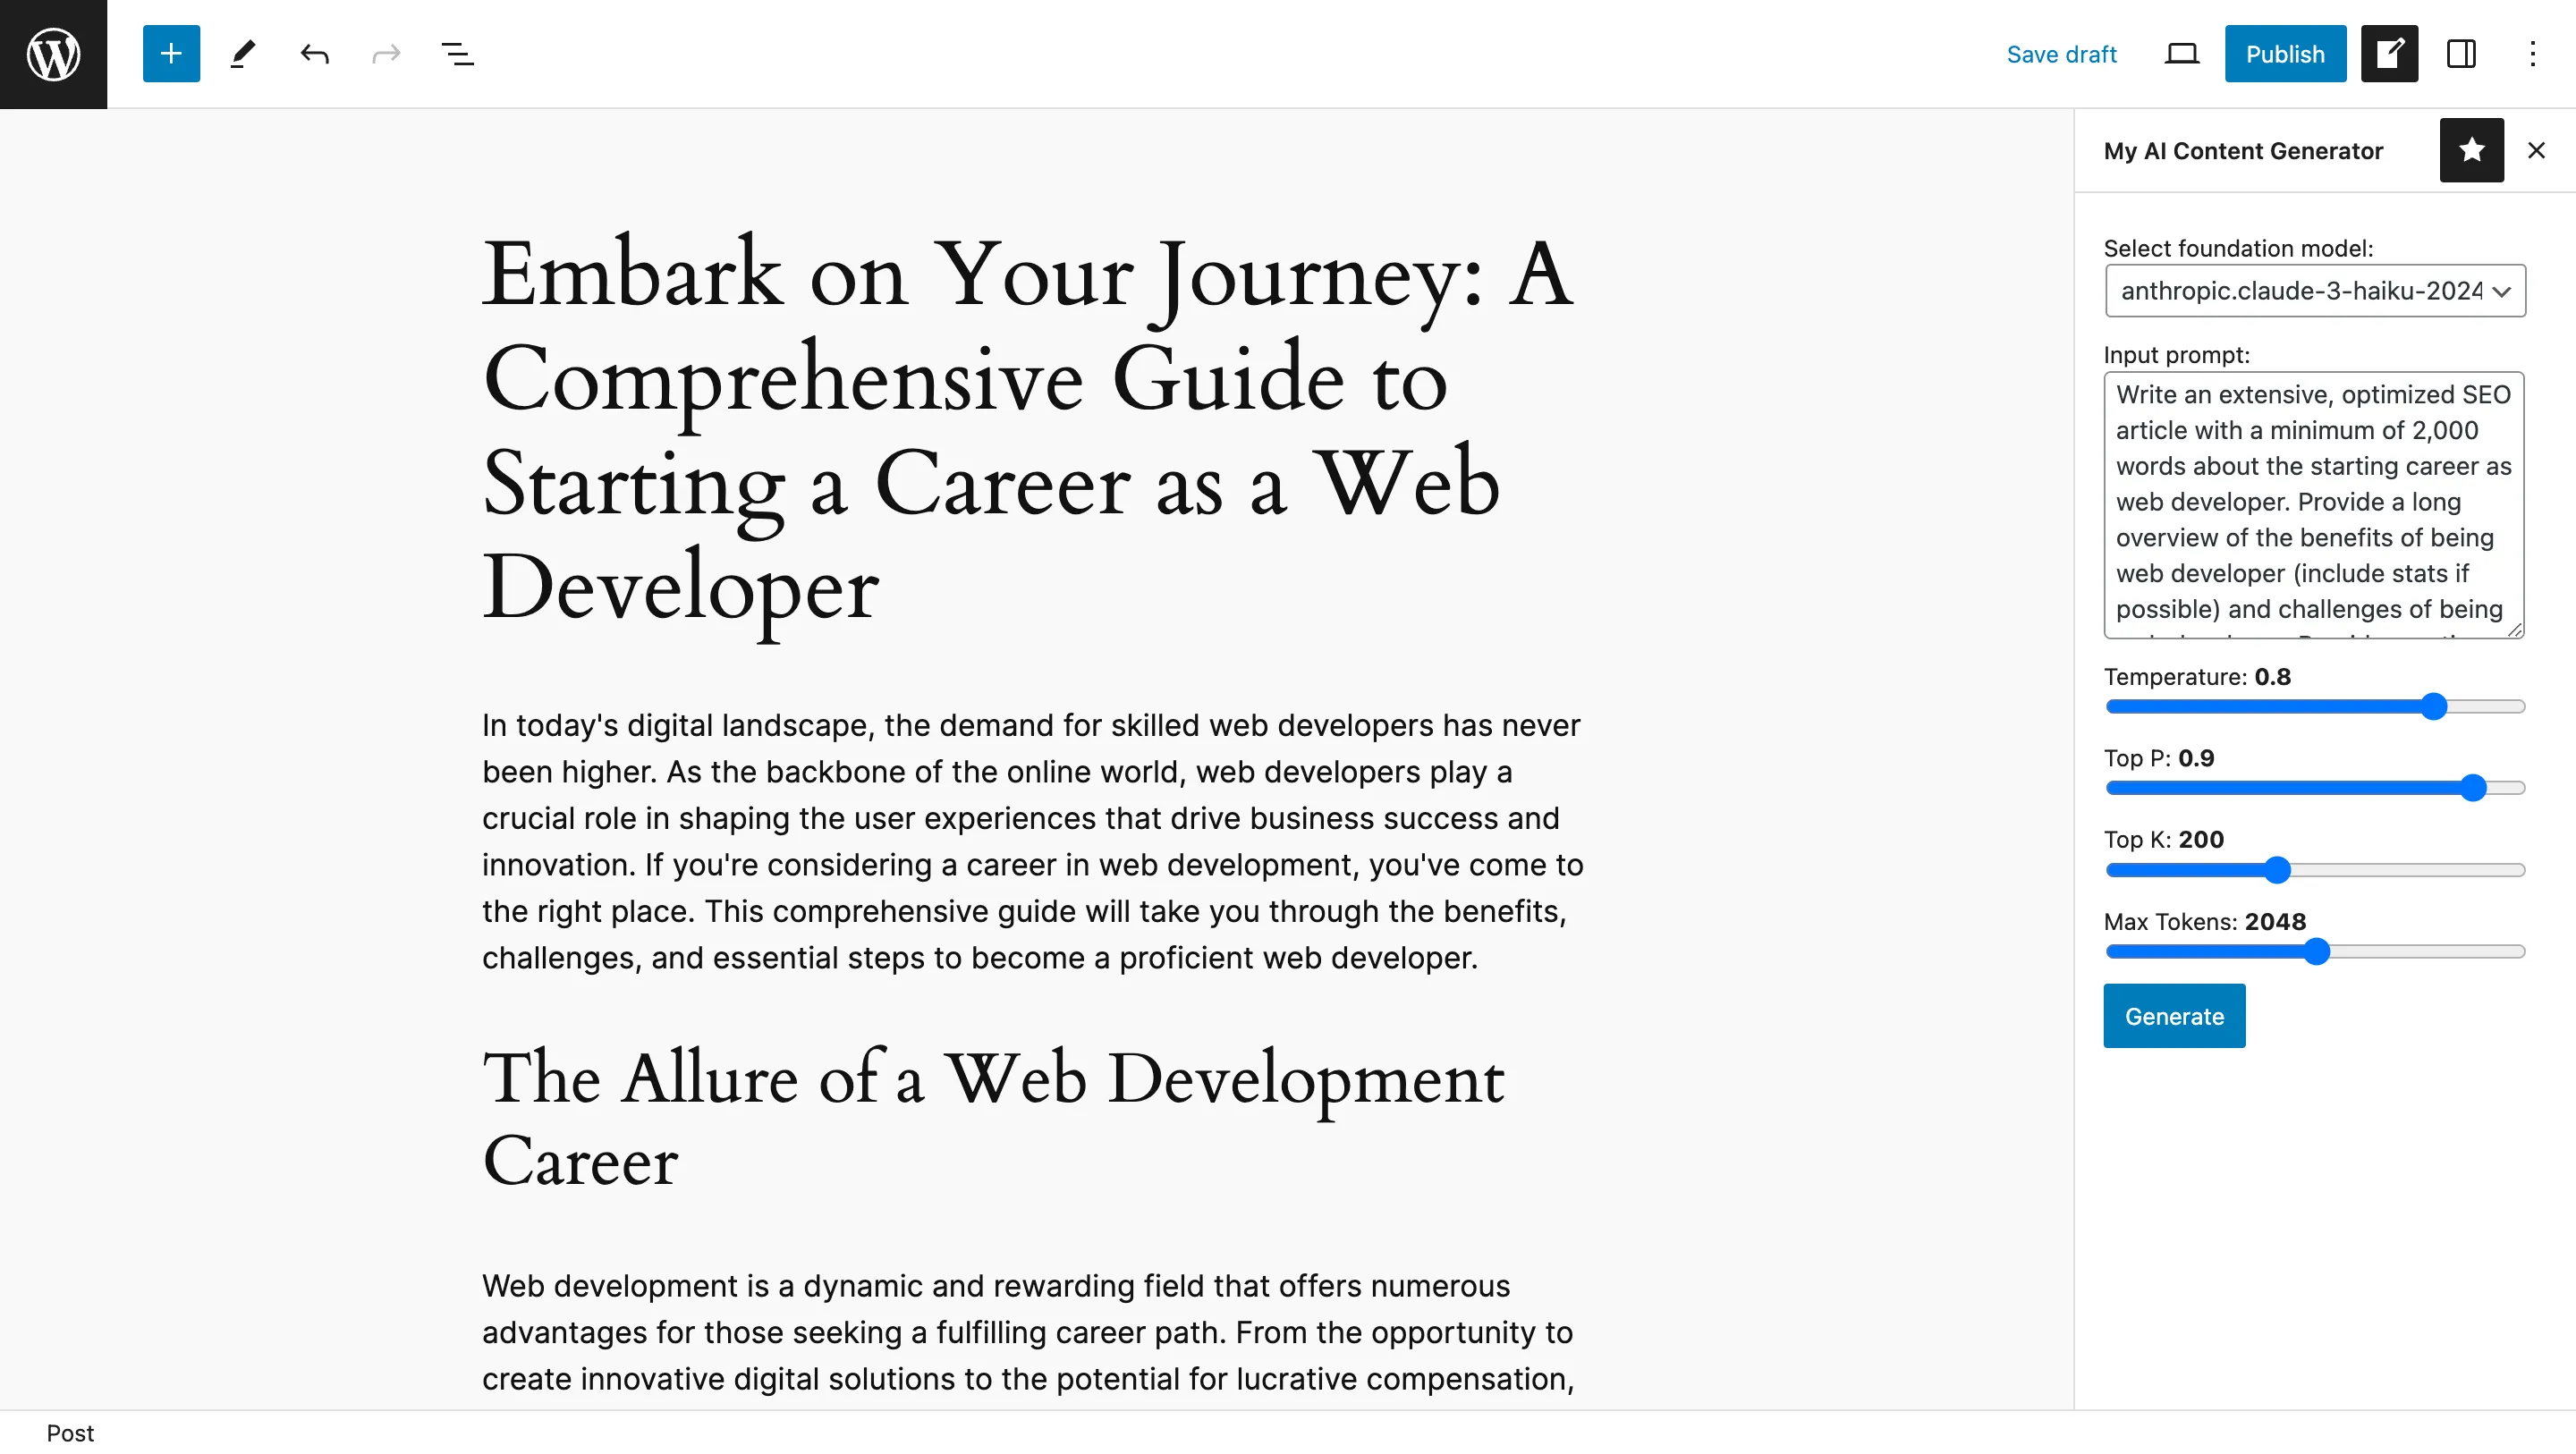
Click the icon and it will display My AI Content Generator sidebar. To start generating an article from AI, here are the steps:
- Select the model, e.g
anthropic.claude-3-haiku-[version]
- Enter your input prompt, e.g “Write an extensive, optimized SEO article with a minimum of 2,000 words about starting a career as a web developer. Provide a long overview of the benefits of being a web developer (include stats if possible) and the challenges of being a web developer. Provide pro-tips on how to become a web developer and which programming language to choose as a beginner.”
- Set the temperature to 0.8, Top P to 0.9, Top K to 200 and Max tokens to 2048
- Click Generate
Wait for couple of moments and the editor will be automatically filled by the AI generated content. Nice! The plugin works as expected. You may try playing around with the parameters or try another model like
mistral.mistral-large-[version]
and click Generate button. You should have a different result each time.There are a few things could be improved from the plugin:
Stream the response. Currently the content from the API is returned as single response. To make it more interactive and add an “instantaneous” feel, you could stream the response. On Amazon Bedrock you can use InvokeModelWithResponseStream API.
Generate image. It would be great if the plugin was able to provide the author with an automatically generated featured image. The featured image could be based on the article summary or different input prompt for the image. You could use SDXL 1.0 model from Stability AI or Titan Image Generator model from Amazon.
AWS Credentials. The value of secret key that stored in the database should be encrypted. In this post I save it as a plain text. This may raise a concern if your database is compromised.
With Amazon Bedrock, you will be charged for model inference and customization. There are two pricing plans for inference: On-Demand and Provisioned Throughput. In this post I use On-Demand. For inference you will be charged input tokens and output tokens. The price is vary between models and region.
As an example, Claude 3 Haiku model in US East (N. Virginia) region cost $0.00025 per 1,000 input tokens and $0.00125 per 1,000 output tokens. In this case the prompt that plugin sent are considered input tokens. The generated content that you received from the model are output tokens.
Keep in mind that, at the time of this writing, only Amazon Titan family models can be paid with AWS credits. Standard AWS credits cannot be used for 3rd party model providers currently.
You can read more on Amazon Bedrock pricing documentation.
You may clean up resources created in this post using AWS Management Console or via AWS CLI for the following resources:
- IAM user
wp-ai-user
- Deactivate Amazon Bedrock foundation models you don't need
In this post, you learn how to build WordPress plugin from scratch to generate content from AI. The content generation are powered by Amazon Bedrock. To integrate with Amazon Bedrock I use AWS SDK for PHP v3. This post demonstrate that you can use PHP to build a generative AI application.
If you have any feedbacks or questions, drop your comment below.
Any opinions in this post are those of the individual author and may not reflect the opinions of AWS.