Build a UGC Live Streaming App with Amazon IVS: Low Latency Broadcasting from a Browser (Lesson 3.3)
Welcome to Lesson 3.3 in this series where we're looking at building a web based user-generated content live streaming application with Amazon IVS. This entire series is available in video format on the AWS Developers YouTube channel and all of the code related to the sample application used in this series can be viewed on GitHub. Refer to the links at the end of the post for more information.
Todd Sharp
Amazon Employee
Published Dec 14, 2023
In the last lesson, we learned how to obtain permission to access a user's web camera and microphone, list available devices, and create a media stream from those devices. In this lesson, we'll learn how to StreamCat provides low-latency live stream broadcast in a web browser with the Amazon IVS Web Broadcast SDK.
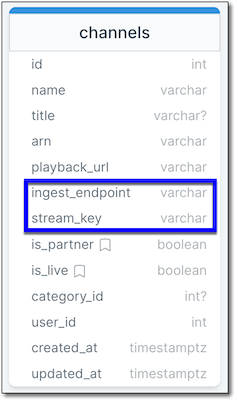
To start a low-latency live stream, we'll need the Amazon IVS channel's
ingestEndpoint and streamKey. If you recall from lesson 1.5, these values are stored in the Channel object for each user.
The first thing we'll need to do to get ready to broadcast is to retrieve these values for the user's channel. The
getChannel() function is used to fetch the user's channel configuration via the backend API.In the
/dashboard/api/channel endpoint's handler, we retrieve the channel from the current logged-in user.This ensures that we have the
ingestEndpoint and streamKey available to configure the broadcast client.To broadcast a low-latency live stream from a browser, StreamCat uses the Amazon IVS Web Broadcast SDK. The full documentation for this SDK is available on GitHub, and we'll walk through how StreamCat uses the SDK to create a low-latency streaming experience. You can install the SDK directly with NPM (see the 'Getting Started' section of the documentation) or by including the SDK via a
<script> tag (which is how StreamCat includes the SDK):💡 Note: Be sure to check for the latest SDK version when building your application!
Now that the SDK and channel information are available, we can create an instance of the
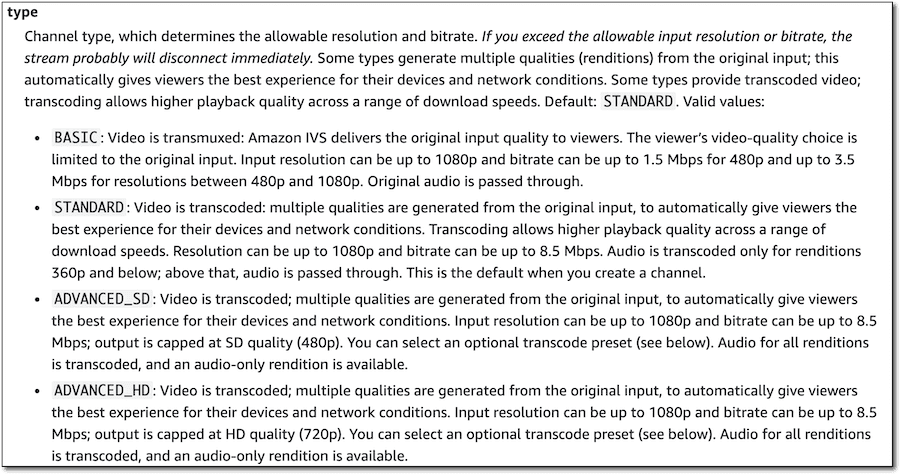
AmazonIVSBroadcastClient. Before we create an instance of the client, we need to understand the difference between various Amazon IVS channel types.

By default, StreamCat sets each channel to a
BASIC channel type. To give users an incentive to grow their channel and broadcast on a consistent basis, StreamCat will upgrade a channel to 'partner' status and set the channel type to ADVANCED_HD with a preset of HIGHER_BANDWIDTH_DELIVERY when the channel achieves more than 5 followers. To create an instance of the broadcast client, we need to determine the appropriate stream configuration. If a channel is a 'partner' channel, we'll use
STANDARD_LANDSCAPE, else we'll use BASIC_FULL_HD_LANDSCAPE. This configuration is passed to the create() method, along with the channel's ingestEndpoint. The client allows us to listen to various events, including a
CONNECTION_STATE_CHANGE event that lets us update a boolean isBroadcasting variable that is used to update the broadcast status on the client side.Your application may have different requirements related to the stream configuration. Refer to the documentation for the broadcast client to learn about all of the available pre-set configurations.
We can present a local preview of the broadcast by adding a
<canvas> to the frontend.And use the
attachPreview() method on the broadcastClient instance.In the previous lesson (3.2) we saw that StreamCat listens for changes on the
selected[Audio/Video]deviceId variable, and creates the appropriate media stream. We can modify the method that watches those changes to add the media stream to the broadcastClient via addVideoInputDevice() or addAudioInputDevice(). For example, to add a video stream to the broadcast:💡 Note: AlpineJS wraps model variables in aProxy, which means sometimes we must useAlpine.raw()to retrieve the underlying object to avoid errors such as in the function above.
Notice that we first must remove any existing streams before adding the new stream. The call to
addVideoInputDevice() accepts a MediaStream as the first argument, a unique name for the stream as the second argument, and a VideoComposition as the third argument. This video composition object contains an index (similar to z-index in CSS), height, width, x, and y. In our case, we pass this.currentVideoComposition, which defaults to the defaultVideoComposition object.We'll see more about how
VideoComposition can be used to layer and position cameras and other media streams in subsequent lessons.Now that we have a
broadcastClient, a preview on the frontend, and have added audio and video streams to the client, we're ready to start and stop the low-latency live stream. For this, we call the startBroadcast() and stopBroadcast() methods, depending on whether or not the stream is currently broadcasting. Note that startBroadcast() requires the channel's streamKey to determine which channel the broadcast belongs to.In this lesson, we looked at how to use the Amazon IVS Web Broadcast SDK to broadcast a low-latency live stream to an Amazon IVS channel. In the next lesson, we'll see how to add screensharing to a broadcast.
Any opinions in this post are those of the individual author and may not reflect the opinions of AWS.
