Build a Karaoke App with Interactive Audio Effects using the Switchboard SDK and Amazon IVS
Add interactive audio effects to your Amazon IVS live streams with this step by step guide
Part 1 - Creating a real-time streaming app with Amazon IVS and the Switchboard SDK
Overview of the Android Audio APIs
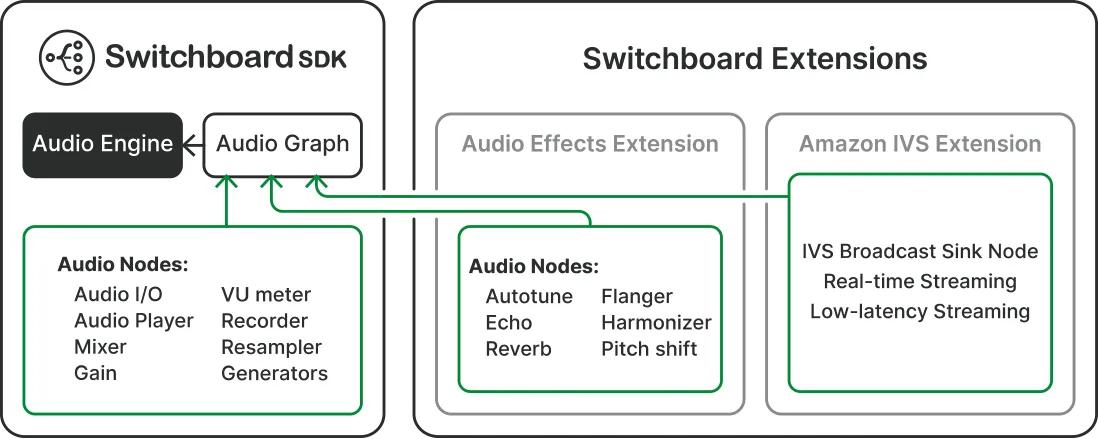
Switchboard SDK building blocks
Adding Switchboard SDK and Amazon IVS to your Android Project
Creating a Karaoke App with Amazon IVS and SwitchboardSDK
Part 2 - Importing Audio Effects through Switchboard Extensions
Loading and applying voice changing effects
- How to create a real-time streaming experience with Amazon IVS
- How to integrate the Switchboard SDK Extensions into your application
- How to test and apply voice changing effects from Switchboard SDK
- How to live stream your new voice to an audience using Amazon IVS
- Part 1 - Creating a real-time streaming app with Amazon IVS and SwitchboardSDK
- Part 2 - Importing and applying voice changing effects
- Part 3 - Testing your new found voice


AudioTrack and AudioRecord. AudioTrack is used for playing back audio data. It's part of the Android multimedia framework and allows developers to play audio data from various sources, including memory or a file. AudioRecord is the counterpart of AudioTrack for recording audio, it's typically used in applications that need to capture audio input from the device's microphone.
- AudioGraphInputNode: The input node of the audio graph.
- AudioPlayerNode: A node that reads in and plays an audio file.
- MixerNode / SplitterNode: A node that mixes / splits audio streams.
- GainNode: A node that changes the gain of an audio signal.
- NoiseFilterNode: A node that filters noise from the audio signal.
- IVSBroadcastSinkNode: The audio that is streamed into this node will be sent directly into the Stage (stream).
- RecorderNode: A node that records audio and saves it to a file.
- VUMeterNode: A node that analyzes the audio signal and reports its audio level.
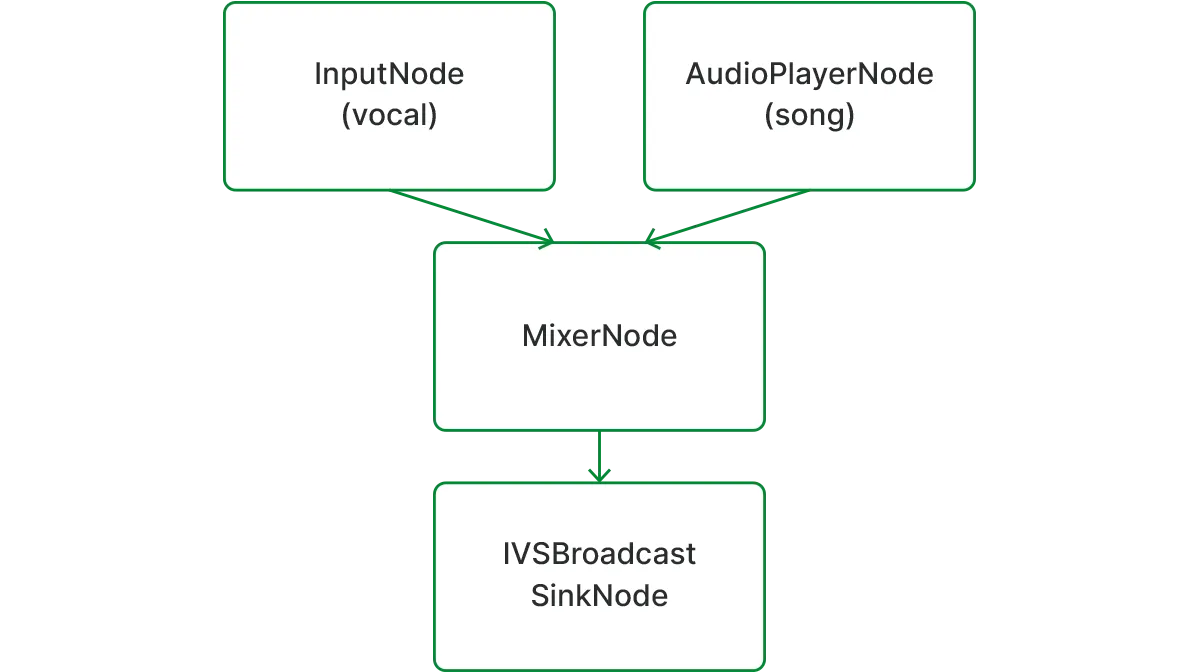
build.gradle.clientID and clientSecret values or you can use the evaluation license provided below for testing purposes.AudioPlayerNode: plays the loaded audio file.AudioGraphInputNode: provides the microphone signal.MixerNode: mixes the backing track and the microphone signal.IVSBroadcastSinkNode: audio sent into this node is published to the created Stage.

- STEP 1: declare the audio graph. The audio graph will route the audio data between the different nodes.
- STEP 2: declare the audio player node, which will handle loading the audio file, and exposes different playback controls.
- STEP 3: define the mixer node, which is responsible for combining the audio from the audio player node with the audio from input node (microphone signal)
- STEP 4: declare the
IVSBroadcastSinkNode. The audio data transmitted to this node will be published to the Stage. We will take care of the AudioDevice initialization in a later step, which is an interface for a custom audio source. - STEP 5: add the audio nodes to the audio graph.
- STEP 6: wire up the audio nodes. We connect the input node (microphone signal) and the audio player node to the mixer node, and the mixer node to the IVSBroadcastSinkNode. The mixer node mixes the two signals together and sends it to the stream. For more detailed information please visit the official documentation.
- STEP 7: define and initialize the audio engine
- Set
microphoneEnabled = true, enables the microphone - Set
performanceMode = PerformanceMode.LOW_LATENCYto achieve the lowest latency possible. - Set micInputPreset = MicInputPreset.VoicePerformance, to make sure that the capture path will minimize latency and coupling with the playback path. The capture path refers to the microphone recording process, while the playback path involves audio output through speakers or headphones. This preset optimizes both paths for synchronized and clear audio performance.
IVSBroadcastSinkNode. The IVSBroadcastSinkNode enables our application to easier route the processed audio to Amazon IVS. In order to set up the IVSBroadcastSinkNode**** we need to initialize the AudioDevice and create a Stage**** with a Stage.Strategy. Let’s have a closer look at how the IVSBroadcastSinkNode communicates with the AudioDevice. The Amazon IVS Broadcast SDK provides local devices such as built-in microphones via DeviceDiscovery**** for simple use cases, when we only need to publish the unprocessed microphone signal to the stream. createAudioInputSource**** on a DeviceDiscovery**** instance. AudioDevice returned by createAudioInputSource can receive Linear PCM data generated by any audio source through the following using the appendBuffer method. Linear PCM (Pulse-Code Modulation) data is a format for storing digital audio. IVSBroadcastSinkNode interacts with the created virtual audio device. - STEP 8: the audio data is channeled to the
IVSBroadcastSinkNodeby theAudioGraph, utilizing thewriteCaptureDatafunction. - STEP 9: the audio data is forwarded to the
AudioDevice, from where it will be broadcasted to theStage.
- STEP 10: declare an instance of the
AudioDevice. Audio input sources must conform to this interface. We will initialize it in STEP 20. - STEP 11: declare an instance of
DeviceDiscovery. We use this class to create a custom audio input source in STEP 20. - STEP 12: declare a list of
LocalStageStream. The class represents the local audio stream, and it is used inStage.Strategyto indicate to the SDK what stream to publish. - STEP 13: declare an instance of
Stage. This is the main interface to interact with the created session. - STEP 14: we define a
Stage.Strategy. The Stage.Strategy interface provides a way for the host application to communicate the desired state of the stage to the SDK. Three functions need to be implemented:shouldSubscribeToParticipant,shouldPublishFromParticipant, andstageStreamsToPublishForParticipant. - STEP 15: Choosing streams to publish. When publishing, this is used to determine what audio and video streams should be published.
- STEP 16: Publishing. Once connected to the stage, the SDK queries the host application to see if a particular participant should publish. This is invoked only on local participants that have permission to publish based on the provided token.
- STEP 17: Subscribing to Participants. When a remote participant joins the stage, the SDK queries the host application about the desired subscription state for that participant. In our application we care about the audio.
- STEP 18: create an instance of a
Stage, by passing the required parameters. The Stage class is the main point of interaction between the host application and the SDK. It represents the stage itself and is used to join and leave the stage. Creating and joining a stage requires a valid, unexpired token string from the control plane (represented as token). Please note that we also have to create a Stage using the Amazon IVS console, and generate the needed participant tokens. We can also create a participant token programmatically using the AWS SDK for JavaScript. - STEP 19: we define the sample rate of the broadcast, based on what sample rate the audio engine is running.
- STEP 20: create a custom audio input source, since we intend to generate and feed PCM audio data to the SDK manually. We pass the number of audio channels, sampling rate and sample format as parameters.
- STEP 21: create an
AudioLocalStageStreaminstance, which represents the local audio stream. - STEP 22: add the created
AudioLocalStageStreaminstance to thepublishStreams**** list.
- STEP 23: Initiate the audio graph via the audio engine. The audio engine manages device-level audio input / output and channels the audio stream through the audio graph. This should be usually called when the application is initialized.
- STEP 24: stop the audio engine.
- STEP 25: start playing the backing track.
- STEP 26: pauses the backing track.
- STEP 27: checks whether the audio player is playing.
- STEP 28: loads an audio file located in the assets folder.
- STEP 29: starts to stream the audio by joining the created stage.
- STEP 30: we stop the stream by leaving the stage.

- STEP 31: Declaring the audio effect nodes.
- STEP 32: Adding the nodes to the audio graph.
- STEP 33: Connecting the nodes in the audio graph. The audio effect nodes are processor nodes, described in section 1.3.2. These processor nodes accept audio input, apply the designated effect during processing, and then output the enhanced audio.

- STEP 34: Associate the audio effects toggle buttons with their respective effects. Pressing the button activates the effect, and pressing it again deactivates it.
Any opinions in this post are those of the individual author and may not reflect the opinions of AWS.
