Exploring Amazon Rekognition and Textract in .NET Blazor
Let's learn Amazon Rekognition and Amazon Textract in .NET Blazor
Published Feb 11, 2024
Have you ever heard about Amazon Rekognition and Amazon Textract? Please read these pages:
We will explore Amazon Rekognition, which will help us recognize images and analyze videos with machine learning (ML). Amazon Rekognition has the ML models to do their tasks, so we don't have to worry! In addition, we will explore Amazon Textract, which will help us extract printed text, handwriting, etc.
Please prepare some of these tools:
- Your favorite IDE.
- .NET SDK
- AWS Account (of course, you will need an AWS Account)
- That's all. :)
I use Visual Studio 2022 Community Edition, so feel free to use another IDE.
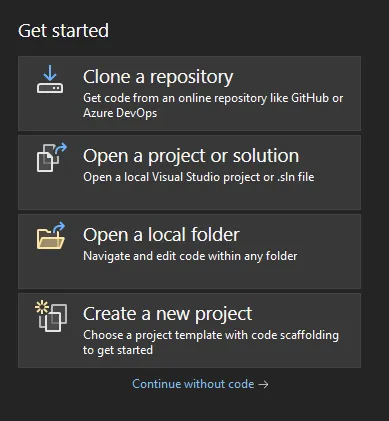
- You may click "Create a new project".

- Search "blazor" and select "Blazor Web App". Click Next.

- Feel free to give any project names and select the project directory. Click Next.

- I use the default value. Feel free to modify the options. Click Create.

You may use this command:
dotnet new blazorserver -o RekognitionTextractExploration.- Right-click on the Project and click Manage NuGet Packages...

- Click Browse, search Rekognition, click AWSSDK.Rekognition, click Install.

- Search Textract, and click AWSSDK.Textract, click Install.

You may use these commands:
dotnet add RekognitionTextractExploration package AWSSDK.Rekognitiondotnet add RekognitionTextractExploration package AWSSDK.Textract
- You can right-click on the Pages directory. You may locate the Pages directory under the Components directory. Select Add > New Item. Click on Razor Component and give any appropriate name, for example, DetectLabels. We will learn to detect labels from a picture which is a feature that Amazon Rekognition has.
- You may copy-paste this code to DetectLabels.razor.
- To add the navigation, please add these codes in NavMenu.razor. You may find the file under Components > Layout directory.
- Your NavMenu.razor will be like this.

There are three important steps. Let's check it out!
- The user will upload the file to the server. We will store the file in the temporary directory.
- We will read the file as a stream and send that to
DetectLabelsAsync. - After getting the result, we will add the detected labels to the
resultsvariable.
- Create a new Blazor Page for exploring Amazon Textract, for example, Textract.razor.
- You may copy-paste these codes.
- To add the navigation, please add these codes in NavMenu.razor.
There are three important steps. Let's check it out!
- The user will upload the file to the server. We will store the file in the temporary directory.
- We will read the file as a stream and send that to
DetectDocumentTextAsync. - After getting the result, we will add the detected texts to the
resultsvariable.
Those features are cool, right? I only share a feature from each service, you may explore other features as well. If you have any feedback, feel free to share it with me. Please take a look at my repository here.

