Live Streaming from Unity - Broadcasting a Game in Real-Time (Part 2)
In this post, we'll learn the basics - getting started with an Amazon IVS real-time stage, and broadcasting game play to that stage from a Unity game.
Todd Sharp
Amazon Employee
Published Feb 12, 2024
In this post, we'll see how to broadcast a game created in Unity directly to a real-time live stream powered by Amazon Interactive Video Service (Amazon IVS). This post will be a little longer than the rest in this series, since we'll cover some topics that will be reused in future posts like creating an Amazon IVS stage, and generating the tokens necessary to broadcast to that stage.
For this post, we're going to utilize the 'Karting Microgame' that is available as a learning template in Unity Hub.
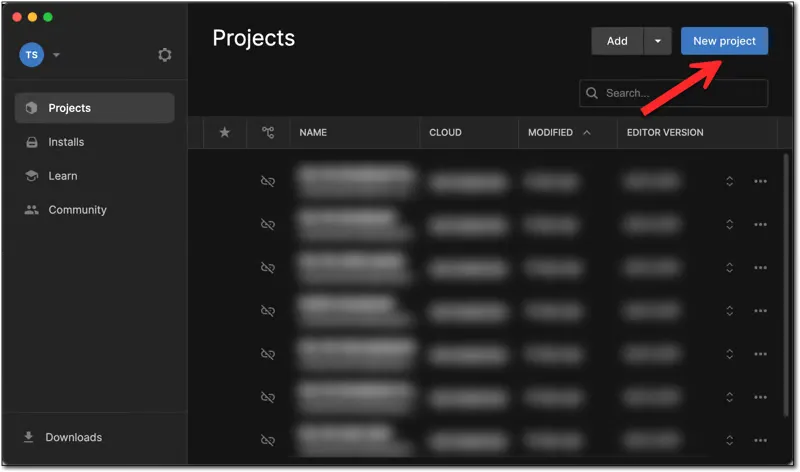
From Unity Hub, click on 'New project'.
Click on 'Learning' in the left sidebar, choose 'Karting Microgame', name your project
ivs-rtx-broadcast-demo and click 'Create project'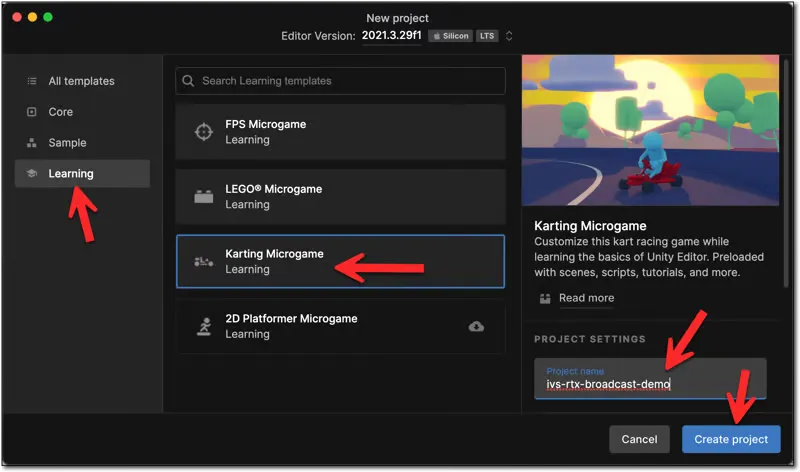
Broadcasting to (and playback from) an Amazon IVS stage utilizes WebRTC. Luckily, there's an excellent Unity WebRTC package that we can use for this and since Amazon IVS now supports the WHIP protocol, we can take advantage of that support to broadcast directly from our game.
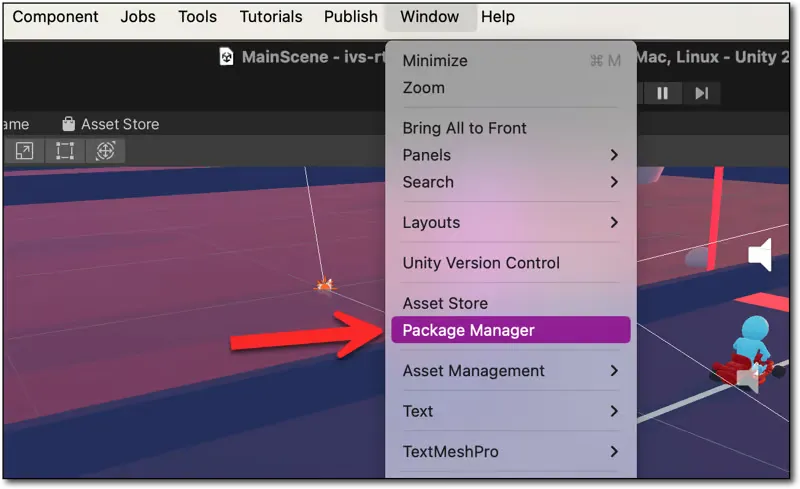
To install the WebRTC package for our Karting demo, go to Window -> Package Manager.
Within the Package Manager dialog, select 'Add package from git URL'.
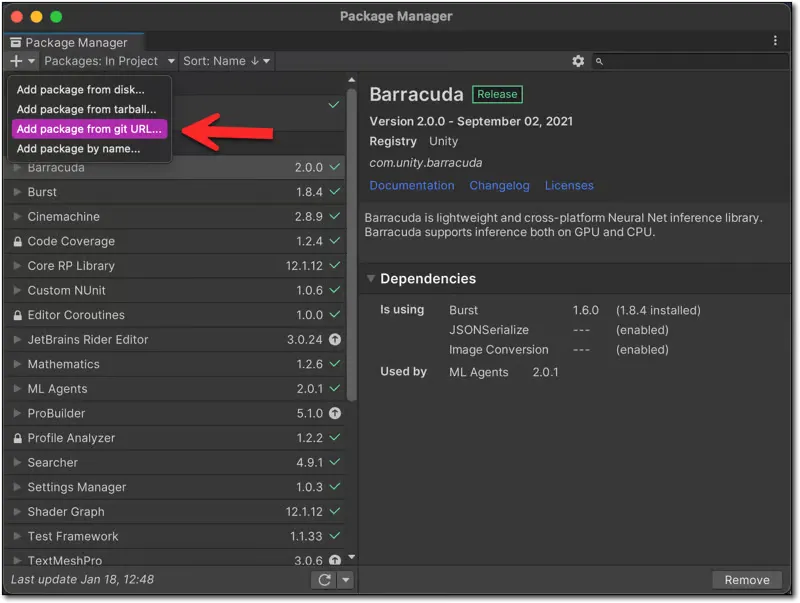
Enter
com.unity.webrtc@3.0.0-pre.7 as the Git URL, and click 'Add'.
⚠️ This demo has been tested and is known to work with the package version listed above. This may not be the latest version by the time you read this post.
Once installed, you should see the WebRTC package details in the Package Manager dialog.
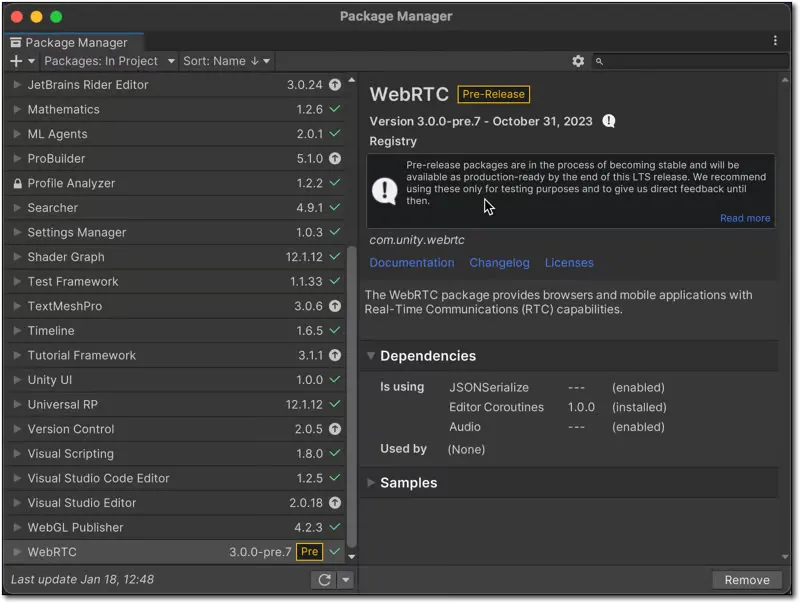
Before we add a camera and the script required to publish gameplay, we'll need to create an Amazon IVS stage and establish a way to generate the required participant tokens necessary to publish to the stage.
An Amazon IVS stage is allows up to 12 broadcasters to publish a real-time live stream to up to 10,000 viewers. We'll re-use this stage for all of our demos, so we'll just manually create one via the AWS management console. When you decide to integrate this feature for all players, you'll create the stage programmatically via the AWS SDK and retrieve the ARN (Amazon Resource Name) for the current player from a backend service. Since we're just learning how things work, there is no harm in creating it manually and hardcoding the ARN into our demo game.
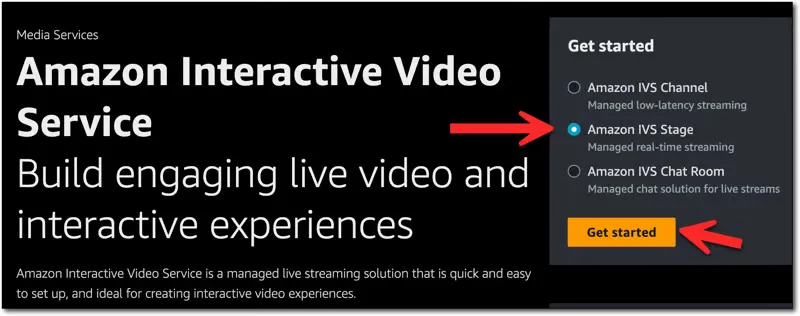
From the AWS Management Console, search for 'Amazon Interactive Video Service'. Once you're on the Amazon IVS console landing page, select 'Amazon IVS Stage' and click 'Get Started'.
Enter a stage name, and click 'Create stage'.
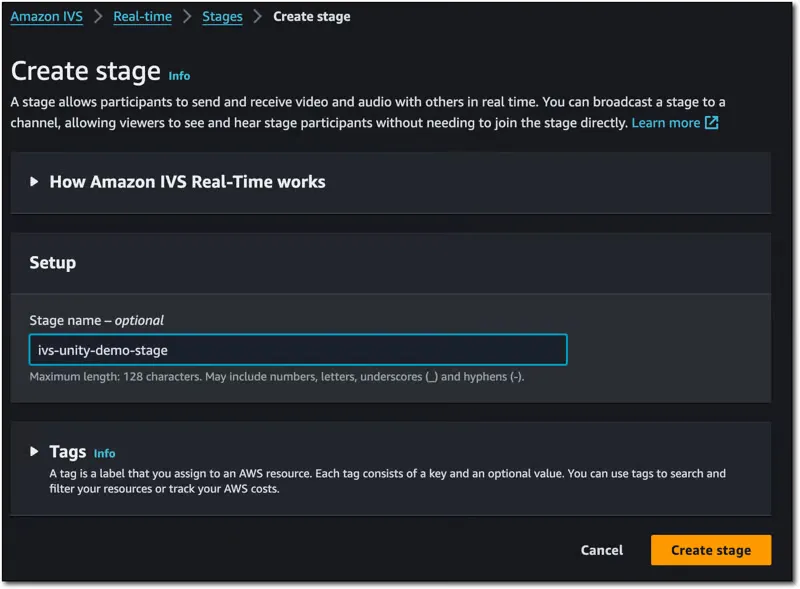
That's it, our stage is ready to go! On the stage details page, grab the stage's ARN.

We'll need this token to generate our tokens.
Each participant in an Amazon IVS stage - including broadcasters and viewers - need a participant token to connect. This is a JWT that is used to authorize the user and contains information such as the
userid, and any capabilities that have been granted to the participant (such as PUBLISH and SUBSCRIBE). It would be time consuming to manually create these tokens and paste them into our Unity code repeatedly, so it's better to create a standalone service that uses the AWS SDK to generate these tokens. Since I create a lot of demos like this, I've deployed an AWS Lambda to handle token generation. If you're not quite ready to do that, create a service locally that uses the AWS SDK for [Your Favorite Language] and utilize `CreateParticipantToken` (docs) . I prefer JavaScript, so my function uses the AWS SDK for JavaScript (v3) and issues a `CreateParticipantTokenCommand` (docs). The most basic, bare bones way to do this would be to create a directory, and install the following dependencies:
Then, create a file called
index.js. In this file, we'll run a super basic web server with Node.js that responds to one route: /token. This path will generate the token and return it as JSON. Note, you'll have to enter your stage ARN in place of [YOUR STAGE ARN].Run it with
node index.js, and hit http://localhost:3000/token to generate a token. We'll use this endpoint in Unity any time we need a token. Here's an example of how this should look:Which produces:
Now that we've got a stage and a way to generate tokens, we can add a new camera that we'll use to broadcast the gameplay to the stage. Expand the 'Main Scene' in Unity and find the
CinemachineVirtualCamera. This camera is used in the Karting Microgame project to follow the player's kart around the track as they drive through the course. Right click on the CinemachineVirtualCamera and add a child Camera. I named mine WebRTCPublishCamera.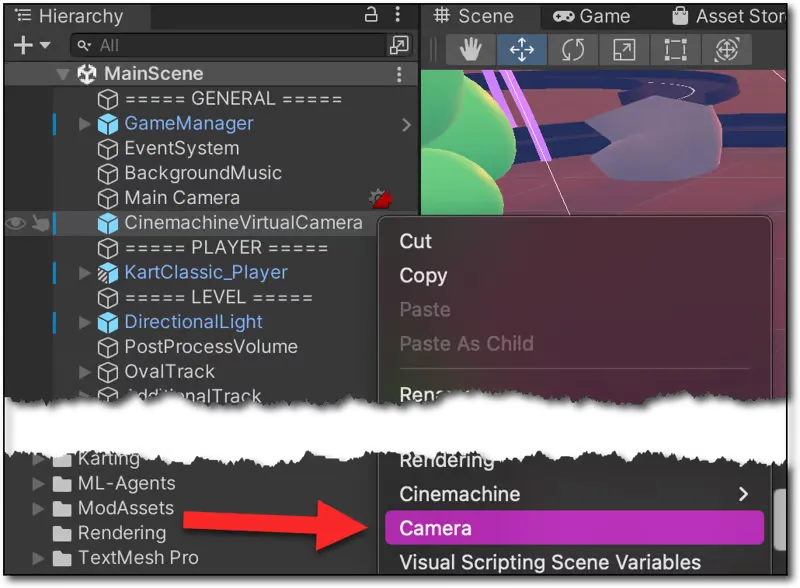
Next, select the newly created camera and scroll to the bottom of the 'Inspector' tab. Deselect the 'Audio Listener' otherwise you'll get errors in the console about having multiple audio listeners in a scene. After you deselect that, click 'Add Component'.

In the 'Add Component' menu, choose 'New Script' and name the script
WebRTCPublish. Click 'Create and Add'. 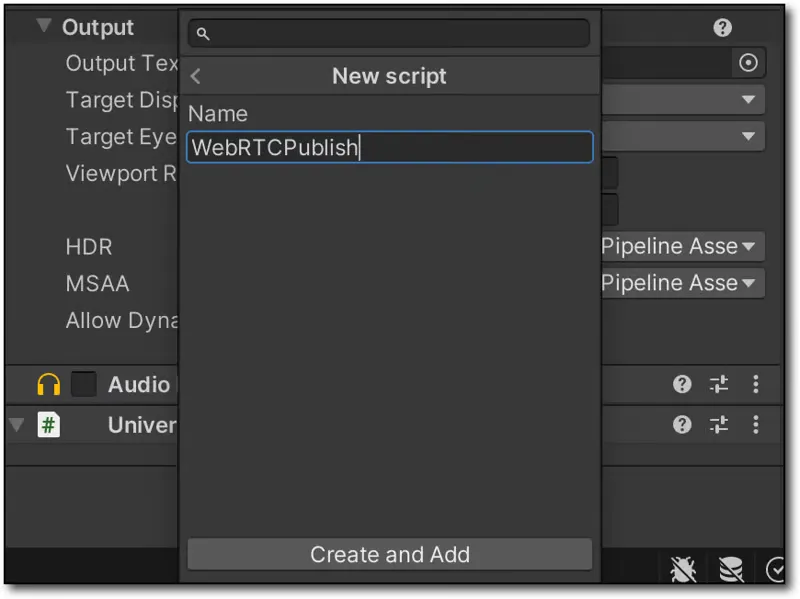
Once the script is added, double click on it to open it up in VS Code (or your configured editor).
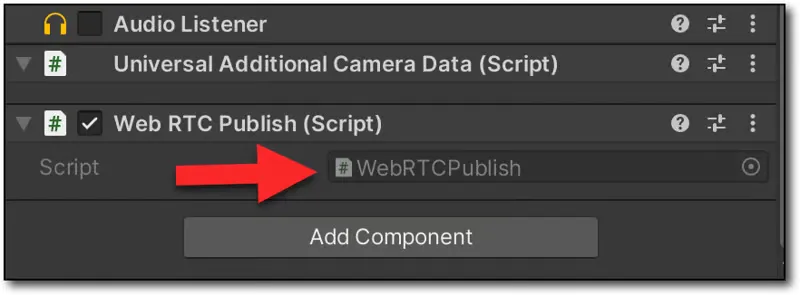
We can now edit the script that will be used to broadcast this camera to the stage.
At this point we can modify the
WebRTCPublish.cs script to include the necessary logic to get a stage token and establish the WebRTC connection to publish the camera to our stage.We'll create a few classes that will help us handle the request and response from our token generation service. We could use separate files for these, but for now, I just define them within the same file to keep things all in one place.
Next we need to annotate the class to require an
AudioListener so that we can publish the game audio. We'll also declare some variables that will be used in the script.Now let's create an async function that will hit our token generation service and request the token. We'll define this inside the
WebRTCPublish class.Within the
Start() method, we'l start the WebRTC.Update() coroutine, establish a new RTCPeerConnection, get the camera and add its output to the peerConnection, and add the game audio as well. Then we'll start a coroutine called DoWhip() that we'll define in just a bit.Let's define
DoWhip() which will get a token, create a local SDP, and pass that along to retrieve a remote SDP (finally setting that on the peerConnection to complete the WebRTC connection process). Note that we're using the Amazon IVS global WHIP endpoint of https://global.whip.live-video.net/ to retrieve the SDP, passing our token as the Bearer value in the Authorization header.At this point, we're ready to launch the game and observe the console in Unity to see our tokens and make sure the connection is established. Launch the game via the 'play' button in Unity and check the console.
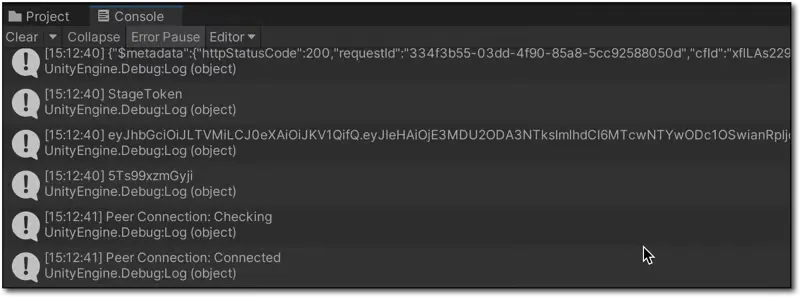
This output looks promising! We've generated a token and the Peer Connection is
Connected. Let's see if our gameplay is being streamed to the stage.To test playback, we could use the Amazon IVS Web Broadcast SDK to connect to the stage and render the participants when they connect. We'll leave that as an offline exercise and test things out from this CodePen. Generate another token, copy it to your clipboard, and paste it into the CodePen and click 'Join Stage' while the game is running and broadcasting to the stage. If everything went well, you should be able to see your real-time stream!
🔊 Note: You'll notice duplicate audio in the video above - that's because both the local game audio and the stream audio were captured.
In
Destroy(), we can close and dispose of our peerConnection and clean up our audio and video tracks.As it stands, I'd say this is pretty impressive! Beyond some of the things I mentioned in the previous post in this series, there is one area of improvement that we'll address in the next post in this series. You may have already noticed it in the video above. If you missed it, check the real-time playback in the video above and you'll notice that there is something missing from the stream - the HUD elements like the match timer and overlays such as the instructions are not displayed. This has to do with the fact that canvas elements in Unity are usually configured to use 'Screen Space - Overlay' which means they render on top of everything that the camera renders to the game screen. This isn't necessarily a bad thing, as you might not need every HUD and UI element to be rendered to the live stream (especially in the case of screens that may show user specific data). This can be handled on a case-by-case basis in your game, but if you absolutely have the need to render the full UI, we'll look at one approach that solves this issue in our next post in this series.
Another improvement here could certainly be the addition of a UI button that can be used to start/stop the stream instead of launching it automatically when the game begins.
In this (rather long) post, we learned how to broadcast from a game built with Unity directly to an Amazon IVS real-time stage. We covered some intro topics like creating the stage and generating tokens that we won't repeat in the coming posts in this series, so be sure to refer back to this post if you need a refresher.
If you'd like to see the entire script that I use for this demo, check out this Gist on GitHub. Note that my production token endpoint uses the
POST method and allows me to send in the stage ARN, user ID, etc so this script contains some additional classes to model that post request. You'll probably need to modify this to work with your own endpoint, but this script should get you started.Any opinions in this post are those of the individual author and may not reflect the opinions of AWS.
