Diagrams to CDK/Terraform using Claude 3 on Amazon Bedrock
Use AI to generate infrastructure as code from Architecture diagrams and images
Deepayan Pandharkar
Amazon Employee
Published Mar 5, 2024
Last Modified Mar 15, 2024
Update #1: Updated content to incorporate feedback.
In today's cloud-native world, infrastructure as code (IaC) has become an indispensable practice for developers and DevOps teams.
With the recent announcement of Claude 3's sonnet on Amazon Bedrock, and its image-to-text capabilities, starts a new era of seamless integration between architecture diagrams and IaC tools like AWS Cloud Development Kit (CDK) or Terraform.
This blog post will explore how you can harness the power of this integration to streamline your infrastructure provisioning and management processes.
Architecture diagrams are a visual representation of your system's components, their relationships, and the overall structure of your application or infrastructure. They serve as a blueprint for communication, collaboration, and decision-making among team members. However, manually translating these diagrams into code can be time-consuming and error-prone, especially in complex environments.
Anthropic has dropped a new line of AI models called the Claude 3 family, and these bad boys are straight fire. We're talking about Claude 3 Opus, Claude 3 Sonnet, and Claude 3 Haiku – the next generation of state-of-the-art models that'll blow your mind.
It has capability to parse text from images. This is what we are going to use in our solution. https://www.anthropic.com/news/claude-3-family
Now about performance, when it comes to most workloads, the Sonnet model is the real MVP. It's faster than Anthropic's previous Claude 2 and 2.1 models, both on inputs and outputs, and it packs a serious punch with higher levels of intelligence. But that's not all – Sonnet is also more steerable, which means you get more predictable and higher-quality outcomes. Talk about a win-win situation!
Here's where it gets even better
Amazon Bedrock has announced support for Anthropic Claude 3 family. https://www.aboutamazon.com/news/aws/amazon-bedrock-anthropic-ai-claude-3
Amazon Bedrock is a fully managed service that's like a one-stop-shop for all things generative AI. With Bedrock, you get to choose from a range of high-performing foundation models from top AI companies like Anthropic, and it comes loaded with a ton of capabilities to make building and scaling generative AI applications a breeze.
Ok, Lets get right into the solution then. Follow below steps to get an architecture extractor for yourself.
For this walkthrough, you should have the following prerequisites:
- An AWS account ready with CDK bootstrap.
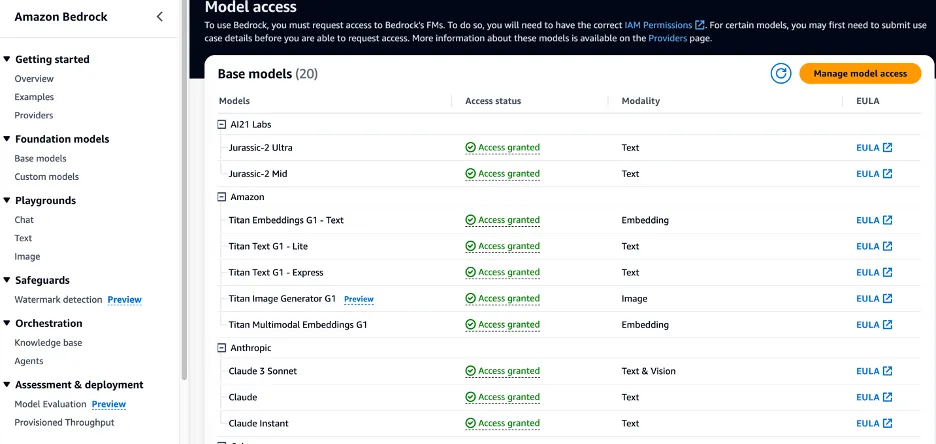
- Amazon Bedrock and model access enable for Claude 3 Sonnet
Step 1: Enable Anthropic Claude 3 Sonnet on Amazon Bedrock
Step 2: Create a file called
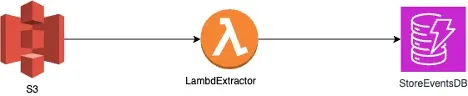
claude_vision.py and copy below codeStep 3: Note the path of image file. For the purpose of demonstration I will be using below diagram, saved as s3_extractor.png on local disk.
Step 4: Run the script python src/utils/claude_vision.py --image_path ~/Desktop/s3_extractor.png and save the output.
Here’s a sample response
Step 5: Initialise a CDK project and update by copying relevant code parts. Now you can copy code as is to make it work but I am making a couple more changes to follow best practices. One is by copying only resource code in stack construct in /lib directory and other is changing scope to this keyword. Please note that same result can be generated directly by GenAi by tweaking prompt.
Update the stack construct.
Finally create a
lambda folder at the root and create a sample hello.js file with below sample code.Step 6: Run
cdk synth and cdk deploy –all. Voila!!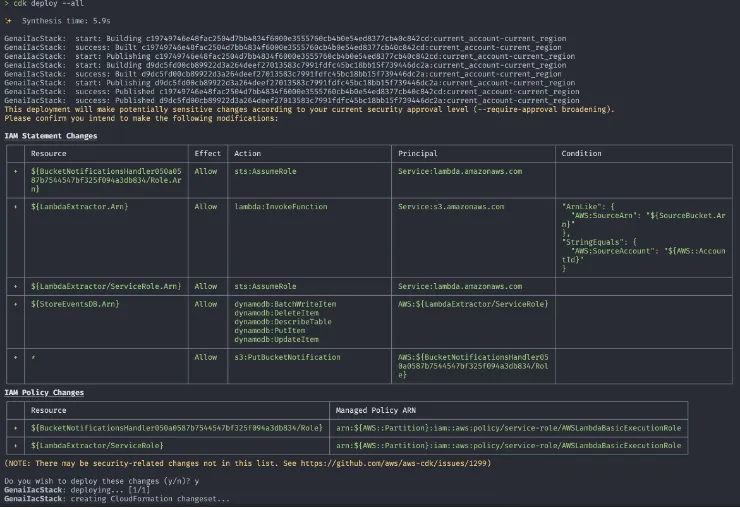
To avoid incurring future charges, delete the resources.
- Run
cdk destroy - Disable Amazon Bedrock Model access.
- Seamless Automation with AI-Powered Assistance: Harnessing AI capabilities to read diagrams and generate code, even if it produces initial boilerplate code if not the fully structured code, streamlines the development process. As AI continues to evolve, the potential for generating more sophisticated and structured code increases, promising even greater efficiency gains in the future.
- Accessibility for Non-Programmers: Diagram-to-code tools empower team members without extensive programming backgrounds to contribute to infrastructure development. By providing a user-friendly interface for creating diagrams and generating code, these tools democratize the process, enabling more team members to participate effectively in infrastructure-as-code initiatives.
- Accelerated Prototyping and Iteration: The ability to quickly generate boilerplate code from diagrams accelerates prototyping and iteration cycles. Teams can rapidly translate architectural designs into functional code, enabling faster feedback loops and more agile development practices.
- Facilitated Learning and Skill Development: For individuals looking to enhance their coding skills, diagram-to-code tools provide a valuable learning resource. By observing the generated code and its relationship to the architectural diagrams, team members can gain insights into coding principles and practices, fostering skill development over time.
The integration of Claude 3's sonnet with AWS Bedrock and the ability to convert architecture diagrams to CDK or Terraform code represents a significant step forward for developers and DevOps teams.
By embracing this approach, you can unlock the power of infrastructure as code, and accelerate the delivery of reliable and scalable cloud infrastructure. Embark on this journey and experience the seamless fusion of visual design and automated code generation, empowering you to build and manage your cloud environments with unprecedented efficiency and confidence.
Next up, a streamlit web UI based approach which provides a friendly interactive UI to use this solution for those who hate CLIsAny opinions in this post are those of the individual author and may not reflect the opinions of AWS.