Connect to an Amazon EC2 Mac instance
Learn how to remotely connect to an EC2 Mac instance
Sebastien Stormacq
Amazon Employee
Published Jun 28, 2023
Last Modified Mar 19, 2024
Back to Start an Amazon EC2 Mac instance
When developing applications for Apple systems (iPhone, iPad, Watch, TV, or Vision Pro), you are required to use a macOS machine at some point of your development workflow. Either to provide remote developers or temporary contractors a managed and secured desktop machine, or to automate your build, test, sign, and release pipelines (also known as continuous integration and continuous deployment or CI/CD ). You can get a high level overview of a macOS-based CI/CD system by reading my first article from this series.
Getting access to a macOS-based machine might take time because of additional procurement, installation, and configuration processes. To make it easier, you can choose to start a macOS-based machine on Amazon EC2.
This series of tutorials takes you through the typical tasks required to start, connect, or configure macOS-based machines in the AWS cloud. Each tutorial is independent from each other, you don't have to follow them all in sequence. Just pick and read the ones that cover the tasks you want to do.
For this series of tutorial, we assume you're somewhat familiar with Amazon EC2. You can quickly jump in by reading this short tutorial. We will rather focus on the aspects that are specific to Mac on EC2.
This is an 11 parts article about EC2 Mac instances and advanced CLI usage on macOS, including command-line build, test, sign, archive and deploy. The next pieces will appear in the list below as they are published.
Enjoy the reading!
| About | |
|---|---|
| ✅ AWS experience | Beginner - 100 |
| ⏱ Time to complete | 20 minutes |
| 💰 Cost to complete | $22 for 24 hours |
| 🧩 Prerequisites | An AWS Account |
| 💻 Code Sample | - none - |
| 📢 Feedback | Any feedback, issues, or just a 👍 / 👎 ? |
| ⏰ Last Updated | 2023-06-28 |
After you launched an EC2 Mac instance, you most probably want to remotely connect to it to install your favorite tools, libraries and other dependencies to build and test the applications you're developing.
Note that there are some cases where the instance is already configured at start (this article shows you how to configure an instance ready to use). In those cases, there is no need to remotely connect to your instance. It is perfectly possible to start and use a pre-configured EC2 Mac instance without ever connecting to it. But for this tutorial, we assume you started the EC2 Mac instance from one of the AWS-provided Amazon Machine Image (AMI) and you have a clean macOS installation available.
There are at least three options to connect to your EC2 Mac instance without installing any additional tools or drivers on it: SSH, SSM, and ARD/VNC. Two of them are for command line connections (SSH and SSM). The last one is to start a full graphical use interface (ARD/VNC).
The most common option is to use SSH. To establish an SSH connection to your EC2 Mac instance, there are three pre-requisites:
- at launch time, you have specified the SSH keypair that will be used for user authentication. Note that this can only be done at launch time. If you forgot to do it launch, you may terminate your instance and start a new one, on the same dedicated host (it might take a while to scrub the machine when you terminate it, and before it becomes available again).
- the instance has been launched on a network (VPC) that has public network connectivity (a public subnet of the VPC), and your instance has a public IP address. These two parameters are the default values when launching an EC2 instance.
- at launch time, or afterwards, you have associated a Security Group with your EC2 Mac instance. The security Group is configured to authorize inbound TCP 22 (SSH) traffic from your laptop IP address or your client network IP range.
Assuming these three pre-requisites are met, connecting to a macOS instance is no different than connecting a Linux server. The user name associated with your key pair is
ec2-user and you have to use the -i option to refer to your private key, stored on your laptop.Using the AWS Console, find the IP address of your EC2 instance. Alternatively, you may use the command line interface using this command (assuming you have only one
mac1.metal instance running) - your IP address will be different than 1.0.0.0 used below:You will now use SSH with your secret key
pem file with the -i option and use the default username AWS created for you on macOS: ec2-user. In this example, we connect to a Big Sur instance (please remember to replace 1.0.0.0 with your instance's IP address from the previous command).Once you are connected, feel free to explore your instance. You will verify it is a regular macOS installation.
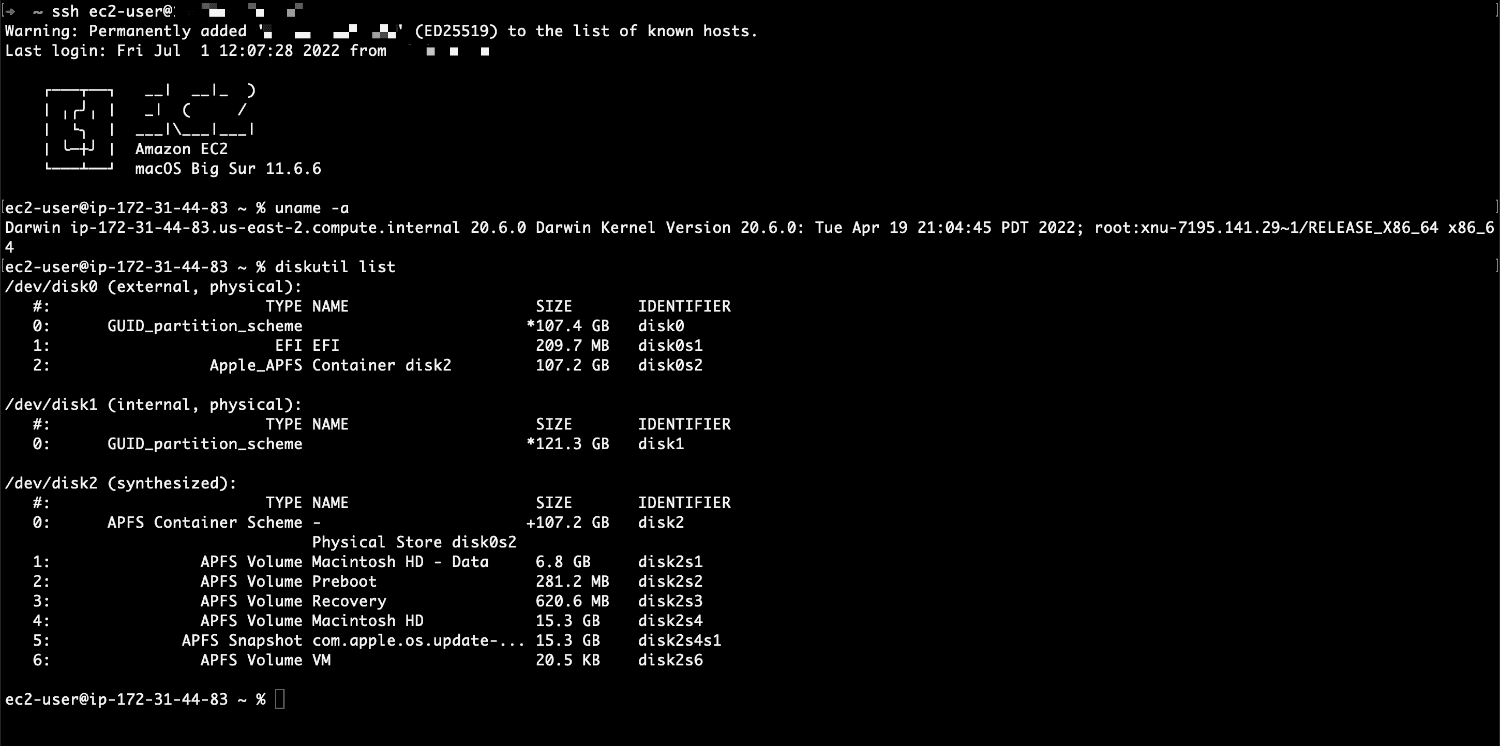
ec2-user is included in the /etc/sudoers file and you can elevate privileges to root with the sudo command, without a password.We chose to start with SSH because many of you are familiar with this tool. However, if you look at it through the prism of security and management, there are a couple of areas of improvements.
The first area of improvement is the networking. SSH requires your instance to live in a public subnet of your VPC, to have a public IP address and to have a Security Group rule allowing inbound TCP traffic on port 22. As EC2 Mac instances are mostly used for development use cases, such as continuous integration and continuous deployment pipelines, all these network constraints do not make sense. Most of you would like to keep these build, test, and deploy instances in private subnets, without public IP addresses attached to it, and without Security Group rules allowing inbound traffic.
The second area of improvement is in terms of access control. SSH authenticates users with a keypair. You have the private part of the keypair on your laptop and the public part is injected on macOS file system as part as the EC2 macOS Init process (if you are curious, macOS Init fetches the public key from the instance meta-data service at this address). Good security practices mandate to securely store private keys and rotate keypair on a regular basis. How do you do that at scale on a fleet of EC2 instances?
To improve your security and management posture, there is another option to connect to your EC2 Mac instance: AWS Systems Manager Session Manager (SSM). AWS SSM is a versatile service that is able to initiate a shell connection to your instance, with the help of an agent running on the host macOS. The agent comes pre-installed on AMIs provided by AWS.
There are two advantages of connecting through SSM over SSH. First, there is no inbound network connection from your network. The SSM agent polls the SSM service, and the service takes care of forwarding information, such as keystrokes, to the instance. This means the EC2 Mac instance might have just a private IP address, sits in a private VPC, and no Security Group is required. Secondly, there is no need to use SSH keypairs to manage user authentication. You manage connection permissions from IAM, granting AWS users or roles permission to connect or not to your instance.
To be functional, the agent running on the instance must have permissions to call SSM APIs. To grant permissions, you create an IAM Role, add permissions to the role, and attach the role to the EC2 instance. You can do so in the IAM Console or using the CLI.
In this tutorial, I show you the steps using the CLI. One of the CLI command requires the instance Id of your EC2 Mac instance. It searches the instance based on it's name. I assume our instance is named "macOS Monterey". Please adapt it to your configuration.
First create a role that can be attached (trusted) by any EC2 instances:
Once the role is created, we need to attach permissions to it. Instead of defining the permissions by myself, I will reuse an AWS-managed policy that contains all the permissions required by SSM. The name of the AWS managed policy is
arn:aws:iam::aws:policy/AmazonSSMManagedInstanceCore.The next three steps create an EC2 instance profile, attach the role to the profile, and attach the profile to my instance.
This is a bit long, but this is a one time operation. Now you can reuse the role and attach to instances at launch time or at any moment after launch. Once the role is attached to the instance, all processes running on macOS, including the SSM agent, are authorized to call SSM API, which is required to establish a connection to your instance.
Ok, now that the initial setup is done, let's connect to the instance. You can do so using the AWS Console or the CLI.
Using the AWS Console, navigate to EC2 section, select the instance you want to connect to. Then select the Connect button.

On the next screen we will verify the instance meets the pre-requisites and select Connect again.

When the instance has correct permission, and if you followed the above instructions, it should have, a black screen opens in your browser. It is a browser based shell connection to your instance.

Alternatively, you may use the command line to connect using SSM.
There is a one-time installation required however. On your local machine, install the SSM plugin for the AWS CLI.
This will now connect you to the Mac instance, you can run some commands shown below (along with their output) to verify:
To end your SSH session, run
exit.When using SSM, you are authenticated as
ssm-user (and not ec2-user as with SSH). Both users are included in the /etc/sudoers file and you can elevate privileges to root with the sudo command, without using a password.To avoid having to remember two different commands, some advanced users configure their local
ssh to use aws ssm start-session command as proxy command when SSH'ing to your hosts. If you're interested, or just curious, check out this documentation.When discovering a new environment, or when you want to install a set of tools on a new instance, or simply to use the graphical user interface you know and love from macOS, you might want to connect to your EC2 Mac instance using the traditional macOS GUI.
The good news is that all the required tools are provided by macOS, no installation is necessary. However, the server side Screen Sharing capability is disabled by default and must be enabled before to attempt to connect. Usually, you use the System Preferences application and the Sharing tab to do so, but here we just have a CLI. Let's see how to enable screen sharing with the CLI.
The first step is to connect to your instance using either SSH or SSM as described before.
Once connected, let's enable Apple Remote Desktop (ARD). This is a two steps process. First set a password for the
ec2-user, then start the Apple Remote Desktop server component.We do not recommend to connect to Apple Remote Desktop (ARD) over the public network. This involves using the public IP address of the instance, and adding a rule to the instance security group to allow inbound traffic on port TCP 5900 (the default for ARD). ARD user authentication is password-based.
Instead, we recommend creating an encrypted tunnel between your client and the EC2 Mac instance. Tunnels are encrypted, and they are not using a username and password to authenticate users.
You can create tunnels either using SSH or SSM. We wil start with SSH, and will show the SSM alternative towards the end of this blog post.
When you create a SSH tunnel, the SSH client on your machine becomes a server and starts to accept incoming connections on localhost. Every data received on this connection is encrypted, and optionally compressed, before being sent to the remote server: your EC2 Mac instance. The SSH server on macOS decrypts and decompresses the data, then send it over the network to the destination you specified on the client. In this case it forwards the traffic to the Apple Remote Desktop Server running on the instance (
localhost:5900).You can learn more about SSH tunnels on this site. The whole process is illustrated below:

To start an SSH tunnel, collect your instance public IP address as described before. Then, use the following command:
Let's explain the options used:
-i, allows you to specify the private part of the keypair used for authentication-Lis the SSH tunneling option. It tells the SSH client on your machine to start to listen to incoming connections on TCP port 5900 (5900:), and to forward all traffic received to the destination host (1.0.0.0). Once on the destination host, to send the traffic tolocalhost:5900which is the address of the ARD server.-Ctells SSH to compress the traffic in the tunnel-Ntells SSH to not start an interactive session on the client. The command blocks until you interrupt it withCtrl-C
Once the tunnel is created, open another tab in your Terminal application and open the ARD client as usual. Just point it to
localhost. The SSH tunnel will act as a server and forward all the traffic to the actual ARD server running on your EC2 Mac instance on the other side of the tunnel.Note that the URI starts withvnc://because Apple Remote Desktop client is based on Virtual Network Computing (VNC) protocol.
The ARD authentication screen appears. Type the username (
ec2-user) and the password you choose when you enabled ARD.
When the VNC authentication succeeds, you are presented with the standard macOS login screen. Enter your credentials again.

And after a few seconds, you should see the familiar macOS desktop.

Once connected, you most probably want to increase the screen resolution.
To do so, you use
displayplacer, the open source command line tool developed by Jake Hilborn.Using your SSH session, or the Terminal application in the GUI session, install the tool, list the display and resolutions available, and select the one you want.
The nice thing is that it is not necessary to restart your VNC client, it adjusts automatically.
As explained earlier, SSH connections and tunnels require your instances to be publicly available on the Internet. It also requires you to manage the generation, secured storage, and rotation of keypairs.
For these reasons, you may chose to use AWS Systems Manager Session Manager (SSM) to connect to your instances. SSM also supports tunneling.
Once the tunnel is started, all the rest: opening the client, connect to the server, and resize the display is similar between SSH and SSM tunnels.
Before starting an SSM tunnel for Apple Remote Desktop, be sure the EC2 Mac instance is attached to an IAM role that has permissions to use SSM APIs, as described earlier.
To start the tunnel, use the following command:
Once the tunnel is opened, connect to the instance from your computer using the following command:
All the remaining steps are similar as with SSH tunnels.
When done, close the tunnel by interrupting the
aws ssm command with Ctrl-C.Congrats 🎉. You can now connect securely to your EC2 Mac instance, using either SSH, or SSM. Read part 3 where you will learn how to resize your boot volume to accommodate for more space before installing your development tools and libraries.
If you enjoyed this tutorial, found any issues, or have feedback for us, please send it our way!
Back to Start an Amazon EC2 Mac instance
Any opinions in this post are those of the individual author and may not reflect the opinions of AWS.