Live Streaming from Unity - Broadcasting to Twitch (Part 9)
We'll wrap this series with a look at broadcasting directly to Twitch from a game built in Unity.
Todd Sharp
Amazon Employee
Published Mar 20, 2024
In this series, we've seen various approaches to live stream directly to and from an Amazon Interactive Video Service (Amazon IVS) real-time stage from a game built in Unity. As we've discussed throughout this series, the various approaches give developers the ability to build a unique, dynamic and interactive game streaming community around their game with numerous benefits to both the player and the stream viewers. But sometimes your playerbase has an established community that they'd like to broadcast to.
In our final post, we'll switch gears and modify our game to broadcast directly to a user's Twitch channel. This of course means that we'll lose some of the interactivity and benefits of building, moderating, and monetizing our own community, but it's still a nice feature to add for your users and provides an easy integration for users who might not need the power and flexibility that third-party streaming software like OBS provides.
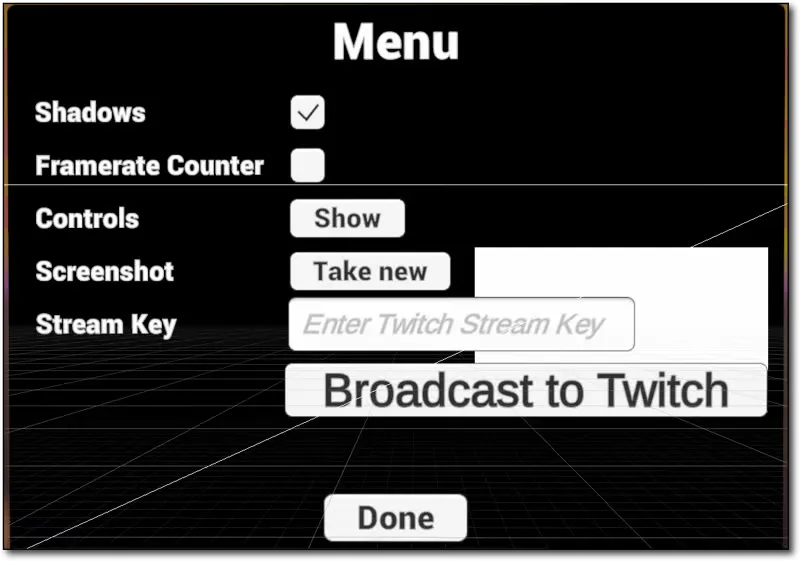
We're going to use the 'Karting Microgame' demo app for this demo, and since we will need the player's Twitch stream key to broadcast, we can enhance the game's menu to provide a text input and a button to allow them to start the broadcast.

Create a new script called
TwitchPublish and attach it to the MainCamera. We're going to broadcast the entire UI to Twitch, including the HUD and all UI elements, so we'll use the approach outlined in part 2 of this series. First, declare a renderTexture and screenshotTexture, a string that will contain the streamKey, and a Button that we can use to enable and disable the 'Broadcast' button depending on the stream's state.Next we'll add
SetStreamKey() and Broadcast() functions. Bind the
On End Edit event of the stream key text input to the SetStreamKey() function.
And the
On Click event of the 'Broadcast to Twitch' button to the Broadcast() function.
The
RecordFrame() and LateUpdate() functions are the same as they were in part 2.Instead of an Amazon IVS participant token, we'll pass the Twitch
streamKey as the Bearer token in the Authorization header. The only other change to DoWhip() is the use of a new endpoint for SDP generation - this one now utilizes a URL specific to Twitch for WebRTC ingest: https://g.webrtc.live-video.net:4443/v2/offer.If we wanted to also include local webcam capture, we can add a
RawImage to the HUD overlay and use the following script to access the user's camera and set the texture of the RawImage to a WebCamTexture.At this point, we can play the game and see that it's broadcasted to Twitch as soon as we click the 'Broadcast to Twitch' button. Note that this broadcast is **not** in real-time, but has about 2 seconds of latency. Note: I've edited out a small section of a few seconds while the Twitch player resolves the best resolution to use on the player side.
We've come to the end of this series where we've taken a look at various approaches to integrating live streaming directly into Unity projects. I'd love to hear your ideas on how you'll be integrating any of the approaches that we've looked at in this post. Feel free to reach out on LinkedIn or Twitter and let me know what you're working on!
For reference, the full script for this post can be accessed here.
Any opinions in this post are those of the individual author and may not reflect the opinions of AWS.
