Build a Web App to Deliver Calming and Empowering Affirmations Using AWS Lambda and Amazon DynamoDB
May is Mental Health Month, so why not take a little time to relax and build yourself a mindfulness app?
Jen Looper
Amazon Employee
Published May 30, 2023
Last Modified Mar 21, 2024
May is Mental Health Month, and when you think about it, coding up a very simple web app can feel like a mindfulness exercise - if done without pressure in a calm environment. So why not take a little time this month to build yourself a mindfulness app that can deliver a quick affirmation to you or anyone lucky enough to come across it on the internet? Using a lightweight web framework called Astro, plus a Lambda endpoint that can query a DynamoDB database, you can code up a friendly affirmation app in no time at all. Let's get started!
By the end of this tutorial, you will have built a web app that you can host on GitHub pages. Refresh the page every time you need a little serotonin boost.
This app was inspired by the instructions given in this helpful tutorial in the Amazon API Gateway docs.
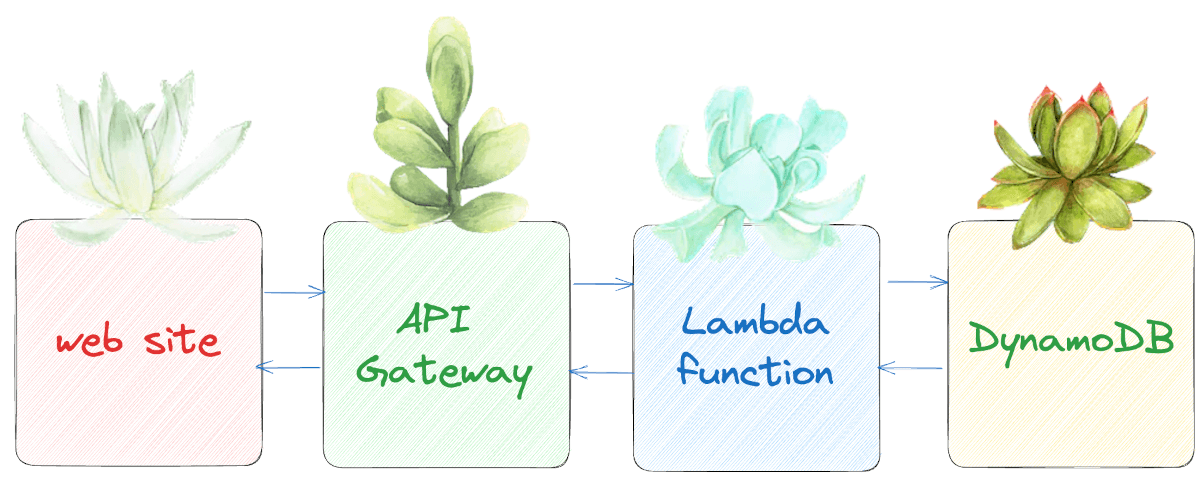
Let's think about the architecture you're going to use. First, you will build a web site connected to Lambda and DynamoDB via API Gateway, something like this:
Let's get set up to start building your app. We'll be using an interesting new framework called Astro. Astro is part of a grouping of lightweight, highly-performant 'meta frameworks' in the JavaScript world, a framework that can pair with or otherwise embed other JavaScript frameworks. Take a look at what you can do with Astro in their excellent AI-infused docs.
Before starting, make sure your local computer is set up to usenpm,git, andnode.
You can start working anywhere on your local computer by using Astro's auto-installer. Run the Astro setup wizard by typing
npm create astro@latest in your terminal or command line. A wizard will launch and help you create a folder for your project. Ask the wizard to Include sample files and be sure to install dependencies. You don't need to use TypeScript in this app, so you can say 'no' to this. Initialize your new Astro folder as a git repository. The terminal will display a message that you've successfully created your app.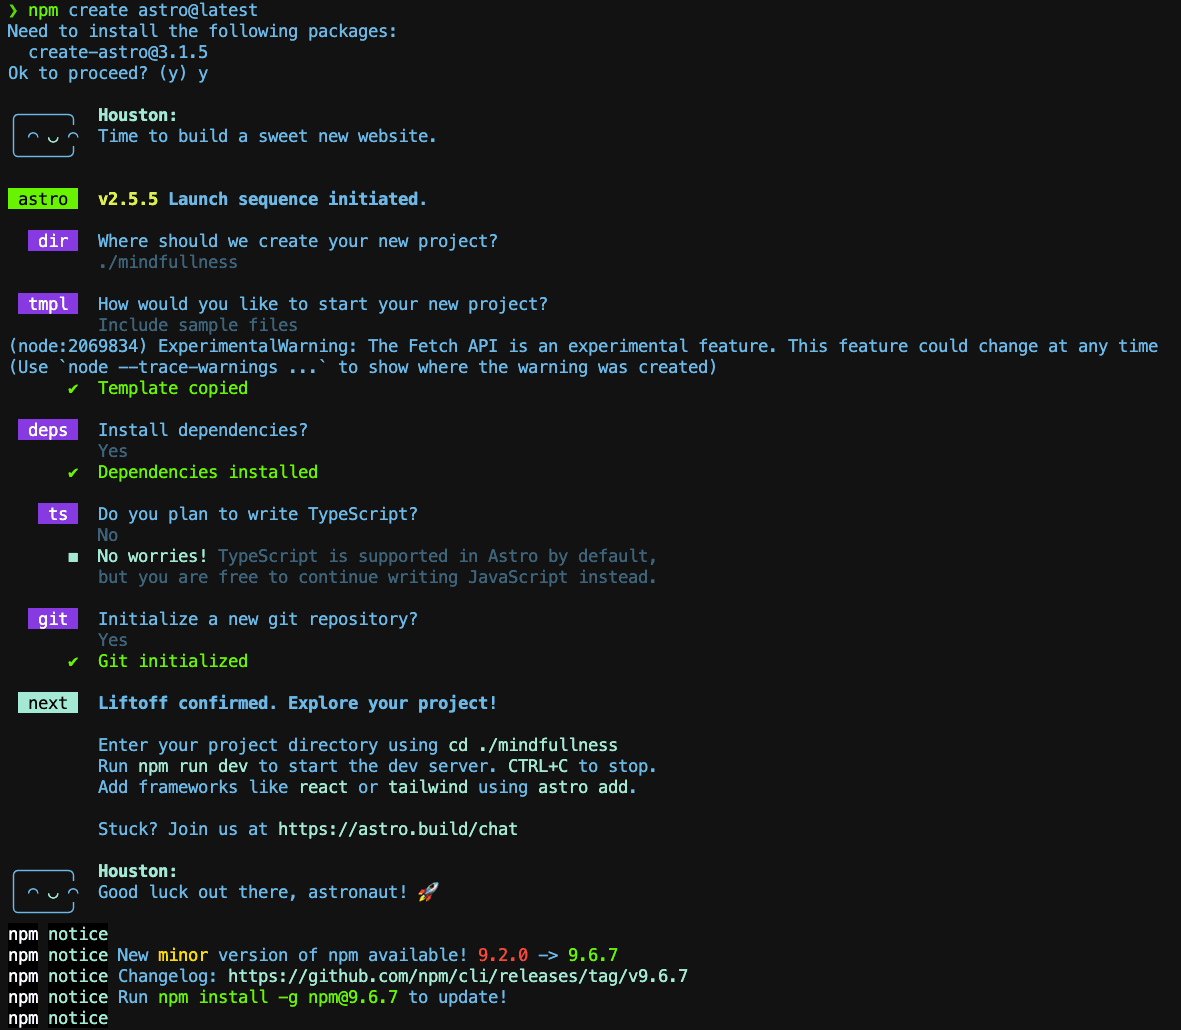
Use
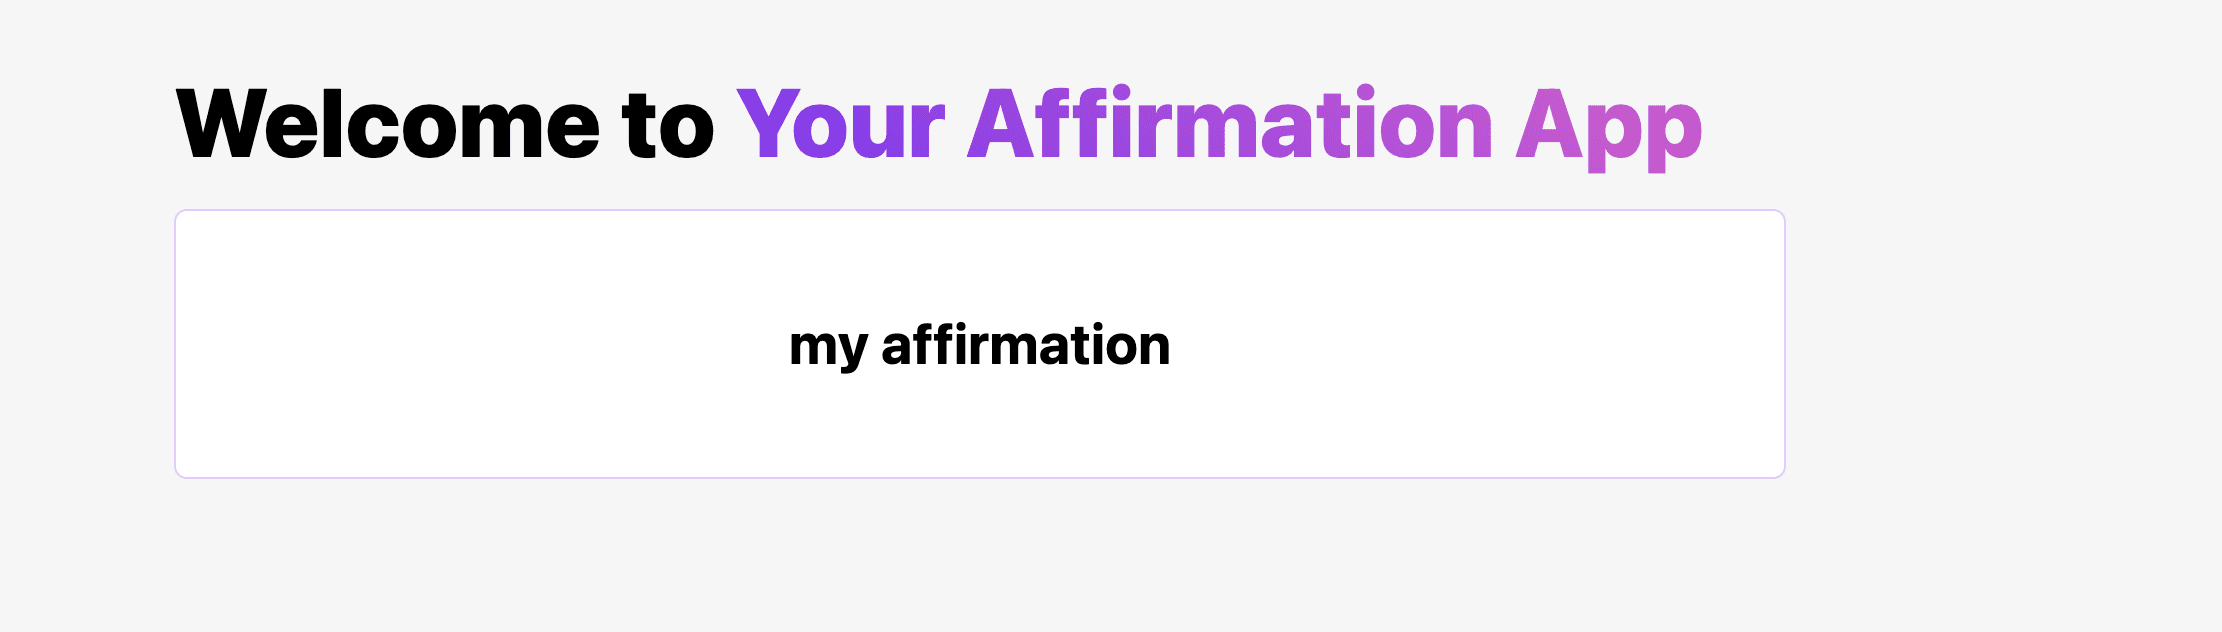
cd to enter the new folder Astro created (you can use ls -al to view all the folders, and it should match what you entered earlier for the project name) and make sure all dependencies are installed by typing npm i in the terminal. Type npm run dev to start your local server. At the moment, your web app looks like this: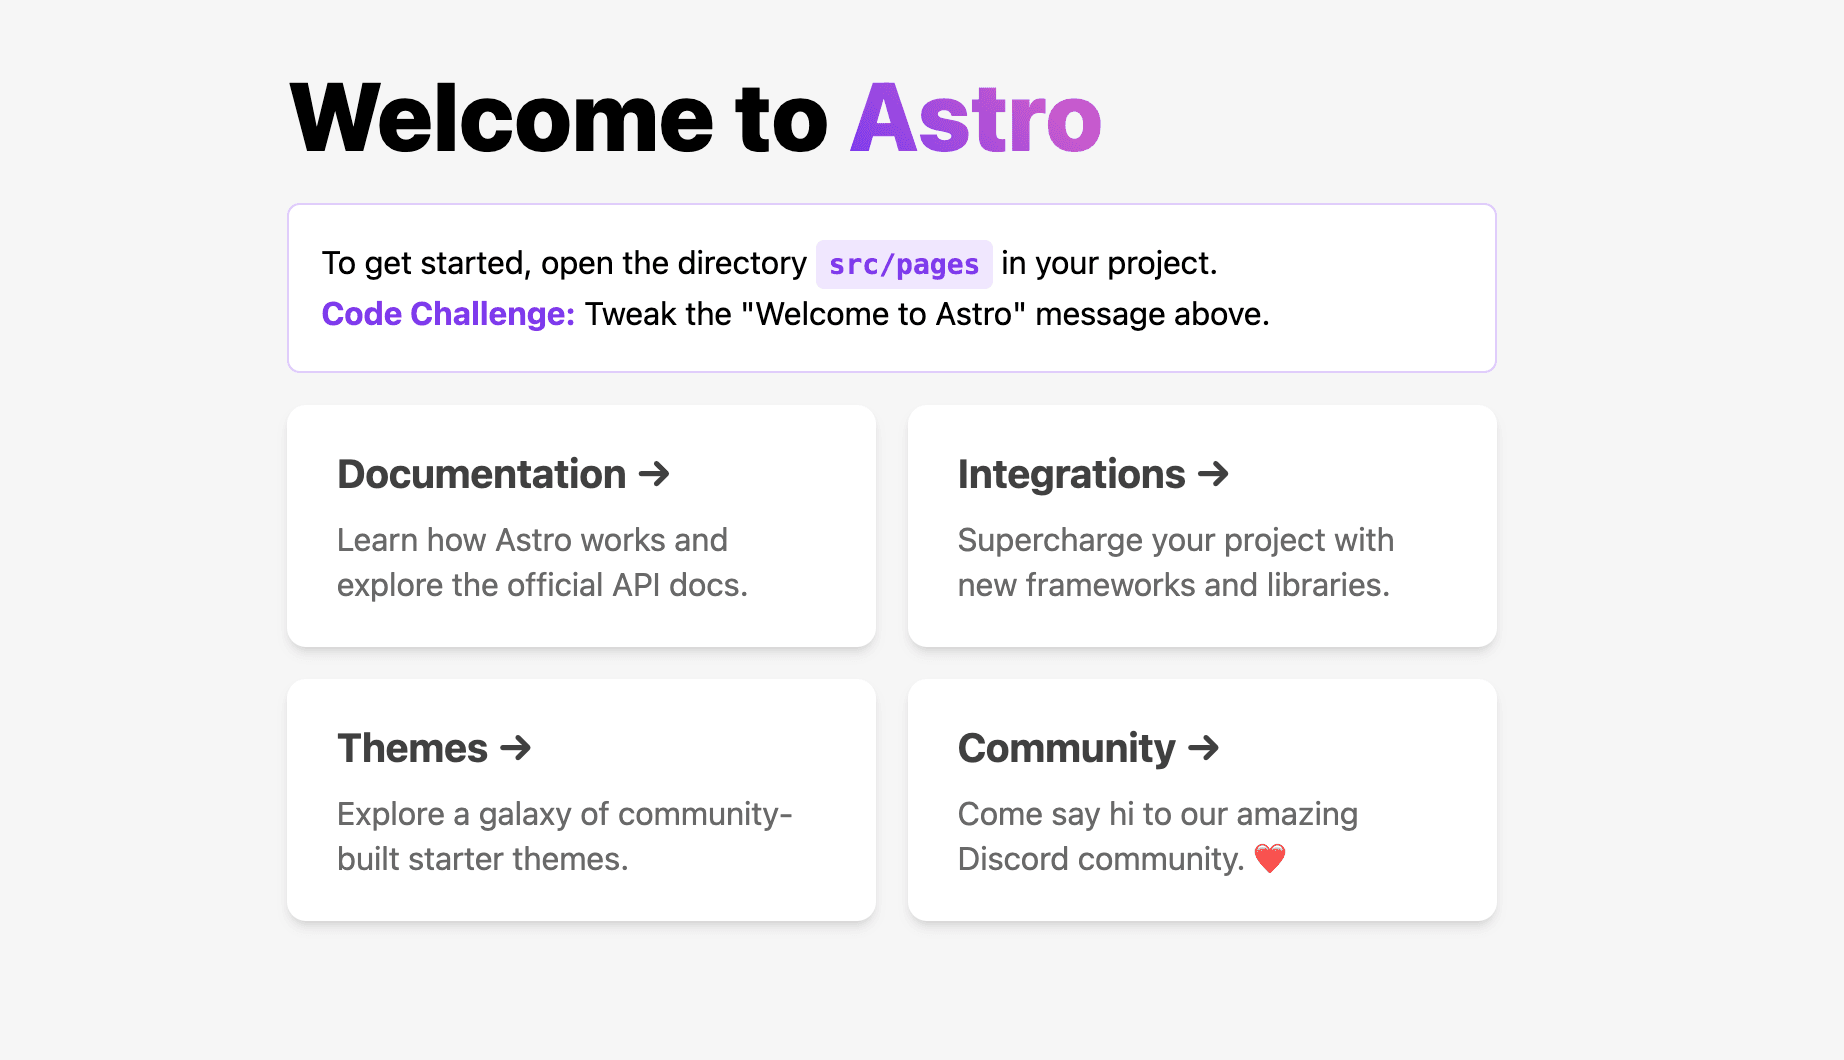
Use your favorite code editor to explore the folder that was just scaffolded. I prefer Visual Studio Code.
tip: typecode .in your terminal to open the folder in VS Code. If you were already using the VS Code terminal to run the previous commands, click on the+to create another terminal instance as you want to leave the app running in the background.
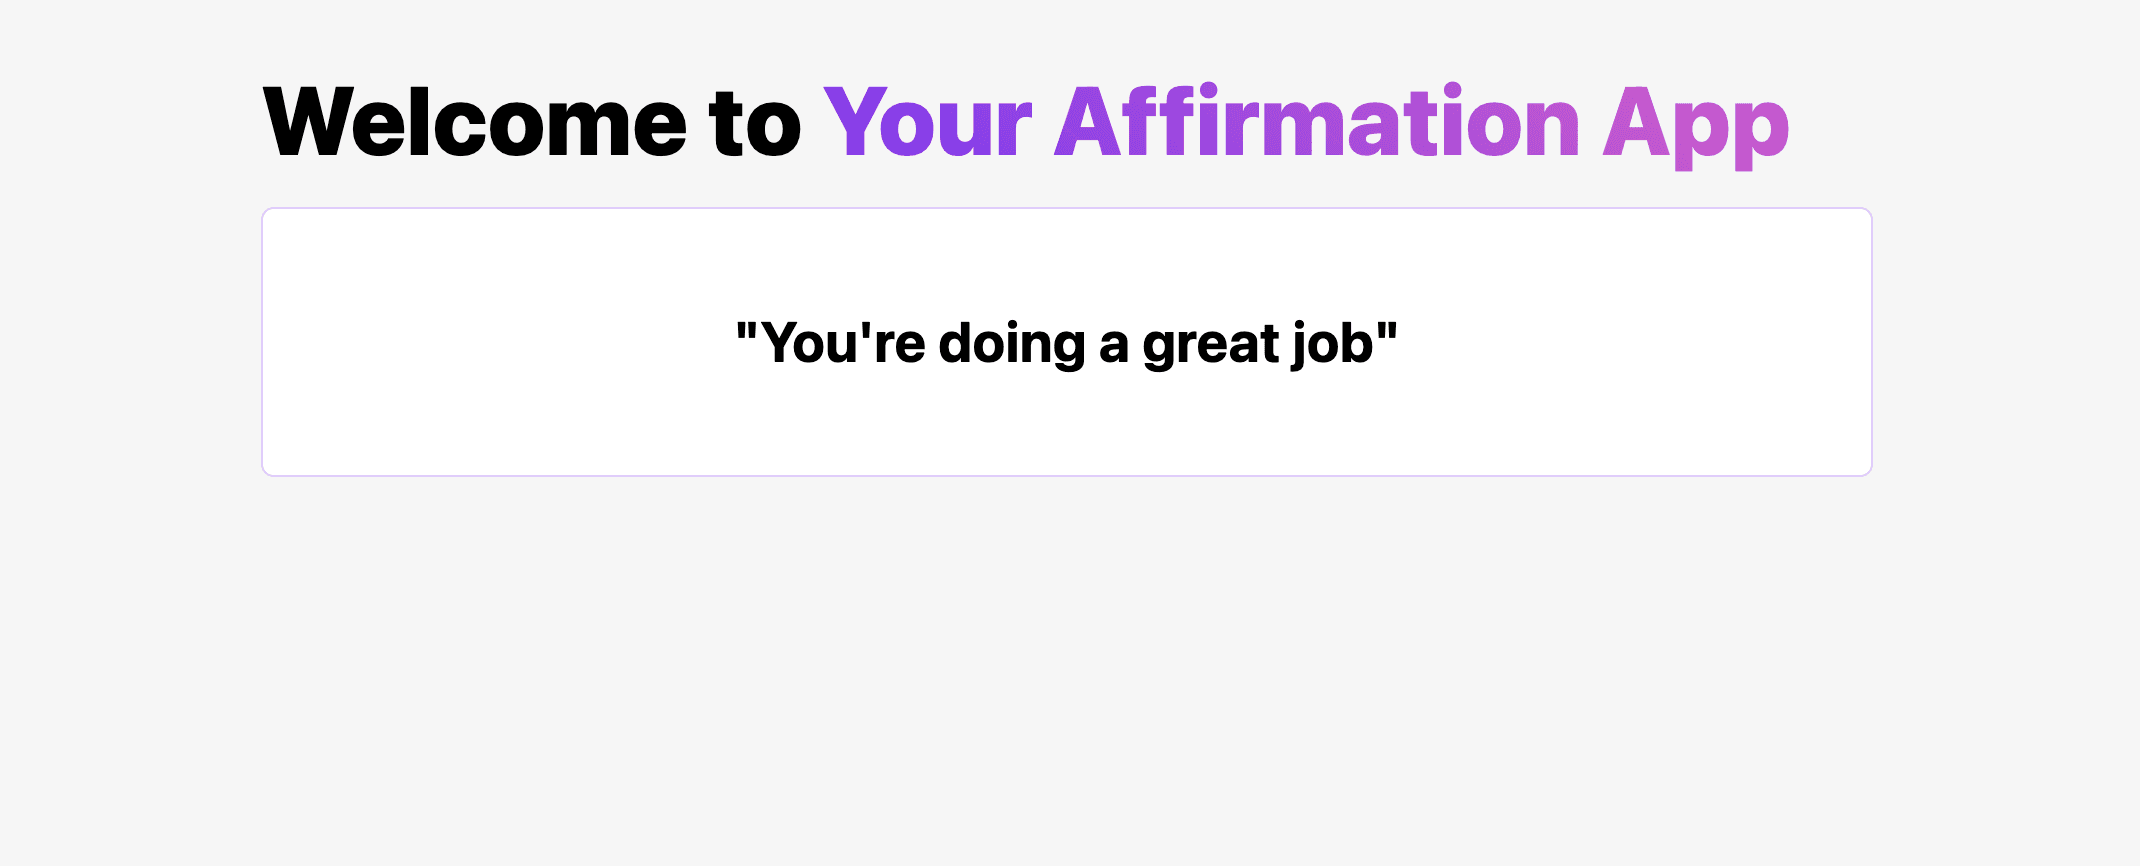
Now you can prune some parts in the scaffolded app, leaving just one box where you'll display your affirmations.
In the
src/pages/index.astro file, replace all the code with the following:You'll see that an error appears in your local server, as the file called
AffirmationsComponent.jsx is missing. Let's fix that.What's going on with the above code? Astro offers an interesting syntax allowing you to combine front matter with style, script, and layout tags. You can progressively enhance your app to include more and more functionality by building up your components' capabilities. By usingclient:loadyou are allowing a child component to load fresh data from a database, which is our use case.
Astro is great for generating static web pages such as blogs, but for this app we need it to do a little bit more. It needs to have the ability to pull data from an endpoint and refresh an element of the page. So we need to add a framework on top of Astro. Let's use another lightweight option, Preact, to allow this site to become dynamic in production.
Preact is a lightweight version of React, "a fast 3kB alternative to React with the same modern API."
You can add frameworks progressively to an Astro app by using the Astro CLI. Type in
npx astro add preact in the terminal of your app. Allow Astro to configure your app to suit Preact's requirements (a configuration change is needed). You will be asked a number of times to accept changes to files, so please answer "yes" to all of them.Tip: use the built-in terminal in VS Code to keep your environment neat by selecting terminal > new terminal.
Now that you have added Preact, in the
/src/components folder, remove the Card.astro file and add a file called components/AffirmationComponent.jsx, a file type understood by Preact.In your
AffirmationComponent.jsx file, add the following code:Your app should now look like the image below. Change the hard-coded affirmation to anything you like! We'll revisit this code once we have an endpoint built to query a database full of great quotes.
Now it's time to build up a database with some sample affirmations. If you are not signed in to your AWS account, please sign in now (or create a new account if you don't have one yet), and search for DynamoDB. This is a serverless database you will use to store a series of affirmations. Choose
Create table and name it Affirmations. For its partition key, enter Id, and leave the dropdown next to it on the default value of String. Now click on Create Table.
It will take a few seconds to create your table, and once done, click on
Affirmations to view it. Let's add a few helpful phrases to our table by navigating to Tables -> Explore Items in the left-hand navigation bar, and confirming that the Affirmations table is selected. Now we can add items by using the Create Item button. Enter a numeric number next to Id, and then click on Add new attribute, enter Text under the Attribute name column, and then the affirmation as text in the Value column. Each item should have an Id and a Text, like this: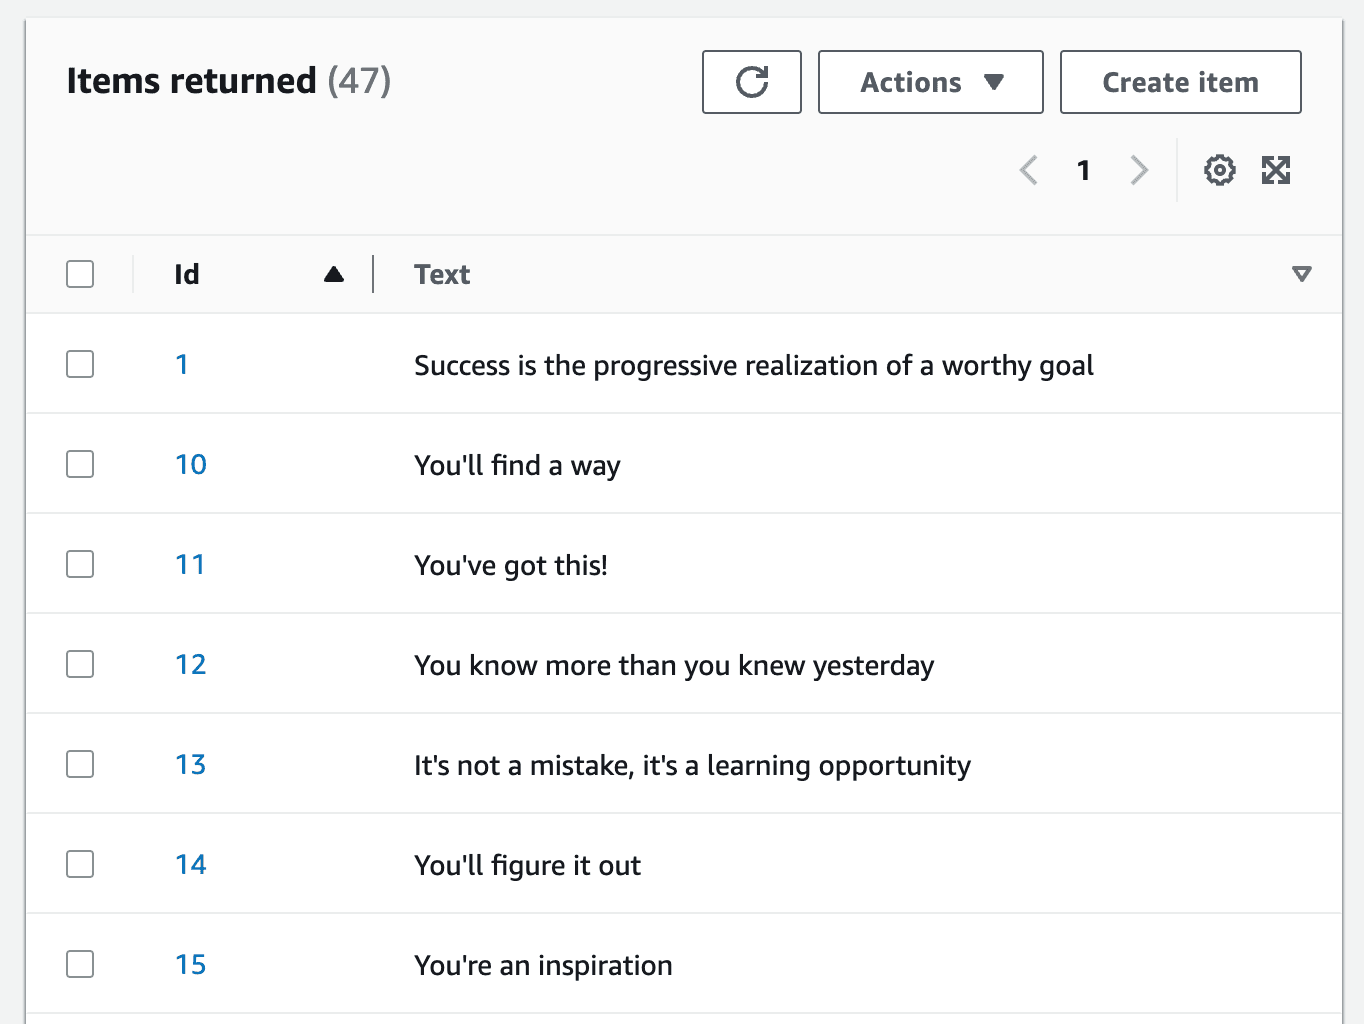
Here's a helpful list of nice affirmations.
Next, you need to create a serverless function using Lambda to query this database. Navigate to the Lambda console and choose
Create function > Author from Scratch. You can call it get-affirmation-function and use Node 18 for the runtime. Now you can create your function.Before adding any function code, make sure that it can read from your DynamoDB table. Select your function and go to the
Configuration tab in the middle of the screen. Your function has been assigned a basic 'role' with a few permissions. Click Add Permissions > Attach policies in the dropdown. Search for DynamoDB and select the AmazonDynamoDBReadOnlyAccess access to let your new function interact with DynamoDB. Add this permission. Now you can write your function's code.You need to add a bit of code in your function to query the database, so open the
index.mjs file in the Lambda code editor. Add the following code and select Deploy:Note, you are selecting a random affirmation by its Id - so edit theminandmaxvariables to reflect how many affirmations you entered into your database.
Now, to connect all the pieces, you can use one more service: API Gateway.
In the AWS console, navigate over to https://console.aws.amazon.com/apigateway. Choose
Create API > HTTP API > Build. Name your new API http-affirmations-api. Click the Next button and create an integration with the Lambda function that you just created. Then add one route, which is the pathway that the API will use to perform various functions between the Lambda function and your database.You need to specify that your API can use http
GET to select elements from the database. Add /items as the route's name, then Next and Create: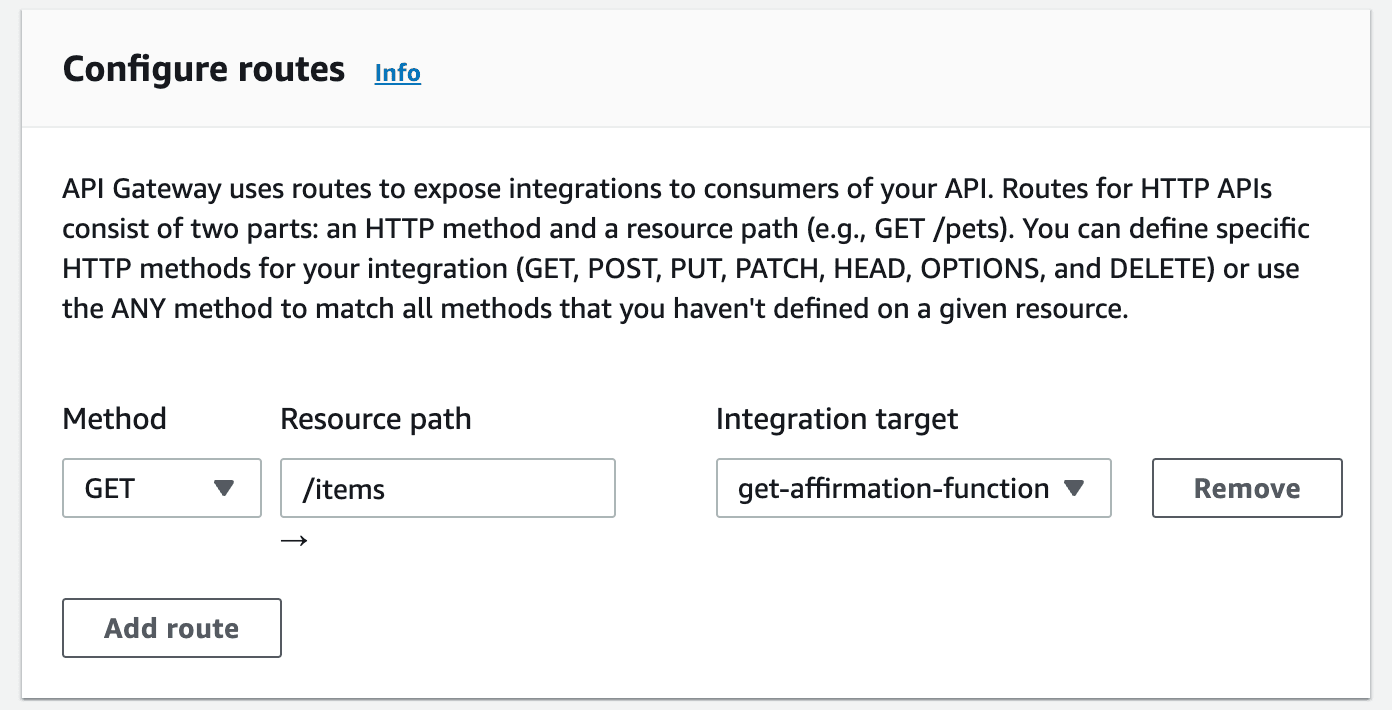
Test your new API by visiting the URL listed in the API Gateway console. Append
/items to the end of the URL; you should see your database items listed!Note, you might need to tweak CORS in your API Gateway if you find that the data stops refreshing and there are errors in your browser console related to CORS. Check the CORS settings in API Gateway for your API - add*in the allowed headers to allow the data to get to your app.
The last thing to do is to configure your web app to query the database and display a new affirmation each time the screen is refreshed. Normally, Astro will fetch data once, when the component is rendered. To make the affirmation change each time the page is reloaded, you need to make a few edits to allow client-side rendering in Astro.
Go back to make some edits to your Astro app. Replace the hard-coded affirmation in the
AffirmationComponent.jsx file. Add these lines to the top:And finally make sure that the
<h3> tag includes just the one affirmation:Your affirmation should change each time you reload the page.
The last thing you need to do is to celebrate your accomplishment and share it with the world. An easy way to do this is by using GitHub pages, deployed via GitHub Actions.
Commit your code to GitHub, using the git integration that was created by Astro when you scaffolded your app. Make sure the repo is public. Now you'll need a GitHub action to build and deploy your app to GitHub pages, since it's not a static app but has a build step.
Navigate to your GitHub repo and visit the Actions tab. Click the
New Workflow button and search for Astro. Select the Astro Workflow and click configure. This process creates a new folder called .github/workflows with a .yml file outlining the steps needed to build your app. Commit this structure to your repo by selecting commit changes.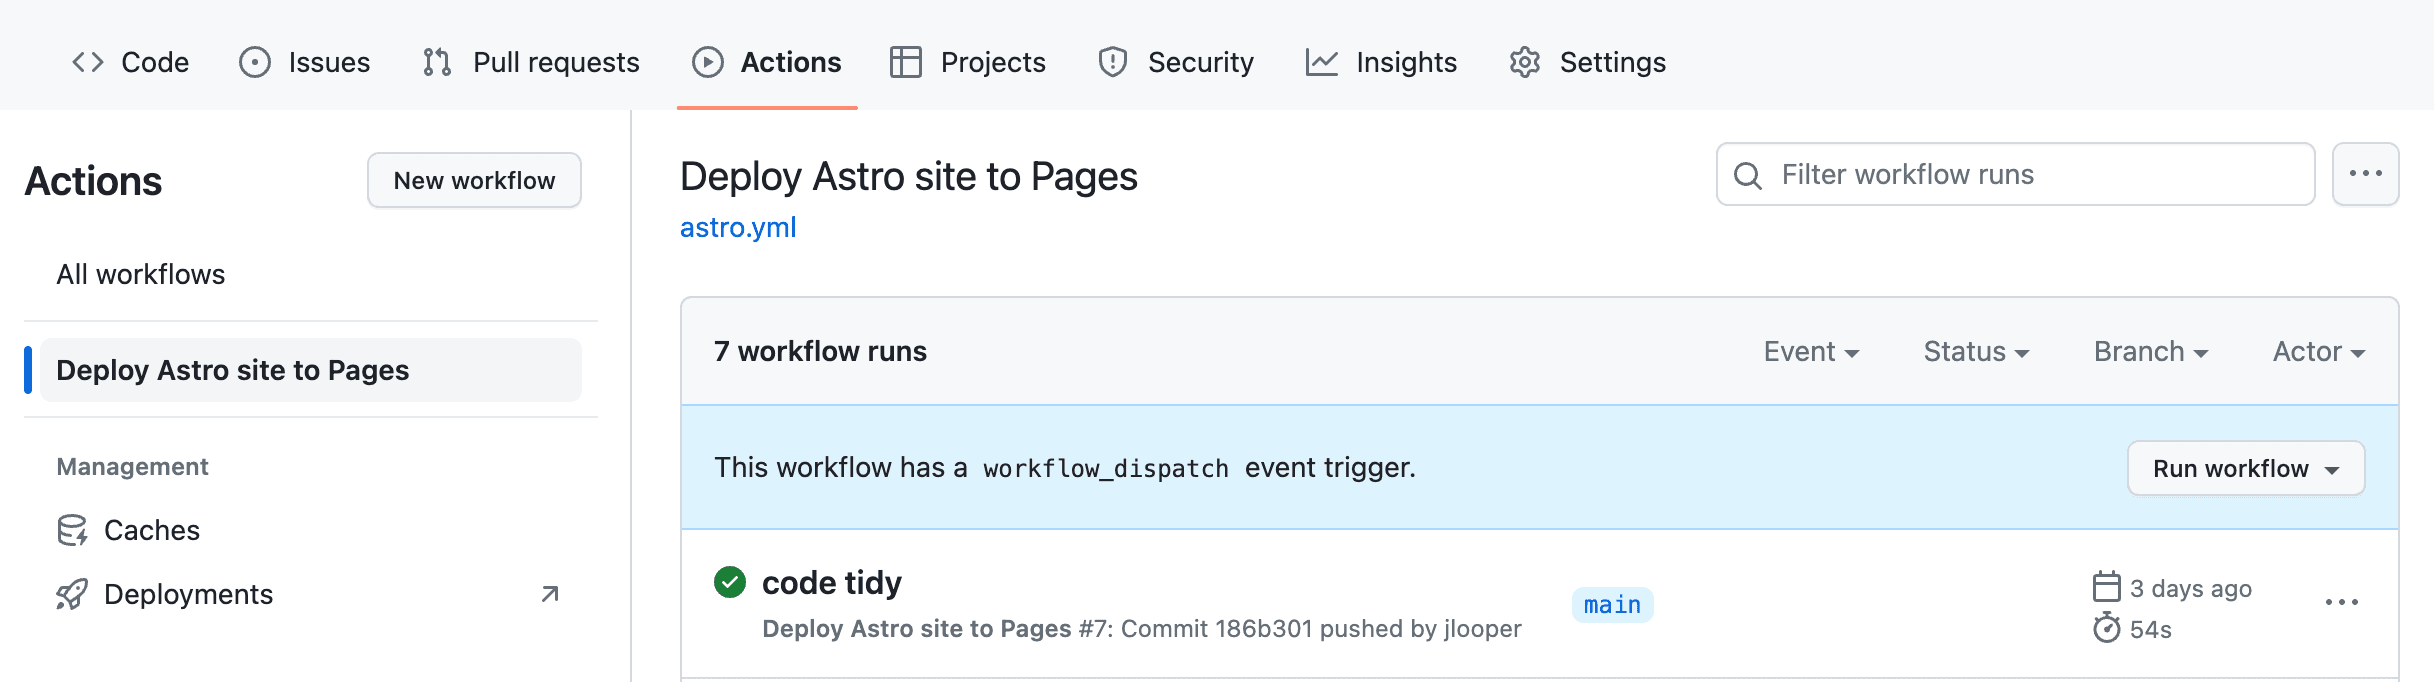
Finally, navigate to
Settings > Pages to ensure that your app has GitHub Pages configured and that your new Action is building them. GitHub should provide you with an URL. A demo of this whole app is available on this GitHub page.Wasn't that calming? By using easy-to-use, beautiful tooling such as Astro, Lambda, DynamoDB, API Gateway, and hassle-free web hosting, you built a lovely application that looks good and helps you feel good, too. Don't forget to hydrate, listen to soothing music, touch grass, and enjoy May!
If you don't want your app to live on, don't forget to remove any assets you created in this tutorial. You can remove your
Affirmations database table in the AWS Console by searching for DynamoDB and choosing the table to delete. Do the same in API Gateway for your http-affirmations-api asset, and in Lambda, delete the get-affirmations function. Remove the role that you created in IAM as well. This will save you from any costs that fail to spark joy. Marie Kondo would be proud of you.Jen Looper is the Head of Academic Advocacy at AWS and manages a team in Developer Relations all about curating the higher-ed student journey through great content, cool events, and a valuable community experience on campuses globally called Cloud Clubs. Learn more about Academic Advocacy's initiatives on our website.
Any opinions in this post are those of the individual author and may not reflect the opinions of AWS.