By default, Amazon WorkSpaces provides the ability for users to authenticate into their WorkSpaces using their AD username and password. To enhance security during authentication, WorkSpaces provides customers with the ability to enable the usage of Common Access Card (CAC) and Personal Identity Verification (PIV) smart cards for authentication into WorkSpaces. This functionality supports smart cards for both pre-session authentication (authentication into the WorkSpace) and in-session authentication (authentication that's performed after logging in). For example, users can log into their WorkSpaces using smart cards and use their smart cards within their WorkSpace session to authenticate to websites or other applications. By integrating this, you can eliminate the need for the end user to use their username and password when using their WorkSpace and all AD-related authentication can be handled via the user's smart card certificate.
In this post, we will walk through step-by-step how you can set up and configure new or existing Microsoft PKI to support PIV smart card authentication including setting up an OCSP responder, proper configuration of Active Directory, domain controllers, certificate templates, group policy, and WorkSpaces. You can expect to have a fully functioning WorkSpaces smart card authentication environment for both Linux and Windows WSP WorkSpaces after completing the steps in this post.
The following figure shows the high-level architecture of the Amazon WorkSpaces solution, depicting internet access by a user to access an Amazon WorkSpace using their smart card in the Amazon WorkSpaces client.
- AWS Account - A VPC with at least 2 private subnets (with internet access) and 1 public subnet (with internet access) - Two Active Directory (AD) domain controllers in different private subnets - An AD Connector - A EC2 security group - A EC2 Keypair - A EC2 Windows instance joined to the AD domain - A Windows computer with the WorkSpaces Client installed - A CAC or PIV card - (Recommended) A public domain in Route53 or a public domain in another provider using a top-level domain found in the IANA Root Zone Database - (Optional) A public S3 bucket
Two Active Directory (AD) domain controllers in different private subnets. (You can use AWS Launch Wizard for Active Directory to deploy self-managed AD or AWS Managed Microsoft AD if you do not have AD setup. If using on-premises AD, ensure VPC connectivity to on-premises is already set up.)
An AD Connector configured to use those domain controllers (including the credentials to your AD Connector service account).
A Windows computer with the WorkSpaces Client installed for testing authentication into the WorkSpace.
A CAC or PIV card used for smart card authentication (e.g. Yubikey 5, Taglio PIVKey + Smart Card Reader, or equivalent products supporting CAC/PIV).
(Recommended) A public domain in Route53 or a public domain in another provider using a top-level domain found in the IANA Root Zone Database to host a DNS record for the OCSP (Online Certificate Status Protocol) responder instance.
(Optional) A public S3 bucket to store certificate revocation lists (CRLs) and public certificates of the CA(s). You aren’t required to store the certificates and CRLs in an S3 bucket. If you don’t use an S3 bucket, the CRLs will be hosted in a file share and Internet Information Services (IIS) website on the Enterprise CA.
Deploying the Solution
The solution I present here involves the following steps:
Deploy Microsoft PKI Quick Start template and set up OCSP responder (required if you do not have PKI already set up in your AD environment)
Create objects in Active Directory with necessary permissions
Configure the Certificate Authority to allow certificates to be issued to smart card users
Request a certificate for your individual smart card user
Verify the smart card is working with its certificate properly and test that the certificate can be verified with OCSP
Register AD Connector with WorkSpaces, create a test Windows WorkSpace using WorkSpaces Streaming Protocol (WSP), import the WSP GPO template, and enable smart card redirection on WorkSpaces
Configure the AD Connector to use smart card authentication
Test pre-session smart card authentication on Windows WorkSpaces
Test in-session smart card authentication on Windows WorkSpaces
Set up smart card authentication on Linux WorkSpaces (GovCloud only)
Test smart card authentication on Linux WorkSpaces (GovCloud only)
Section 1: Deploy an offline root CA and enterprise subordinate CA by using the Microsoft Public Key Infrastructure Quick Start template and set up an OCSP responder
If you do not already have Microsoft PKI infrastructure set up (e.g. CAs, OCSP responder) in your AD environment, this first section is to deploy an offline root CA and enterprise subordinate CA by using the Microsoft Public Key Infrastructure Quick Start template and create an OCSP responder instance. If you already have PKI infrastructure set up, including an OCSP responder, please skip to Section 2.
Step 1. Create a Secret in Secrets Manager
In this step, you store the AD account credentials used for deploying the template in a Secrets Manager secret. Automation uses this secret to create the CA infrastructure in your self-managed AD environment. This user account should be in the Enterprise Admins group.
On the Store a new secret page, under Select secret type, choose Other type of secret.
Under Key/value pairs, do the following:
In the first field, enter username, and in the same row, in the next field, enter the name of your AD account.
Choose + Add row.
On the new row, in the first field, enter password, and on the same row, in the next field, enter the password for your AD account.
Under Encryption key, choose a key of your choice.
Choose Next.
On the Store a new secret page, for Secret name, enter a name for the secret, leave the default settings for the remaining fields, and choose Next on each of the next two pages.
Review the settings, and then choose Store to save your changes. The Secrets Manager console returns you to the list of secrets in your account with your new secret included in the list.
Choose your newly created secret from the list, and take note of the Secret ARN value. You will need it in the next step.
Step 2: Deploy the Microsoft Public Key Infrastructure Quick Start template
In this step, you deploy an offline root CA and an enterprise subordinate CA by using the Microsoft Public Key Infrastructure Quick Start. Because you use a Quick Start template for this deployment, you only need to enter the following information—you can change the default values for any fields not explicitly mentioned below.
To deploy the CAs with the Microsoft Public Key Infrastructure Quick Start
For Amazon S3 URL, enter: https://aws-quickstart.s3.amazonaws.com/quickstart-microsoft-pki/templates/microsoft-pki.template.yaml
Choose Next.
Specify the stack details as follows:
For VPC CIDR, enter the CIDR of the VPC where your AD domain controllers reside.
For VPC ID, select the VPC where your AD domain controllers reside.
For CA(s) Subnet ID, select a private subnet in the VPC where your AD domain controllers reside.
For Domain Members Security Group ID, select an existing security group that allows outbound communication with the AD domain controllers. This will be attached to the CA instances that are created.
For Key Pair Name, select any EC2 key pair in your account.
For Active Directory Domain Services Type, select SelfManaged or AWSManaged (dependent on your AD environment).
For Domain FQDN DNS Name, enter the DNS name of the AD domain. In this example, I use corp.example.com.
For Domain NetBIOS Name, enter the NetBIOS name of the AD domain. In this example, I use CORP.
For IP used for DNS (Must be accessible), enter the IP address of one of the AD domain controllers.
For IP used for DNS (Must be accessible), enter the IP address of the other AD domain controller in a different subnet.
For Secret ARN Containing CA Install Credentials, enter the Secrets Manager secret ARN created in Step 1: Create Secret in Secrets Manager.
For CA Deployment Type, select One-Tier or Two-Tier. Two-Tier is recommended, refer to CA Hierachies for more details.
For Use S3 for CA CRL Location, select No or Yes. Note: If you don’t want to use an S3 bucket to store the certificate revocation lists (CRLs), set Use S3 for CA CRL Location to No. When No is selected, the Quick Start stores and hosts the CRLs in a file share and Internet Information Services (IIS) website on the Enterprise CA.
For CA CRL S3 Bucket Name, enter the name of the bucket you created to store certificate revocation lists (CRLs) and certificates. Note: If you set Use S3 for CA CRL Location to No, leave this field as default.
Select Next on the current screen and the following screen.
Check the box next to each of the following statements.
I acknowledge that AWS CloudFormation might create IAM resources with custom names.
I acknowledge that AWS CloudFormation might require the following capability: CAPABILITY_AUTO_EXPAND.
Choose Create stack.
It should take 20 to 30 minutes for the resources to deploy.
Step 3: Allow the Domain Controllers to Communicate with the Enterprise CA
In this step, you configure AWS security group rules so that your directory domain controllers can connect to the enterprise subordinate CA to request a certificate. To do this, you must add outbound rules to each domain controller’s AWS security group to allow all outbound traffic to the AWS security group of the enterprise subordinate CA so that the directory domain controllers can connect to the enterprise subordinate CA to request a certificate. If you are using self-managed AD and your domain controllers are outside of AWS, you can ensure your domain controllers allow the necessary traffic from on-premises to the enterprise subordinate CA instance.
In the navigation pane of the AWS VPC console, under the Security heading, choose Security Groups.
Select the AWS security group of your AWS Managed Microsoft AD directory. When using AWS Managed Microsoft AD, the security group name is formatted like the following: d-1234567890_controllers. If using self-managed AD, select a different security group that is attached to your domain controllers.
Switch to the Outbound rules tab, and choose Edit outbound rules.
Choose Add rule and then do the following:
For Type, select Custom TCP.
For Port range, enter 135.
For Destination, select Custom and then enter the private IP assigned to the Enterprise CA instance.
Add an additional rule by repeating the same above steps, but change the Port range value to 49152 - 65535.
Add another additional rule by repeating the same above steps, but change the Port range value to 80 and the Destination to Anywhere-IPv4 to allow the domain controllers to check CRLs during authentication. This can be restricted further based on your environment.
Choose Save rules.
When using AWS Managed Microsoft AD, the domain controllers will automatically request a certificate based on the template named LdapOverSSL-QS that was created by the Microsoft Public Key Infrastructure on AWS Quick Start deployment. It can take up to 30 minutes for the directory domain controllers to auto-enroll the available certificates. If using self-managed AD, the next step discusses how you can enable auto-enrollment to accomplish the same.
Step 4: Setup domain controller auto-enrollment for certificates (self-managed AD)
As the CloudFormation template creates and deploys a certificate template named LdapOverSSL-QS, ensure your domain controllers have auto-enrollment enabled in order for them to be granted a certificate to be used for authenticating users. Each domain controller that is going to authenticate smart card users must have a domain controller certificate. If you are using AWS Microsoft Managed AD, you can skip this step as it is already enabled.
Connect to your MGMT instance with an AD user in the Domain Admins group or a group with equivalent permissions.
Open PowerShell as an Administrator and run the following commands to install the Group Policy Management console if it's not installed and open it:
Install-WindowsFeature GPMC gpmc.msc
Create or locate an existing group policy in your domain that will apply to your domain controllers, right-click it, select Edit…
Enable certificate auto-enrollment in the policy:
In the Group Policy Management Editor, under Computer Configuration, and expand Policies.
Expand Windows Settings, expand Security Settings, and select Public Key Policies.
Double-click Certificate Services Client – Auto-Enrollment and set the following settings:
After applying the setting, close out of Group Policy Management Editor.
Step 5: Confirm the Domain Controllers Contain Required Certificates
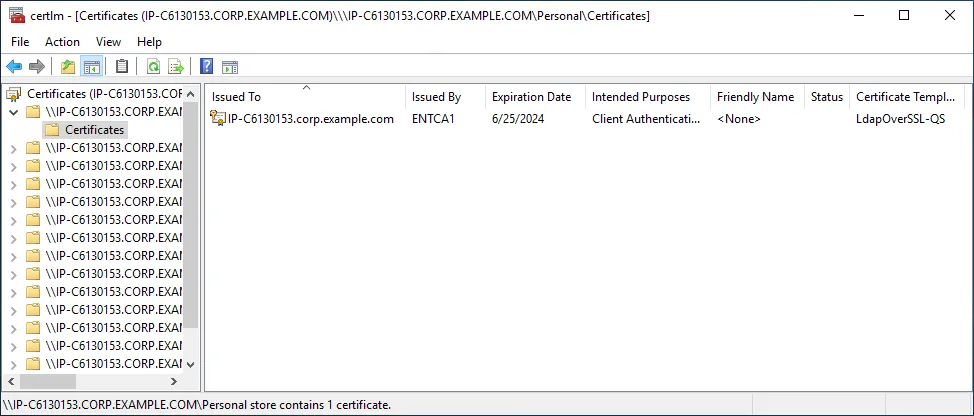
Each domain controller that is going to authenticate smart card users must have a domain controller certificate. Ensure the domain controllers have a certificate in their Personal store from the certificate template LdapOverSSL-QS.
Review the certificate store on each domain controller to ensure they receive a certificate from the LdapOverSSL-QS template:
On the MGMT instance, open certlm.msc.
Right-click Certificates – Local Computer, select Connect to Another Computer, enter the name of one of the DCs, select OK.
Expand Personal, select Certificates, and confirm a certificate exists from the LdapOverSSL-QS template:
Repeat the above steps for the remaining domain controllers in the domain that will be authenticating users.
Run certutil -DCInfo in PowerShell and ensure it completes successfully without any errors.
Step 6: Deploy an EC2 Windows Instance and Configure it as an OCSP Responder Instance
For pre-session authentication into WorkSpaces, Online Certificate Status Protocol (OCSP) is required for certificate revocation checking. An OCSP responder is a component of a public key infrastructure (PKI) that can be installed on Windows Server to meet this requirement. The OCSP responder is required to be publicly accessible on the internet over HTTP. In this blog post, we are only setting up one OCSP responder, which we will refer to as the OCSP instance. If you’d like to make the OCSP responder highly available, you can do so by setting up multiple OCSP responders in an Array.
Launch a standard EC2 Windows instance using Windows Server in a public subnet (OCSP responder should be in a public subnet) and set Auto-assign public IP to enable. At minimum, a t2.medium instance type or equivalent is recommended.
Attach a security group to the OCSP instance that allows you to RDP (port 3389) into it.
Gather a public DNS name that resolves to the public IP address of your EC2 instance for use later when setting the OCSP responder URL:
Option 1: (Recommended) If you own a public domain in Route53 or another provider, create an A record that resolves to the IP address of the OCSP instance. Note down the full DNS name of this record (e.g. ocsp.mydomain.com) as you will need it in the following steps when configuring the CA for OCSP.
Option 2: If you do not own a public domain, you can instead use the auto-generated public IPv4 DNS name of your EC2 instance. You can find this value in the details tab of your EC2 instance in AWS console. Note down the value of the Public IPv4 DNS name for the following steps when configuring the CA for OCSP. If this value does not appear, please ensure DNS hostnames is enabled on your VPC.
Manually join the OCSP instance to your AD domain, specify a desired computer name (e.g. OCSP), and restart it.
Connect to your Enterprise CA instance (created from the Quick Start template) with an AD user in the Domain Admins or AWS Delegated Administrators group.
Duplicate a new OCSP response signing certificate template:
Select the Compatibility tab, select the operating system used by the Enterprise CA. Choose Server 2016 if using Server 2016 or newer. For Certificate recipient, select the Windows version used by the OCSP responder instance.
Select the General tab, give it a name (e.g. CA OCSP Response Signing), and check Publish certificate in Active Directory.
Note: The above commands were tested on Server 2019 and newer.
Respond to any installation prompts and wait for the installation to complete.
Configure OCSP after installation:
Open ocsp.msc, right-click Revocation Configuration, select Add Revocation Configuration.
Select Next, enter a name (e.g. OCSP), select Next, select Select a certificate for an Existing enterprise CA, select Next.
Select Browse CA certificates published in Active Directory, select Browse…
Select your CA, select OK
Select Next, ensure to select the certificate template created earlier.
Select Next, select Finish.
Adjust the security group attached to the OCSP instance to allow HTTP (port 80) inbound from all IP addresses as required for the OCSP responder configuration. To perform certificate revocation checking, the OCSP responder must be internet-accessible.
Connect back to the Enterprise CA instance and verify Enterprise PKI status:
Connect to your Enterprise CA instance.
Open pkiview.msc, expand out your CAs, select Refresh, left-click your CA
The content should look similar to the following (with your correct OSCP URL that you also set on the certificate template earlier):
Note: If the OCSP Location #1 shows any error status, it can be due to your Enterprise CA instance not having internet connectivity and/or the OCSP instance is not allowing HTTP traffic from ALL IPs. The Enterprise CA instance needs internet access to verify that the OCSP location is publicly reachable.
The public DNS name for your OCSP instance should be publicly resolvable and should be accessible over HTTP (port 80), therefore, on any computer confirm this:
Open PowerShell and run the following command (adjust the command to your configured OCSP DNS name): tnc ocsp.mydomain.com -port 80
The results should look similar to the following:
Section 2: Create Objects in the Active Directory with the Necessary Permissions
In this step, we will configure AD objects in your environment to prepare for smart card authentication and setup Kerberos Constrained Delegation on your AD Connector service account.
Install Active Directory tools on the MGMT instance and create AD objects:
Connect to your MGMT EC2 instance with an AD user in the Domain Admins or AWS Delegated Administrators group.
Once connected, open PowerShell as Administrator and run the following commands. When prompted, enter the desired password for the test smart card user and hit enter. These commands will create an AD user for your test smart card user and an AD group for the smart card users. If you already have an AD user with an email address and AD group created for this purpose, you can skip this.
Use the SetSpn command to set a Service Principal Name (SPN) for your existing AD Connector service account to enable the service account for delegation configuration:
Open PowerShell and run the following commands (adjust the variables to specify your service account and any unique SPN):
Open dsa.msc, locate your AD Connector service account, right-click it, select Properties.
Choose the Delegation tab, Select the Trust this user for delegation to specified services only and Use any authentication protocol radio buttons:
Choose Add…, select Users or Computers, and add ALL of the domain controllers that the AD Connector service account will be allowed to complete TLS mutual authentication with. If using AWS Managed Microsoft AD, add all domain controllers.
Choose OK to display a list of available services used for delegation.
Choose the LDAP service type for each domain controller, click OK and click OK to finish the configuration.
Please note that the Kerberos Constrained Delegation setting is specific to computer names. When using AWS Managed AD as your domain controllers, the domain controllers may be replaced with new domain controllers causing this setting to become inaccurate, which will cause users to fail to log in with smart card authentication in the WorkSpaces client. You may want to consider automating the updating of this value using PowerShell in that scenario.
Section 3: Configure the Certificate Authority to Allow Certificates to be Issued to Smart Card Users
Create a certificate template to allow self-enrollment smart card logon certificates to your users:
Connect to your Enterprise CA with an AD user in the Domain Admins or AWS Delegated Administrators group.
Open certtmpl.msc, find the Smartcard Logon template, right-click it, select Duplicate Template.
Select the Compatibility tab, select the operating system used by the Enterprise CA. Choose Server 2016 if using Server 2016 or newer. For Certificate recipient, select the oldest Windows version in your environment.
Select the General tab:
Change the Template display name to a desired name (e.g. SmartcardWS, you will need this name later).
(Optional) Select Publish certificate in Active Directory.
(Optional) Select Do not automatically reenroll if a duplicate certificate exists in Active Directory.
Select the Request Handling tab:
Ensure Purpose: is Signature and encryption
(Optional) Check Include symmetric algorithms allowed by the subject.
Change Do the following when the subject is enrolled and when the private key associated with this certificate is used to Prompt the user during enrollment or to your preference.
Select the Cryptography tab:
Change Provider Category: to Key Storage Provider.
Select Requests must use one of the following providers, check Microsoft Smart Card Key Storage Provider.
Change Request hash: to SHA256 or to your preference.
Select the Security tab and select Add…
Add a user or group that you want to have the ability to request a smart card certificate (e.g. Smartcard Users AD group that was created earlier), and select OK.
For the user/group you added, check both Read and Enroll under the Allow column.
Select OK to finish the creation of the certificate template
Publish the certificate template:
Open certsrv.msc, expand the underlying CA.
Right-click Certificate Templates, hover over New, select Certificate Template to Issue.
Select the certificate template you just created, select OK.
Section 4: Request a Certificate for Your Test Smart Card User
In this section, we will log in as the smart card user, confirm the smart card is functioning, request a certificate used for smart card authentication, and load the certificate onto the smart card. Some smart cards may require specific drivers to be installed in order for the smart card to function in Windows.
Connect to a EC2 Windows instance or computer that is joined to your domain as your test smart card user.
Note: If connecting to a remote computer, ensure to use an RDP client that can redirect the smart card into the remote session. The Microsoft Remote Desktop Client can be used for this purpose.
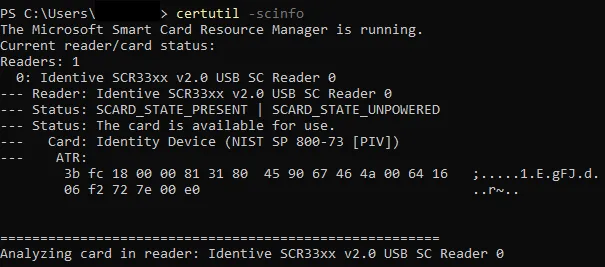
Confirm the smart card is functioning in Windows:
Open PowerShell, run the command certutil -scinfo, and enter your PIN when prompted.
The smart card should report as available for use and no errors should be reported:
Note: Some smart cards may require minidrivers to be installed. Please refer to the guidance from the manufacturer of the smart card to configure it for use in Windows.
Request a certificate for the smart card test user:
Open certmgr.msc while logged in as your test smart card user.
Right-click Personal, select All Tasks, select Request New Certificate…
Select Next, select Next, check the box next to your certificate template (e.g. SmartcardWS), select Enroll:
Note: If you do not see the certificate template, ensure your user has enroll permissions on the certificate template. If the computer does not have the CA certificates installed, the certificate template may not be presented. Complete a group policy update to install the certificates.
When prompted, enter in your smart card PIN and complete the certificate request:
The certificate request should succeed:
Note: If you are not prompted to enter your PIN during this process, please ensure your certificate template is set up correctly and that your smart card is functioning.
Note: Smart cards can have multiple digital slots. Please ensure your certificate is loaded into the authentication slot in order for Windows smart card authentication to succeed.
Section 5: Verify the Smart Card is Working Properly with its Certificate and Test that the Certificate Can Be Verified with OCSP
Verify the smart card is working properly with its certificate:
Open certmgr.msc while logged in as your test smart card user on a computer with the smart card inserted.
Expand Personal, select Certificates folder, and confirm if you see a certificate appear that is signed by your CA’s certs.
If the certificate appears, delete the certificate (ensure you delete the correct one), and unplug your smart card.
If the certificate doesn't appear, unplug your smart card. Plug the smart card back in, click the refresh button in certmgr.msc, and the certificate should appear (it may take some time and multiple refreshes).
This confirms that the smart card is functioning as expected.
Test that the certificate can be verified with OCSP:
In certmgr.msc, right-click your test user’s certificate, select All Tasks, select Export….
Select Next, select Next, select Next select Browse…, save the certificate, select Finish, and select OK.
Open PowerShell and change directory (cd) to the directory where the certificate was exported to, and run the following command against the certificate: certutil -URL exportedcertificate.cer
In the URL Retrieval Tool window that opens, select the OCSP (from AIA) radio button.
Select Retrieve, and you should see the status as Verified and the OCSP URL appear.
Note: If the above fails after 15 seconds or returns unsuccessful, it's likely that you do not have your CA certificates installed in the local computer store that is completing this test, or that your OCSP responder is not configured correctly.
Section 6: Register AD Connector with WorkSpaces, Create a Test Windows WSP WorkSpace, Import the WSP GPO Template, and Enable Smart Card Redirection on WorkSpaces
In this section, we will register your AD Connector with WorkSpaces, create a test Windows WSP WorkSpace, import the WSP GPO template, and enable smart card redirection via Group Policy.
Open the WorkSpaces console, and choose Directories in the navigation pane.
Select your AD Connector, choose Actions, select Register.
Select two subnets of your VPC that are not in the same Availability Zone. The WorkSpaces launched against this directory will be launched in these subnets.
Choose Register.
Create a test Windows WSP WorkSpace:
Launch a WSP WorkSpace for your test user and wait for it to become available. Note: Smart card authentication is only supported on WSP Windows and WSP Amazon Linux 2 WorkSpaces at this time.
Connect to your test user’s WorkSpace via RDP (it must be in a running state) with an AD user in the Domain Admins or AWS Delegated Administrators group.
Open PowerShell and run all of the following commands to copy the WSP GPO template to the SYSVOL folder:
Enable smart card redirection via Group Policy on WorkSpaces:
Connect to your MGMT instance or a domain controller with an AD user in the Domain Admins or AWS Delegated Administrators group.
Open gpmc.msc, create or locate an existing group policy in your domain applied to the OU where the WorkSpaces computer objects are stored (e.g. default computers container or Computers OU in AWS Managed Microsoft AD), right-click it, select Edit…
In the Group Policy Management Editor, under Computer Configuration, expand Policies, expand Administrative Templates, expand Amazon, and select WSP.
Close out of Group Policy Management Editor once it has been enabled.
Once deployed, reboot the test WorkSpace to update the group policy applied to the WorkSpace.
Section 7: Configure the AD Connector to use smart card authentication
Export all of your CA certificates used in your certificate chain in Base-64 encoded format:
Connect to your MGMT instance as your test smart card user.
Open certmgr.msc, expand Personal, and select Certificates.
Double-click the user certificate, select the Certification Path tab.
You will need to export and register every certificate in the certification path (besides the user certificate) with the AD Connector.
Expand Trusted Root Certification Authorities, and select Certificates.
Right-click your root certificate, select All Tasks, select Export…, select Next, select Base-64 encoded X.509 (.CER), and select Next.
Select Browse…, save the certificate, select Next, select Finish, select OK.
Repeat the same steps for any intermediate certificate in the Intermediate Certification Authorities store.
Copy the outputted Base64 certificate(s) to your local computer or a computer with access to AWS console.
Register the outputted certificates with your AD Connector:
Open Directory Services console, view the details page of your AD Connector, scroll down to Smart card authentication.
Under CA certificates, select Actions, select Register Certificate.
Select Choose file, choose the certificate exported from previous step.
For OCSP responder URL, enter your OCSP responder URL.
Select Register certificate.
Repeat the above steps again for each certificate in your certificate chain that you exported.
After all of the certificates have been registered, select Enable under Smart Card authentication, and select Enable, which will enable smart card authentication for the entire AD Connector.
Section 8: Test Pre-Session Smart Card Authentication on Windows WorkSpaces
Use the WorkSpaces client to test smart card authentication:
Enter your registration code for your directory when prompted.
Select Insert your smart card and select your user’s certificate when prompted.
Enter the smart card pin when prompted:
This completes the TLS mutual authentication with AD Connector login phase.
Next, you will be presented with the Windows logon page.
Select Sign-in options, select the smart card icon, and enter your smart card PIN:
This completes pre-session smart card authentication with Windows WorkSpaces. If you receive any errors, refer to the troubleshooting section towards the end of this article.
Section 9: Test In-Session Smart Card Authentication on Windows WorkSpaces
Within a WorkSpaces session, test in-session smart card authentication:
Connect to the WorkSpace.
RDP into an EC2 instance or computer using your smart card and enter your PIN when prompted.
This completes in-session smart card authentication with Windows WorkSpaces.
Note: Additional customizations of the Windows logon experience can be done using Microsoft's provided GPOs and the WSP GPO template.
Section 10: Set Up Smart Card Authentication on Linux WorkSpaces (GovCloud Only)
Smart card authentication is supported on Amazon Linux 2 WorkSpaces using the WSP protocol in the us-gov-west-1 and us-gov-east-1 regions. To set this up, you will need to create a custom image that contains the certificates in your certificate chain. The following steps assume the Linux user already has a certificate on their smart card.
From a Windows computer in your AD environment, export ALL of the certificates in your certificate chain in DER format (not including the user certificate). You can do this using certmgr.msc from any AD-joined Windows computer in your environment.
Use PowerShell from one of your Windows computers in your AD environment (e.g. MGMT instance) to copy the certificates onto the WorkSpace using SCP:
Once the certificates are copied to the WorkSpace, convert each of your certificates into PEM format using Terminal:
openssl x509 -inform der -in ~/root.cer -out /tmp/root.pem openssl x509 -inform der -in ~/int.cer -out /tmp/int.pem
Prepare the WorkSpace for smart card authentication by running the following commands to enable smart card authentication by referring each certificate in the certificate chain:
sudo su cd /usr/lib/skylight/ ./enable_smartcard --ca-cert /tmp/root.pem /tmp/int.pem
Create a bundle from the image once the image is finished creating.
Launch a WorkSpace for your test smart card user from your custom bundle.
Section 11: Test Smart Card Authentication on Linux WorkSpaces (GovCloud Only)
Use the WorkSpaces client to test smart card authentication:
Open the WorkSpaces client.
Enter your registration code for your directory, if prompted.
Select Insert your smart card, and select your user’s certificate when prompted.
Enter the smart card pin when prompted:
This completes the TLS mutual authentication with AD Connector login phase.
Enter your PIN at the logon page.
This completes pre-session smart card authentication with Linux WorkSpaces. If you receive any errors, refer to the troubleshooting section towards the end of this article.
Troubleshooting
Certificate Validation Failed Error in the WorkSpaces Client
Certificate validation failed indicates a failure before or during the mutual TLS authentication phase that occurs with the AD Connector. This can be caused due to various reasons including the following:
The AD Connector’s service account does not have the correct Kerberos Constrained Delegation Settings. Ensure the service account is delegated access to the LDAP service on each DC that it can authenticate with, refer to this.
The Kerberos supported encryption types for your service account and domain controllers do not match. If you are using self-managed AD, collect the packet captures on each DC when reproducing the issue and analyze the Kerberos and LDAP traffic from the AD Connector IPs for any errors.
OCSP validation is failing. Refer to the previous Section 5 Step 2 to test OCSP validation.
The AD Connector registered certificates for smart card authentication are not correct.
The smart card is failing to redirect the certificate into the user’s personal store.
If you are unable to find the cause and you've confirmed the smart card authentication endpoints are not blocked, a packet capture on the domain controllers during authentication is required to identify the exact root cause. Analyze the Kerberos and LDAP traffic from the AD Connector IPs for any errors. If using AWS Managed Microsoft AD (of size large) and need to take a packet capture, you can use Traffic Mirroring.
Unknown Error Occurred in the WorkSpaces Client
This indicates that the mutual TLS authentication with AD Connector was successful, but an issue prevented the client from starting smart card authentication. This can be caused by the following:
The WSP GPO template to enable smart card redirection is not configured or is set to deny.
The user certificate fails to be redirected into the WorkSpace.
At the Windows WorkSpace Logon Screen, Various Errors Can Be Reported During Smart Card Authentication
The above error indicates a Windows OS-level smart card authentication failure. This and other related errors at this logon screen can be caused due to the following reasons:
The domain controller authenticating the user does not have a certificate in the personal store. Review the Event Viewer logs on the WorkSpace.
The user’s smart card certificate is not trusted by the WorkSpace. Connect to the WorkSpace using RDP and confirm what certificate is being redirected into the user’s personal store and ensure it is trusted.
The user’s certificate is not configured correctly for Windows smart card authentication.
At the Linux WorkSpace Logon Screen, Various Errors Can Be Reported During Smart Card Authentication
The above error indicates a Linux OS-level smart card authentication failure. This and other related errors at this logon screen can be caused due to the following reasons:
The custom image used to create the WorkSpace does not have the correct certificates in the certificate chain added in the image.
Alternative UPN suffixes are required in your environment. If so, ensure to configure them on each WorkSpace as outlined here.
A separate OS-level authentication issue. SSH into the WorkSpace and review the logs in /var/log/secure for any errors around the timestamp.
Cleaning Up
Disable smart card authentication on the AD Connector:
Open Directory Services console, view the details page of your AD Connector, scroll down to Smart card authentication.
Select Disable under Smart Card authentication, which will disable smart card authentication for the entire AD Connector.
Choose the secret your created, select Actions, and select Delete secret.
Remove the Kerberos Constrained Delegation setting from your AD Connector service account.
Clean up any created DNS records, AD users, groups, and group policies your environment.
Conclusion
In this post, you learned how to set up and configure a new or existing Microsoft PKI environment for use with smart card authentication for Amazon WorkSpaces. Now your users are able to authenticate into their WorkSpaces without needing to use a username or password.
Next, if you are using self-managed AD, instead of having users request their certificates manually through certmgr.msc, you can grant users autoenroll permissions on the certificate template and configure user certificate auto-enrollment on their local computer. Users can then be prompted to autoenroll a certificate onto their smart card at logon to their local computer.
Additionally, to enforce smart card authentication at the WorkSpace OS-level for Windows WorkSpaces, you can apply a group policy to adjust the interactive logon policy on the OU where the WorkSpaces computer objects exist to require users to use a smart card when authenticating in Windows.