Deploy LangChain 🦜🔗 applications on AWS with LangServe 🦜️🏓
Learn how to deploy LangChain applications with LangServe in minutes on Amazon ECS and AWS Fargate using AWS Copilot.
João Galego
Amazon Employee
Published Apr 3, 2024
Last Modified Jun 26, 2024
Setting up the development environment
Deploy the CloudFormation stack
Access the instance via EC2 Instance Connect
Deploying existing LangServe applications
Building and testing LangChain applications 🏗️
Deploying LangServe applications 🚀
Securing and operationalizing LangServe Applications
EDITS
12-04-2024: Updated instructions to reflect thelangchainpackage split
Organizations must move quickly when building generative AI applications. The rapid pace of innovation and heavy competitive pressure means that accelerating the journey from prototype to production is no longer an ancillary concern, but an actual imperative. One key aspect of this involves choosing the right tools and frameworks that will enable faster iteration cycles and quick experimentation by both developers and external users.
LangChain is an open source framework that simplifies the entire development lifecycle of generative AI applications. By making it quick to connect large language models (LLMs) to different data sources and tools, LangChain has emerged as the de facto standard for developing everything from quick prototypes to full generative AI products and features. LangChain has recently entered the deployment space with the release of LangServe, a library that turns LangChain chains and runnables into production-ready REST APIs with just a few lines of code.
In this post, I’m going to show you how to build, test, ship and deploy LangChain-based applications with LangServe on Amazon Elastic Container Service (ECS) and AWS Fargate in a quick, secure and reliable way, without the need to manage infrastructure.
In the following sections, we're going to build, test and deploy a simple LangChain application, powered by Anthropic’s Claude on Amazon Bedrock, that assumes a role before replying to a user’s request.
Role prompting can be used to control the style, tone, depth and even the correctness of the generated text. Using this technique, LLMs can play a wide variety of roles with different personalities simply by feeding in the right input (prompt).
👨💻 All code and documentation for this walkthrough is available on GitHub.
Before we get started, take some time perform the following prerequisite actions:
1/ If you’re using your own workstation, make sure these tools are installed and properly configured:
👇 The Development Environment Setup section below explains how to provision the development environment using AWS CloudFormation.
- Any code editor or IDE e. g. VS Code
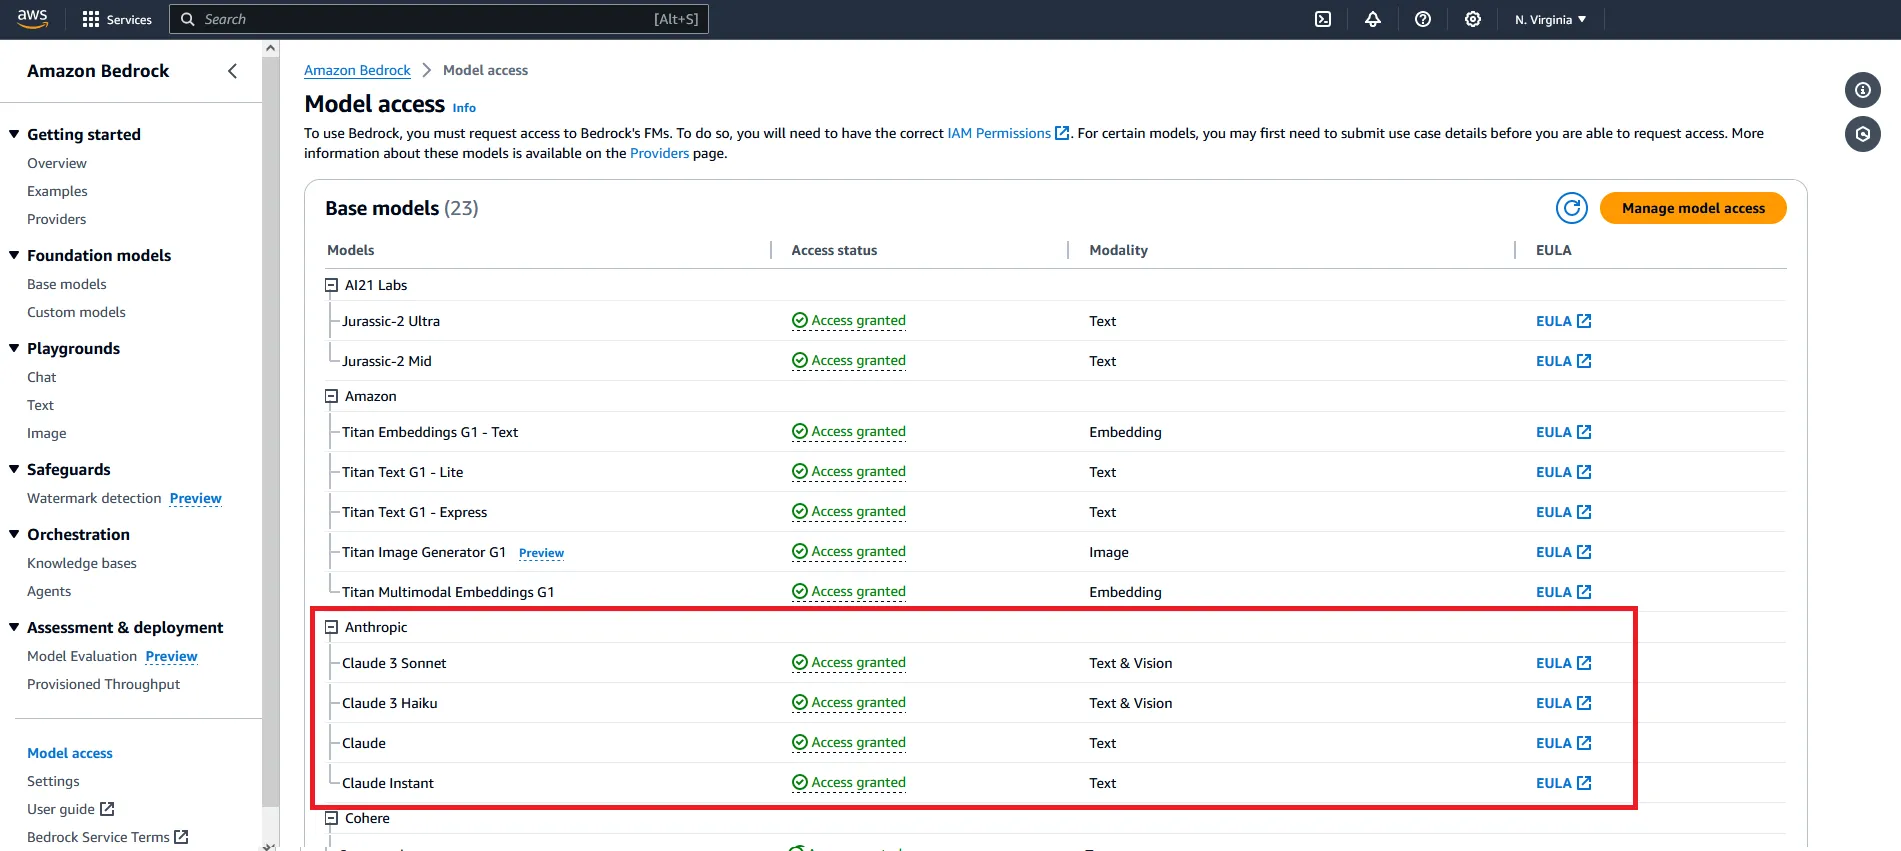
2/ Enable access to Anthropic’s Claude models via Amazon Bedrock
💡 For more information on how to request model access, please refer to the Amazon Bedrock User Guide (Set up > Model access)
This walkthrough includes two separate tracks:
- Fast lane 🏍️ - deploy an existing LangServe application
- Deep Dive 🤿 - build, test and deploy a LangServe application from scratch
You can start with the Fast Lane track, delete the application, then carry on with the Deep Dive track, and vice versa. Either track will produce similar results.
Here's a high-level overview of what we're going to do in each one:
Fast Lane 🏍️
- Setting up the development environment
- Deploy the CloudFormation stack
- Log in to the Code Server IDE
- Access the instance via EC2 Instance Connect
- Deploying an existing LangChain application
Deep Dive 🤿
- Setting up the development environment
- Deploy the CloudFormation stack
- Log in to the Code Server IDE
- Access the instance via EC2 Instance Connect
- Building and testing LangChain applications
- Bootstrap a new LangServe project using the LangChain CLI
- Add LangChain templates to the project
- Deploy and test the application locally with LangServe
- Deploying LangServe applications
- Deploy the application to Amazon ECS and AWS Fargate using AWS Copilot
- Securing and operationalizing LangServe application
- Add security features like Basic Authentication and security groups
- (optional) Connect the application to LangSmith for monitoring and logging
Let's start by setting up the development environment with Conda, code-server, Docker and AWS Copilot pre-installed.
1/ Open the CloudFormation console, click on Create stack > With new resources (standard), select Specify template > Upload a template file in the Create stack section and upload the template file (
infra/cloudformation/deploy.yml).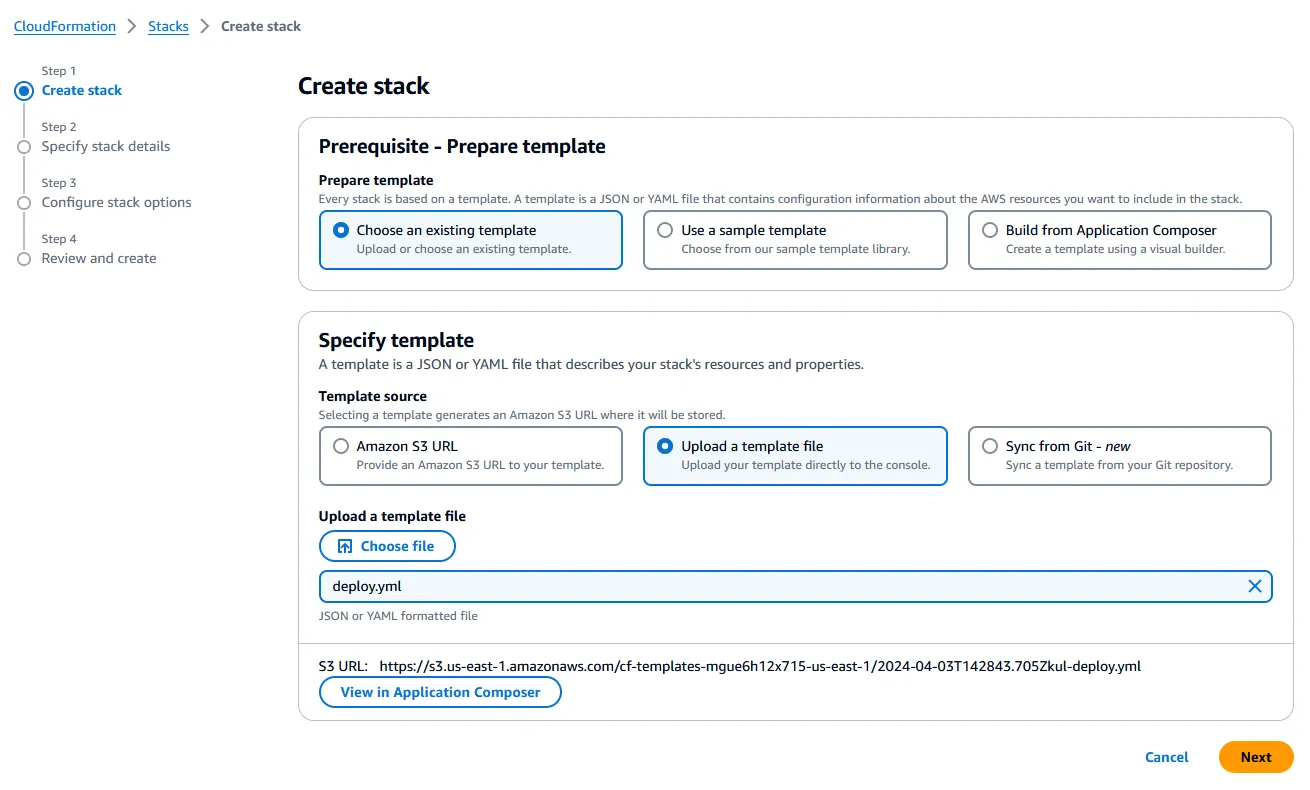
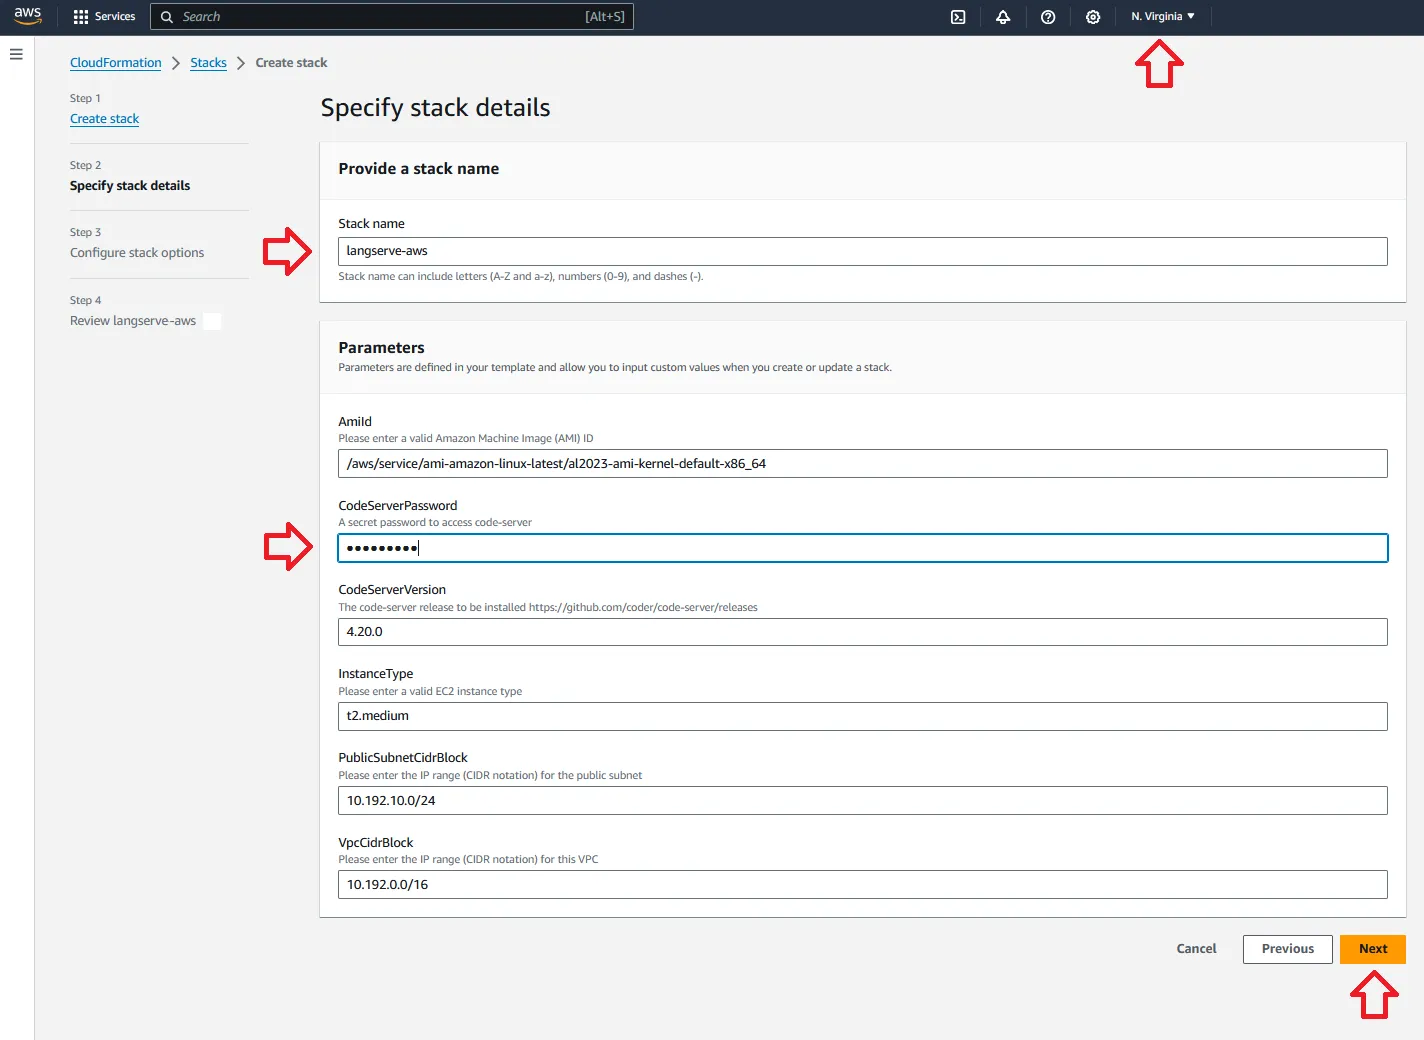
2/ In the Specify stack details section, fill in the Parameters and click Next:
- Use the Region selector in the navigation bar at the top to select the region you want to use to deploy the resources (the default region is
us-east-1/ N. Virginia). - For Stack name, use the default value (
langserve-aws) or change it to something else. - For CodeServerPassword, enter a secure password and store it somewhere safe - this password will be used later to access code-server.
- For all the remaining parameters, use the default values.
3/ In the Configure stack options section, leave everything unchanged and click Next.
4/ Review everything, check the acknowledgement boxes and click Create stack.
🕓 The stack should take ~5 minutes to deploy. When it's finished, it will show the statusCREATE_COMPLETE.
1/ On the AWS CloudFormation console, select the stack and open the Outputs tab.
2/ Point your web browser to the URL shown in CodeServerUrl.
3/ Use the password specified in the Deploy the CloudFormation stack (step 2) to login.
💡 At this point, you can open a new Terminal session from code-server and/or access the instance directly using EC2 Instance Connect.
1/ On the AWS CloudFormation console, select the stack and open the Outputs tab.
2/ Point your web browser to the URL shown in InstanceConnectUrl or start a new Terminal session on your workstation and run the command below (don’t forget to replace
<InstanceId>)1
aws ec2-instance-connect ssh --instance-id <InstanceId>❗ Feel free to skip this section if you’re interested in building the application from scratch.
In this section, we’ll be deploying the full application using AWS Copilot, an open source command line interface (CLI) that makes it simple for developers to build, release, and operate production-ready containerized applications. Behind the scenes, AWS Copilot will be using Amazon ECS and AWS Fargate, which allows us to run applications without the need to manage infrastructure, getting the latest up-to-date and patched compute capacity for our workloads.
0/ If you’re using your own workstation and haven’t done so already, now it’s the right time to install the AWS Copilot CLI - you can do so through Homebrew or by downloading the binaries directly. You can check if the CLI is installed correctly by running
copilot --help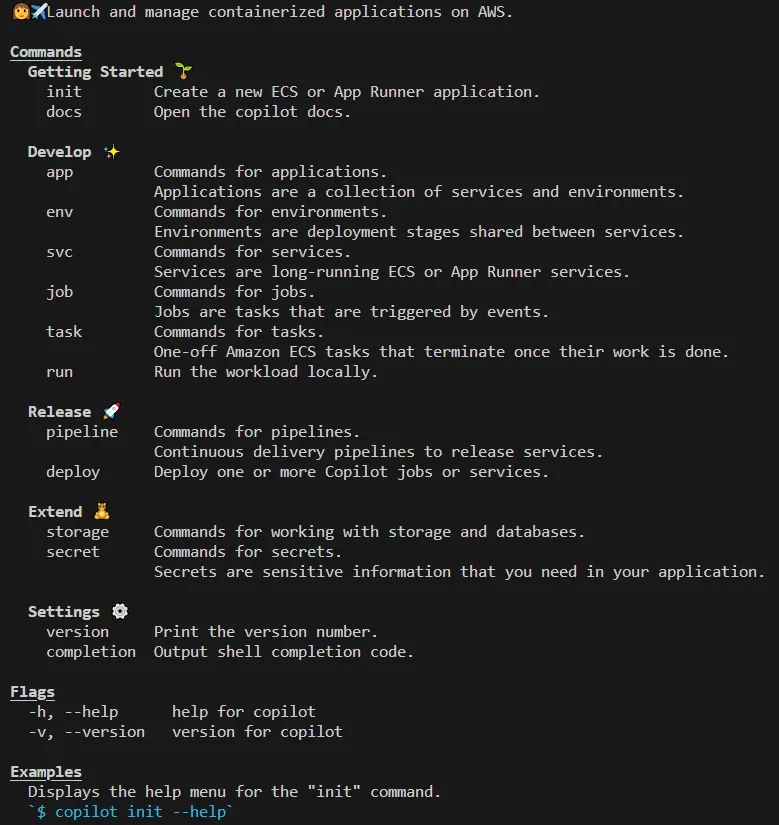
1/ Clone the project repository
1
git clone https://github.com/JGalego/deploy-langserve-aws.git
2/ Initialize the application
1
2
cd deploy-langserve-aws/bedrock-chat-app
copilot app init
3/ Add user credentials and the LangChain API key as secrets
1
2
3
4
5
6
# Bedrock Chat app
copilot secret init --app bedrock-chat-app --name BEDROCK_CHAT_USERNAME
copilot secret init --app bedrock-chat-app --name BEDROCK_CHAT_PASSWORD

# LangSmith
copilot secret init --app bedrock-chat-app --name LANGCHAIN_API_KEY
4/ Deploy the application
1
copilot deploy --all --init-wkld --deploy-env --env dev
🕓 The deployment should take ~10 minutes. AWS Copilot will return the service URL (COPILOT_LB_DNS) once it's done.
5/ Point your browser to the service playground (
<COPILOT_LB_DNS>/claude-chat/playground) to test the service.☝️ Use the credentials specified in step 3 to login (the default username/password isbedrock/bedrock).
6/ Finally, don’t forget to clean up the resources when you’re done!
1
copilot app delete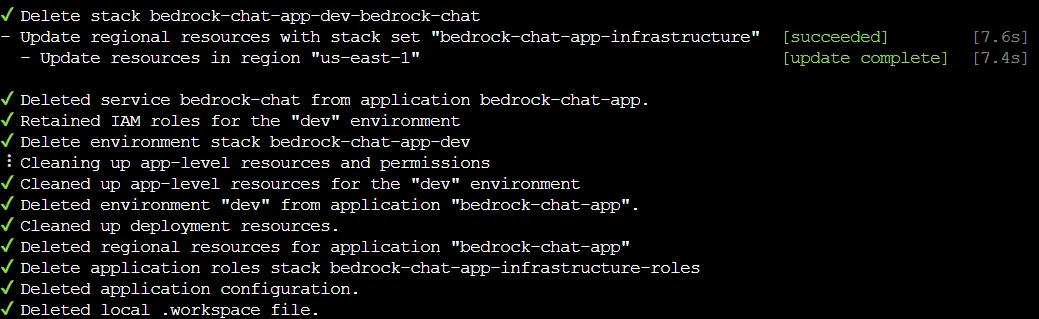
💡 Keep on reading if you want to learn more about the application and how to build one yourself.
In this section, we’re going to build the LangServe application from scratch. If you have a project already, just go back to the fast lane section (Deploying existing LangChain applications).
1/ We'll start by creating a new Conda environment to keep our project isolated
1
2
3
4
5
6
7
8
9
10
11
# Create a new environment
conda create --name langserve-aws \
             --channel defaults \
             --channel conda-forge \
             python=3.11 \
             "poetry>=1.7.1"

# Switch to the new environment
# > Note: if you're running this on your workstation and you're
# a first time Conda user, you probably need to run 'conda init'
conda activate langserve-aws
2/ Once the environment is activated, you can install the LangChain CLI by running
1
pip install langchain-cli
3/ Create a new directory to hold the application files
1
2
mkdir deploy-langserve-aws
cd deploy-langserve-aws
4/ Bootstrap a new LangServe project by issuing the command (skip the package installation for now)
1
2
langchain app new bedrock-chat-app
cd bedrock-chat-app
This will create the basic structure of a LangServe REST API without external packages. You can use the
--package option to add existing packages (commonly known as templates) upon creation, add them afterwards with the langchain app add command or create new ones with the langchain template new command. The tree structure for the project should look as follows (pycache files/folders are not shown).1
2
3
4
5
6
7
8
9
├── .gitignore
├── Dockerfile
├── README.md
├── app
│ ├── __init__.py
│ └── server.py
├── packages
│ └── README.md
└── pyproject.toml5/ Create a new template named
claude-chat1
langchain template new packages/claude-chatThis command will add the template files to the
packages folder1
2
3
4
5
6
7
8
9
10
11
12
13
14
15
16
17
18
├── Dockerfile
├── README.md
├── app
│ ├── __init__.py
│ └── server.py
├── environment.yml
├── packages
│ ├── README.md
│ └── claude-chat
│ ├── LICENSE
│ ├── README.md
│ ├── claude_chat
│ │ ├── __init__.py
│ │ └── chain.py
│ ├── pyproject.toml
│ └── tests
│ └── __init__.py
└── pyproject.toml6/ LangChain uses Poetry as the dependency manager. Make sure the local
claude-chat service is added as a dependency by issuing the command1
poetry add packages/claude-chatRight now, the package contains only sample code. We’ll need to edit the
chain.py file under the claude_chat template to do something useful. This file exposes a Runnable, the basic building block that allows us to define custom chains as well as invoke them in a standard way. 7/ Remove the sample code and copy+paste the following sections directly to the
chain.py file in order:> Parameters: the inference parameters which control the degree of randomness and the length of Claude’s responses are configured via environment variables
1
2
3
4
5
6
7
8
9
10
import os

# For a description of each inference parameter, please refer to
# https://docs.aws.amazon.com/bedrock/latest/userguide/model-parameters-claude.html
_model_kwargs = {
    "temperature": float(os.getenv("BEDROCK_CLAUDE_TEMPERATURE", "0.1")),
    "top_p": float(os.getenv("BEDROCK_CLAUDE_TOP_P", "1")),
    "top_k": int(os.getenv("BEDROCK_CLAUDE_TOP_K", "250")),
    "max_tokens": int(os.getenv("BEDROCK_CLAUDE_MAX_TOKENS_TO_SAMPLE", "300")),
}
> Models: the application will use Amazon Bedrock’s native integration with LangChain via Bedrock Chat to call Anthropic’s Claude model. By default, the API uses Claude 3 (Sonnet) and you can quickly configure different alternatives that are available at runtime.
1
2
3
4
5
6
7
8
9
10
11
12
13
14
15
16
17
18
19
20
21
22
23
24
25
26
27
28
29
30
31
32
33
34
35
36
37
from langchain_aws import ChatBedrock
from langchain_core.runnables import ConfigurableField

# Full list of base model IDs is available at
# https://docs.aws.amazon.com/bedrock/latest/userguide/model-ids-arns.html
_model_alts = {
    # As of June 2024, Claude 3.5 Sonnet is only available in N. Virginia (us-east-1)
    "claude_3.5_sonnet": ChatBedrock(
        model_id="anthropic.claude-3-5-sonnet-20240620-v1:0", model_kwargs=_model_kwargs
    ),
    # As of April 2024, Claude 3 Opus is only available in Oregon (us-west-2)
    "claude_3_opus": ChatBedrock(
        model_id="anthropic.claude-3-opus-20240307-v1:0", model_kwargs=_model_kwargs
    ),
    "claude_3_haiku": ChatBedrock(
        model_id="anthropic.claude-3-haiku-20240307-v1:0", model_kwargs=_model_kwargs
    ),
    "claude_2_1": ChatBedrock(
        model_id="anthropic.claude-v2:1", model_kwargs=_model_kwargs
    ),
    "claude_2": ChatBedrock(
        model_id="anthropic.claude-v2", model_kwargs=_model_kwargs
    ),
    "claude_instant_1": ChatBedrock(
        model_id="anthropic.claude-instant-v1", model_kwargs=_model_kwargs
    ),
}

_model = ChatBedrock(
    model_id="anthropic.claude-3-sonnet-20240229-v1:0", model_kwargs=_model_kwargs
).configurable_alternatives(
    which=ConfigurableField(
        id="model", name="Model", description="The model that will be used"
    ),
    default_key="claude_3_sonnet",
    **_model_alts,
)
> Prompts: the prompt template is intentionally simple as we’re just assigning a
role and injecting the user’s input.1
2
3
4
5
6
7
8
9
10
11
from langchain_core.prompts import ChatPromptTemplate
# For some tips on how to construct effective prompts for Claude,
# check out Anthropic's Claude Prompt Engineering deck (Bedrock edition)
# https://docs.google.com/presentation/d/1tjvAebcEyR8la3EmVwvjC7PHR8gfSrcsGKfTPAaManw
_prompt = ChatPromptTemplate.from_messages(
[
("system", "You are {role}."),
("human", "{input}"),
]
)> Chains: the
chain is defined declaratively using the LangChain Expression Language (LCEL) - in this case, we’re just chaining (piping) together the prompt template and the chat model.1
2
3
# For a quick intro to the LangChain Expression Language (LCEL), please refer to
# https://python.langchain.com/docs/expression_language/
chain = _prompt | _modelAt this point, the complete file should look something like this
1
2
3
4
5
6
7
8
9
10
11
12
13
14
15
16
17
18
19
20
21
22
23
24
25
26
27
28
29
30
31
32
33
34
35
36
37
38
39
40
41
42
43
44
45
46
47
48
49
50
51
52
53
54
55
56
57
58
59
60
61
62
63
64
import os

# For a description of each inference parameter, please refer to
# https://docs.aws.amazon.com/bedrock/latest/userguide/model-parameters-claude.html
_model_kwargs = {
    "temperature": float(os.getenv("BEDROCK_CLAUDE_TEMPERATURE", "0.1")),
    "top_p": float(os.getenv("BEDROCK_CLAUDE_TOP_P", "1")),
    "top_k": int(os.getenv("BEDROCK_CLAUDE_TOP_K", "250")),
    "max_tokens": int(os.getenv("BEDROCK_CLAUDE_MAX_TOKENS_TO_SAMPLE", "300")),
}

from langchain_aws import ChatBedrock
from langchain_core.runnables import ConfigurableField

# Full list of base model IDs is available at
# https://docs.aws.amazon.com/bedrock/latest/userguide/model-ids-arns.html
_model_alts = {
    # As of June 2024, Claude 3.5 Sonnet is only available in N. Virginia (us-east-1)
    "claude_3.5_sonnet": ChatBedrock(
        model_id="anthropic.claude-3-5-sonnet-20240620-v1:0", model_kwargs=_model_kwargs
    ),
    # As of April 2024, Claude 3 Opus is only available in Oregon (us-west-2)
    "claude_3_opus": ChatBedrock(
        model_id="anthropic.claude-3-opus-20240307-v1:0", model_kwargs=_model_kwargs
    ),
    "claude_3_haiku": ChatBedrock(
        model_id="anthropic.claude-3-haiku-20240307-v1:0", model_kwargs=_model_kwargs
    ),
    "claude_2_1": ChatBedrock(
        model_id="anthropic.claude-v2:1", model_kwargs=_model_kwargs
    ),
    "claude_2": ChatBedrock(
        model_id="anthropic.claude-v2", model_kwargs=_model_kwargs
    ),
    "claude_instant_1": ChatBedrock(
        model_id="anthropic.claude-instant-v1", model_kwargs=_model_kwargs
    ),
}

_model = ChatBedrock(
    model_id="anthropic.claude-3-sonnet-20240229-v1:0", model_kwargs=_model_kwargs
).configurable_alternatives(
    which=ConfigurableField(
        id="model", name="Model", description="The model that will be used"
    ),
    default_key="claude_3_sonnet",
    **_model_alts,
)

from langchain_core.prompts import ChatPromptTemplate

# For some tips on how to construct effective prompts for Claude,
# check out Anthropic's Claude Prompt Engineering deck (Bedrock edition)
# https://docs.google.com/presentation/d/1tjvAebcEyR8la3EmVwvjC7PHR8gfSrcsGKfTPAaManw
_prompt = ChatPromptTemplate.from_messages(
    [
        ("system", "You are {role}."),
        ("human", "{input}"),
    ]
)

# For a quick intro to the LangChain Expression Language (LCEL), please refer to
# https://python.langchain.com/docs/expression_language/
chain = _prompt | _model
8/ Next, you need to update the template dependencies by running the following commands
1
2
3
4
5
6
7
# Add dependencies at the template level
# > Note: As of this writing, LangServe requires pydantic<2 to work properly
# https://github.com/langchain-ai/langserve/pull/181
poetry add --directory=packages/claude-chat boto3 langchain-aws "pydantic<2"

# and update app lock file
poetry update
Notice that LangChain uses Boto3, the AWS SDK for Python, to call Amazon Bedrock. If you’re using your own workstation, you probably need to select a default AWS Region and setup AWS credentials before making any requests.
💡 For more information on how to do this, please refer to the AWS Boto3 documentation (Developer Guide > Credentials).
1
2
3
4
5
6
7
# Option 1: (recommended) AWS CLI
aws configure

# Option 2: environment variables
export AWS_ACCESS_KEY_ID=...
export AWS_SECRET_ACCESS_KEY=...
export AWS_DEFAULT_REGION=...
9/ Once the
chain.py is updated, you’ll need to install the package1
poetry install --directory=packages/claude-chat10/ To use the
claude-chat template, replace the ‘dummy’ API route in the server code (app/server.py)1
2
# Edit this to add the chain you want to add
add_routes(app, NotImplemented)with a new API route that directs requests to the chain
1
2
3
from claude_chat.chain import chain as claude_chat_chain

add_routes(app, claude_chat_chain, path="/claude-chat")
11/ Since LangServe is automatically installed with the LangChain CLI, we can start the application right away
💡 Use the--hostand--portflags to change the listen address and port if necessary.
1
2
3
4
5
6
# Retrieve LangServe URL
aws cloudformation describe-stacks --stack-name langserve-aws | \
   jq -r '.Stacks[0].Outputs[] | select(.OutputKey == "LangServeUrl") | .OutputValue'

# Start the application
langchain serve --host 0.0.0.0
12/ You can check that the server is up and running by navigating to LangServeUrl, which is available in the Outputs section of the CloudFormation stack, or http://127.0.0.1:8000 if you’re running it locally (unless you specified a different port).
By default, LangServe will redirect you to the self-generated OpenAPI docs endpoint:
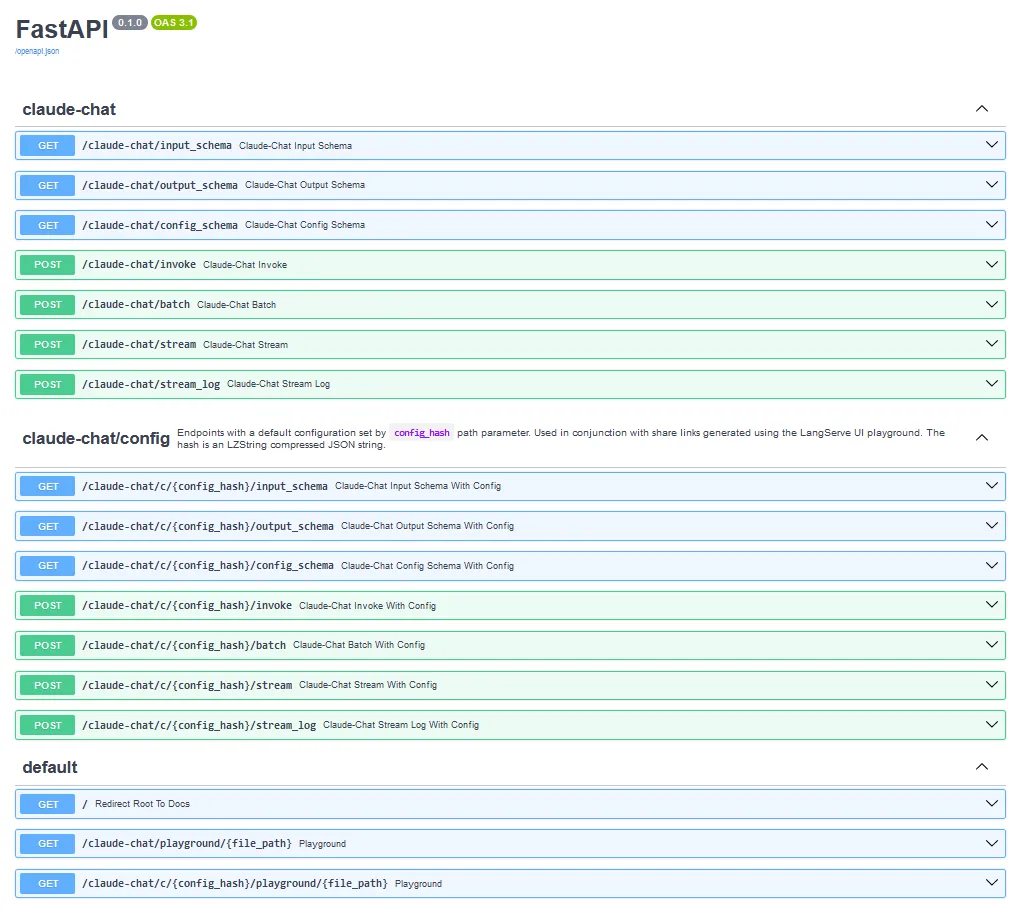
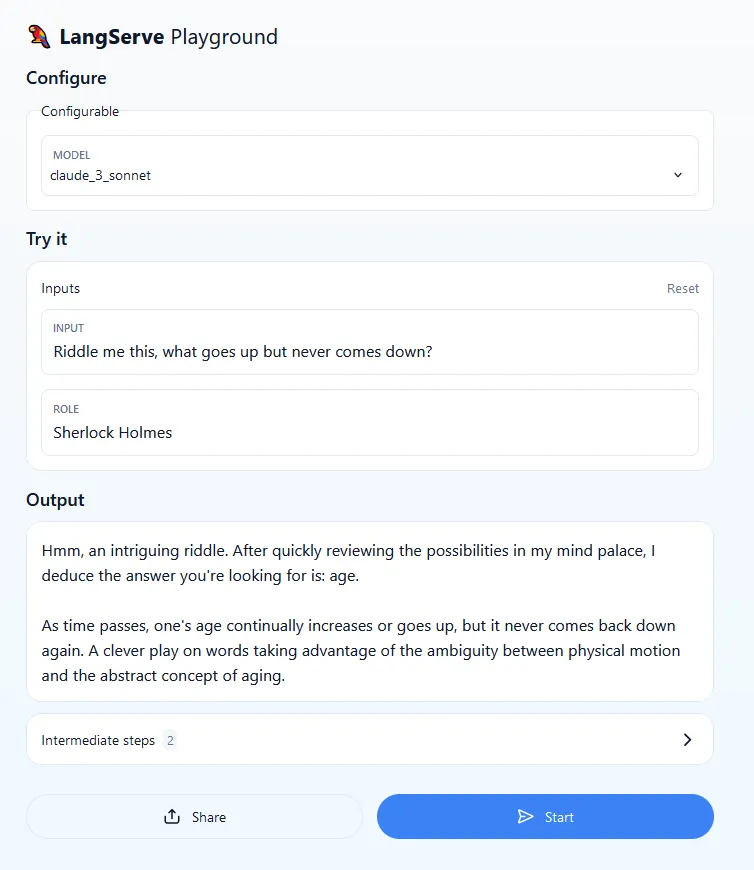
LangServe automatically creates a playground under
<LangServeUrl>/claude-chat/playground so you can quickly test the service.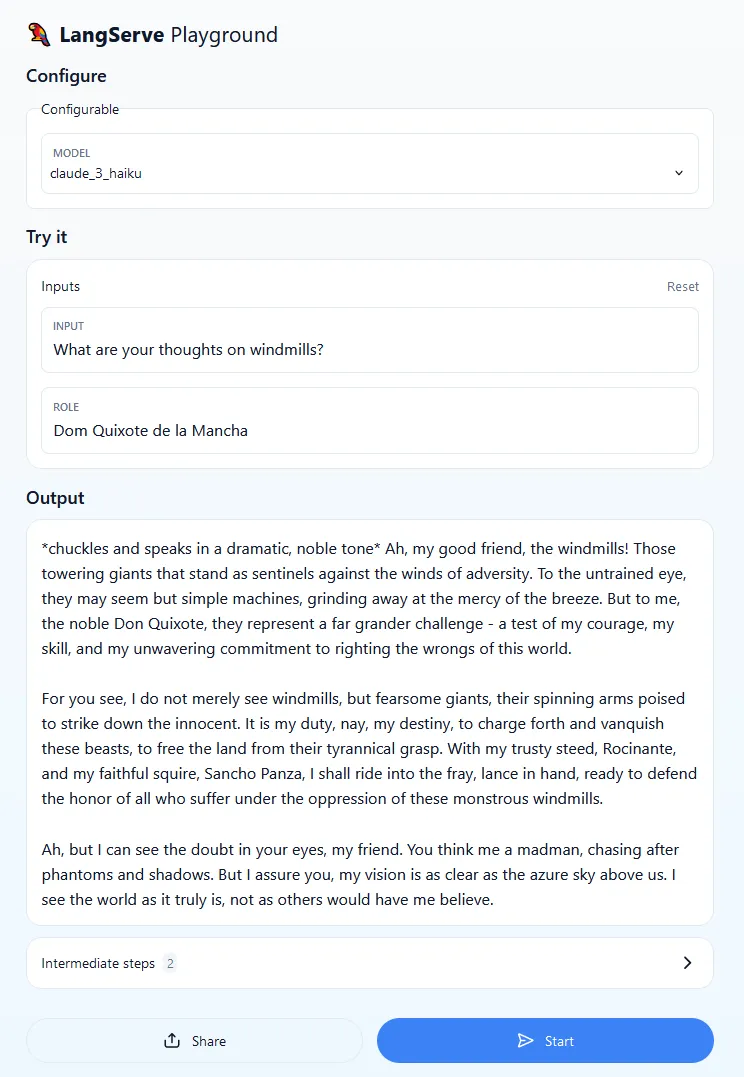
I encourage you to try different models (Configure > Configurable > Model), prompts and roles (Try it > Inputs > Input/Role). Notice that the same prompt may not work with different models and model versions. In general, assuming that the role and inference parameters remain unchanged, the same prompt can yield different results. This is to be expected and it’s one of the reasons why it’s important to test your application and run it against different prompts and prompt templates before going into production.
While this is beyond the scope of this post, keep in mind that you can have more control over the model output simply by tweaking the inference parameters and applying some prompt engineering best practices.
💡 For some tips on how to construct effective prompts for Claude models, check out Anthropic's Prompt Engineering section and the Bedrock Prompt Engineering Guidelines.
Now that we’ve tested the API locally, it’s time to deploy the application for the first time on AWS. For this part, we will be using AWS Copilot to create the application (
bedrock-chat-app), bootstrap an environment (dev) and deploy a service (claude-chat).1/ One of the nicest features of AWS Copilot Deploy is that we can deploy a project to AWS with a single command
1
2
3
4
5
copilot init --app bedrock-chat-app \
             --name claude-chat \
             --type 'Load Balanced Web Service' \
             --dockerfile './Dockerfile' \
             --deploy
AWS Copilot will ask for an environment name once the initial setup is complete. ✋ Read the next step before entering anything!
At first glance, the command may seem complex, but let’s break it down:
copilot initis used to create a new Amazon ECS or AWS App Runner application--appallows us to choose a name for the application (bedrock-chat-app), while--nameis used to define the new service (claude-chat)--typespecifies the type of service that will be created- In this case, you are creating an Internet-facing Load Balanced Web Service; if you want a service without a public endpoint, you can create a Backend Service, which is beyond the scope of this post
--dockerfilereferences a local path to the Dockerfile, which is auto-generated by the LangChain CLI--deployasks copilot to deploy the service to a new or existing environment
As far as AWS Copilot is concerned, an application is just a collection of different environments and services working together. Service and environment definitions are provided declaratively via manifest files, which are converted into AWS CloudFormation templates.
2/ ⚠️ Before proceeding, you will need to edit the
claude-chat service manifest file (copilot/claude-chat/manifest.yml) in the IDE. By default, the LangServe application will redirect requests to root (
/) to the /docs path with a 307 status code (Temporary Redirect). Since the default health check in the Load Balanced Web Service manifest (http.healthcheck) expects a 200 status code, this will prevent the service from entering a healthy state. You can either change the health check path (which is commented out in the sample service manifest)
1
2
http:
  healthcheck: '/docs'
or add
307 to the list of allowed HTTP status codes for healthy targets1
2
3
http:
healthcheck:
success_codes: '307'Both options will work since
http.healthcheck accepts either targets (strings) or full health check configurations (maps).3/ Next, you need to give the service permissions to invoke specific Bedrock models. 🚦 A simple way to do this with AWS Copilot is to use workload addon templates. These are just CloudFormation templates that a) create at least one resource and b) contain the parameters
App, Env and Name. Create a new folder named
addons under copilot/claude-chat and add a template file named bedrock-policy.yml with the following contents1
2
3
4
5
6
7
8
9
10
11
12
13
14
15
16
17
18
19
20
21
22
23
24
25
26
27
28
29
30
31
32
33
# You can use any of these parameters to create conditions or mappings in your template.
Parameters:
App:
Type: String
Description: Your application name
Env:
Type: String
Description: The environment name your service, job, or workflow is being deployed to
Name:
Type: String
Description: Your workload name
Resources:
BedrockAccessPolicy:
Type: AWS::IAM::ManagedPolicy
Properties:
PolicyDocument:
Version: '2012-10-17'
Statement:
- Sid: BedrockActions
Effect: Allow
Action:
- bedrock:InvokeModel
- bedrock:InvokeModelWithResponseStream
Resource:
- arn:aws:bedrock:*::foundation-model/anthropic.*
Outputs:
# You need to output the IAM ManagedPolicy so that Copilot can add it
# as a managed policy to your ECS task role.
BedrockAccessPolicyArn:
Description: "The ARN of the ManagedPolicy to attach to the task role."
Value: !Ref BedrockAccessPolicyThis template will create a custom managed policy that grants
bedrock:InvokeModel* (including streaming) access to the models provided by Anthropic (anthropic.*). Since the template returns the policy ARN, AWS Copilot will automatically attach it to the ECS task role.4/ 🖥️🔙 Return to the terminal and create an environment named
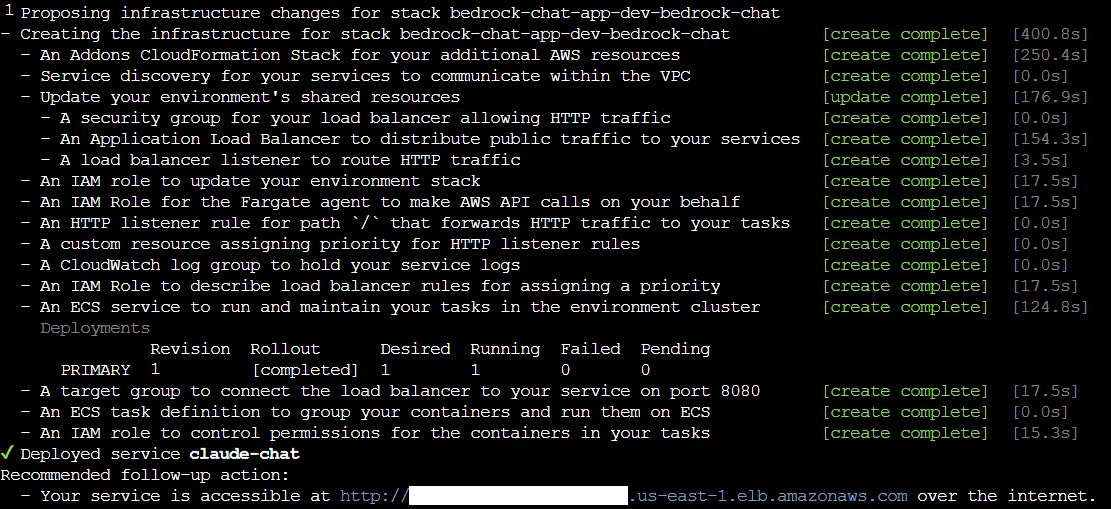
dev. After a couple of minutes, the message below will appear in the console and AWS Copilot will return the public URL to access the application.
5/ Once the service is deployed, you can use the Copilot CLI to get more information about the service
1
copilot svc show --app bedrock-chat-app --name claude-chat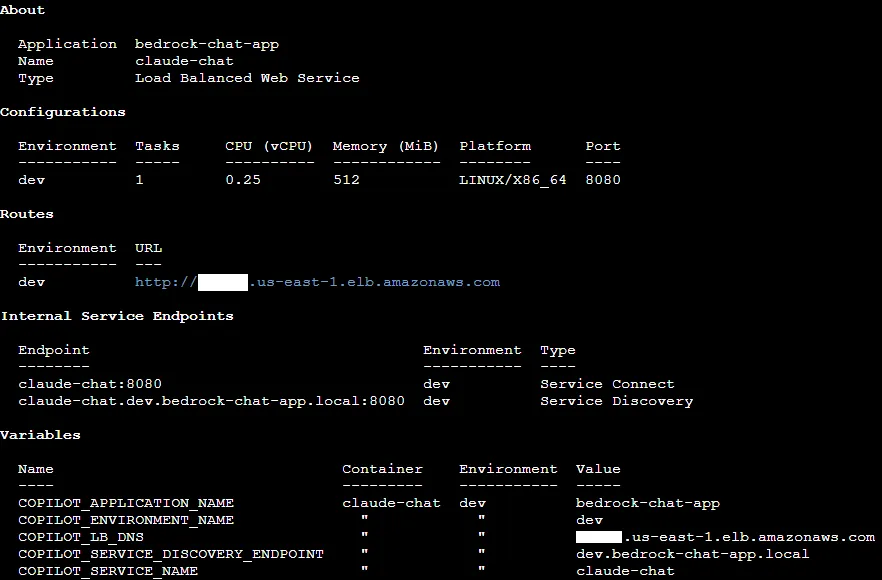
to check the service status
1
copilot svc status --env dev --name claude-chat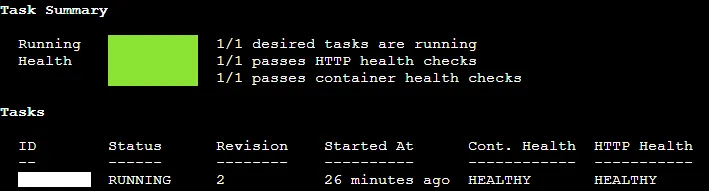
and to check the service logs
1
copilot svc logs --app bedrock-chat-app --env dev --name claude-chat
You can use the
--resources flag with the env show / svc show sub-commands to get the full list of active resources or env package / svc package to print the corresponding CloudFormation template.While production-grade authentication for LangServe applications is outside the scope of this post, it is still valuable to spend a few minutes discussing some simple ways to help protect your API which, as it currently stands, is open to everyone.
LangServe is built on top of FastAPI which means that you can implement a basic authentication scheme with a quick refactoring of the server code.
💡 For more in-depth information on how to handle authentication, please refer to FastAPI's security and middleware documentation.
1/ Replace the contents in
app/server.py with the following code sample.1
2
3
4
5
6
7
8
9
10
11
12
13
14
15
16
17
18
19
20
21
22
23
24
25
26
27
28
29
30
31
32
33
34
35
36
37
38
39
40
41
42
43
44
45
46
47
48
49
50
51
52
53
54
55
56
57
58
59
60
61
62
63
64
65
66
67
68
69
70
71
72
73
74
75
76
77
78
79
80
81
82
83
#pylint: disable=missing-function-docstring,wrong-import-position
import os
import secrets
from fastapi import APIRouter, Depends, FastAPI, HTTPException, status
from fastapi.openapi.docs import get_redoc_html, get_swagger_ui_html
from fastapi.openapi.utils import get_openapi
from fastapi.responses import RedirectResponse, Response
from fastapi.security import HTTPBasic, HTTPBasicCredentials
# The following section is adapted from
# https://github.com/tiangolo/fastapi/issues/364
# We are disabling the default docs and
# recreating them behind some basic authentication
app = FastAPI(
title="Claude Chat",
version="0.1.0",
docs_url=None,
redoc_url=None,
openapi_url = None,
)
router = APIRouter()
security = HTTPBasic()
def get_current_username(credentials: HTTPBasicCredentials = Depends(security)):
correct_username = secrets.compare_digest(
credentials.username, os.getenv('BEDROCK_CHAT_USERNAME', 'bedrock'))
correct_password = secrets.compare_digest(
credentials.password, os.getenv('BEDROCK_CHAT_PASSWORD', 'bedrock'))
if not (correct_username and correct_password):
raise HTTPException(
status_code=status.HTTP_401_UNAUTHORIZED,
detail="Incorrect username or password",
headers={"WWW-Authenticate": "Basic"},
)
return credentials.username
async def health():
content = """
<h3>Bedrock Chat is up and running!</h3>
"""
return Response(content=content, status_code=200, media_type="text/html")
async def redirect_root_to_docs():
return RedirectResponse("/docs")
async def get_swagger_documentation():
return get_swagger_ui_html(openapi_url="/openapi.json", title="docs")
async def get_redoc_documentation():
return get_redoc_html(openapi_url="/openapi.json", title="docs")
async def openapi():
return get_openapi(title=app.title, version=app.version, routes=app.routes)
###############
# Claude Chat #
###############
from langserve import add_routes
from claude_chat.chain import chain as claude_chat_chain
add_routes(router, claude_chat_chain, path="/claude-chat")
app.include_router(router, dependencies=[Depends(get_current_username)])
########
# Main #
########
if __name__ == "__main__":
import uvicorn
uvicorn.run(app, host="0.0.0.0", port=8000)
Each request that goes through the router will call the function
get_current_username to authenticate the user. The default credentials are bedrock/bedrock, but you can change their values by fixing BEDROCK_CHAT_* environment variables.2/ The new version of the server code adds a dedicated health check route, so don’t forget to change the health check path from
/docs to /health in the copilot/claude-chat/manifest.yml.3/ (Optional) A simple and secure way to inject credentials, like the Bedrock Chat username and password, and other sensitive information into the service is to store that information as a secret in AWS Systems Manager Parameter Store (SSM)
1
2
copilot secret init --app bedrock-chat-app --name BEDROCK_CHAT_USERNAME
copilot secret init --app bedrock-chat-app --name BEDROCK_CHAT_PASSWORD
then add a reference to the service manifest file
1
2
3
secrets:
  BEDROCK_CHAT_USERNAME: /copilot/${COPILOT_APPLICATION_NAME}/${COPILOT_ENVIRONMENT_NAME}/secrets/BEDROCK_CHAT_USERNAME
  BEDROCK_CHAT_PASSWORD: /copilot/${COPILOT_APPLICATION_NAME}/${COPILOT_ENVIRONMENT_NAME}/secrets/BEDROCK_CHAT_PASSWORD
4/ The changes to the service can be pushed to the
dev environment by issuing the command1
copilot svc deploy --name claude-chat --env dev6/ Once the deployment finishes, you can test that this authentication setup works with a simple
curl command:1
2
3
4
5
6
7
8
9
10
11
12
13
14
15
16
# Retrieve the public load balancer DNS name
export COPILOT_LB_DNS=`aws cloudformation describe-stacks \
--stack-name bedrock-chat-app-dev | \
jq -r '.Stacks[0].Outputs[] | \
select(.OutputKey == "PublicLoadBalancerDNSName") | \
.OutputValue'`
# Make a request to the service
# Pro tip: Get only the model output by piping (|)
# the command below to jq .output.content
curl --silent \
--request POST \
--user <USERNAME>:<PASSWORD> \
--header 'Content-Type: application/json' \
--data-raw '{"input": {"input": "<PROMPT>", "role": "<ROLE>" }, "config": { "configurable": {"model": "<MODEL>"}}}' \
$COPILOT_LB_DNS/claude-chat/invokeBe sure to replace
USERNAME, PASSWORD, ROLE, PROMPT and MODEL (e. g. claude_3_haiku) with the correct values.💡 You can restrict access to the service by adding a custom security group via workload add-on templates. The security group will be automatically attached to the ECS service as long as it is included in theOutputsection of the template.
Another interesting application of secrets is in setting up a connection to LangSmith, the official LangChain observability tool that can be used to log and monitor calls to the LangServe API.
⚠️ As of this writing, LangSmith is still in limited preview (beta release). For more information on how to get started with LangSmith, please refer to the LangSmith docs for a complete interactive walkthrough.
1/ Create a LangSmith account.
2/ Navigate to the Settings page and generate a new API key.
3/ Create a new secret to hold the LangChain API key.
1
copilot secret init --app bedrock-chat-app --name LANGCHAIN_API_KEY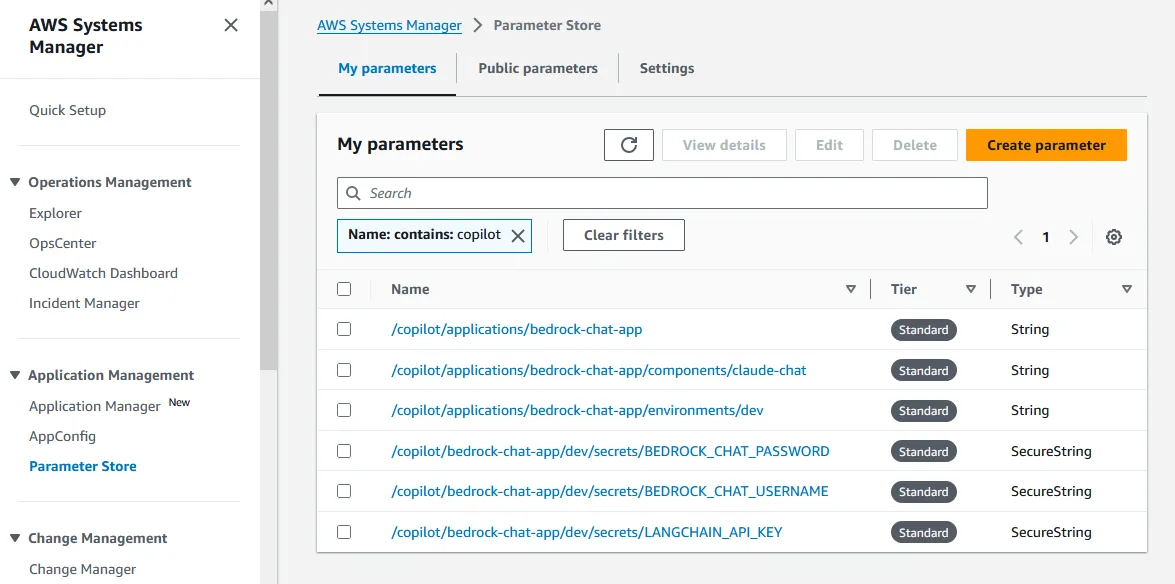
4/ Add the LangSmith configuration and the LangChain API key to the service manifest file.
1
2
3
4
5
6
7
variables:
LANGCHAIN_TRACING_V2: true
LANGCHAIN_PROJECT: ${COPILOT_APPLICATION_NAME}-${COPILOT_ENVIRONMENT_NAME}
LANGCHAIN_ENDPOINT: "https://api.smith.langchain.com"
secrets:
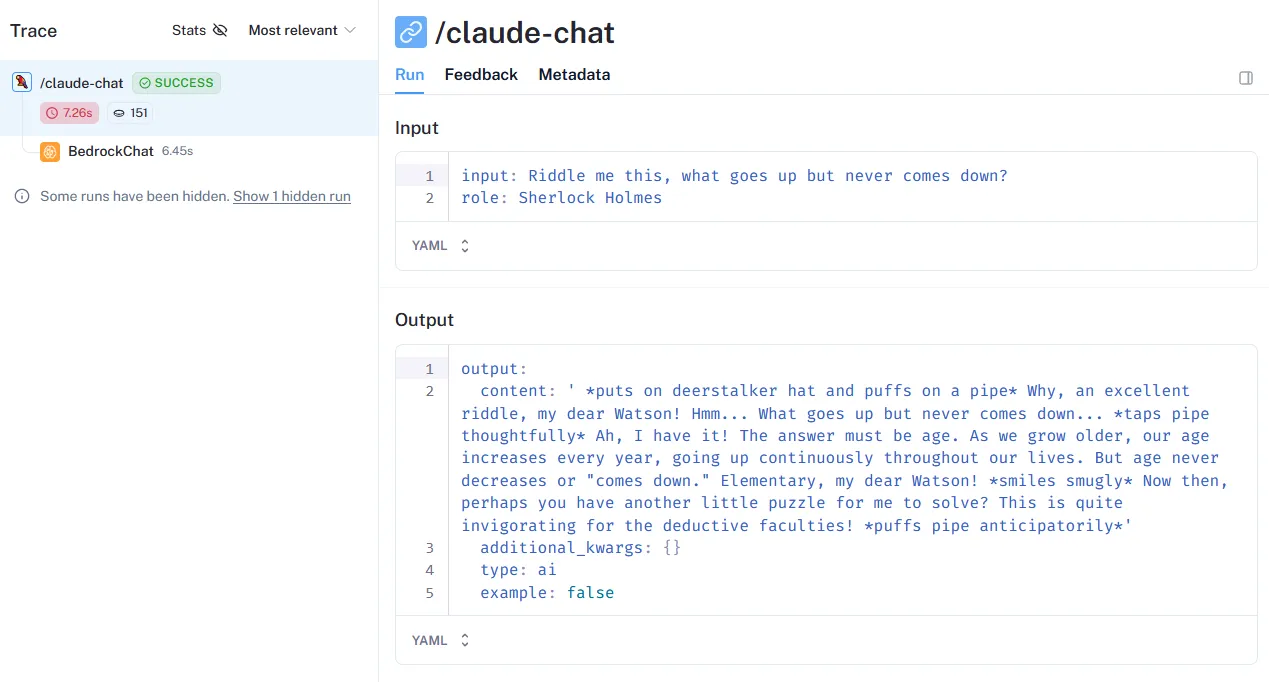
LANGCHAIN_API_KEY: /copilot/${COPILOT_APPLICATION_NAME}/${COPILOT_ENVIRONMENT_NAME}/secrets/LANGCHAIN_API_KEY5/ Once the changes are deployed, the traces will start to show up in LangSmith under the designated project
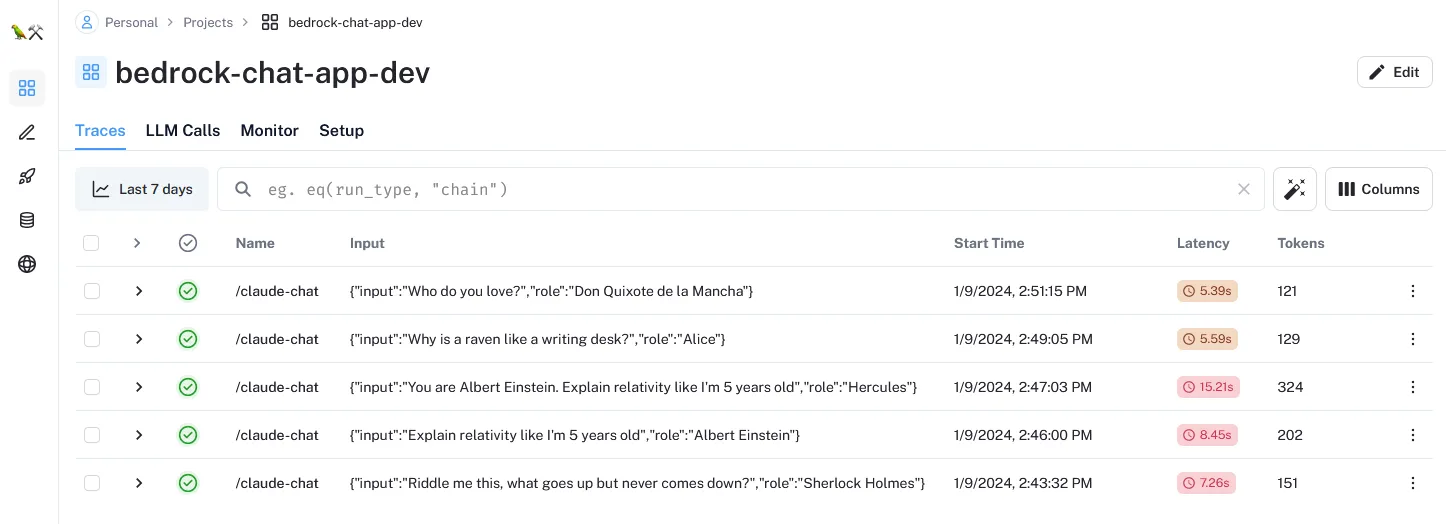
and you can start to drill down into each model call
When you’re done, don’t forget to delete the application
1
2
3
4
5
6
7
8
# Remove Claude Chat service
copilot svc delete --env dev --name claude-chat

# Remove dev environment
copilot env delete --name dev

# Remove Bedrock Chat application
copilot app delete --name bedrock-chat-app
and remove the CloudFormation stack.
1
aws cloudformation delete-stack --stack-name langserve-aws
If you’re using your own workstation, you may want to delete the Conda environment
1
2
3
# Switch off the environment and delete it
conda deactivate
conda remove -n langserve-aws --allIn this post, I have shown how to integrate a LangServe project with the typical AWS container services stack. The LangChain CLI makes it simple to develop and test applications locally, while AWS Copilot simplifies the process of building, packaging and deploying the application.
With some minor adjustments, all the steps in this walkthrough can be fully automated and integrated into your CI/CD pipeline to provide continuous feedback to the rest of the organization.
However, this is just the beginning. Getting a generative AI application ready for production is a long and arduous journey. In future posts, I will explore different ways to bridge this gap and bring generative AI products to your end users.
📩 Any questions/feedback? Leave a comment below and let's build together! 💪
- (LangChain) LangChain Expression Language
- (AWS) Introducing AWS Copilot
- (AWS) AWS Copilot CLI
Any opinions in this post are those of the individual author and may not reflect the opinions of AWS.
5 Comments
Log in to comment