#TGIFun🎈 YOLambda: Running Serverless YOLOv8/9
Run inference at scale with YOLOv8/9 in a secure and reliable way with AWS Lambda.
João Galego
Amazon Employee
Published Apr 5, 2024
Last Modified May 6, 2024
In this episode of #TGIFun🎈, I'd like to demonstrate a quick and easy way to deploy YOLOv8/9 👁️ on AWS Lambda using the AWS SAM (Serverless Application Model) CLI.
Hosting YOLO on Lambda strikes a good balance between performance, scalability and cost efficiency. Plus, it's always fun to put stuff inside Lambda functions. If you're interested in exploring other deployment options though, feel free to scroll all the way down to the References section.
👨💻 All code and documentation is available on GitHub.
So what's YOLOv8 and why should you care? Let's start with a short recap...
YOLOv8 (You Only Look Once) is a state-of-the-art computer vision model that supports multiple tasks

It builds on top of an already long history of YOLO models
")
and it was designed to be smaller 🤏 and faster ⚡ than previous iterations.

While a full description of the YOLOv8 architecture is well beyond the scope of this article, it's useful to gain some intuition on what's happening behind the scenes.
Referring back to the original (YOLOv1) paper, YOLO models work by dividing the input image into a grid, predicting a set of bounding boxes [note: as we will see shortly, these are expressed as 2+2-tuples of top-left
(x1, y1) and bottom-right coordinates (x2, y2)], as well as their associated confidence scores and class probabilities, to generate the final predictions.")
It goes without saying that I'm obviously oversimplifying things here.
Over the years, there have been many improvements like faster NMS implementations (Non-Maximum Suppression, in case you're wondering) or the use of "bag-of-freebies" and "bag-of-specials" approaches (best names ever!) that have made YOLO faster and stronger.
Fortunately, you won't need to care about those at all to work on this project. If you're interested in such things though, I strongly encourage you to read up on the history of YOLO.
❗ This introduction was written before the release of YOLOv9.
💡 If you want to learn more, just scroll all the way down to the References section.
In this project, we're going to create a simple object detection app that accepts an image 🖼️

sends it to the YOLO model and returns a list of detected objects
1
2
3
4
5
6
7
8
9
10
11
12
13
14
15
16
17
18
19
20
21
22
23
24
25
26
27
28
29
30
31
32
33
34
35
36
37
38
39
40
41
42
43
44
45
46
47
48
49
50
51
52
53
54
55
56
57
58
59
60
61
62
63
64
65
66
67
68
69
70
71
72
73
74
75
76
77
78
79
80
81
82
83
84
85
86
87
88
89
90
91
92
93
94
95
96
97
98
99
100
101
102
103
104
105
106
107
108
109
110
111
112
[
    {
        "box": [
            962,
            154,
            1247,
            630
        ],
        "conf": 0.8881231546401978,
        "cls": "person"
    },
    {
        "box": [
            67,
            227,
            502,
            711
        ],
        "conf": 0.8832821846008301,
        "cls": "person"
    },
    {
        "box": [
            5,
            45,
            240,
            578
        ],
        "conf": 0.8401730060577393,
        "cls": "person"
    },
    {
        "box": [
            733,
            88,
            936,
            460
        ],
        "conf": 0.809768795967102,
        "cls": "person"
    },
    {
        "box": [
            308,
            98,
            556,
            442
        ],
        "conf": 0.7752255201339722,
        "cls": "person"
    },
    {
        "box": [
            903,
            2,
            1088,
            505
        ],
        "conf": 0.7346365451812744,
        "cls": "person"
    },
    {
        "box": [
            534,
            149,
            769,
            391
        ],
        "conf": 0.6235901117324829,
        "cls": "person"
    },
    {
        "box": [
            632,
            338,
            672,
            467
        ],
        "conf": 0.40179234743118286,
        "cls": "bottle"
    },
    {
        "box": [
            552,
            387,
            614,
            467
        ],
        "conf": 0.617901086807251,
        "cls": "cup"
    },
    {
        "box": [
            1101,
            376,
            1279,
            639
        ],
        "conf": 0.3513599634170532,
        "cls": "couch"
    },
    {
        "box": [
            426,
            364,
            915,
            614
        ],
        "conf": 0.46763089299201965,
        "cls": "dining table"
    }
]
which we can then place on top of the original image

We're going to use a vanilla YOLOv8 model, but you're more than welcome to use a fine-tuned model or to train your own YOLO.

Sounds fun? 🤩 Then buckle up and let's built it together!
Before we get started, make sure these tools are installed and properly configured:
1
2
3
4
5
6
7
8
9
10
11
12
# Python / Conda
python -V
conda info

# Docker
docker info

# AWS SAM
sam --info

# JQ
jq -hLet's start by cloning the repository
1
2
git clone https://github.com/JGalego/YOLambda
cd YOLambda
🧪 Switch to thefeat/YOLOv9branch if you're feeling experimental!
As a best practice, I recommend you create a Conda environment or something similar to keep everything isolated
1
2
3
# Create a new environment and activate it
conda env create -f environment.yml
conda activate yolambda
Once the environment is activated, we can kick things off and install the project dependencies
1
pip install -r requirements.txt
One of those dependencies is the ultralytics package which includes the
yolo CLI. We can use it to download the YOLOv8 model and convert it to the ONNX format:
💡 The YOLOv8 series offers a wide range of models both in terms of size (nano >>xl) and specialized task likesegmentation orposeestimation. If you want to try a different model, please refer to the official documentation (Supported Tasks and Modes).
🧪 Replaceyolov8nwithyolov9cin the commands below to work with YOLOv9. Just keep in mind that the performance and the output of our app may not be the same.
1
2
# Export nano model for object detection from PT to ONNX
yolo mode=export model=yolov8n.pt format=onnx dynamic=True
As an optional step, we can run ONNX Simplifier (based on ONNX Optimizer) against our model to get rid of redundant operations. Everything counts to reduce the size of our model and make it run faster.
1
2
3
# (Optional) Simplify
# https://github.com/daquexian/onnx-simplifier
onnxsim yolov8n.onnx yolov8n.onnx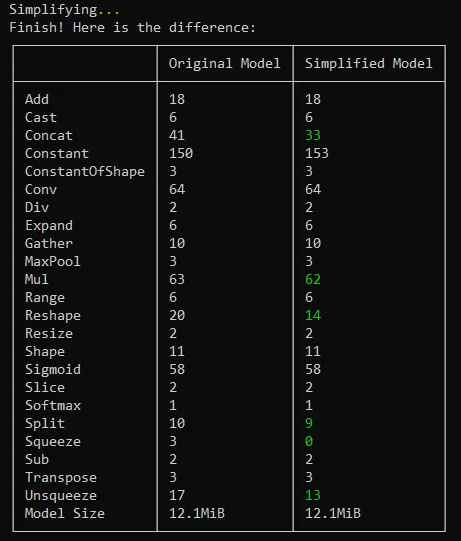
Once this is done, we can look "under the hood" and take a peek at the computational graph with a tool like Netron:
1
2
3
4
5
6
# 🌐 Browser
# Visit https://netron.app/

# 💻 CLI
# https://github.com/lutzroeder/netron
netron -b yolov8n.onnx
Let's move our model to a dedicated folder
1
mkdir models; mv yolov8n.onnx $_
and use the AWS SAM CLI to build a container image for our appp
1
2
# Build
sam build --use-container
While in development, we can test our app by using
sam local1
2
3
4
5
# Create event
echo {\"body\": \"{\\\"image\\\": \\\"$(base64 images/example.jpg)\\\"}\"} > test/event.json
# Invoke function
sam local invoke --event test/event.jsonWhenever you're ready, just start the deployment 🚀
1
2
# Deploy
sam deploy --guided
While this is running, let's take a closer look at our template
1
2
3
4
5
6
7
8
9
10
11
12
13
14
15
16
17
18
19
20
21
22
23
24
25
26
27
28
29
30
31
32
33
34
35
AWSTemplateFormatVersion: '2010-09-09'
Transform: AWS::Serverless-2016-10-31
Description: >
  Scaling YOLOv8 inference with Serverless:
  How to build an object detection app using AWS Lambda and AWS SAM

Resources:
  YOLOModel:
    Type: AWS::Serverless::LayerVersion
    Properties:
      LayerName: yolo-models
      Description: YOLO models
      ContentUri: models/
      CompatibleRuntimes:
        - python3.9
        - python3.10
        - python3.11
  YOLOFunction:
    Type: AWS::Serverless::Function
    Properties:
      CodeUri: src/
      Layers:
        - !Ref YOLOModel
      Handler: app.handler
      Runtime: python3.10
      MemorySize: 10240
      Timeout: 60
      FunctionUrlConfig:
        AuthType: AWS_IAM

Outputs:
  YOLOV8FunctionUrlEndpoint:
      Description: "YOLO Lambda function URL"
      Value:
        Fn::GetAtt: YOLOFunctionUrl.FunctionUrl
Here are a few important things to notice:
- 🧱 Resources - there's one for the Lambda function (
YOLOFunction) and another one for the YOLOv8 model (YOLOModel) which will be added to our function as a Lambda layer; the Lambda function itself will be accessible through a Lambda function URL. - ⚙️ Settings - the memory size is set to the maximum allowed value (
10GB) to improve performance cf. AWS Lambda now supports up to 10 GB of memory and 6 vCPU cores for Lambda Functions for more information. - 🔐 Security - authentication to our function URL is handled by IAM, which means that all requests must be signed using AWS Signature Version 4 (SigV4) cf. Invoking Lambda function URLs for additional details.
The deployment should be done by now 😊 Don't forget to note down the function URL
1
2
# Requires jq
export YOLAMBDA_URL=$(sam list stack-outputs --stack-name yolambda --output json | jq -r .[0].OutputValue)
You can use tools like
awscurl to test the app (awscurl will handle the SigV4 signing for you)1
2
3
4
5
# Create payload
echo {\"image\": \"$(base64 images/example.jpg)\"} > test/payload.json
# Make request
awscurl --service lambda -X GET -d @test/payload.json $YOLAMBDA_URLor create your own test scripts
1
python test/test.py $YOLAMBDA_URL images/example.jpg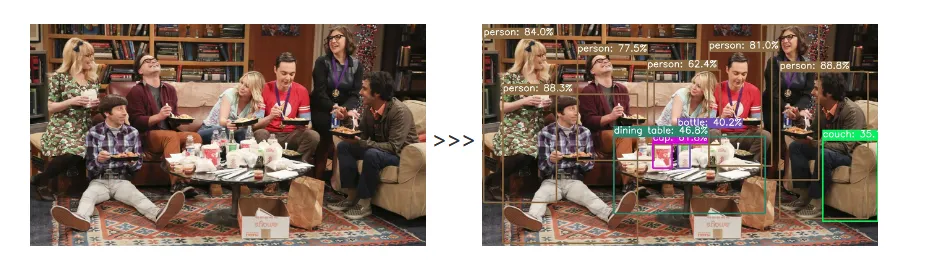
And that's it! 🥳 We just crossed the finish line...
Sooo, what's next? Here are a few recommendations:
- Explore the code - it's just there for the taking, plus I left some Easter eggs and L400 references in there for the brave ones.
- Check out the
feat/YOLOv9branch to test the newest member of the YOLO family
- Build your own app - I'm pretty sure you already have a cool use case in mind
- Share with the community - leave a comment below if you do something awesome
I hope you enjoyed it, see you next time! 👋
This is the first article in the #TGIFun🎈 series, a personal space where I'll be sharing some small, hobby-oriented projects with a wide variety of applications. As the name suggests, new articles come out on Friday. // PS: If you like this format, don't forget to give it a thumbs up 👍 Work hard, have fun, make history!
- (Redmon et al., 2015) You Only Look Once: Unified, Real-Time Object Detection
- (Terven & Cordova-Esparza, 2023) A Comprehensive Review of YOLO Architectures in Computer Vision: From YOLOv1 to YOLOv8 and YOLO-NAS
- HowTo: deploying YOLOv8 on AWS Lambda (an alternative implementation 💪)
Any opinions in this post are those of the individual author and may not reflect the opinions of AWS.
Comments
Log in to comment