#TGIFun🎈 YOLambda: Running Serverless YOLOv8/9
Run inference at scale with YOLOv8/9 in a secure and reliable way with AWS Lambda.
👨💻 All code and documentation is available on GitHub.


(x1, y1) and bottom-right coordinates (x2, y2)], as well as their associated confidence scores and class probabilities, to generate the final predictions.
❗ This introduction was written before the release of YOLOv9.
💡 If you want to learn more, just scroll all the way down to the References section.

1
2
3
4
5
6
7
8
9
10
11
12
13
14
15
16
17
18
19
20
21
22
23
24
25
26
27
28
29
30
31
32
33
34
35
36
37
38
39
40
41
42
43
44
45
46
47
48
49
50
51
52
53
54
55
56
57
58
59
60
61
62
63
64
65
66
67
68
69
70
71
72
73
74
75
76
77
78
79
80
81
82
83
84
85
86
87
88
89
90
91
92
93
94
95
96
97
98
99
100
101
102
103
104
105
106
107
108
109
110
111
112
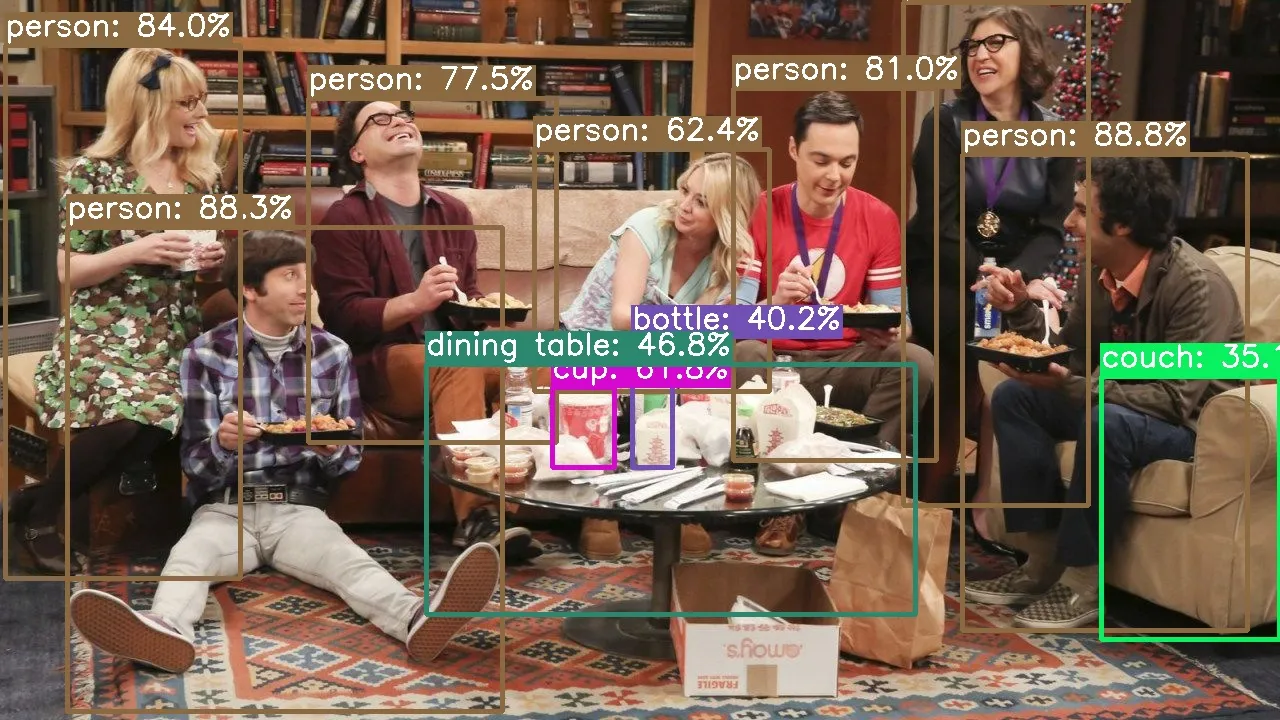
[
    {
        "box": [
            962,
            154,
            1247,
            630
        ],
        "conf": 0.8881231546401978,
        "cls": "person"
    },
    {
        "box": [
            67,
            227,
            502,
            711
        ],
        "conf": 0.8832821846008301,
        "cls": "person"
    },
    {
        "box": [
            5,
            45,
            240,
            578
        ],
        "conf": 0.8401730060577393,
        "cls": "person"
    },
    {
        "box": [
            733,
            88,
            936,
            460
        ],
        "conf": 0.809768795967102,
        "cls": "person"
    },
    {
        "box": [
            308,
            98,
            556,
            442
        ],
        "conf": 0.7752255201339722,
        "cls": "person"
    },
    {
        "box": [
            903,
            2,
            1088,
            505
        ],
        "conf": 0.7346365451812744,
        "cls": "person"
    },
    {
        "box": [
            534,
            149,
            769,
            391
        ],
        "conf": 0.6235901117324829,
        "cls": "person"
    },
    {
        "box": [
            632,
            338,
            672,
            467
        ],
        "conf": 0.40179234743118286,
        "cls": "bottle"
    },
    {
        "box": [
            552,
            387,
            614,
            467
        ],
        "conf": 0.617901086807251,
        "cls": "cup"
    },
    {
        "box": [
            1101,
            376,
            1279,
            639
        ],
        "conf": 0.3513599634170532,
        "cls": "couch"
    },
    {
        "box": [
            426,
            364,
            915,
            614
        ],
        "conf": 0.46763089299201965,
        "cls": "dining table"
    }
]

1
2
3
4
5
6
7
8
9
10
11
12
# Python / Conda
python -V
conda info

# Docker
docker info

# AWS SAM
sam --info

# JQ
jq -h1
2
git clone https://github.com/JGalego/YOLambda
cd YOLambda🧪 Switch to thefeat/YOLOv9branch if you're feeling experimental!
1
2
3
# Create a new environment and activate it
conda env create -f environment.yml
conda activate yolambda1
pip install -r requirements.txtyolo CLI. 💡 The YOLOv8 series offers a wide range of models both in terms of size (nano >>xl) and specialized task likesegmentation orposeestimation. If you want to try a different model, please refer to the official documentation (Supported Tasks and Modes).
🧪 Replaceyolov8nwithyolov9cin the commands below to work with YOLOv9. Just keep in mind that the performance and the output of our app may not be the same.
1
2
# Export nano model for object detection from PT to ONNX
yolo mode=export model=yolov8n.pt format=onnx dynamic=True1
2
3
# (Optional) Simplify
# https://github.com/daquexian/onnx-simplifier
onnxsim yolov8n.onnx yolov8n.onnx
1
2
3
4
5
6
# 🌐 Browser
# Visit https://netron.app/

# 💻 CLI
# https://github.com/lutzroeder/netron
netron -b yolov8n.onnx
1
mkdir models; mv yolov8n.onnx $_1
2
# Build
sam build --use-containersam local1
2
3
4
5
# Create event
echo {\"body\": \"{\\\"image\\\": \\\"$(base64 images/example.jpg)\\\"}\"} > test/event.json
# Invoke function
sam local invoke --event test/event.json1
2
# Deploy
sam deploy --guided1
2
3
4
5
6
7
8
9
10
11
12
13
14
15
16
17
18
19
20
21
22
23
24
25
26
27
28
29
30
31
32
33
34
35
AWSTemplateFormatVersion: '2010-09-09'
Transform: AWS::Serverless-2016-10-31
Description: >
Scaling YOLOv8 inference with Serverless:
How to build an object detection app using AWS Lambda and AWS SAM
Resources:
YOLOModel:
Type: AWS::Serverless::LayerVersion
Properties:
LayerName: yolo-models
Description: YOLO models
ContentUri: models/
CompatibleRuntimes:
- python3.9
- python3.10
- python3.11
YOLOFunction:
Type: AWS::Serverless::Function
Properties:
CodeUri: src/
Layers:
- !Ref YOLOModel
Handler: app.handler
Runtime: python3.10
MemorySize: 10240
Timeout: 60
FunctionUrlConfig:
AuthType: AWS_IAM
Outputs:
YOLOV8FunctionUrlEndpoint:
Description: "YOLO Lambda function URL"
Value:
Fn::GetAtt: YOLOFunctionUrl.FunctionUrl- 🧱 Resources - there's one for the Lambda function (
YOLOFunction) and another one for the YOLOv8 model (YOLOModel) which will be added to our function as a Lambda layer; the Lambda function itself will be accessible through a Lambda function URL. - ⚙️ Settings - the memory size is set to the maximum allowed value (
10GB) to improve performance cf. AWS Lambda now supports up to 10 GB of memory and 6 vCPU cores for Lambda Functions for more information. - 🔐 Security - authentication to our function URL is handled by IAM, which means that all requests must be signed using AWS Signature Version 4 (SigV4) cf. Invoking Lambda function URLs for additional details.
1
2
# Requires jq
export YOLAMBDA_URL=$(sam list stack-outputs --stack-name yolambda --output json | jq -r .[0].OutputValue)awscurl to test the app (awscurl will handle the SigV4 signing for you)1
2
3
4
5
# Create payload
echo {\"image\": \"$(base64 images/example.jpg)\"} > test/payload.json
# Make request
awscurl --service lambda -X GET -d @test/payload.json $YOLAMBDA_URL1
python test/test.py $YOLAMBDA_URL images/example.jpg
- Explore the code - it's just there for the taking, plus I left some Easter eggs and L400 references in there for the brave ones.
- Check out the
feat/YOLOv9branch to test the newest member of the YOLO family
- Build your own app - I'm pretty sure you already have a cool use case in mind
- Share with the community - leave a comment below if you do something awesome
This is the first article in the #TGIFun🎈 series, a personal space where I'll be sharing some small, hobby-oriented projects with a wide variety of applications. As the name suggests, new articles come out on Friday. // PS: If you like this format, don't forget to give it a thumbs up 👍 Work hard, have fun, make history!
- (Redmon et al., 2015) You Only Look Once: Unified, Real-Time Object Detection
- (Terven & Cordova-Esparza, 2023) A Comprehensive Review of YOLO Architectures in Computer Vision: From YOLOv1 to YOLOv8 and YOLO-NAS
- HowTo: deploying YOLOv8 on AWS Lambda (an alternative implementation 💪)
Any opinions in this post are those of the individual author and may not reflect the opinions of AWS.
