CDK Cloud Development Kit
Unleashing the Power of Cloud Development: Exploring the CDK.
Published May 2, 2024
Welcome to the second installment of my Knowledge Series, where I aim to compile a wealth of high-quality content on various AWS topics, making it freely available to all. In this post, we'll embark on a deep dive into the AWS Cloud Development Kit (CDK), exploring advanced topics such as multi-environment deployments, and custom constructs, and providing an interactive guide to help you kickstart your CDK journey using the comprehensive AWS CDK documentation.
By the end of this deep dive into the AWS CDK, you'll have gained a comprehensive understanding of its advanced capabilities, empowering you to harness the full potential of infrastructure as code in your AWS projects. Whether you're a seasoned cloud architect or a newcomer to the world of AWS, the CDK offers a powerful set of tools and techniques to streamline your infrastructure provisioning workflows and accelerate your journey to the cloud. So, let's dive in and unlock the true power of the AWS CDK together!
Different teams may have different deployment workflows for infrastructure and code, leading to delays and risks when accessing required services. Manual configuration of environments can result in inconsistencies between testing and development environments. Over time, deployed environments may drift, potentially causing disruptions during production. Standing up in new environments is time-consuming and error-prone. Many of these challenges can be mitigated through the adoption of Infrastructure as Code (IaC).
Managing your infrastructure should be as easy as managing your application code.
Similar to version control systems (VCS) and automated testing used for application code, IaC offers numerous advantages. It involves defining infrastructure and its configuration in human-readable files.
With the procedural code, we are defining the process of creating our infrastructure. When using the procedural approach we will run into some challenges. It doesn't consider the current state of the infrastructure, if we deploy an ec2 instance and we want to resize it, this approach doesn't know how to do it.
With the declarative approach, we are defining the state of our infrastructure. If we now launch resources with this script, we can go into the service that manages this script and it knows which exact resource instance has to be changed. Here the challenge is that we need a service to map the state to the actual infrastructure. Another challenge is that it will be more difficult to create reusable components.
We get the best benefit of both of these approaches when we pair them and that's what the CDK does.
There are multiple different solutions to achieve this goal (IaC). There are some third party and some AWS services which help us build infrastructure.
- SAM (Serverless Application Model)
- Terraform
- CloudFormation
- Pulumi
The CDK is a framework to provision cloud resources using a programming language.
CDK lets us use familiar programming languages, avoiding the need to learn new CloudFormation syntax. It helps unify development for both code and infrastructure while maintaining AWS support.
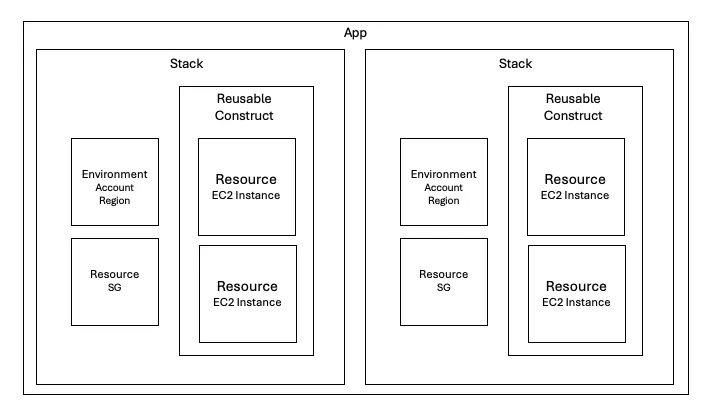
When using the CDK to provision cloud resources in our account, we create Resources, each with its identifier. These Resources represent the infrastructure elements built using the CDK, and their identifiers enable future referencing.
To facilitate reuse across our organization, we utilize Constructs, which are logical groupings of Resources. If we need to add additional Resources that are related to the Construct but should remain separate, we can include them alongside individual Resources within Constructs. This higher-level organization is called a Stack, which is the deployment unit within the CDK. Stacks correspond to CloudFormation Stacks and share their limitations.
Every Stack is associated with an environment specifying the account and region, either explicitly or implicitly defined. At the top level of a CDK project is the CDK App, serving as the root of the context tree and capable of containing one or more Stacks.
Constructs serve as the fundamental components of AWS CDK applications, encapsulating one or more CloudFormation resources along with their configurations. With constructs, we can incrementally build our applications, importing and configuring them piece by piece.
These constructs are essentially classes that we import into our CDK apps. While the AWS Construct Library provides a rich set of pre-built constructs, we also have the flexibility to craft and share our own or leverage constructs developed by third parties.
The primary motivation behind constructing these components is the ability to reuse them in future projects, streamlining development efforts and promoting consistency across applications.
When initializing constructs, they all require three parameters:
- Scope: This defines the construct's parent or owner, which can be either a stack or another construct. The scope determines where the construct fits in the construct tree.
- ID: An identifier that must be unique within the scope. This ID is crucial as it's used to generate unique identifiers like resource names and AWS CloudFormation logical IDs.
- Props: A set of properties defining the construct's initial configuration. Higher-level constructs often offer more default props, simplifying configuration.
In this example from the AWS docs, "this" is frequently employed as the scope, denoting that the resource should be provisioned in the parent container. Following this, each resource is assigned a unique ID within the stack. Furthermore, we specify the parameters necessary for customizing the resource.
The AWS Construct Library contains a collection of constructs that are developed and maintained by AWS. However, we can also build our construct library using npm.
https://docs.aws.amazon.com/cdk/api/v2/docs/aws-cdk-lib.aws_ec2.Instance.html
To build, use, and distribute custom components, we can utilize an npm registry. Sharing our code with others is facilitated through an npm registry.
To create custom components for sharing, we initiate a project with the CDK, aiming to minimize the number of files using the command:
Once we define our components in this file, we need to compile the project to generate target files, as specified in the `package.json`.
Before publishing, we typically scope the project (refer to documentation). After scoping, we log in to npm to publish the package.
Finally, we can import the custom construct library into other projects as needed.
Composition is the key pattern for defining higher-level abstraction through constructs. A high-level construct can be composed of any number of lower-level constructs. With composition, we define reusable components and share them like any other code.
Constructs are nested within other constructs using the `scope` argument, which is passed to every construct starting from the root, the App class. This hierarchical arrangement of constructs is known as the construct tree in CDK.
These constructs mirror CloudFormation (CF) stacks, employing similar design patterns to circumvent limitations and maintain project organization. Common CF design patterns include Nested, Distributed, Main, and Skeleton. These patterns aim to sidestep limitations and adhere to consistent design principles.
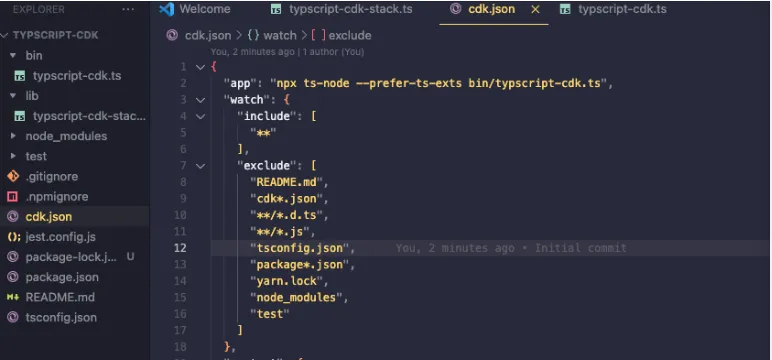
Once the project is created, we'll notice that the CDK has generated several files for us. The `cdk.json` file references the `bin/typescript-cdk.ts` file, serving as the project's entry point.
The `package.json` file reveals the dependencies installed in our project. As we begin referencing additional AWS services, we'll need to add more dependencies.
By default, the CDK includes tests in the project, allowing us to test the infrastructure we've developed.
These are constructus which are a direct map to which are available in CloudFormation. In the CDK Documentation, these are going to be referred to as the CFN resources.
These constructs are specifically written for the SDK. Which is going to be more easy to deploy. In the CDK these are going to be referred to as the CDK Constructs. We have to make sure that the Constructs that we are using are Stable, when the CDK gets updated we may have to rewrite our entire code.
Level 3 Constructs are often found in organizations or development teams with established guidelines. These Constructs can represent entire architectures ready for deployment. While there's no strict limit on nesting Constructs, three common categories exist along with their levels of abstraction. As Constructs ascend in level, they become more opinionated in their design.
To create a project, we use the `init` command followed by the desired programming language.
There are different templates from which we can choose: "app", "lib" and. Then there also is the programming language from which we can choose from.
The Bootstrap step is not required every time; it's a one-time operation per environment. CDK initiates the creation of its resources to facilitate stack management. An environment is defined by a combination of the account number and the region.
Once infrastructure programming is complete, we can initiate the synthesis of the project. This step involves taking our code and generating a CloudFormation template. While this command is executed automatically during deployment, we can also run it individually as needed.
(optionally)
During the deployment phase, AWS will take our CloudFormation Stacks and provision them. Here, we deploy Stacks, which can be listed individually. If there are multiple stacks, we should specify the ones we want to launch.
One advantage of declarative approaches is the ability to modify infrastructure even after provisioning in the AWS Cloud. During the Update step, we can make changes to our CDK project. To update a project we can just redeploy it.
To begin, within the `lib` directory, we can create a subdirectory named "stacks." Within this directory, we'll create a separate directory for each function of the app. Instead of initializing the `MasterFullStack` in the main file, we'll initialize all the stack files.
Just like having communication between different constructs, we want to gain communication between different stacks, this is called Interstack communication. There are multiple ways on how to implement this functionality:
In the realm of cloud computing, the term "environment" holds multifaceted significance. It encompasses not only the AWS Environment, where distinct environments like testing, production, and development reside but also extends to the broader business or "code" environment—a space where code deployment occurs, often resembling a sandbox for experimentation.
Each environment carries specific characteristics that demand careful consideration. For instance, in the developmental realm, cost-efficient solutions are favored, prompting the avoidance of large, costly instances. Conversely, the production environment mandates stringent isolation and security measures to safeguard critical operations.
Given the diverse requirements across environments, the challenge lies in harmonizing workloads to suit these distinct characteristics. The goal? To avoid redundancy while ensuring seamless deployment across varied environments.
In the CDK we can have props passed into our custom construct. For this, we can choose the lib template when we create the project. The lib template will include an export Interface. As we can see this export interface is meant for the props passed into the construct.
These components (constructs) are going to be L2 or L3 constructs and are in most cases going to be uploaded to a repository like npm.
In the CDK we also can pass props into the stacks. We can do this using an export interface as well, however, we can see that this time we are extending a class from StackProps.
In this interactive guide, I'll walk you through the process of creating an AWS CDK project step by step. Additionally, I'll provide you with valuable resources to further enhance and expand your CDK skills.
If you need any help throughout the guide you can always reference the aws docs or ask a question on repost.
AWS Docs
Repost
To be able to start creating AWS we first need to have the AWS CLI and the cdk installed. To install the AWS CDK run:
To check if the AWS CDK has been downloaded successfully you can run:
If you now get a version number back it means that you have successfully installed the CDK.
You now have to select a programming language in which you want to write your infrastructure, in this guide I will choose Javascript. Run the following commands to create a dir, go into that dir, and then create a CDK project in the programming language JavaScript.
(Optional)
If you want to install any third-party or event constructs that you have made you can import these into the CDK project
This example was taken from the AWS docs, however, you can just replace "@aws-cdk/aws-codestar-alpha" with your package name. To use that construct in your file you have to import it.
To check which packages you have installed you can go to package.json file.
Now we will create a S3 Bucket and a ec2 instance, to make this a bit easier we are going to use L2 Constructs.
If you now create further projects in the realm of the AWS CDK you are always going to use the CDK docs. You need to get familiar with them.
The CDK Properties must be or can be defined in the Construct, if the property has a question mark it means that it is optional, if not it is mandatory and the code will most likely fail if not enfored.
There are many great websites from where you can get inspiration for your CDK Project, this is one of my personal favorites.
I wanted to take a moment to express my sincere gratitude to all those who have contributed to my learning journey with the AWS CDK. Without the invaluable resources, documentation, and tutorial videos provided by individuals and organizations in the AWS community, I would not have been able to write this article.
When I embarked on my journey to learn about the AWS CDK, I found it incredibly fascinating. Here was a tool that allowed me to leverage my programming skills to create and manage AWS resources—an opportunity that seemed both exciting and daunting at first. Like many beginners, I struggled to find the right starting point. The sheer volume of information and the complexity of the subject matter made it feel like an uphill battle.
However, as I dedicated countless hours to working with the CDK, reading documentation, and watching tutorials, I began to unlock its potential. With each tutorial completed and each concept understood, I gained confidence in my abilities and started to see tangible results in my projects.
What fascinated me most about the CDK was its ability to bridge the gap between traditional infrastructure management and modern software development practices. Suddenly, infrastructure became code, and I could apply familiar programming patterns and techniques to automate the creation and management of cloud resources.
But it wasn't all smooth sailing. There were moments of frustration and exhaustion—times when I felt overwhelmed by the complexity of the CDK and the seemingly endless list of AWS services and features to learn. Yet, with perseverance and determination, I pushed through the challenges and continued to build my knowledge and expertise.
Now, as I reflect on my journey, I realize how far I've come. This blog post is a culmination of my experiences—a testament to the hours spent mastering the CDK and the valuable lessons learned along the way. It serves as a guide for others who may be embarking on their own CDK journey, offering insights, tips, and resources to help them navigate the learning curve more efficiently.
So, if you're just starting out with the CDK, know that the journey may be challenging, but the rewards are well worth it. With dedication and persistence, you too can harness the power of the AWS CDK to build scalable, efficient, and reliable cloud infrastructure.