Build a CI/CD Pipeline to Improve Your IaC with AWS CloudFormation
A walk-through of how to create a CI/CD pipeline from scratch using Amazon CodeCatalyst, to deploy your Infrastructure as Code (IaC) with AWS CloudFormation.
Rohini Gaonkar
Amazon Employee
Published Mar 22, 2023
Last Modified Mar 19, 2024
Starting more than a decade ago, Infrastructure as Code (IaC) dramatically changed how we do infrastructure. Today, we can define our Cloud Infrastructure in a template file in YAML/JSON and use services like AWS CloudFormation to perform CRUD (create, read, update and delete) operations on the infrastructure. We don't have to click into the AWS Management Console to set up everything, or create scripts and run using the CLI. In short, Infrastructure as code made setting up infrastructure less time consuming and error-prone.
But we're not done yet. Just writing CloudFormation templates and updating stacks manually is not using the ultimate superpower of IaC. The real purpose of defining IaC is to send it through the same CI/CD pipeline as an application goes through during software development. We can now apply the same best practices of versioning, tracking changes, doing code reviews, tests, and rollbacks to the infrastructure code. This will make our infrastructure more repeatable, reliable, and consistent, increasing in speed of deployments, reducing errors, and eliminating configuration drift.
This tutorial will show you how to set up a CI/CD pipeline using Amazon CodeCatalyst for your Infrastructure as Code written with CloudFormation. The pipeline will utilize pull requests to submit, test, and review any changes requested to the infrastructure.
| About | |
|---|---|
| ✅ AWS experience | 200 - Intermediate |
| ⏱ Time to complete | 30 minutes |
| 💰 Cost to complete | Free tier eligible |
| 🧩 Prerequisites | - AWS Account - CodeCatalyst Account - AWS CloudFormation basic understanding |
| 💻 Code Sample | Code sample used in tutorial on GitHub |
| 📢 Feedback | Any feedback, issues, or just a 👍 / 👎 ? |
| ⏰ Last Updated | 2023-03-22 |
Before we begin, ensure you have an AWS Account. You can create a new account by signing up here.
Follow steps in the documentation to set up CodeCatalyst.
We need to create CloudCatalyst service roles in our AWS account. We will be using these to provide permission to CodeCatalyst. This is a one-time activity only.
Simply deploy a CloudFormation stack. You can find detailed instructions on how to deploy this stack using AWS Console here.
- Stack name
CodeCatalyst-IAM-roles - Region: any (preferred
us-west-2) - Download the template provided here and upload this in CloudFormation console -> Create new stack -> Template -> Upload a template.
This will create 2 new AWS Identity and Access Management (IAM) roles -
main_branch_IAM_role and pr_branch_IAM_role in your AWS account.Please note, themain_branch_IAM_roleprovides full access to AWS resources in EC2 and CloudFormation services, as those will be used by sample CloudFormation template mentioned in this blog. Please use this role carefully and delete it when not required.
Before we create the CI/CD pipeline and workflows, let's set up CodeCatalyst.
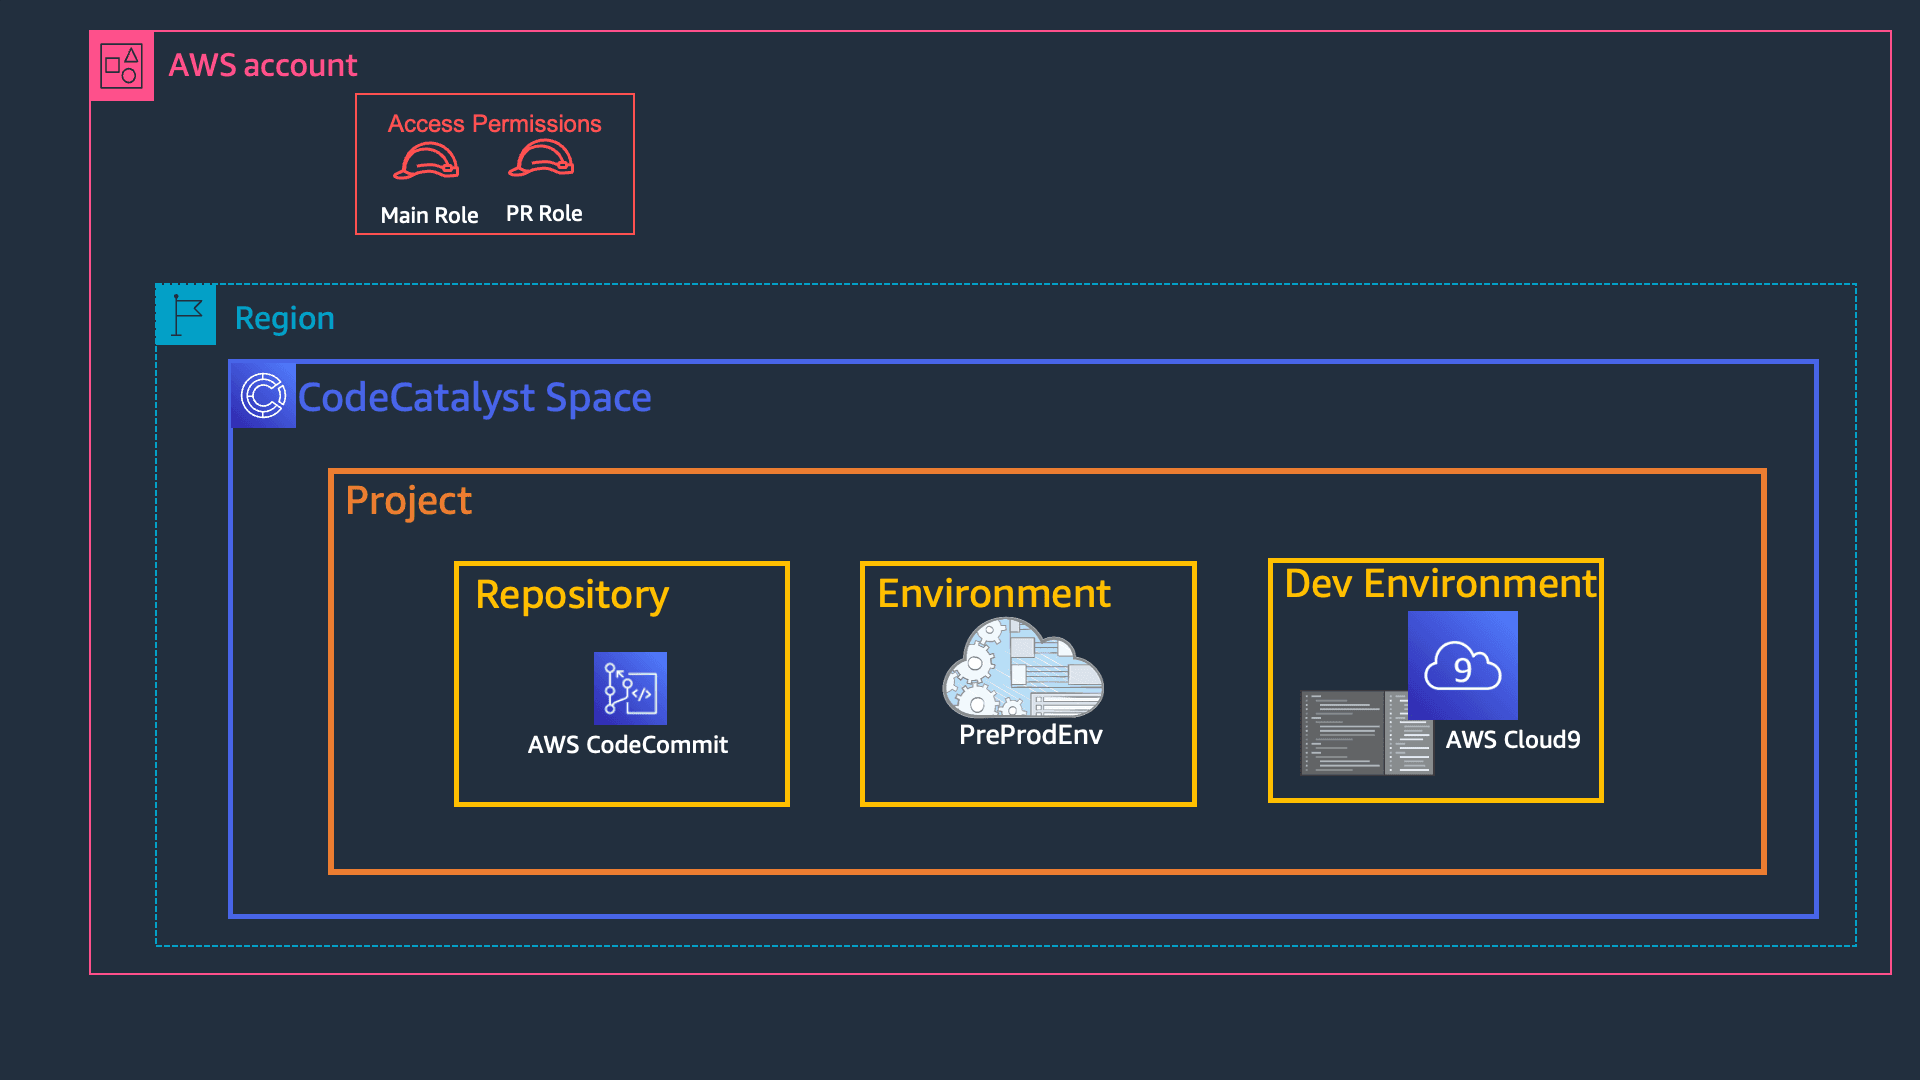
Let's start with our CodeCatalyst Space. A space represents you, your company, your department, or your group. Your development teams can manage projects inside it.
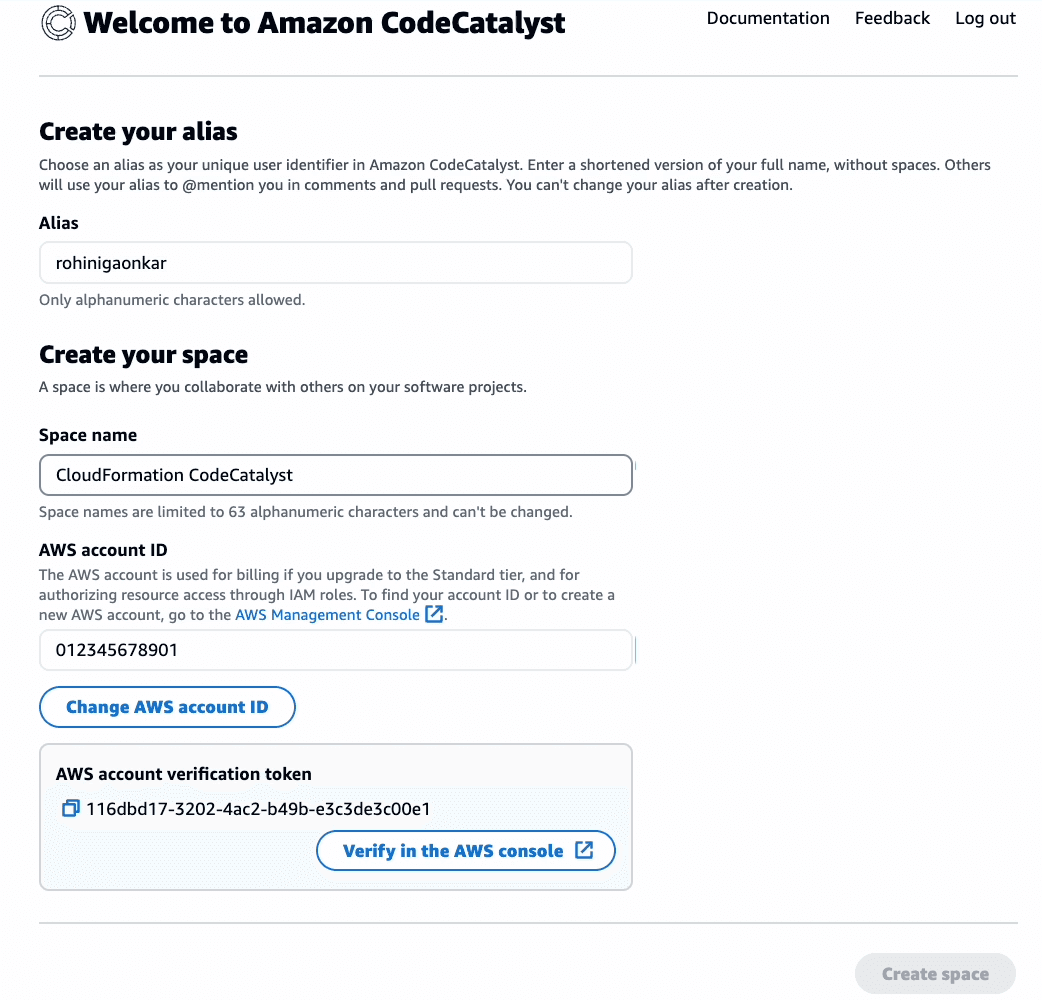
Create a new space by clicking on
Create Space on the CodeCatalyst Dashboard, add a name (we will use CloudFormation CodeCatalyst), and add the AWS Account ID to link for billing. Follow the prompts to link your AWS Account with CodeCatalyst.Please note that
012345678901 is a placeholder; replace it with your own account ID. You can find your account ID in the top right of your AWS Console. Before you can create the space, follow the Verify in the AWS console link and complete the verification. You should get green tick to proceed!(At the time this writing, CodeCatalyst is in public preview, and only one region is currently supported.)
Once the space is created, go to the
AWS Accounts tab, click on your account ID, and then click on Manage roles from the AWS Management Console.This will open a new browser tab to
Add IAM role to Amazon CodeCatalyst space. In the dialog, select the option Add an existing role you have created in IAM and select the main_branch_IAM_role from the dropdown. Click Add role. Follow the same steps for the pr_branch_IAM_role.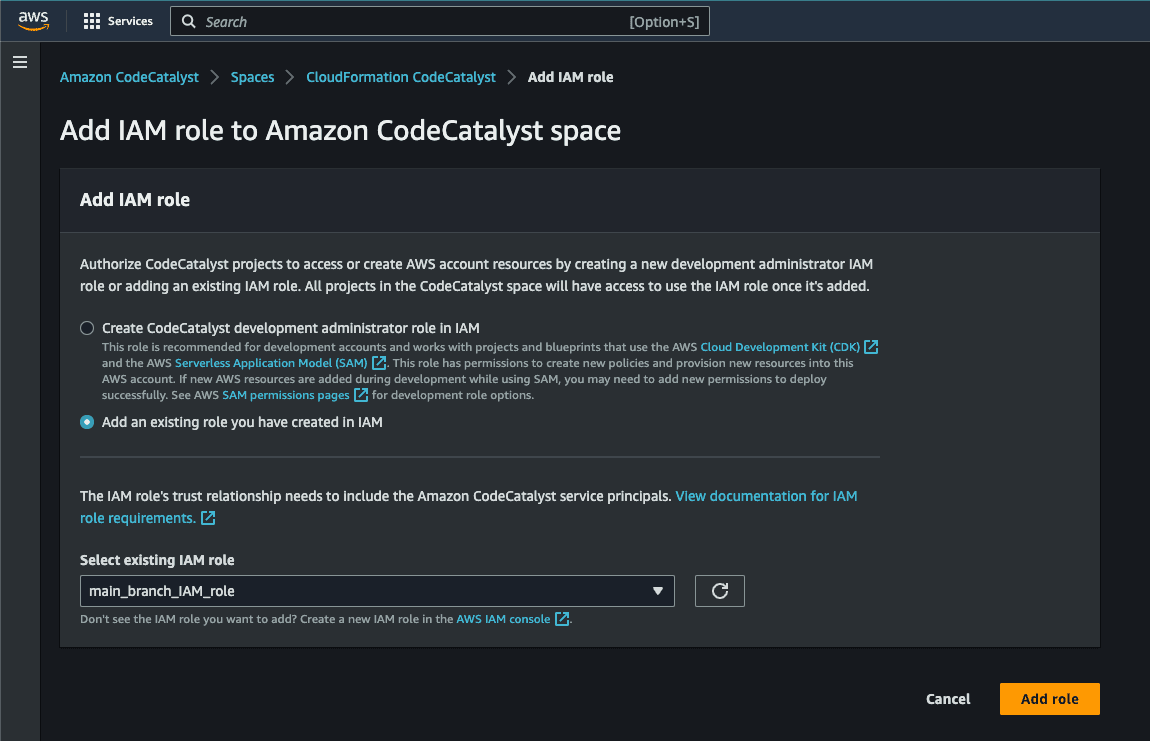
Next, we create a new Project inside the space. We can have multiple projects inside a space.
To create a project, click on the
Create Project button, select Start from scratch, and give your project a name - we will use ThreeTierApp.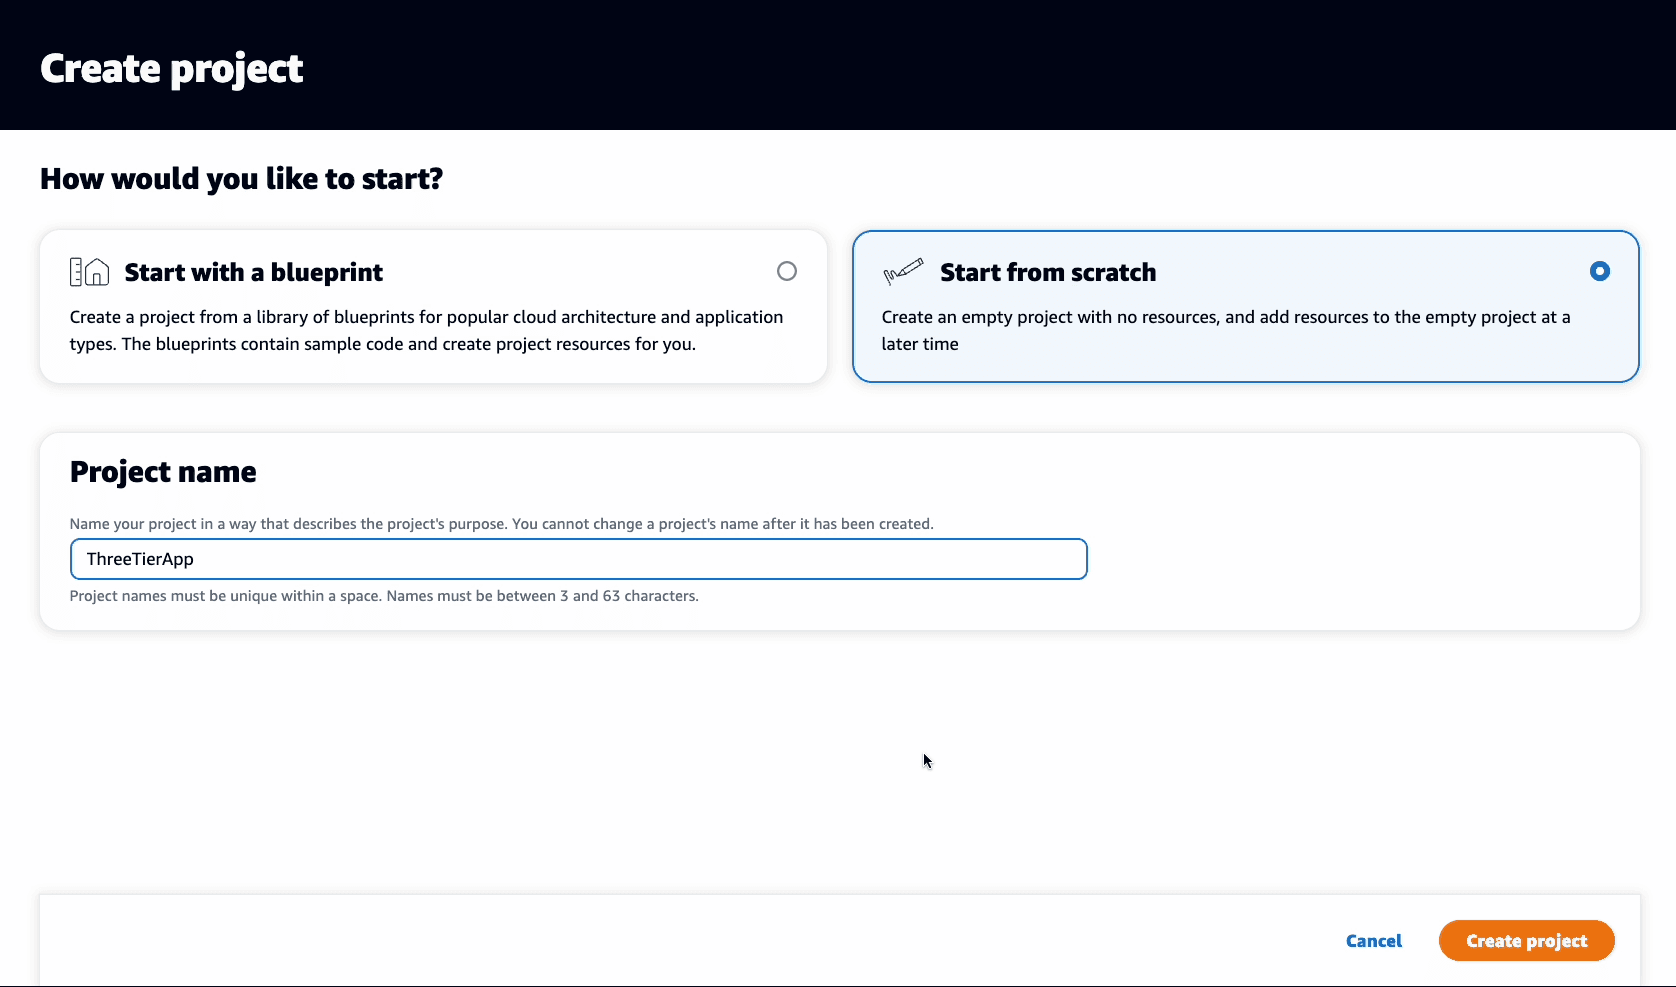
Now we'll create a new repository for our code - in our case, the CloudFormation template and other resources. Click
Code in the left-side navigation menu, then select Source repositories, Add repository, and choose Create repository. Set a repository name ( we will use 3-tier-app in this tutorial), add a description and none for the .gitignore file: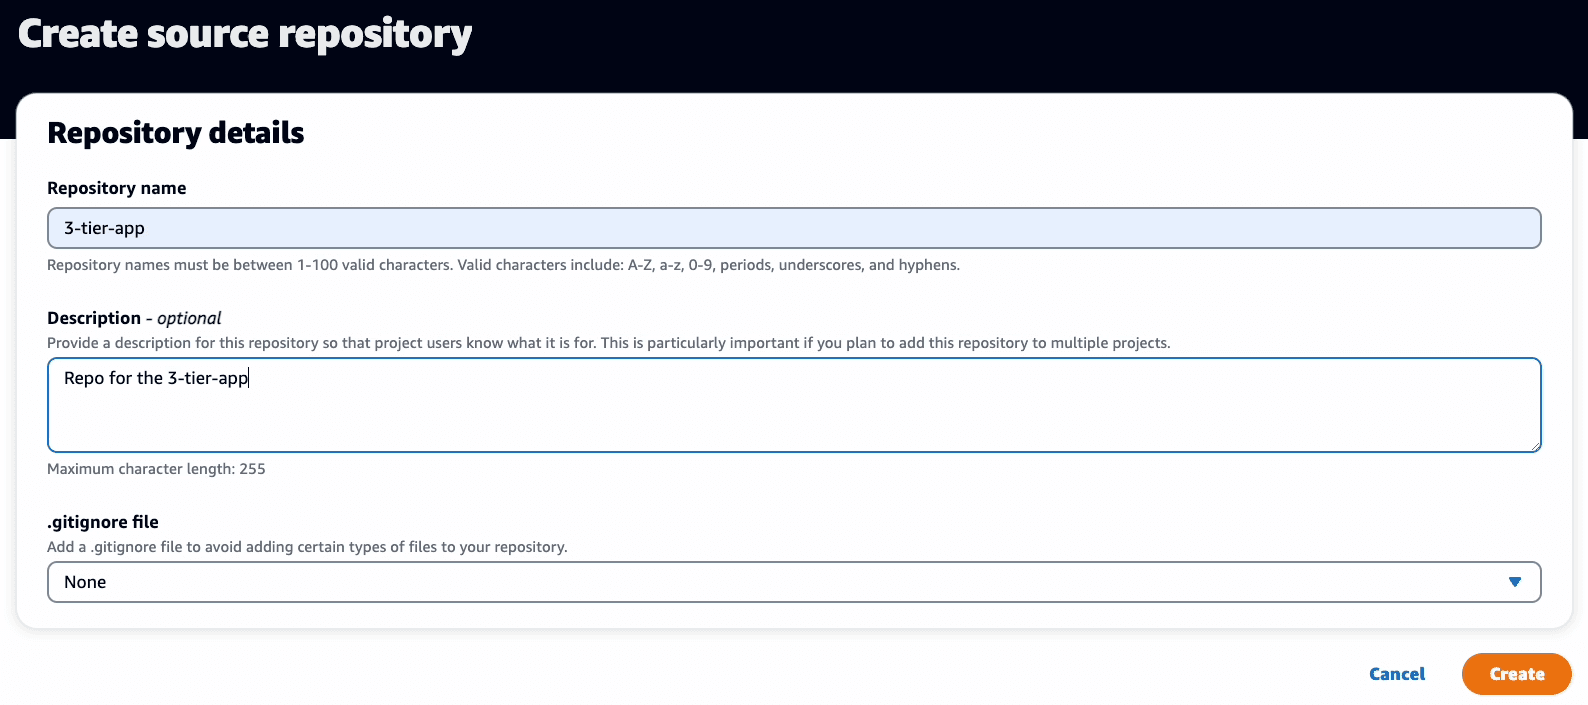
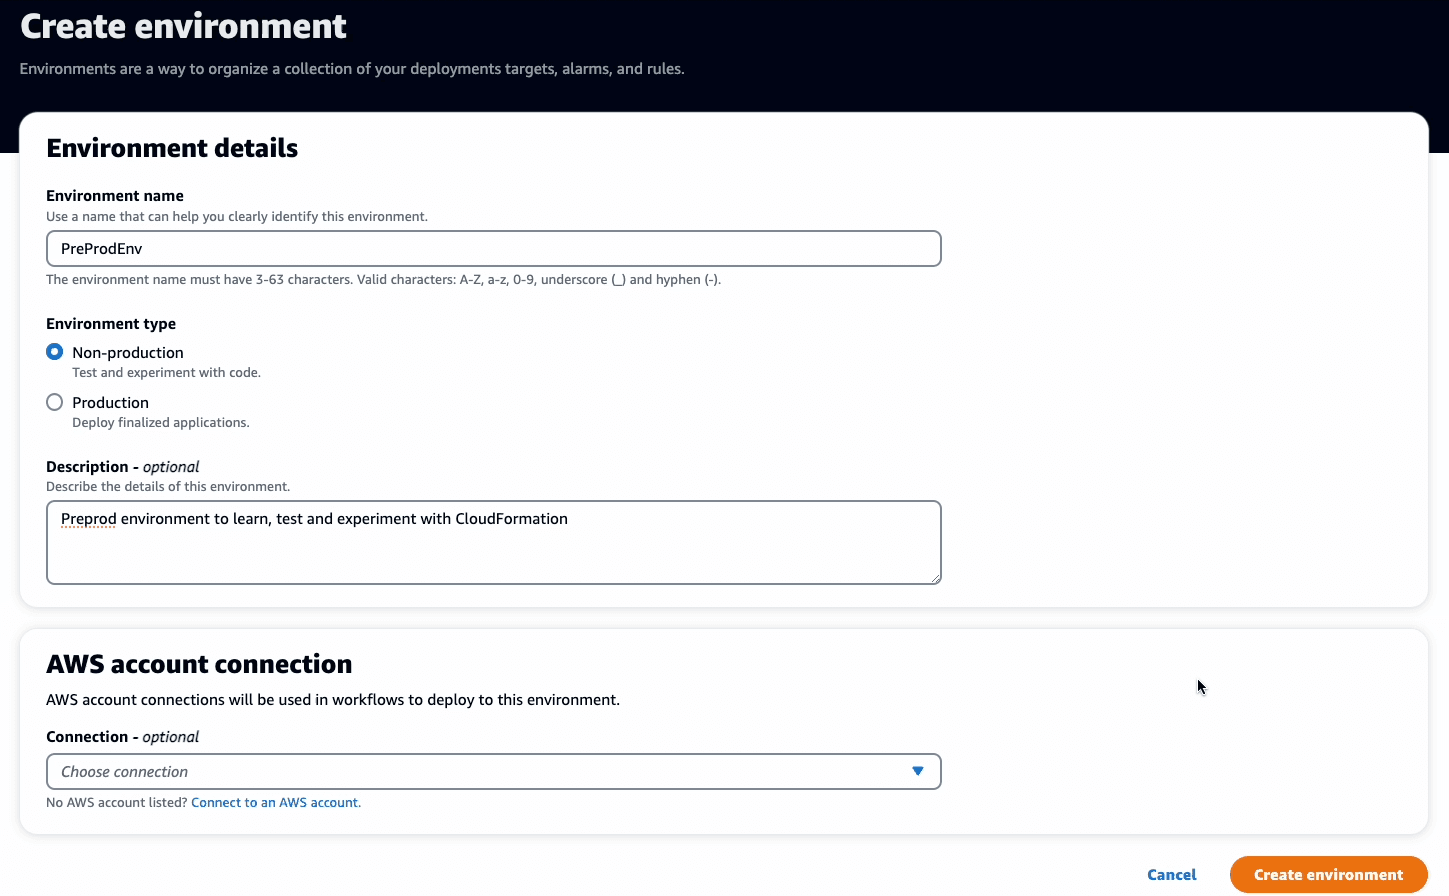
Lastly, we need to set up the AWS environment where our CloudFormation stack will be deployed by automated workflows. This is my non-production environment where my sample CloudFormation template will be deployed.
From the left navigation panel, select
CI/CD, Environments, and click on Create Environment. In the Environment details enter following:- Environment name:
PreProdEnv - Environment type:
Non-production - Description:
Pre-production environment to learn, test and experiment with CloudFormation - AWS account connection
Connection: Select the AWS account ID that will be used in the workflows to deploy this environment
To work on our infrastructure as code with CloudFormation, we need a Dev Environment. You have the option to use the following support IDEs (Integrated Development Environments):
- AWS Cloud9
- Visual Studio Code
- JetBrains IDEs
- IntelliJ IDEA Ultimate
- GoLand
- PyCharm Professional
For this blog, we will be using
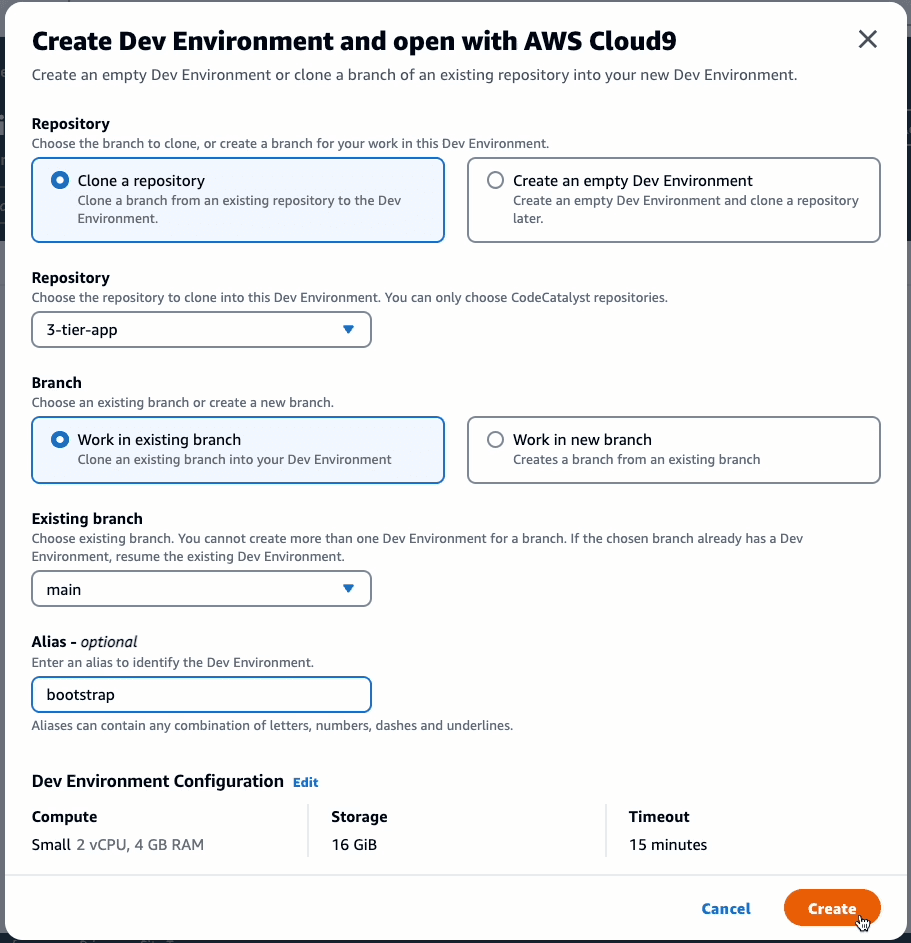
AWS Cloud9 for our development environment.From the left navigation panel, select
Code, Dev Environments, and click on Create Dev Environment. In the Create dev environment and open with AWS Cloud9 dialog box select following:- Repository:
Clone a repository - Repository: Select the repo that you want to clone. We created a repo
3-tier-app1above, so select same. - Branch:
Work in existing branch - Alias:
bootstrap
By default, it will launch a Small (2vCPU, 4 GB RAM), 16 Gib storage with 15minutes timeout.
Click on
Create and it will open a new Cloud9 dev environment. It will take a minute or two, so grab a coffee before we start the CloudFormation magic.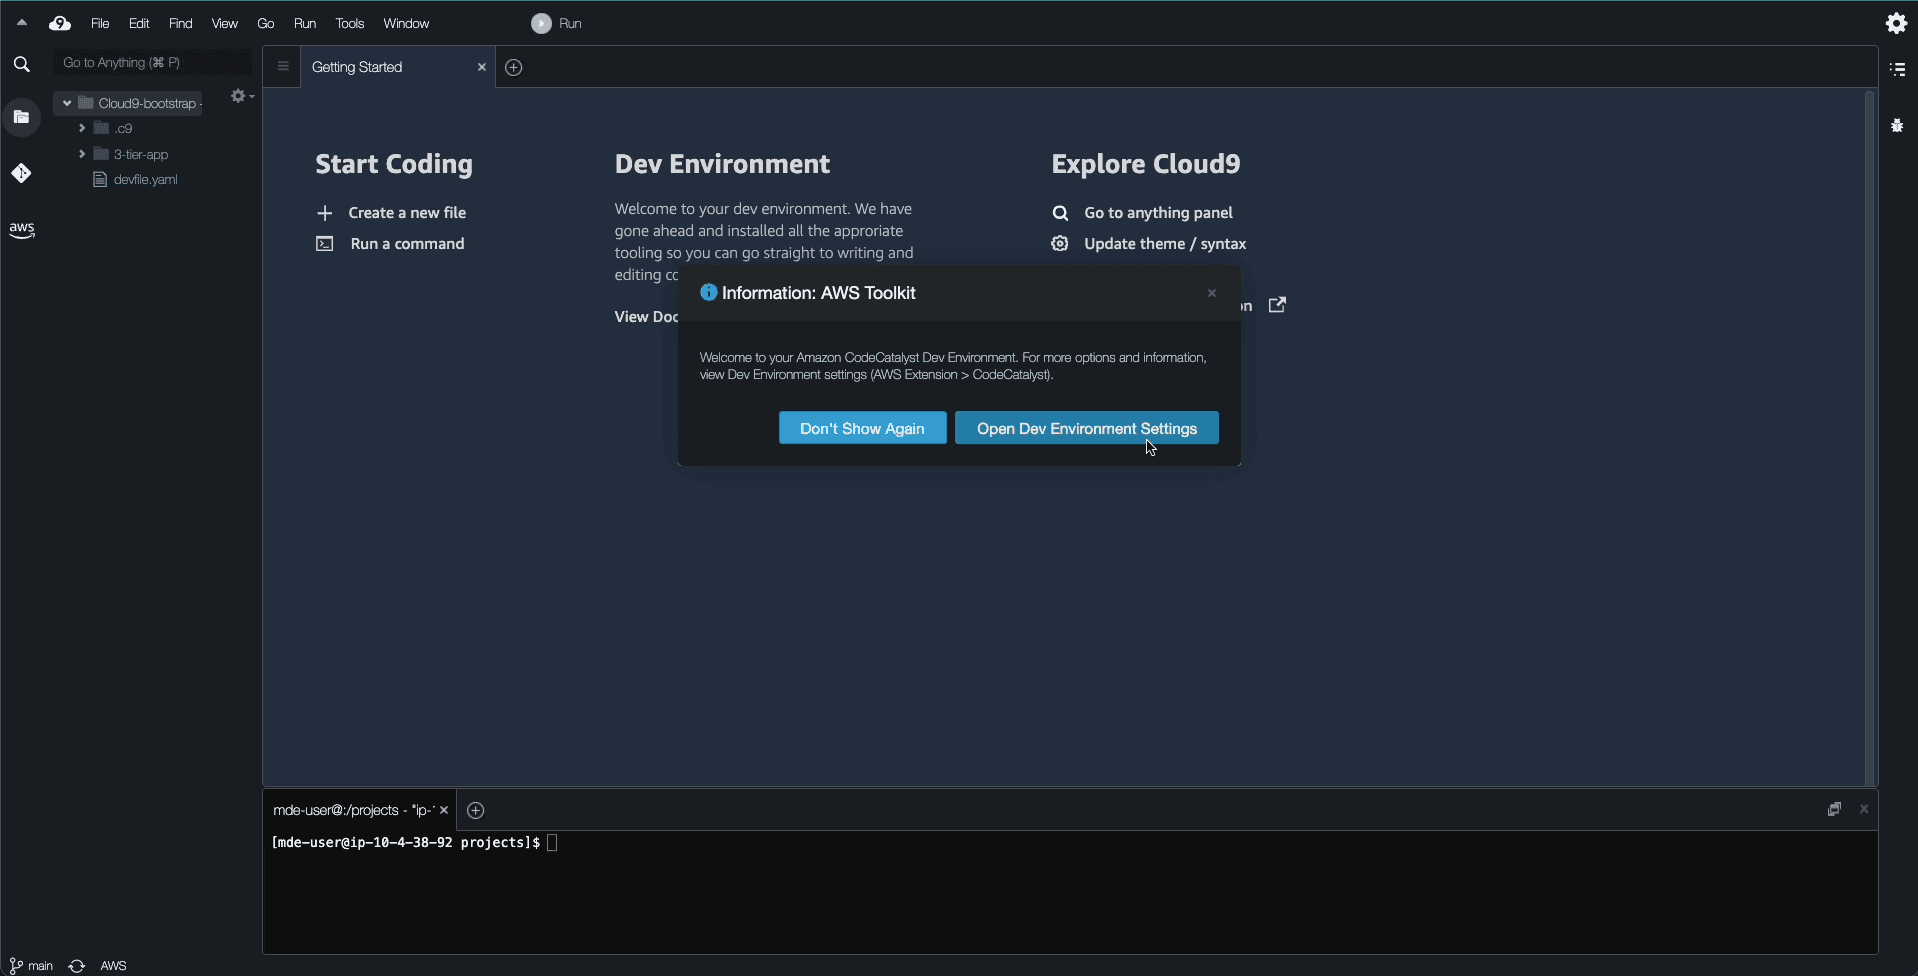
On the welcome screen, you can modify the Dev Environment Settings if you want.
You will find an empty repository
3-tier-app, with a readme.md, devfile.yaml, and some hidden folders. The devfile.yaml, contains the definition to build your application libraries and toolchain. You can ignore it for the purpose of this tutorial.You can use your own CloudFormation template, or simply use one of the sample templates.
For this blog, I am using a sample template that deploys a VPC with 2 subnets and publicly accessible Amazon EC2 instances that are in an Auto Scaling group behind a Load Balancer form. Feel free to use the same as I will be making changes to this template and run a pull request workflow.
In the real world, you would deploy the networking infrastructure and application deployment in separate CloudFormation nested stacks. Nested stacks allow more regularly needed changes to the application stack to be applied without running the networking stack every time, which saves time. Likewise, the networking team can make changes independently without running the application stack. This approach also keeps the template body size within CloudFormation Quotas. Since this deployment with CodeCatalyst is smaller and simpler -- and we don't have to worry about long-term operations -- let's deploy everything in a single template.
Let's ensure we commit our changes to our git repo using the following commands:
Output :
You can verify if the CloudFormation template is successfully updated in the repo - in the CodeCatalyst console, click
Code in the left-side navigation menu, then select Source repositories. A new file VPC_AutoScaling_With_Public_IPs.json should be added to the repo.Next step is to create automated workflows. The intention is whenever a commit is pushed to the main branch, trigger automated actions. In our case, we are defining only one action - deploy the updated CloudFormation template and/or update the stack.
Now you have 2 options for creating a workflow :
- Create Workflow using Code Catalyst Console in Visual drag-drop method [navigate to CI/CD -> Workflows]
- Create Workflow using the dev environment using yaml [the method we are following in the blog]
To create the workflow, create a hidden folder in your repo and add a
main_branch.yaml file:Open
.codecatalyst/workflows/main_branch.yaml in your IDE, and add the following. Remember to:- replace the placeholder AWS account ID
123456789012with the value of your account, and the IAM role namemain_branch_IAM_role, if you changed it - if you are using your own CloudFormation template, replace the CloudFormation filename in
template
- main_branch.yaml
In the workflow, we have provided parameter values for the CloudFormation stack creation. If you are using your own template, make sure you modify the parameter-overrides section and the template name accordingly.
Let's try out our new workflow!
First, we need to stage, commit, and push our changes directly to the main branch - this is needed as only workflows committed to the repo will be run by CodeCatalyst.
Use the following commands:
Output :
In your browser, navigate to the
CI/CD -> Workflows page. You should see the workflow running: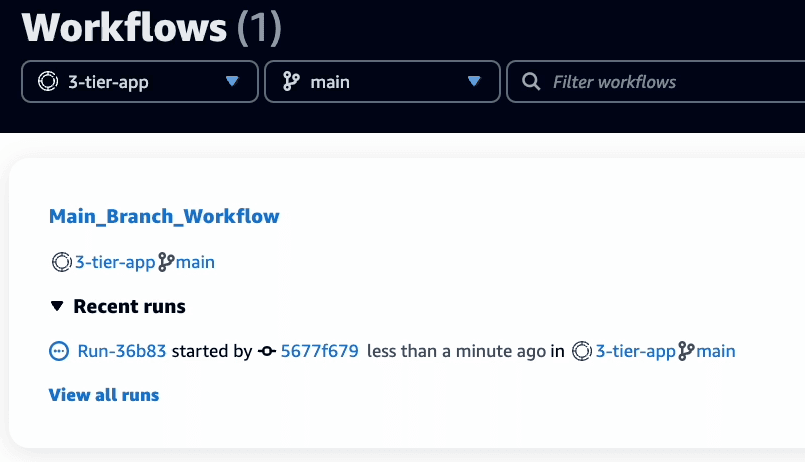
If you click on Recent runs to expand it, you will see the details of the currently running job. Click on the job ID (Run-XXXXX) to view the different stages of the build:
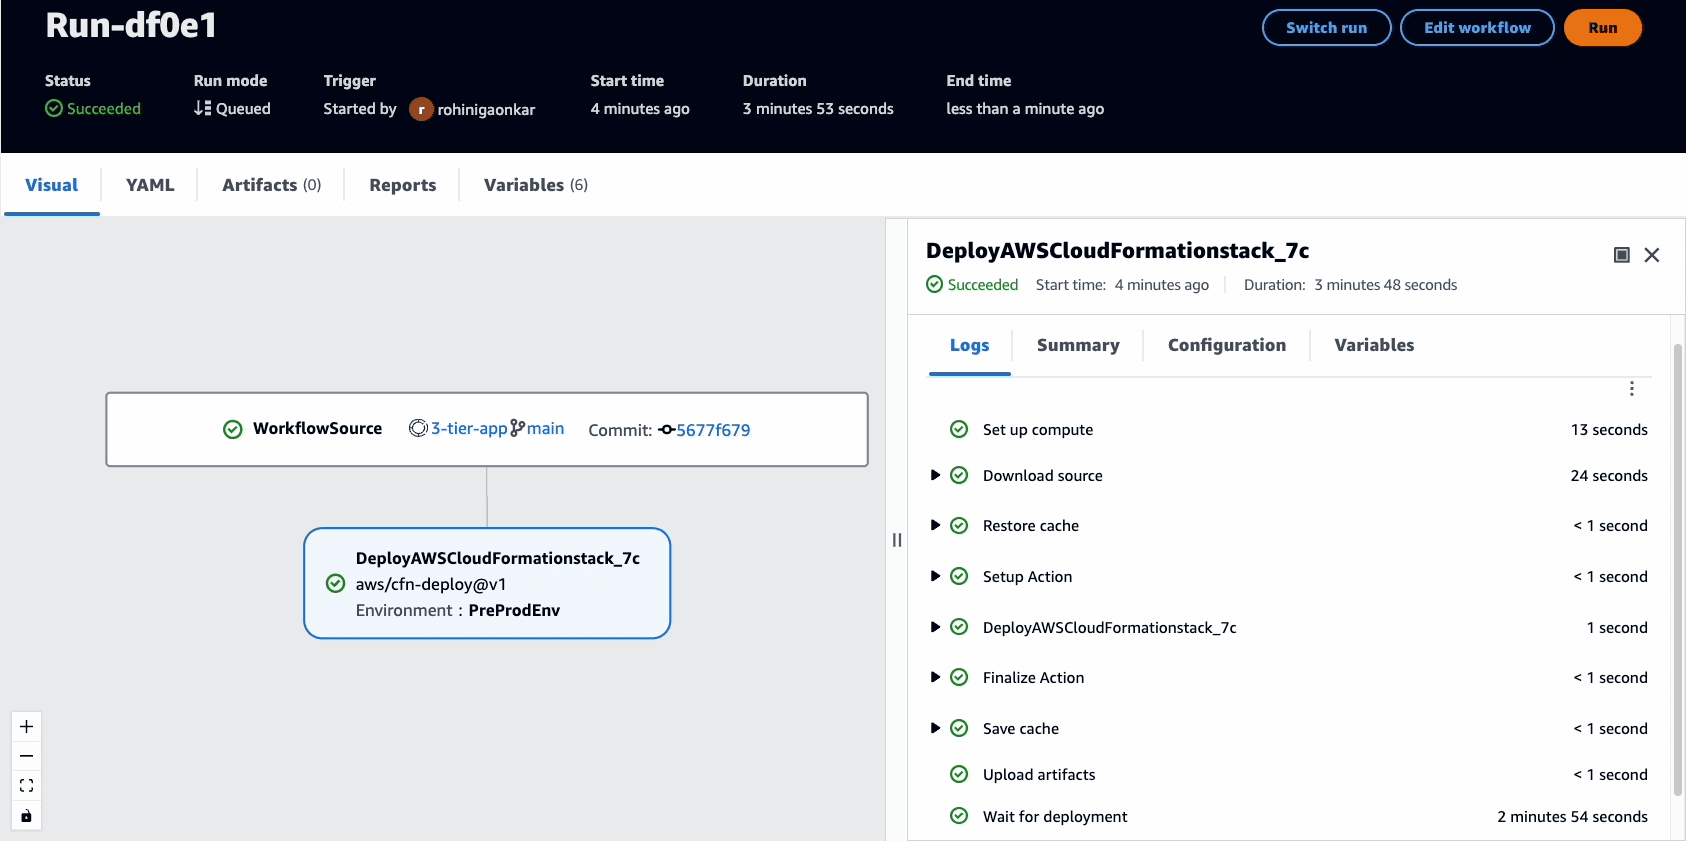
It will take some time for CodeCatalyst to go through all the stages and deploy the CloudFormation stack. The stack deployment time depends on the resources defined in the template. For example, this deployment was done in 3mins 48 seconds.
Our CloudFormation stack is successfully deployed by the Workflow! You can find the CloudFormation outputs in the
Variables tab.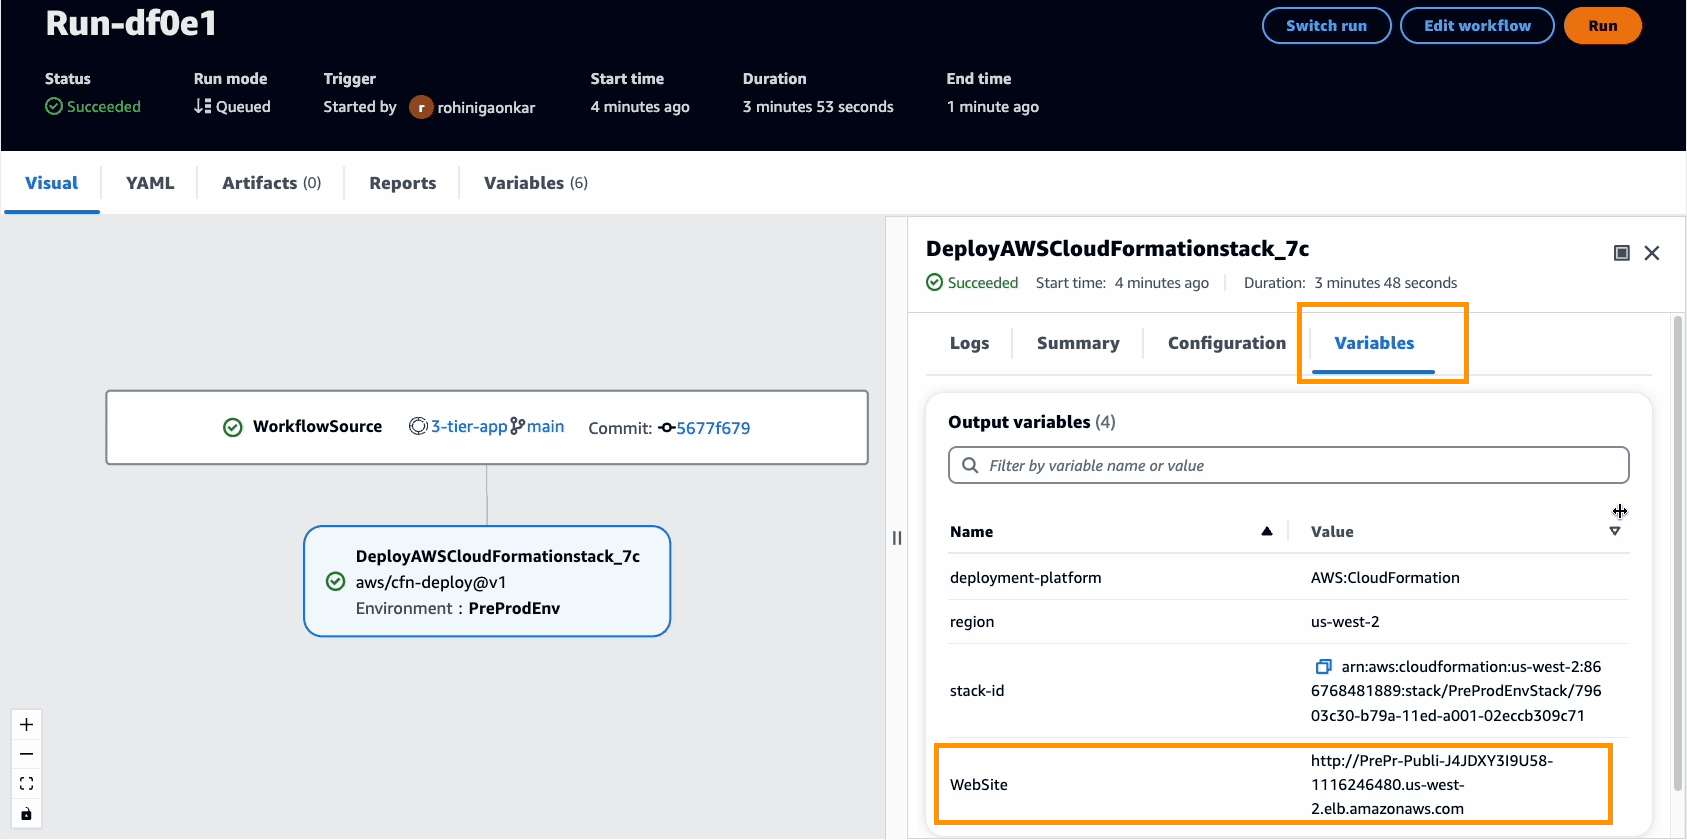
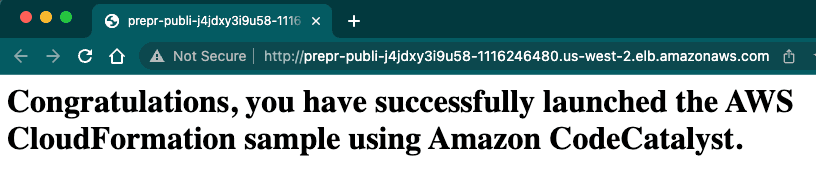
If you open the Website link, you can access the sample application deployed by this template.
It might happen that the run fails due to errors. Read through the logs to understand any issue and remediate it. If you get internal error, at this point it is good to check the stack deployment in the CloudFormation dashboard of AWS Management Console. If the CloudFormation stack has rolled back, then delete the stack manually, fix the issues, and run the workflow again. You can find help in Documentation for Troubleshooting, Premium Support center or AWS re:Post.
Let's say you now want to make changes to the infrastructure. For example, we want to add a third subnet to the VPC, updating LoadBalancer and Autoscaling groups to use it.
As a best practice, you should never make changes directly to the main branch. We should always create a separate branch on which changes will be done, and once these changes are approved by reviewers they will be merged with the main branch. There are many git branching strategies that you can explore and use for your specific org/team needs. You can use the same strategies with CodeCatalyst.
For this blog, I am keeping it simple. Anytime I need to make changes, I create a new branch (step2) and I make new changes to infrastructure there (step3). I then create a Pull Request (PR) to merge the new branch with the main branch. As shown in the image, anytime a PR is opened (step4), CodeCatalyst will automatically run PR workflow to create a change set (step5). A change set allows you to preview how proposed changes to a stack might impact your currently running resources. You can then decide if you want to execute the changes or not.
Once a reviewer approves the changes and proceeds with merging the pull request (step6), the
main_workflow that we created earlier will automatically merge the code and deploy changes to PreProdEnv, my non-prod environment (step7). You might have different branching strategies and more tests for your production environment deployment.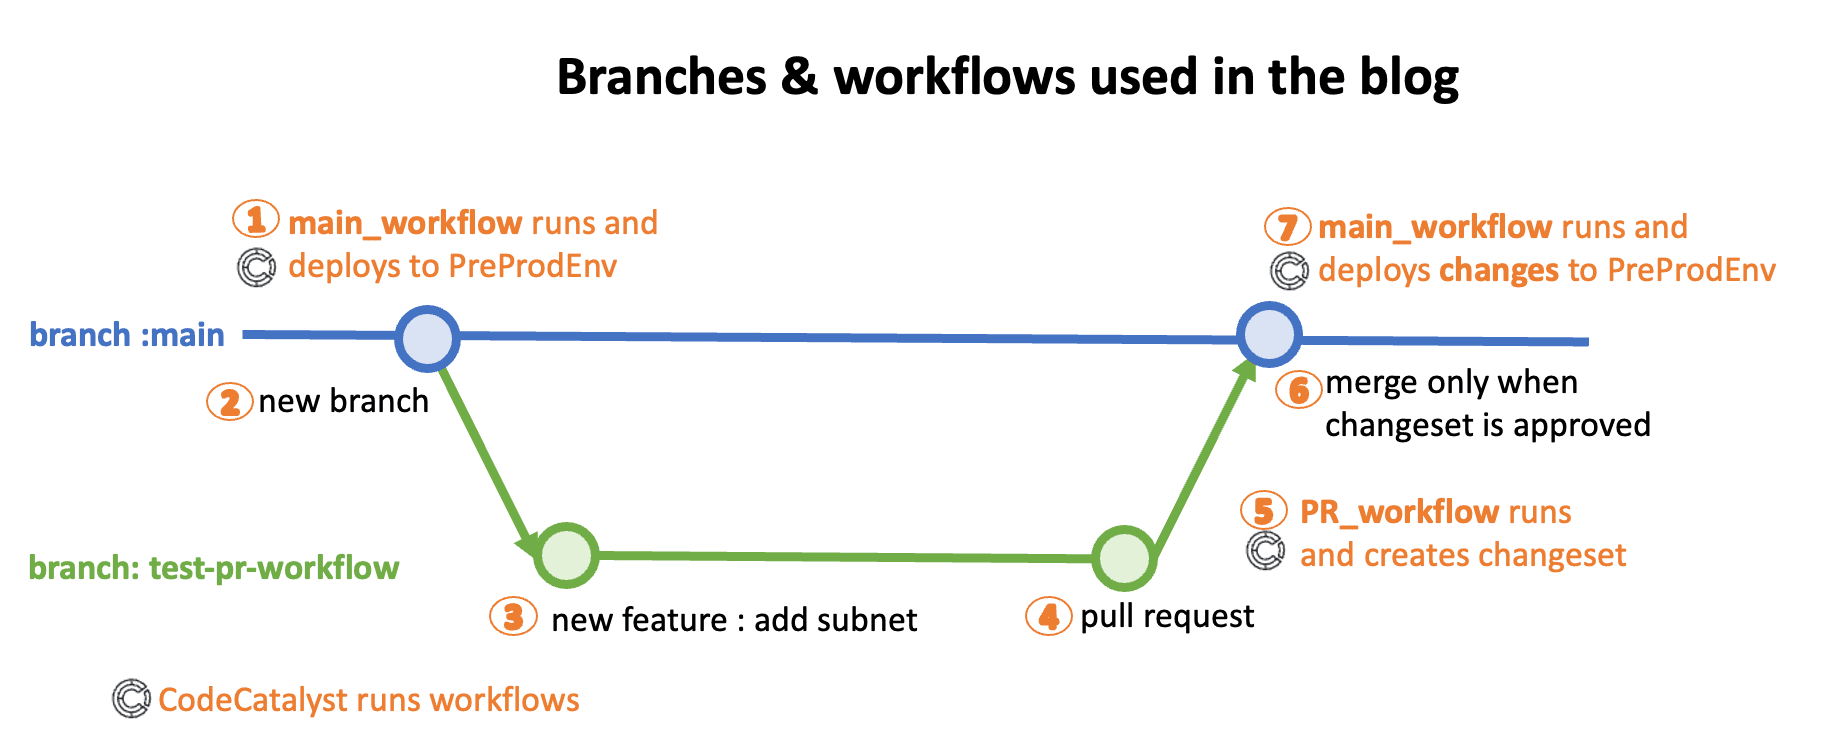
We are going to first write a PR workflow so that any time a new Pull request is created, CodeCatalyst will first run this workflow. In this PR workflow, we are NOT deploying any changes to the PreProdEnv. When a PR is opened or revised, we are validating it using super-linter and then creating a CloudFormation change set.
Create a new file
pr_branch.yaml in the hidden .codecatalyst/workflows/ directory and paste the following.Remember to:
- replace the placeholder AWS account ID
123456789012with the value of your account, and the IAM role namemain_branch_IAM_role, if you changed it - if you are using your own CloudFormation template, replace the CloudFormation filename in
template - pr_branch.yaml
In the above Pull Request Workflow, notice the following definitions:
- In the
Super-Linter_0daction, we are definingVALIDATE_CLOUDFORMATION: "true"environment variable. This ensures that our CloudFormation template is validated using thecfn-lintgithub action. cfn-lint is an open source tool that helps validate AWS CloudFormation yaml/json templates against the AWS CloudFormation Resource Specification and additional checks. This includes checking valid values for resource properties and best practices. - In the
CreateChangeSetaction, theno-execute-changeset: "1"option in the workflow below, it indicates whether to run the change set or have it reviewed. Default is'0', which means it will run the change set. We don't want it to execute the changes; we just want to see the changes that will happen if PR is merged, hence we set it to'1'which means we do not execute the ChangeSet. - In the
CreateChangeSetaction, we have added a new propertyDependsOn: - Super-Linter_0d. This tells the workflow to first runSuper-Linter_0daction, and if it is successful, only then run theCreateChangeSetaction.
Now stage, commit, and push our changes directly to the main branch using following commands:
Output :
CodeCatalyst will then create another workflow. You can confirm this from the CodeCatalyst console CI/CD -> Workflow. You can see that
PR_Branch_Workflow is created but it has not run.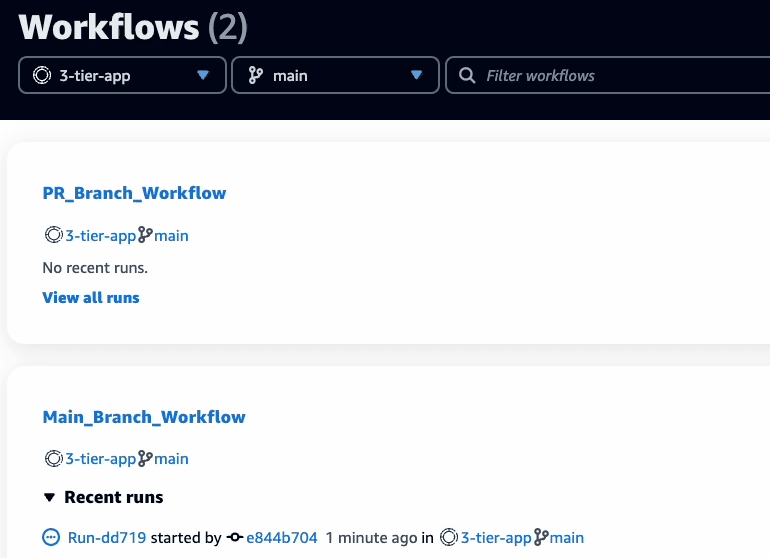
If you click on the
PR_Branch_Workflow, you can see the workflow. As defined in the workflow yaml above, the workflow will run the action Super-Linter_0d first and if it is successful, only then it will run action CreateChangeSet.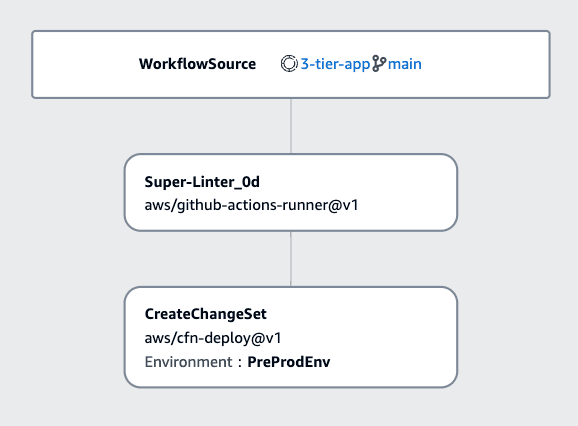
Now let's go back to our Dev Environment and before we start making changes to the CloudFormation template, ensure we have created a new test-pr-workflow branch.
Output :
- If you are using your own CloudFormation template, make any changes to the template to create a change set.
- For the sample CloudFormation template used in this blog, you have 2 options :
- simply replace its content with this already modified template. Make sure the name of template file is same(
VPC_AutoScaling_With_Public_IPs.json), as workflow has filename mentioned in it,OR - you can make the following changes manually to add a third subnet and its resources to the template:Add following JSON code to the sample CloudFormation template under
Resourcessection.In the Mappings, LoadBalancer and AutoScaling resources, add thePublicSubnet3like following :
Now save the modified file and push it to the
test-pr-workflow branch, using the following commands:Output :
In the CodeCatalyst Console, navigate to
Code -> Repository. You can see the 2 branches: main and test-pr-workflow.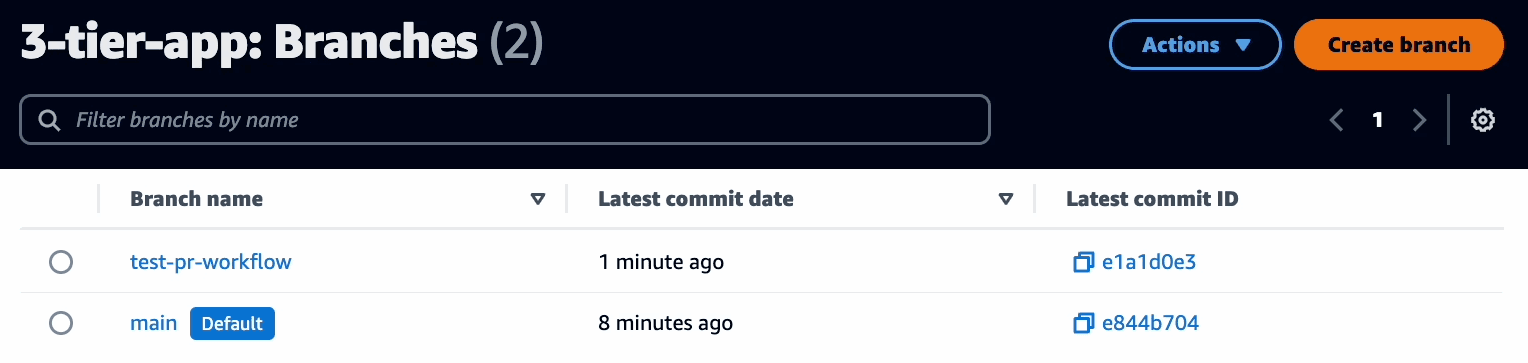
Now that we have all changes in the branch named
test-pr-workflow, you can ask others to review the changes by creating a pull request.Perform the following steps to create pull request to compare the changes in the test branch with the main branch: Goto Code -> Pull requests in the CodeCatalyst console. Click on
Create pull request and enter following details:- Source repository:
3-tier-app - Source branch:
test-pr-workflow - Destination branch:
main - Pull request title:
Merge new third subnet - Pull request description:
New third subnet created and added to VPC, RouteTable, NACL, LoadBalancer, ASG
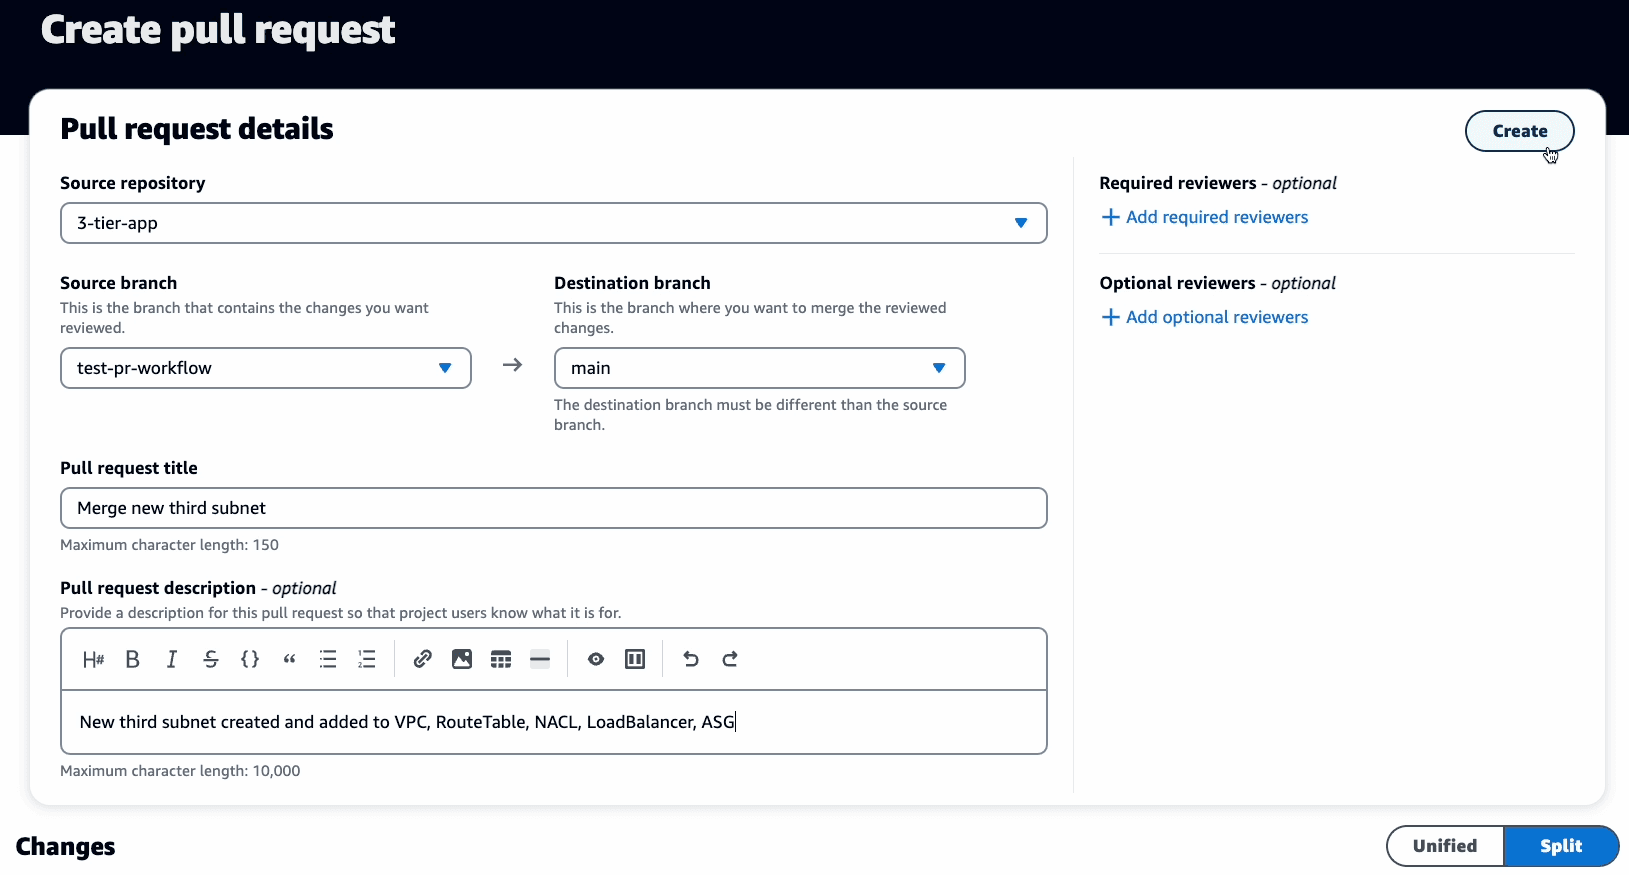
You can optionally add reviewers to approve/deny the merge.
Note that our source branch is
test-pr-workflow and our destination for merge is the main branch. Once this PR is created, it will trigger the PR_Branch_Workflow that will create a CloudFormation change set (and not make any deployments!).To see the active run forPR_Branch_Workflow, in the CodeCatalyst console, navigate to theCI/CD->Workflowspage and ensure you select thetest-pr-workflowbranch. By default, the Workflows page always shows themainbranch. You have to switch branches to see the active workflow in other branches.
Now you might notice that this run on
PR_Branch_Workflow has failed.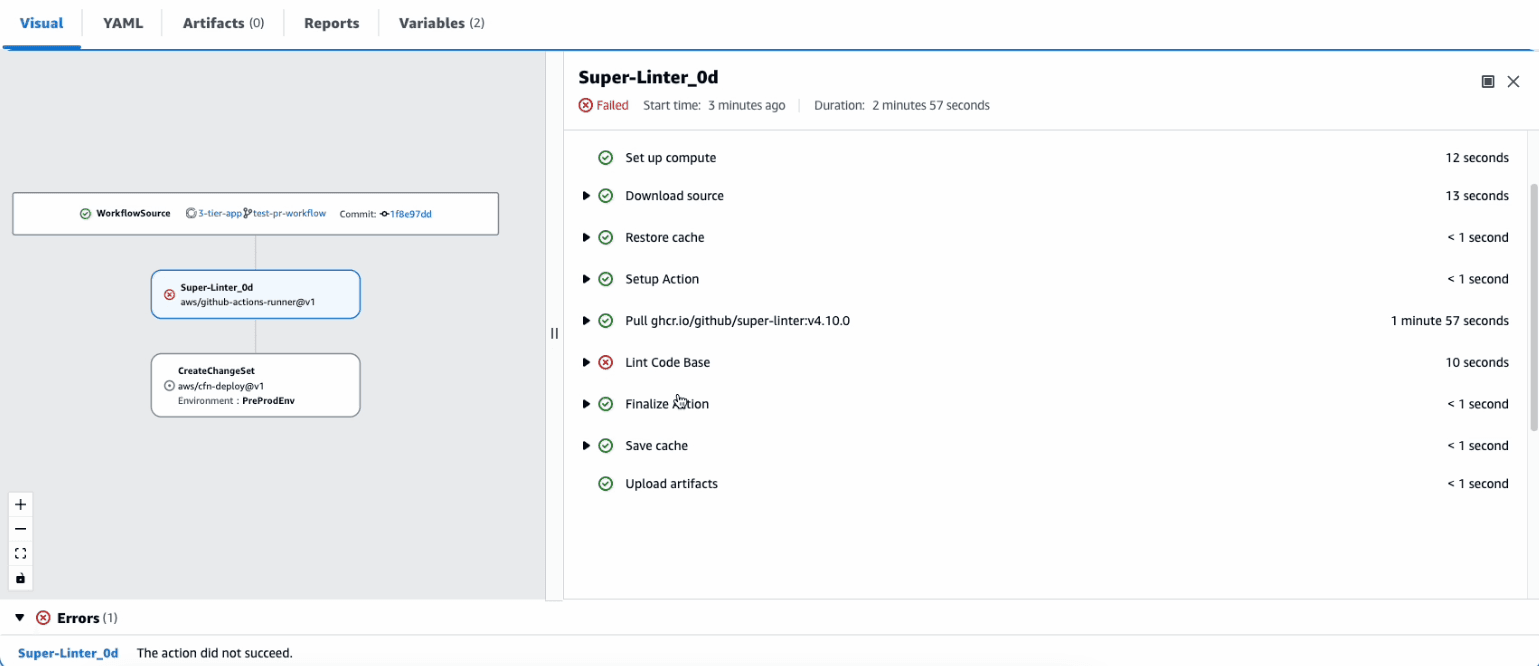
If you expand the Lint Code Base you will find following:
So, our CloudFormation template did parse through cfn-lint and found one error. We have a mapping resource that is defined but never used anywhere in the template. We should delete this in the template file and push changes to the
test-pr-workflow.So, back in the Dev Environment on AWS Cloud9 remove the following block from the CloudFormation template:
Save the file, stage, commit, and push the changes to
test-pr-workflow branch. As this is a revision to the branch, it should automatically trigger the workflow to run again.Output:
In your browser, navigate to the
CI/CD -> Workflows page. Make sure you select the test-pr-workflow branch. A new run should now be active.You can confirm the new workflow has run successfully.
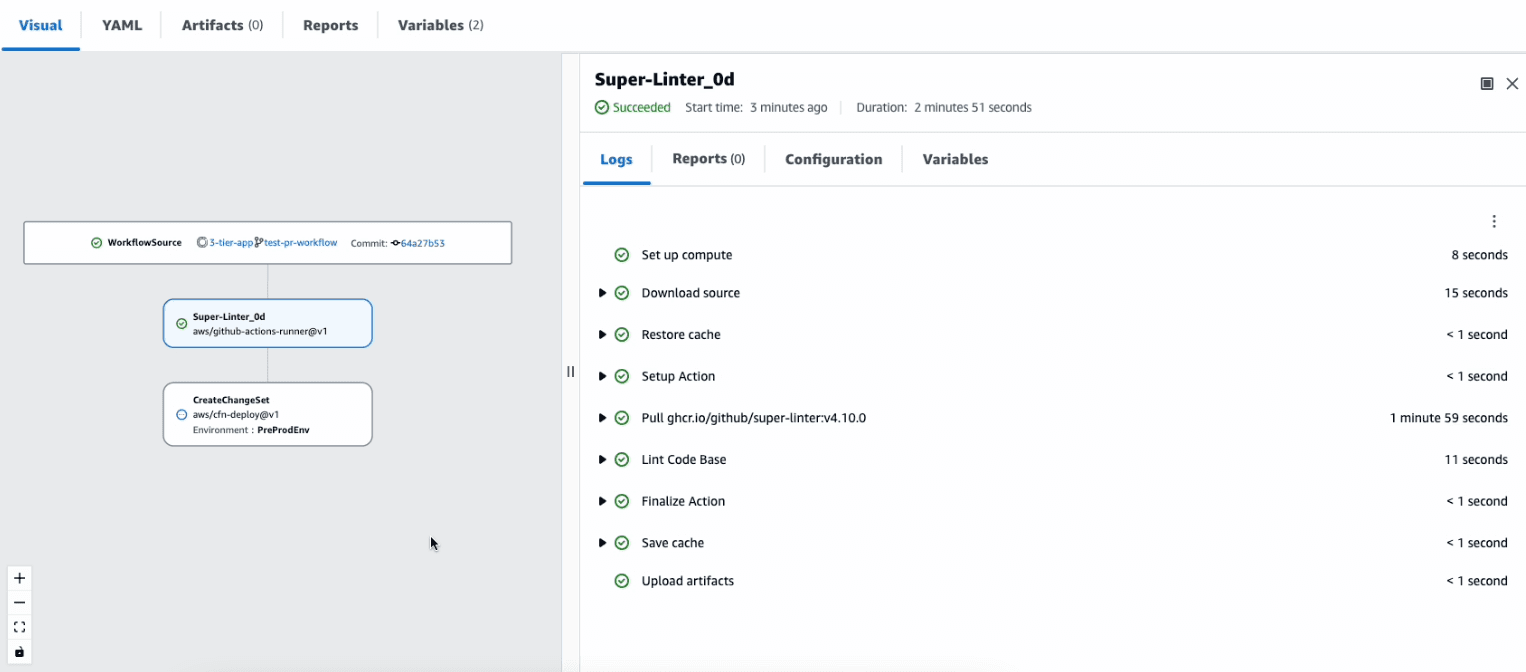
If you expand on Lint Code Base, you will find following text that identifies no errors:
Now the workflow will proceed to the next action:
CreateChangeSet.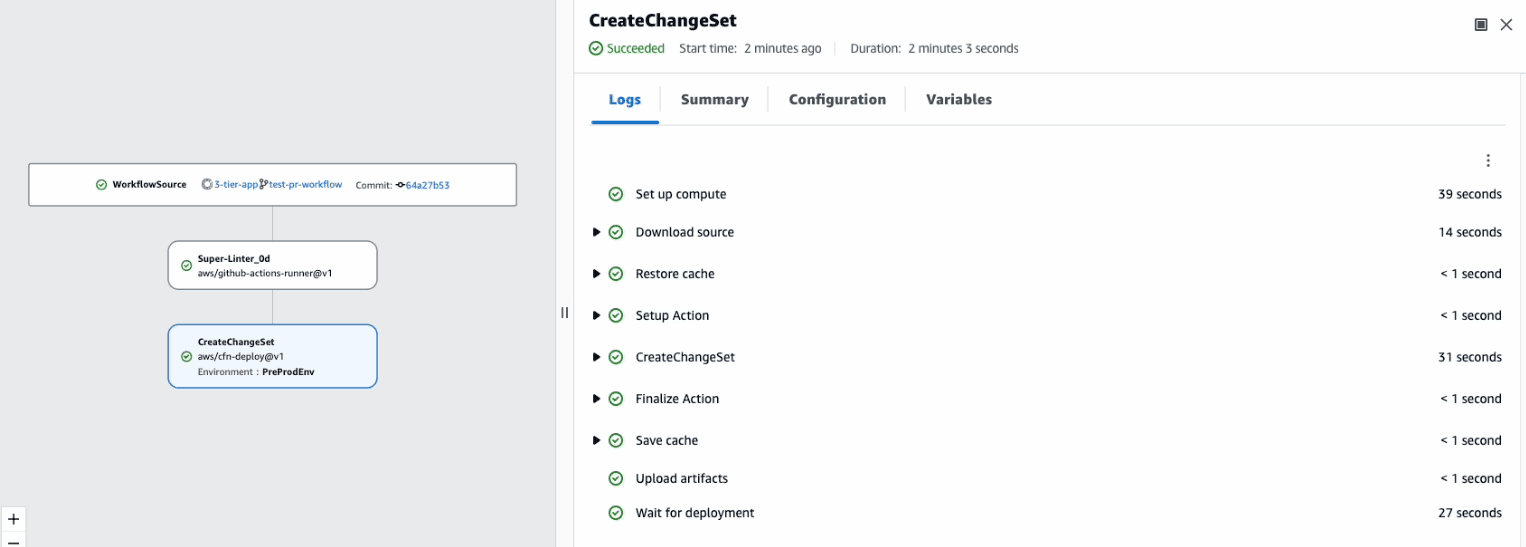
Once the action is successful, you can go to CloudFormation Console, Changeset tab and verify the changes proposed by the new pull request.
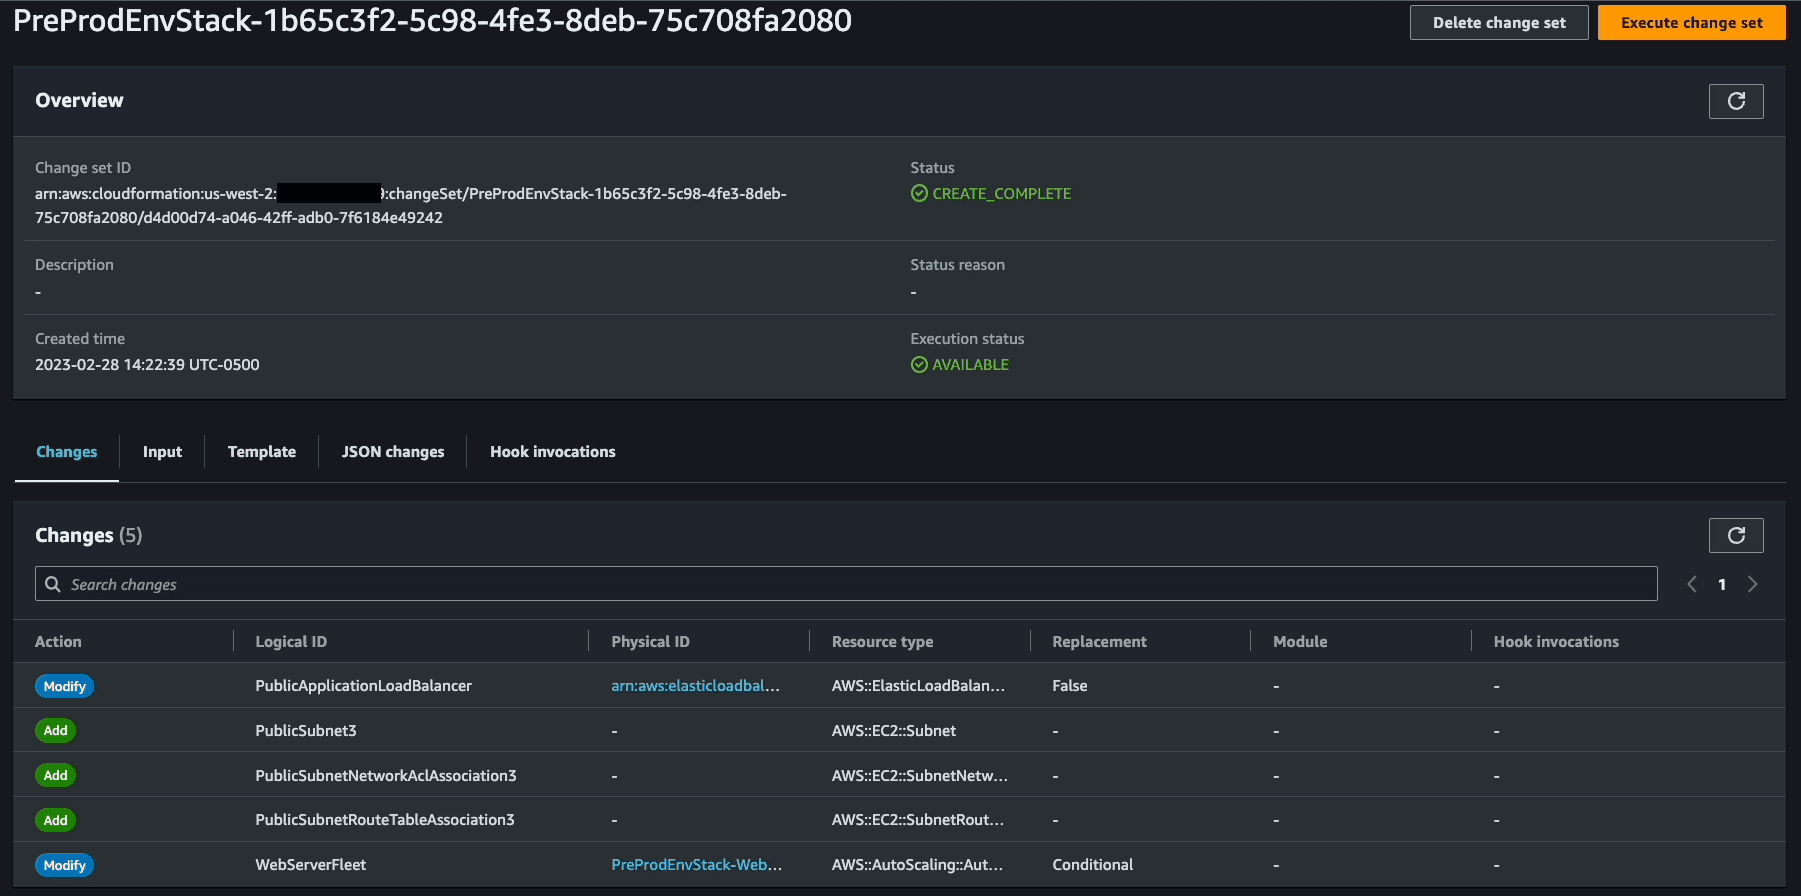
A reviewer will confirm that all the actions have run successfully, the change set is clean. In our case, I am the reviewer, so in my browser, I will go to the
Code -> Pull Requests, and then click on Merge.If there are conflicts, or if the merge can't be completed, the merge button is inactive, and aNot mergeablelabel is displayed. In that case, you must obtain approval from any required approvers, resolve conflicts locally if necessary, and push those changes to thetest-pr-workflowbefore you can merge.

At this point you have 2 options for merge strategies:
- Fast forward merge - Merges the branches and moves the destination branch pointer to the tip of the source branch. This is the default merge strategy in Git. Select this option for this blog.
- Squash and merge - Combines all commits from the source branch into single merge commit in the destination branch.
You can optionally delete the source branch after merging this pull request.
In our case, the source branch is
In our case, the source branch is
test-pr-workflow, and I am deleting this branch to keep my branching structure clean and simple.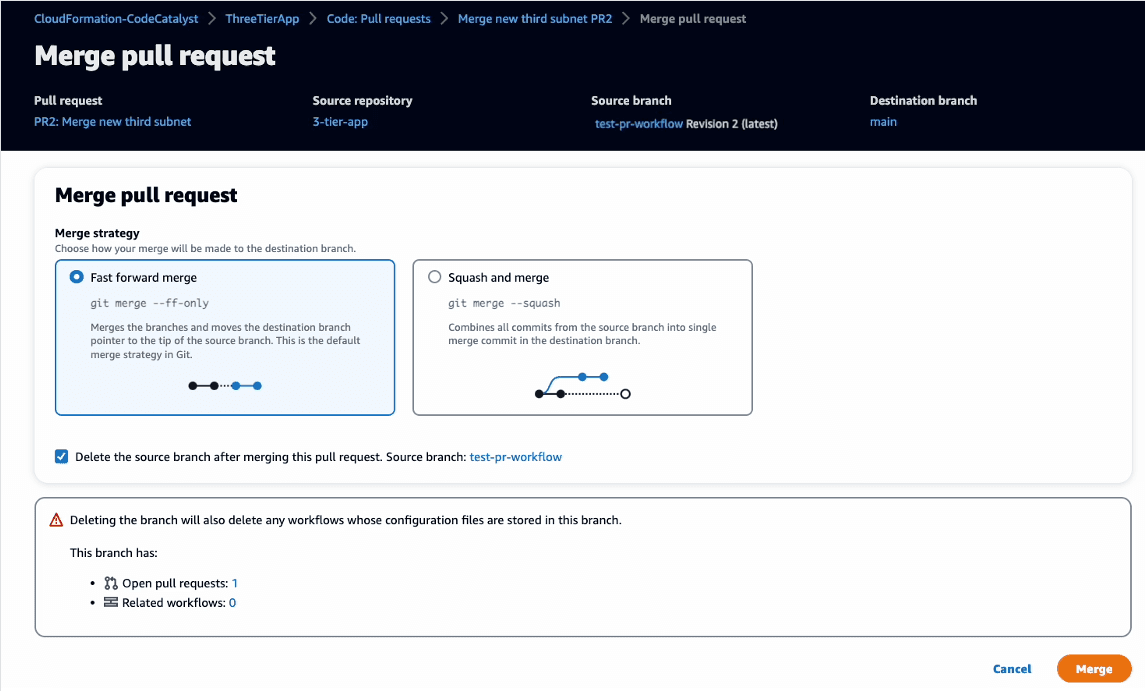
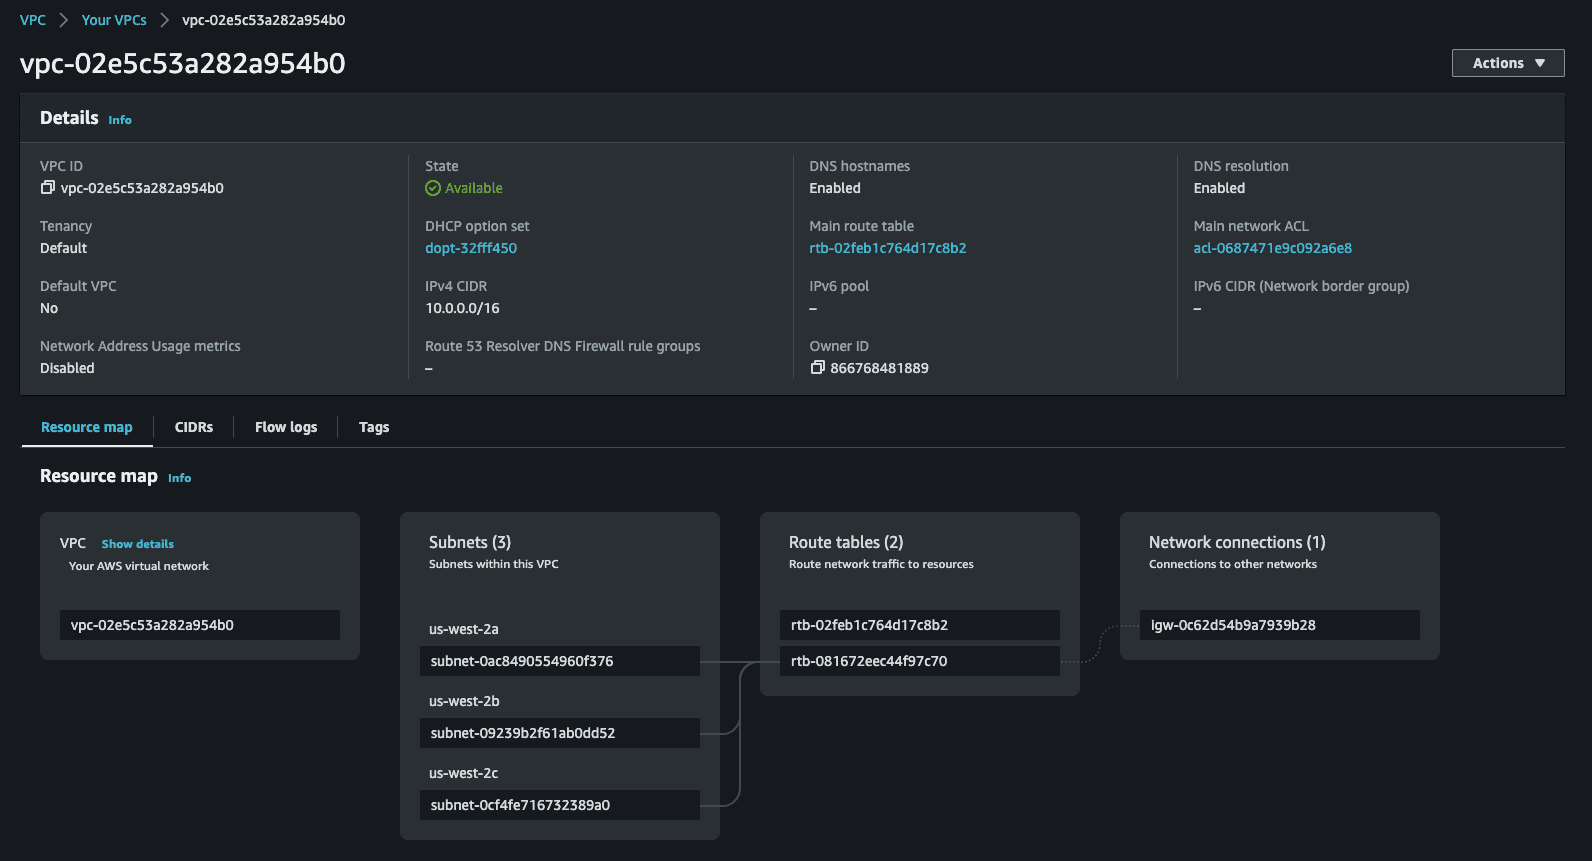
Once you click on merge, CodeCatalyst will merge the code changes from
test-pr-workflow to main branch. This will trigger the Main_Branch_Workflow and deploy the updated CloudFormation code to the PreProdEnv.You can optionally confirm the newly created subnet in the VPC console.
We have now reached the end of this tutorial: we learned how to create workflows, how to pull request, how to use actions - to create ChangeSet, to deploy CloudFormation stack and to run cfn-lint on our template before we make infrastructure changes. You can further explore the features of CodeCatalyst like inviting team members or creating issues. If you no longer wish to explore, then delete all the resources we created here. Clean up CloudFormation stacks in your AWS account. Open the AWS CloudFormation console, delete the
PreProdEnvStack and CodeCatalyst-IAM-roles.To delete the project we created in CodeCatalyst. In the left-hand navigation, go to
Project settings, click on Delete project, and follow the instructions to delete the project.Lastly, to delete the CodeCatalyst space, go to CodeCatalyst dashboard, then
Space settings tab and click on Delete space.Congratulations! You've now learned how to deploy Infrastructure as Code using CloudFormation with CodeCatalyst, and can deploy any infrastructure changes using a pull request workflow. If you enjoyed this tutorial, found any issues, or have feedback for us, please send it our way!
For more DevOps related content, check out our DevOps Essentials guide and learn about How Amazon Does DevOps in Real Life.
Any opinions in this post are those of the individual author and may not reflect the opinions of AWS.