mTLS in Amazon EKS Fargate with NGINX Ingress Controller and ACM PCA
Ensure secure end-to-end communications between Kubernetes workloads
Olawale Olaleye
Amazon Employee
Published Jan 19, 2024
Last Modified Mar 18, 2024
Step 2: Install and Configure the Cluster Components
Install ALB Controller on Fargate using Helm option
Download NGINX Ingress Controller manifest and customize it for Amazon EKS Fargate
Install Cert Manager with Helm
Install and Setup External DNS in the cluster (optional)
Step 3: Create Private Certificate Authority
Step 4: Install AWS-PCA-ISSUER
The flexibility of the cloud helps organizations to scale as quickly as possible while generating immense application traffic. But preventing “man-in-the-middle attacks” or other forms of cyber-attacks becomes a necessity for these businesses - even as they build solutions such as Microservice architectures, Business-to-business (B2B) APIs, User Authentications, Content Delivery, Internet of Things (IoT) sensors and many more. Mutual Transport Layer Security (mTLS) helps them to improve the security of their applications - or to comply with industry standards or a specific compliance requirement - by ensuring that the integrity of the parties at each end of a network connection are proven to each other. In microservice architectures, a service mesh is predominantly used to provide the infrastructure you need to safely implement mTLS between services. Configuring a service mesh introduces more components and complexity, such as sidecar proxies, control plane components, and the need to manage configurations and policies.
In this tutorial, I’ll show you how to set up mTLS for an application running on Amazon Elastic Kubernetes Service (Amazon EKS) Fargate using NGINX Ingress Controller and ACM Private CA without using a service mesh. Mutual TLS adds extra layer to secure Kubernetes workload traffic. It can be used for business-to-business applications or standards such as Open Banking.
This tutorial addresses two challenges:
- Setting up NGINX Ingress Controller on Amazon EKS Fargate.
- Configuring mTLS with NGINX Ingress Controller using certificate issued by ACM Private CA.
Some limitations to keep in mind:
- For mTLS support with NGINX Ingress controller behind a Service of
Type=LoadBalancer, you will need to create a TCP listener using a Network Load Balancer and implement mTLS on the target. - Privileged containers aren't supported on Fargate.
| About | |
|---|---|
| ✅ AWS experience | 200 - Intermediate |
| ⏱ Time to complete | 30 minutes |
| 🧩 Prerequisites | - AWS Account |
| 📢 Feedback | Any feedback, issues, or just a 👍 / 👎 ? |
| ⏰ Last Updated | 2024-01-19 |
- An active Amazon Web Services (AWS) account.
- Install the latest version of Helm CLI
- Install the latest version of AWS Command Line Interface (AWS CLI)
- Install the latest version of kubectl. To check your version, run:
kubectl version. - Install the latest version of eksctl. To check your version, run:
eksctl info. - A custom domain name to test the application.
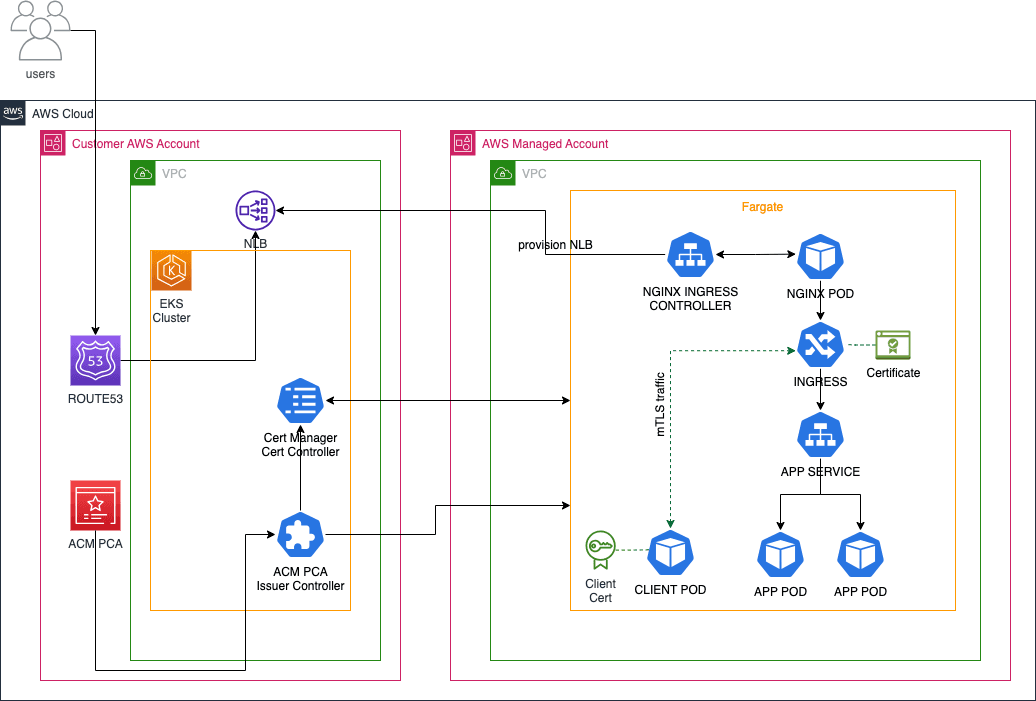
This tutorial is part of a series on managing security-sensitive workloads using Amazon EKS, and it's dedicated to ensuring secure communications between Kubernetes workloads with mTLS in Amazon EKS Fargate. This tutorial builds on an existing Amazon EKS cluster with Fargate configured for running financial workloads. It covers the following components:
- Ingress-Nginx Controller: It is an Ingress controller for Kubernetes using NGINX as a reverse proxy and load balancer. It can enable Client Certificate Authentication using additional annotations in Ingress Rule to achieve mTLS.
- AWS Certificate Manager Private CA: enables creation of private certificate authority (CA) hierarchies, including root and subordinate CAs, without the investment and maintenance costs of operating an on-premises CA.
- AWS Private CA Issuer: It is an addon to cert-manager that signs off certificate requests using AWS Private CA.
- AWS Load Balancer Controller: A Kubernetes controller to help manage Elastic Load Balancers for the Kubernetes cluster
- Cert-manager: is a Kubernetes add-on to automate the management and issuance of TLS certificates from various issuing sources.
- ExternalDNS: helps to automatically manage DNS routing of your applications using Amazon Route 53
- Sample Application Deployment: Deploy a sample workload for an mTLS-enabled service. This workload encompasses the deployment of a sample application configured for mutual TLS (mTLS) within a Kubernetes environment, with a specific focus on Amazon EKS.
There is a charge for operating a private CA. $400 per private CA per month for general-purpose mode and $50 per private CA per month for short-lived certificate mode. This charge is pro-rated for partial months based on when you create and delete the CA.
In this section, you will configure the Amazon EKS cluster with only Fargate Profiles. For step-by-step guidance, check out the tutorial at Building an Amazon EKS Cluster Pre-configured for Financial Workload.
Retrieve the VPC automatically created for the cluster and substitute values below with your own:
Install the ALB controller with the command below:
Privileged containers aren't supported on Fargate. The default NGINX Ingress controller pod requires privilege escalation to run. We will download the original NGINX ingress controller manifest and customize it by following the steps below:
- Download the deploy.yaml template from https://kubernetes.github.io/ingress-nginx/deploy/#aws
- Edit the downloaded `deploy.yaml`` file to make the following changes:
Locate the line text below and change the loadbalancer type to
nlb-ip as shown below:Change the default ports of the ingress-nginx-controller service as shown below:
(Optional) Add the extra annotation below to the service section if you want to expose your application publicly:
Add
http-port=8080 and https-port=8081 as extra args to the deployment manifest as shown below:Change the controller container ports in the deployment manifest as shown below:
Set privilege escalation to false:
- Deploy the modified manifest
- Wait for about 60seconds for Fargate to schedule to ingress controller pod. Verify the installation with this command:
Expected output:
Kubelet listens on port 10250 by default which clashes with the default port for the cert-manager webhook. In the command below, the listening port of the webhook has been set to 10260 to prevent this challenge in EKS Fargate.
You may manually create a DNS record in Amazon Route53 for your application. Refer to the documentation to setup and manage records in Route 53 that point to controller deployed ALBs.
To setup ExternalDNS in your Kubernetes cluster, see Setting up ExternalDNS for services on AWS (on the GitHub website) and Set up ExternalDNS.
To setup ExternalDNS in your Kubernetes cluster, see Setting up ExternalDNS for services on AWS (on the GitHub website) and Set up ExternalDNS.
- Download sample
external-dnsmanifest
- Open the downloaded
external-dns.yamlfile and edit the--domain-filterflag to include your hosted zone(s). The following example is for a hosted zoneexample.com:
- Deploy the downloaded
external-dns.yamlfile
- Verify it deployed successfully.
Follow the steps below to create an AWS Certificate Manager Private CA with RSA 2048 selected as the key algorithm in the same region as the cluster.
- To create a private certificate authority, execute the content below in your terminal, replace example.com with your own value:
- Create and install your private CA certificate
- Issue the root certificate with the csr file from the previous step. Note that if you are using AWS CLI version 2, you will need to pass the CSR data through encoding prior to invoking the
issue-certificatecommand.
- Import the signed certificate as the root CA
- Import the root CA certificate to install it on the CA. AWS CLI version 2 needs passing the certificate data through encoding. Execute the command below:
- Inspect the status of the CA and confirm it is in active state. If it is active state, then it is ready for use
- Get the ARN of the CA:
The AWS PrivateCA Issuer plugin acts as an addon to cert-manager that signs certificate requests using ACM Private CA.
Define your environment variables:
Define your environment variables:
Remember to replace
The AWS PCA Issuer plugin works as an addon to the cert-manager that signs off certificate requests using AWS Certificate Manager Private Certificate Authority.
YOUR_PRIVATE_CA_ARN and example.com with your own values.The AWS PCA Issuer plugin works as an addon to the cert-manager that signs off certificate requests using AWS Certificate Manager Private Certificate Authority.
- Copy and paste the command below in your terminal to create a
pca-iam-policy.jsonfile:
- Create and IAM policy called
AWSPCAIssuerIAMPolicywith the command below:
Note the IAM policy Arn in the command output. This is required in the next step.
- Create a Service Account for the AWS PCA Issuer plugin with the command below:
Replace the
IAM_POLICY_ARN with the ARN value retrieved previously.- Add the AWS PCA Issuer Helm repository and run the helm install command:
- Verify that AWS PCA issuer is configured correctly by running following command after about 60 seconds:
- Copy and paste the command below in your terminal to create the Cluster Issuer and Certificates files:
- Copy and paste the command below in your terminal to create
mtls-cert.yamlfile. The file will create a secret containing CA certificate along with the Server Certificate that can be used for both TLS and Client Auth. It will also create an additional secret that will be used by the client application or you can create just one certificate use the same secret.
- Create an issuer in Amazon EKS Cluster and generate TLS certificates for the backend applications
- Copy and paste the command below in your terminal to create an example workload:
- Run the commands below to create the workload:
- Copy and paste the command below in your terminal to create an Ingress manifest file
ingress.yamlfor the workload:
Deploy the manifest:
After about 2mins, run the command below to verify the ingress created
Expected output:
- Copy and paste the command below in your terminal to create a test client pod that has the necessary client certificate to interact with the application:
- Let’s verify if we can access the application from the test pod. Exec into the pod:
- Run a curl command to test connectivity to the application
You should see a 200 HTTP response for a successful request.
- Let’s enable mTLS in the ingress manifest
ingress.yamlwe previously created. Uncomment the annotations below in theingress.yamlas shown below:
Apply the change by executing the command below:
- Verify that the test pod is able to connect with the application using a mutual certificate key file. Exec into the pod:
- Run a curl command to test connectivity to the application
You should see a 200 HTTP response only when the certificate and key is specified in the curl command.
To avoid incurring future charges, you should delete the resources created during this tutorial. You can delete the resources with the following command:
In this tutorial, you’ve successfully set up a mutual TLS for an application running in Amazon EKS on Fargate using a customized NGINX Ingress controller installation to deploy Network Load Balancer that is provisioned by AWS Load Balancer Controller. To explore more tutorials, check out Navigating Amazon EKS.
Any opinions in this post are those of the individual author and may not reflect the opinions of AWS.